
This article will teach you how to use Node.js, Fastify and HarperDB to build a course management system. This application will help you track the courses you are doing and the courses you plan to do.
You will use the following technologies:
- Node.js
- HarperDB
- Fastify
Introduction
When it comes to Node.js and Fastify, people are familiar with these technologies. However, when it comes to databases, there is a new kid on the block!
![]()
Recently, I took a break from the databases I usually use to play around with HarperDB. HarperDB is a distributed database with NoSQL and SQL capabilities. The most fascinating thing about HarperDB is that you perform all the CRUD database operations using only one endpoint.
The most notable features of HarperDB are:
- using a single endpoint
- execute SQL queries on JSON data
- it removes the need for an ORM by returning the results as JSON arrays
- the ability to insert data via JSON, CSV or using SQL
Does not that look interesting?
Prerequisites
Before going further, there are some prerequisites you should be aware of. The tutorial assumes basic knowledge of:
- Node.js and FastifyJS
- Databases
- JavaScript
- Knowing how to use a package manager like npm
Additionally, you should have a Node version of 12.xx or higher for HarperDB to run. Lastly, you need to have a HarperDB account, which you can create here. Do not worry; it's free!
Set up the folder structure
The first step of the tutorial is to set up the folder structure of the application. Create a new folder called course-management and open it. You can do it with the following commands:
mkdir course-management
cd course-management
The basic folder structure is ready. Of course, when you build each part of the application, you'll create more folders.
Install dependencies
At this point, you should be in the course-management folder. Let's initialise the project with the following command:
npm init -y
The -y flag generates the "package.json" automatically without you having to answer the usual questions about the project name, description and so on. If you open "package.json", you can see that all fields are autocompleted.
Install the required packages
The next step is to install the packages needed to build the application. You can install multiple packages in one line. Run the command below in your terminal:
npm i fastify harperive dotenv --save
The command installs three packages/dependencies:
- Fastify - FastifyJS is a new web framework, and it claims to be the fastest web framework in town.
- Harperive - It's the Node.js driver for HarperDB.
- Dotenv - A module that loads environment variables from an
.envfile toprocess.env.
Configure the Fastify server
Before proceeding to configure the server, you need to create a few files. The first step is to create the following files:
touch app.js
touch .env
The app.js file contains the server configuration. On the other hand, the .env file stores your environment variables.
Open the app.js file and write the following code:
const app = require('fastify')({
    logger: true
});

require('dotenv').config()

app.get('/', (req, res) => {
    res.send({ hello: 'world' });
});

app.listen(process.env.PORT, (err, addr) => {
    if (err) {
        app.log.error(err);
        process.exit(1);
    }

    app.log.info(`Your server is listening on port ${process.env.PORT} 🧨`);
});
With the first line, you import the Fastify package and store it in a constant named app. In the same line, you also enable the logger. After that, you import dotenv so you can use environment variables.
Lastly, you create a GET round that responds with JSON, and then you listen on the port specified in the .env file.
Moving on, open the .env file and add the following lines:
PORT=3000
INSTANCE_URL=
INSTANCE_USERNAME=
INSTANCE_PASSWORD=
INSTANCE_SCHEMA=
The fields starting with INSTANCE will hold information about the database. Now, it's time to create a HarperDB account if you do not have one already.
Create and configure the database
First of all, login into the HarperDB Studio. After you log in, click on the + button, which creates a new HarperDB Cloud Instance. Figure 1 illustrates that!
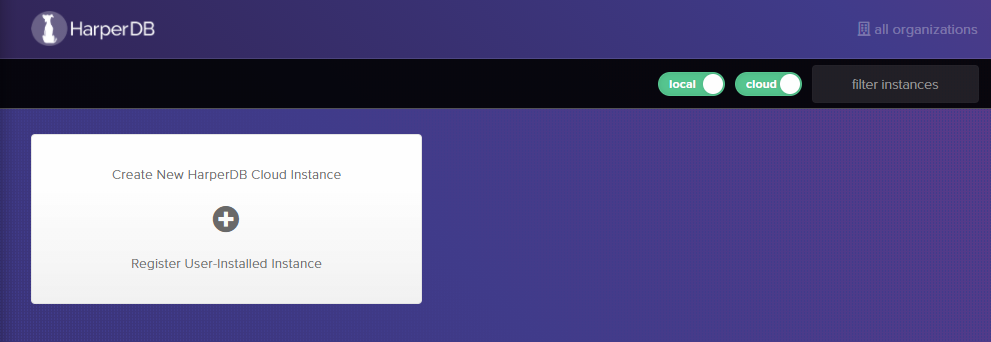
Figure 1
After that, you will be asked to choose either a "New HarperDB Cloud Instance" or "Register User-Installed Instance", as shown in figure 2.
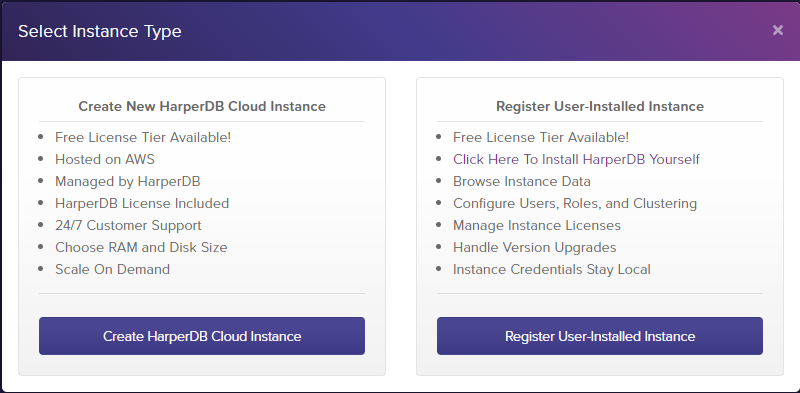
Figure 2
Click on the button saying "Create HarperDB Cloud Instance". As a result, you create a database instance in their cloud rather than hosting it yourself. After that, you need to enter:
- the name of the instance
- a username
- a password
In figure 3 below, you can see my instance information.
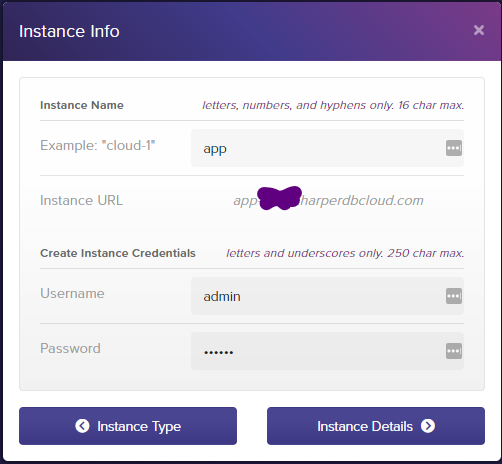
Figure 3
The next step is to choose your instance specifications. For this tutorial, I advise you to choose the free options. You get the following specs for free:
- 0.5GB RAM
- 1GB of storage and 100 IOPS
Figure 4, below, illustrates that! However, if you plan to use the DB heavily, I recommend powering up the instance and choose better specifications!
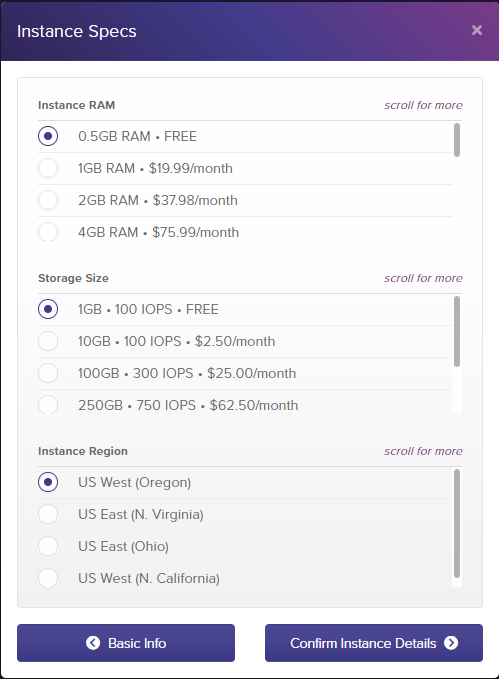
Figure 4
The last step is to confirm the instance details and then wait for the instance to spin up. After the instance is set up and initialised, click on the instance. For example, you can see my newly-created instance in figure 5 below.
If you are accessing the instance for the first time, you might be prompted to enter the username and password you set previously.
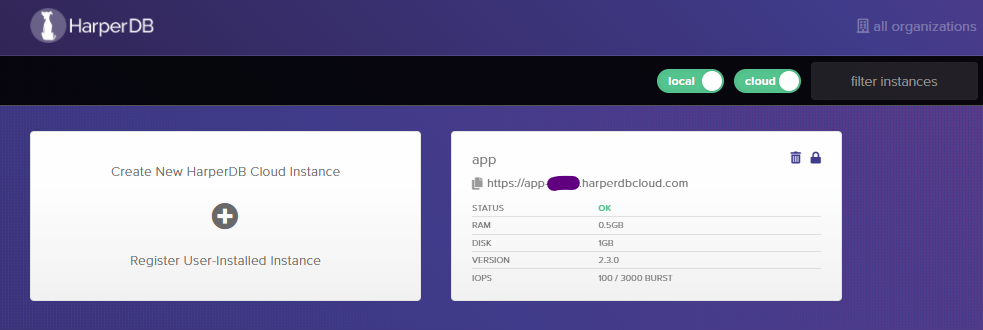
Figure 5
Your instance does not have any schemas or tables at the moment. As a result, you need to create a schema first! You can see that I chose mydb as the name for my schema (figure 6). However, you can use any other name for your schema.
Once you chose a name for your schema, click on the green checkmark to save it!
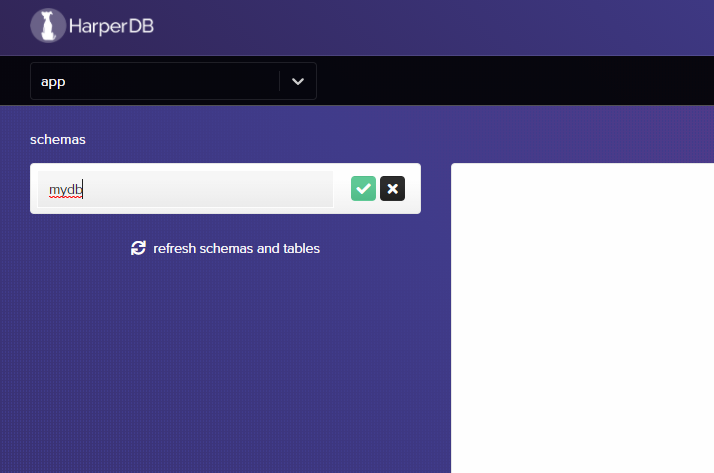
Figure 6
Lastly, you need to create tables. For the moment, you'll set up only one table called courses. Enter the name "courses" and provide a hash_attribute name as well. The "hash attribute" is used to uniquely identify each record. In simpler words, the "hash attribute" is the ID, which is unique for each record. Now, click on the green checkmark to save it. As shown in figure 7.
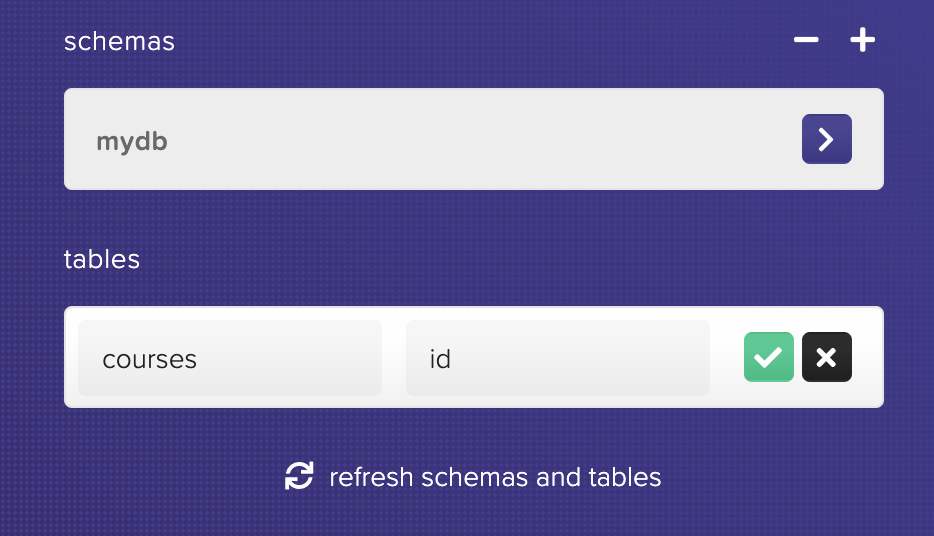
Figure 7
Now, you are ready to use the database in the Node.js application!
Set and config HarperDB in the app
Go into the .env file and add the following lines:
INSTANCE_URL=https://app-tutorial.harperdbcloud.com/
INSTANCE_USERNAME=admin
INSTANCE_PASSWORD=password
INSTANCE_SCHEMA=mydb
Of course, you need to change those details with yours! The above information is fictive, so it will not work if you try!
Save the file, and let's move on! Now create two folders and a database file. You can do so by following these commands:
mkdir src
mkdir src/db
touch src/db/db_config.js
With the above commands, you create the "db" folder inside "src". Also, you create the file "db_config.js" that stores the configuration for the database.
Open the newly-created file db_config.js and write the following code:
const harperive = require('harperive').Client;

const DB_CONFIG = {
    harperHost: process.env.INSTANCE_URL,
    username: process.env.INSTANCE_USERNAME,
    password: process.env.INSTANCE_PASSWORD,
    schema: process.env.INSTANCE_SCHEMA
};

const client = new harperive(DB_CONFIG);

module.exports = client;
With the first line, you import the Node.js driver for HarperDB. After that, you create the database configuration with the details stored in the .env file. Lastly, you create a new client and export it.
You'll use the client later, in the controller file! For now, let's move to the routes and controllers.
Configure app endpoints
The first step is to create two new folders in the src folder. Create them as follows:
mkdir src/controllers
mkdir src/routes
After that, you need to create two new JavaScript files in the newly-created folders. Create the files course.js and courseController.js as follows:
touch src/routes/course.js
touch src/controllers/courseController.js
You'll start by creating the routes. In this scenario, you can make use of the FastifyJS plugin architecture. So open the course.js file from the "routes" folder, and write the following code:
const courseController = require('../controllers/courseController');

async function routes(app, opts) {

}

module.exports = routes;
There are three things happening:
- You import the controllers used for routes.
- You create a
routesfunction. - You export the newly-created
routesfunction.
In this method - routes - you configure the endpoints of your application. For each route, you specify the HTTP method, the URL and the handler at minimum. However, there are many other parameters. You can see the complete list here.
With that being said, let's build the first endpoint that returns all the courses when accessed. You can do so by calling the route method on the app, as follows:
const courseController = require('../controllers/courseController');

async function routes(app, opts) {

    // Get all courses
    app.route({
        method: 'GET',
        url: '/courses',
        handler: courseController.getCourses
    });
}

module.exports = routes;
You build all the other routes/endpoints in a similar fashion. The only things that change are the method, URL and handler.
In the Gist below, you can see all the endpoints. You have an endpoint for each CRUD operation. Application users can see all the courses, a specific course, add new courses, delete and edit existing courses.
Note: Each route/endpoint has a specific controller, as you can see. At the moment, they are just placeholders because there are no controllers. That means, if you try to access the routes they won't work! But that changes in the next step because you'll build the application logic now.
One more thing before going further. Go to the app.js in the root folder, and add the following line:
app.register(require('./src/routes/course'));
The purpose of that line is to make the routes available in your application. If you do not add this line, your routes will not work.
The final version of app.js should look as follows:
Build application logic with HarperDB
The application logic defines what happens when a user makes a request to the routes specified in the previous section.
As an example, when someone accesses the route /courses, they should see all the courses from the database. As a result, let's start with that route.
The code for all routes will be in courseController.js. Thus, open the courseController.js file and import the "Harperive" client at the top of the file:
const client = require("../db/db_config");
Now, this where the fun begins. To portray the capabilities of HarperDB, you'll use both SQL and NoSQL operations to manipulate data.
Build the GET route
In the same file, add the following code after importing the database client:
const getCourses = async (req, res) => {
    const allCourses = await client.query('SELECT * FROM mydb.courses');

    res.send({ allCourses });
};

module.exports = {
    getCourses,
}
As you can see, the HarperDB Node.js driver allows you to run SQL queries on your database. The above query selects and returns all the courses from the database.
After that, you use the response object to send the data to the client. If you run the application and try to access the /courses route, you won't get any data because the database is empty.
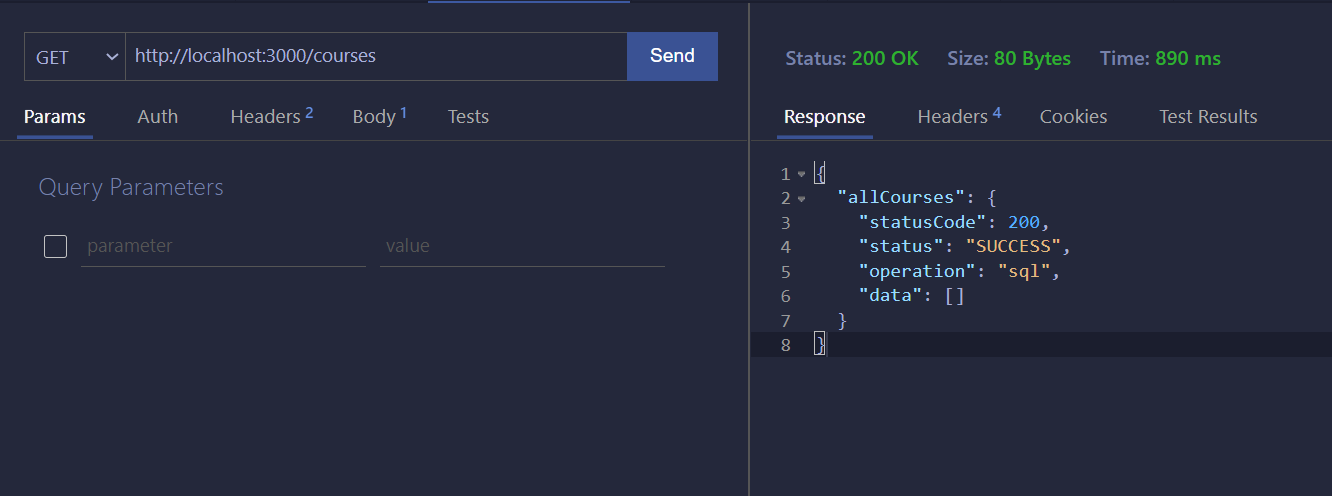
Figure 8
Figure 8 illustrates a successful request. You can see that the "data" array is empty because the database is empty. However, we'll repeat the request once there is data in the database.
Build the POST route
The next step is to build the POST route so you can add data into your database. In this case, we'll use a NoSQL operation. Write the following code after the getCourses constant:
const addCourse = async (req, res) => {
    const allProperties = Object.keys(req.body).length;

    if (allProperties !== 4) {
        res.code(400).send({
            error: 'Some properties are missing! Add the name, description, author and link!'
        });

        return;
    }

    try {
        const newCourse = await client.insert({
            table: 'courses',
            records: [
                {
                    name: req.body.name,
                    description: req.body.description,
                    author: req.body.author,
                    link: req.body.link
                }
            ]
        });

        res.send({ newCourse });
    } catch (error) {
        res.send({ error });
    }
};

module.exports = {
    getCourses,
    addCourse,
}
First of all, the part before the try catch block makes sure the user provides all the fields. If the user tries to add a course without specifying the name, description, author or link, it will return an error. The user must always provide all four fields.
Then, in the try catch block, you use the database client to insert the new course into the database.
-
You need to specify the table (which in this case is
courses) and then therecords. -
The
recordsfield is an array of objects, which means you can enter multiple courses in one go. However, for now, one is enough.
Provided the insertion is successful, it returns the newly-added course. You can see the route in action in figure 9 below.
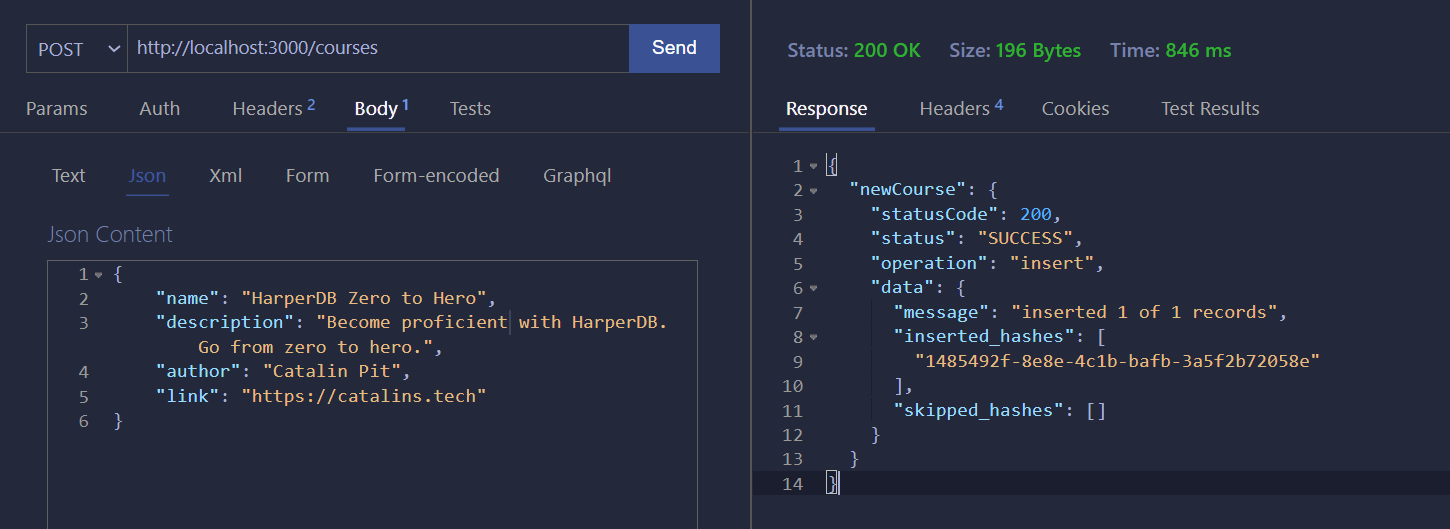
Figure 9
The operation was successful, and the new course was added to the database! Figure 10 shows the course in the database!
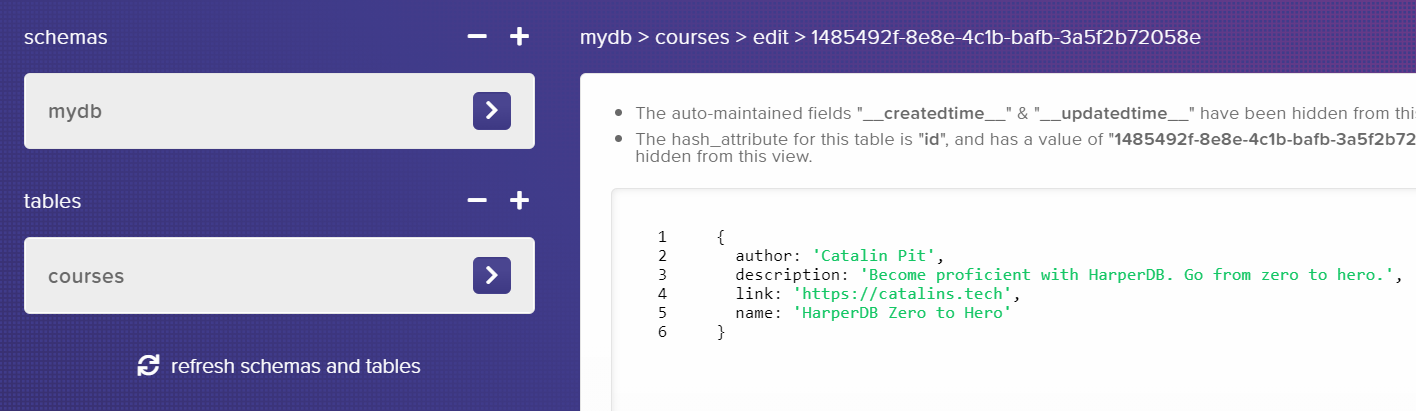
Figure 10
GET a specific course
Getting a specific course is similar to getting all courses, but with one addition. Now, you use a WHERE clause to select a specific course.
You pass the course "ID" in the URL, and then the SQL query matches that with a record from the database.
But first of all, how do you get the ID?, you might ask! There are two options (you need courses in the database first):
- You can visit the route
http://localhost:3000/coursesand get the ID of any course you want. - Go to the HarperDB studio, click on the course, and you'll see all the details. At the top of the page, you'll see that it specifies which one is the ID - see figure 10 above.
const getSpecificCourse = async (req, res) => {
    const course = await client.query(`SELECT * FROM mydb.courses WHERE id="${req.params.id}"`);

    res.send({ course });
};

module.exports = {
    getCourses,
    addCourse,
    getSpecificCourse,
}
After that, it returns the course. Figure 11 below illustrates what happens when you make a GET request to get a specific course!
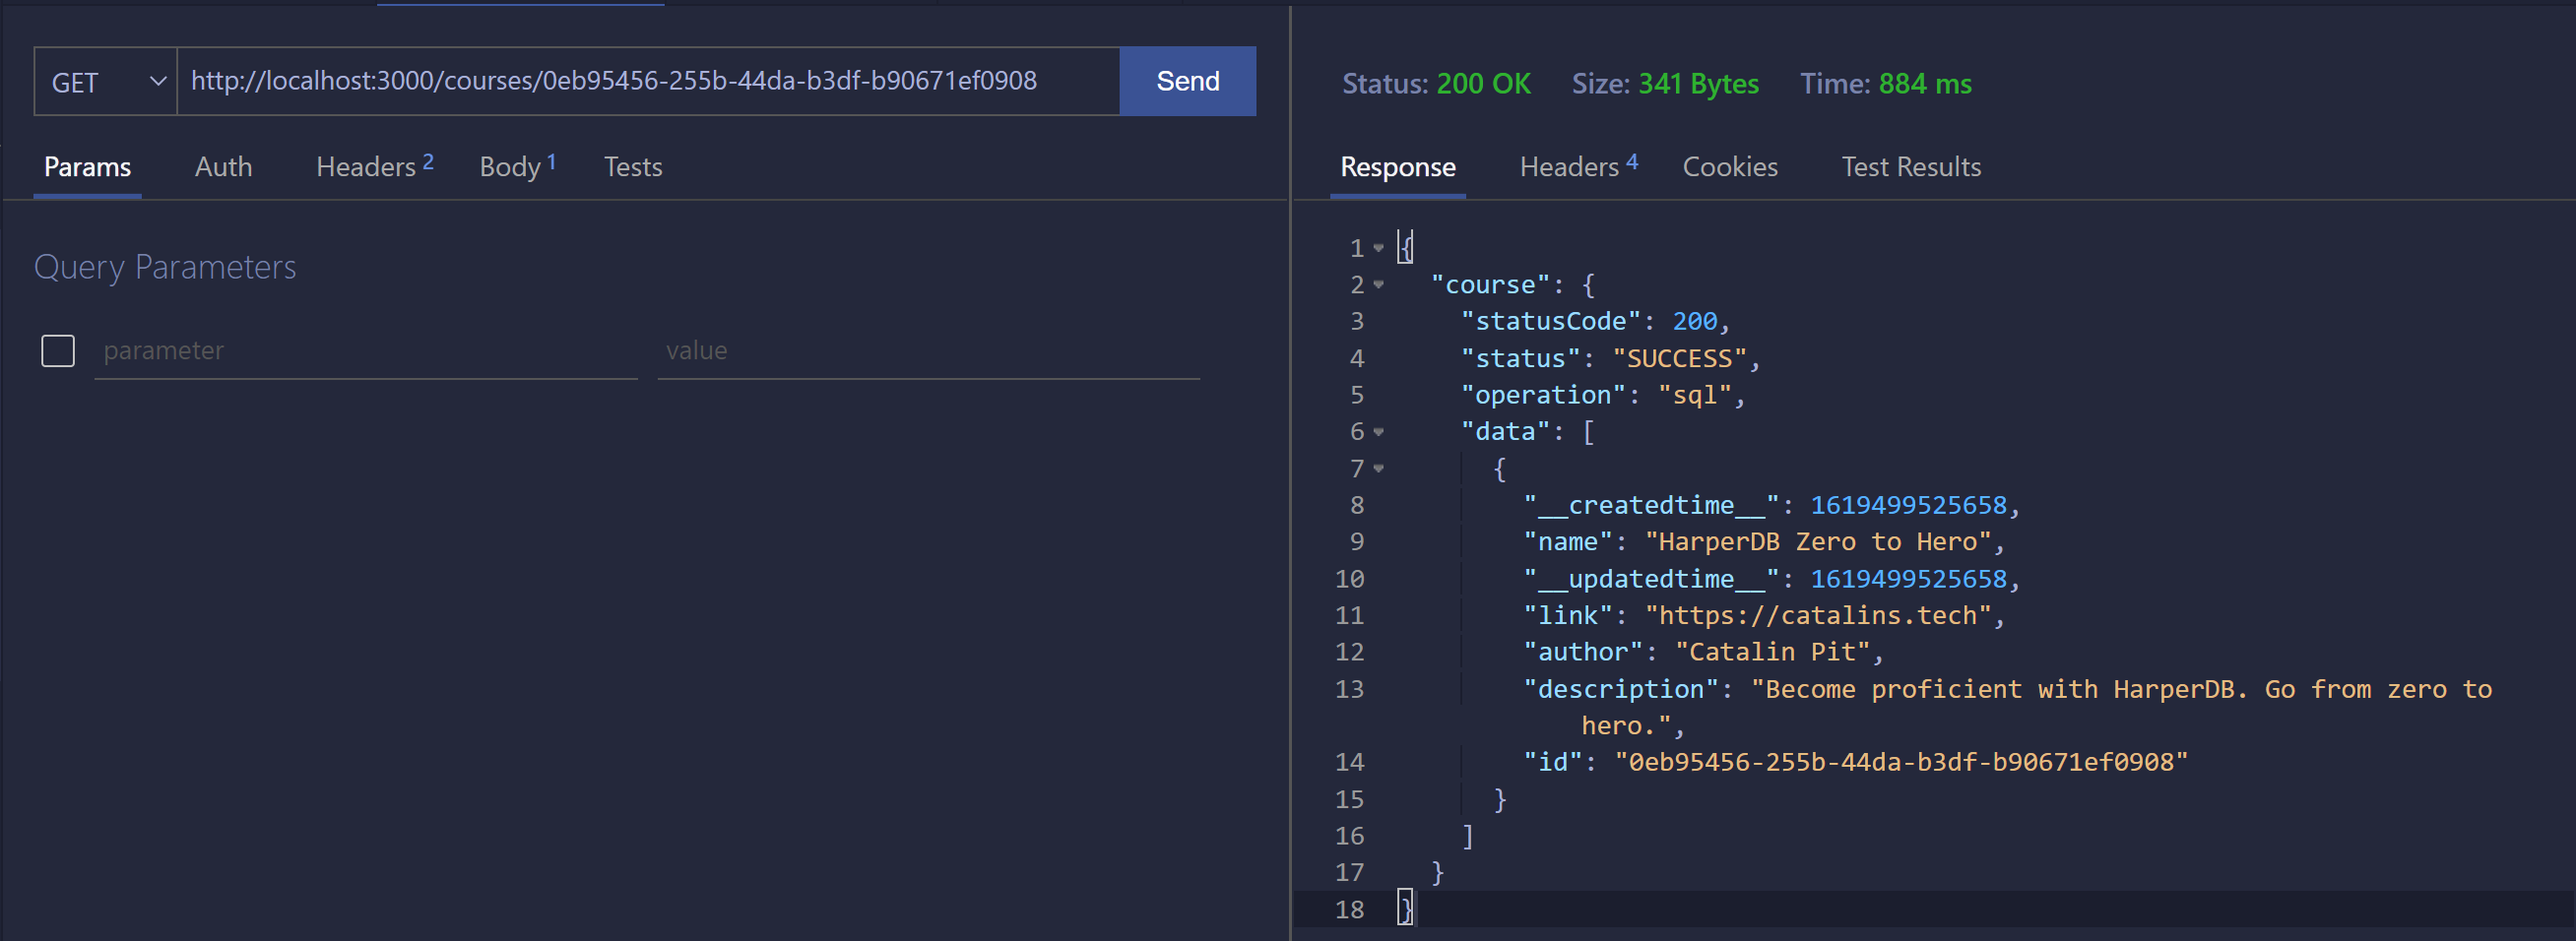
Figure 11
DELETE a specific course
You can delete a course by providing the course ID in the URL. For example, if you make a DELETE request to http://localhost:3000/courses/0eb95456-255b-44da-b3df-b90671ef0908, you delete the course with the specified ID.
const deleteCourse = async (req, res) => {
    const course = await client.query(`DELETE FROM mydb.courses WHERE id="${req.params.id}"`);

    res.send({
        message: 'Course deleted!',
        deleteCourse: course
     });
};

module.exports = {
    getCourses,
    addCourse,
    getSpecificCourse,
    deleteCourse
}
Once the course is deleted, it sends a message confirming that and some more extra information. Figure 12 illustrates a "DELETE" request.
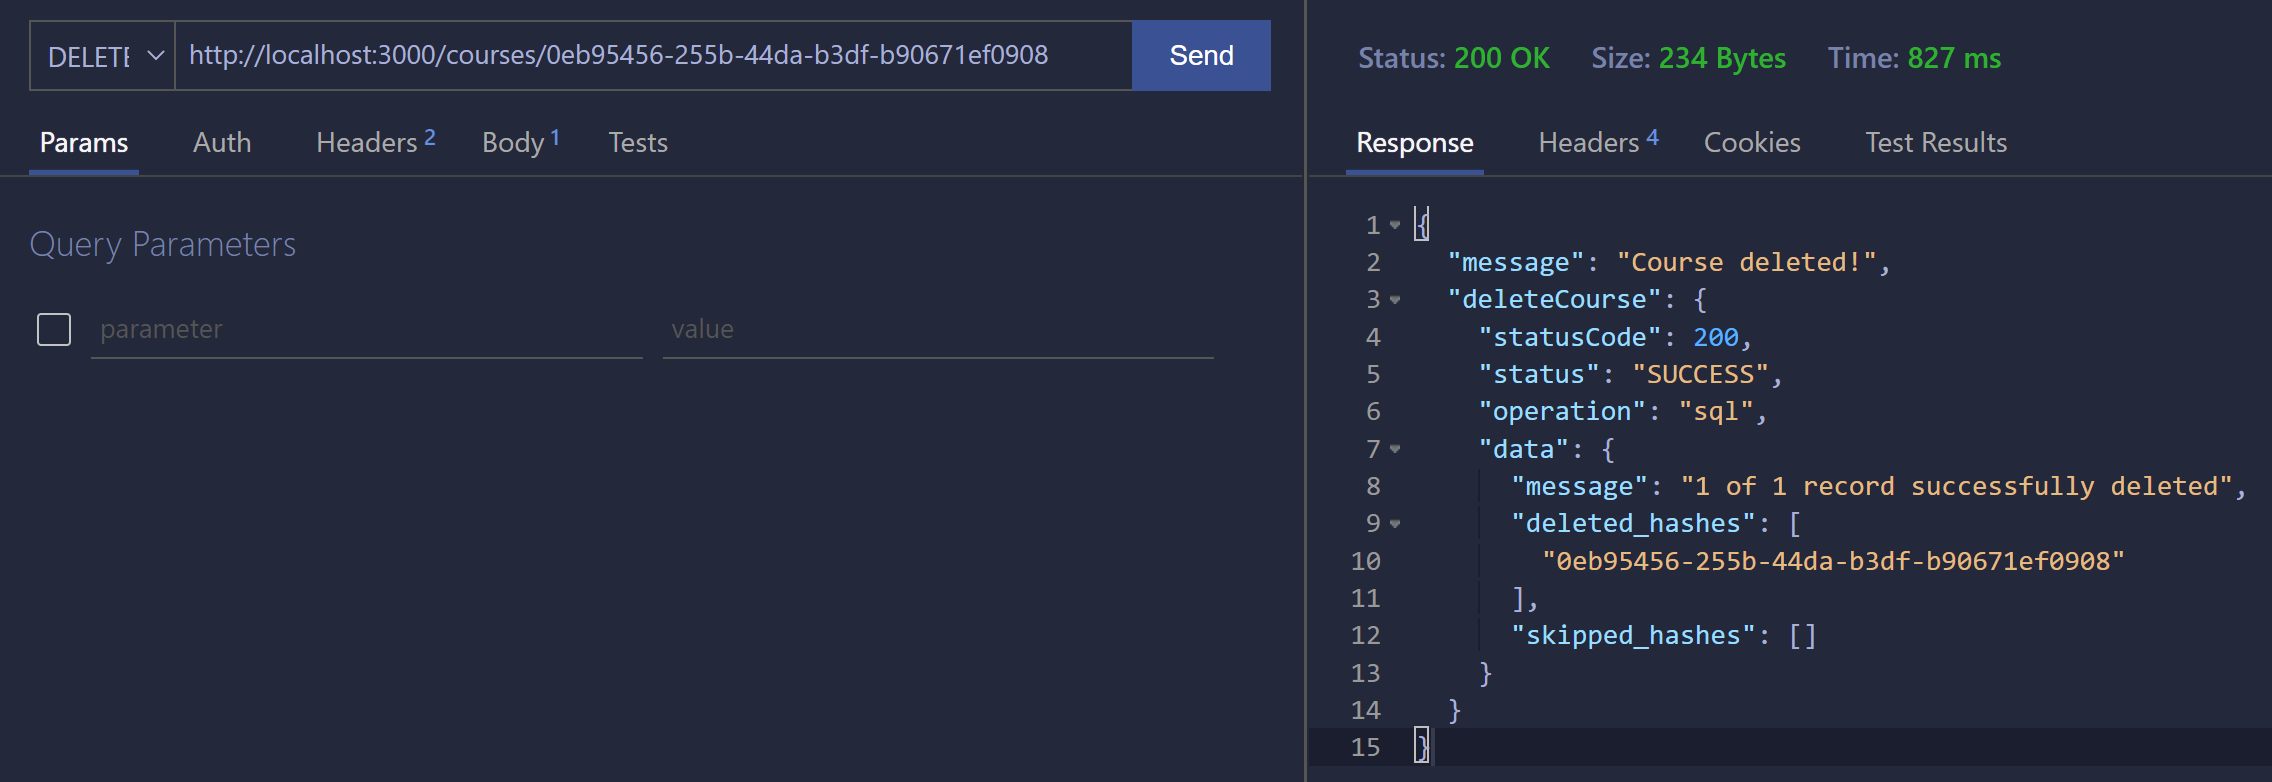
Figure 12
Build the PUT route
Lastly, this route allows you to update an existing course. All the code before the try catch block makes sure the users only use the allowed fields - name, description, author and link. If the user tries to update a field that does not exist, the server will respond with an error.
To edit the course, you're using a NoSQL operation again. You call the update method on the database client, then pass the table name (courses - in this case) and the records you want to update.
Also, it's essential to specify the id in the records array. If you do not, the server does not know which record to update.
const editCourse = async (req, res) => {
    const updates = Object.keys(req.body);
    const allowedUpdates = ['name', 'description', 'author', 'link'];
    const isValidOperation = updates.every((update) => allowedUpdates.includes(update));

    if (!isValidOperation) {
        res.code(400).send({ error: 'Not a valid operation! '});

        return;
    }

    try {
        const updatedCourse = await client.update({
            table: 'courses',
            records: [
                {
                    id: req.params.id,
                    name: req.body.name,
                    description: req.body.description,
                    author: req.body.author,
                    link: req.body.link
                }
            ]
        });

        res.send({ updatedCourse });
    } catch (error) {
        res.send({ error });
    }
};

module.exports = {
    getCourses,
    addCourse,
    getSpecificCourse,
    deleteCourse,
    editCourse
}
If there is an error, the server sends back the error. Otherwise, it returns the updated course. The figure below shows how to make a PUT requests and what happens it's successful!

Figure 13
That's all about routes and controllers! You can see the whole courseController.js file in this Gist. I chose not to embed it because it is big and takes a significant space on the page!
Similarly, you can see the complete application on my GitHub. To learn better, go through it, change stuff, break stuff, add things and so on!
How to start the application
You can start the application by running node app.js in the root folder.
However, if you clone the application from GitHub, you need to install the dependencies first. You can do so by running:
npm install
node app.js
Conclusion
By this point, you should have a REST API that allows you to store and manipulate courses. The purpose of this tutorial was to get up-to-speed with the two technologies. As a result, other things could be added, such as:
- Authorisation
- API rate limiting
- Adding a front-end and transform it into a full-stack application
With that being said, if you like the tutorial and want part 2, where I build the front-end with Vue, let me know in the comments!