
Contributing to open-source is a great way to improve your programming skills, help others and learn how to work in a collaborative environment.
However, many people are put off by the complexity of the projects. They also think that contributing to open-source is all about coding.
But that is not true! You can contribute to open source projects in other ways, such as:
- Writing documentation
- Creating supporting materials
- Reviewing code
- Translating to other languages
- Structure and re-structure the code and project structure
Thus, in this article, you will learn how to make your first open-source contributions with the help of Hashnode documentation. Hashnode is a blogging platform that open-sourced their documentation, which is a great place to start your open-source journey.
About Open Source Software and the benefits of contributing
Before going further, let's clarify what open source means and what are the benefits of contributing to open source as a developer.
In the simplest terms, open-source software is software whose source code is available to anyone. As a result, people can see the implementation of the software and even contribute themselves to it. An example is the code editor Visual Studio Code, whose repository you can see here.
On the other hand, Github is an example of closed-source software. That means only specific people have access to the source code. Usually, the specific people are the founding organization/people and the team.
Now that you know what open source is, let's see the benefits of contributing to open-source software. The most notable benefits are as follows:
- Contributing to popular software can bring great satisfaction knowing that lots of people use your code.
- You accelerate the progress of your programming skills. Writing code for a real-world application used by people is very different to building side projects.
- By contributing to open source, you learn how to work in a team and a collaborative environment.
- It can bring job opportunities; companies might notice your contributions and offer you a job.
- By contributing, you can learn new skills. For instance, if you learnt a new programming language, you can contribute to a project using that language.
- You develop non-technical skills such as communication, writing, problem-solving, creativity skills.
Therefore, you can see that contributing to open-source software can bring lots of valuable benefits. It is a great way to accelerate your developer career.
Before contributing
Usually, open-source projects have a code of conduct and contribution guidelines. The code of conduct is a document that sets the behaviour expectations of the contributors. Its purpose is to create a healthy, positive and constructive community.
Additionally, the contributions guidelines describe how you should create pull requests, open issues and the workflow required to make contributions.
Both the code of conduct and the contribution guidelines are important, so it's highly recommended you check them before making any contribution.
How to contribute
![]()
To contribute to open source, you should be familiar with the basic Git workflow. For this tutorial, you will be using the following workflow:
- Fork the repository - in this case, the Hashnode documentation
- Download the repository on your machine by cloning
- Create a separate branch for your work
- Make the required changes
- Commit the changes
- Push the changes
- Open a pull request
This is the most basic Git workflow, and it's more than enough in most cases. I used it successfully to make contributions to complex codebases.
The next step is to find a project and start contributing! Therefore, let's do just that.
Find a project
The first step is to find an open-source project to contribute to. Finding a project to contribute can be difficult, but there are many ways to pick a project.
You can either choose a piece of software you are using daily or a project that piqued your interest. Alternatively, there are some websites that curate suitable projects/issues for beginners.
However, as mentioned previously, you will use the Hashnode documentation to make your first contributions.
Fork the project
To fork the project, you need to go to the Hashnode documentation repository, which you can access here.
Once you are in the repository, you should see a "Fork" button. Click on the button to create a copy of the repository in your account.
See figure 1 for reference.
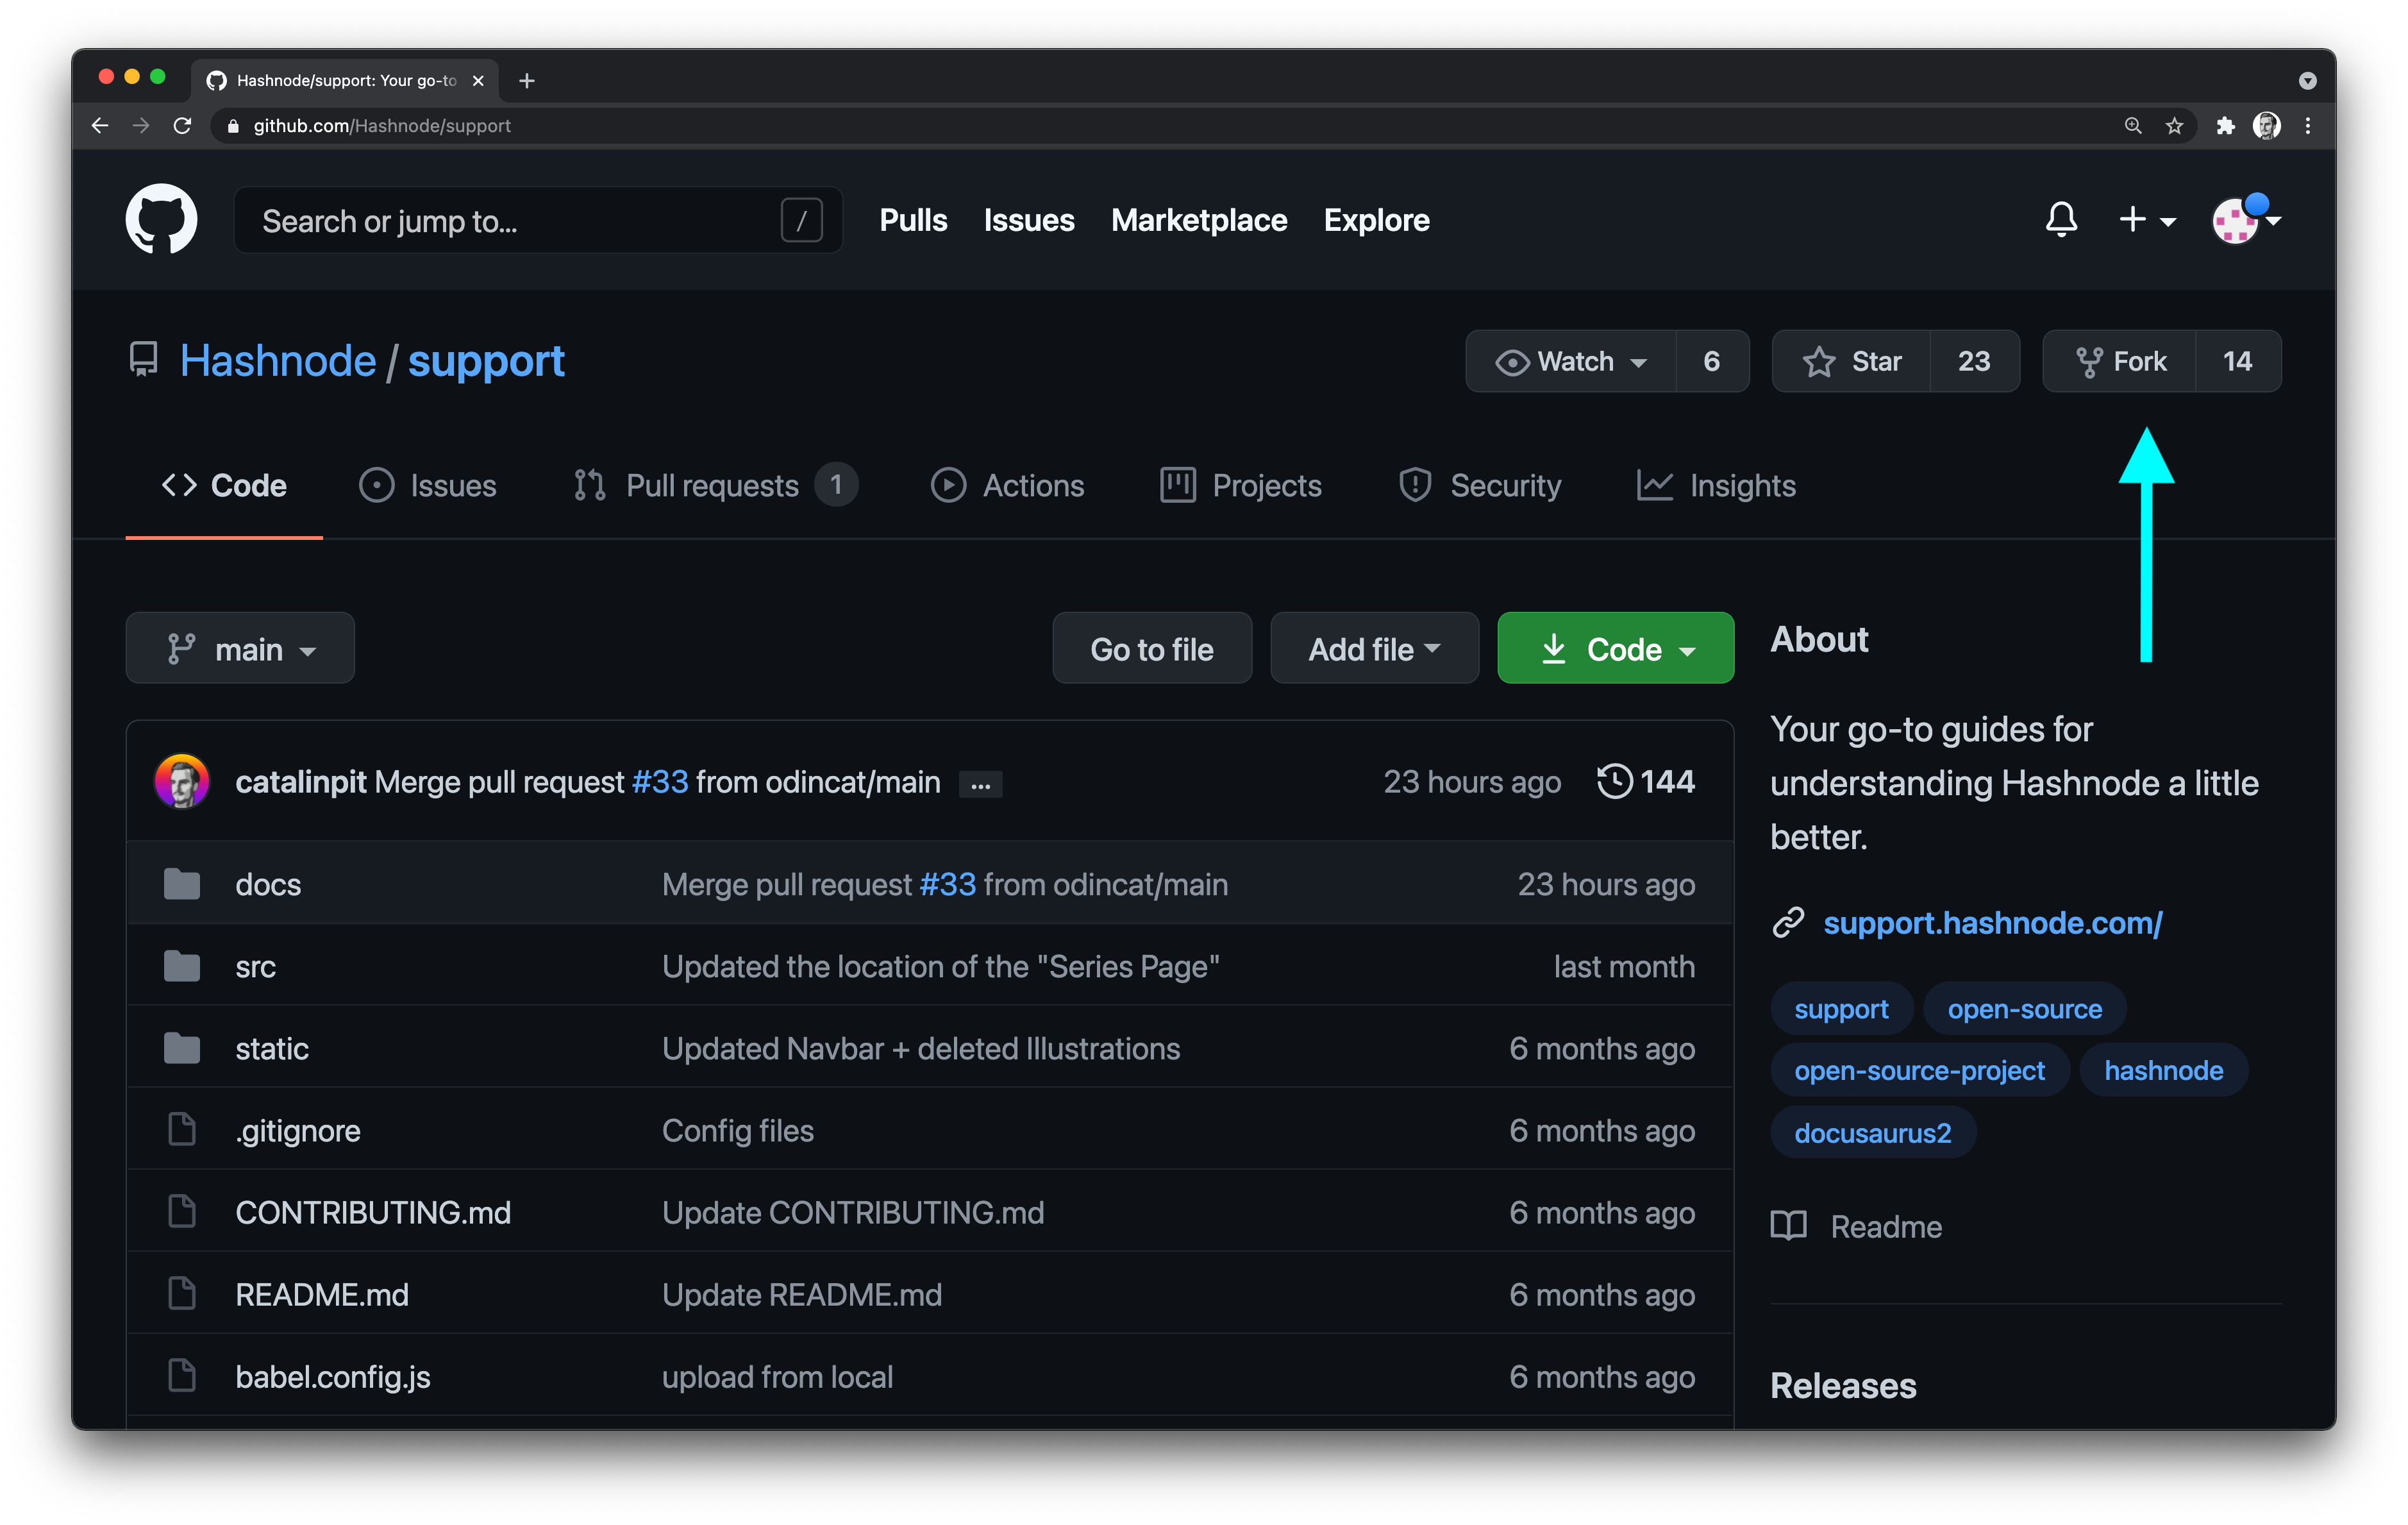
Figure 1
Forking takes a while, but once it completes, you should see the repository in your account. Now, you might ask "why fork the project and not clone it directly on the machine?".
Forking a project creates an independent copy of the project on your account. That means you can experiment with the forked project without affecting the original repository. Also, when you fork a project, you can contribute to the original project by creating pull requests. Thus, in this case, you fork the Hashnode repository, make changes, and then create pull requests to modify the original repository.
On the other hand, when you clone a project, you create a local copy of the remote repository. In simpler words, you "download" the repository from GitHub on your machine. Also, if the project is owned by anyone other than yourself, you cannot contribute to the project unless you are added as a collaborator. So cloning works when you are the repository owner or when you want to check a repository, but you do not wish to contribute.
With that being said, you should see the forked repository in your account. See figure 2 below for reference.
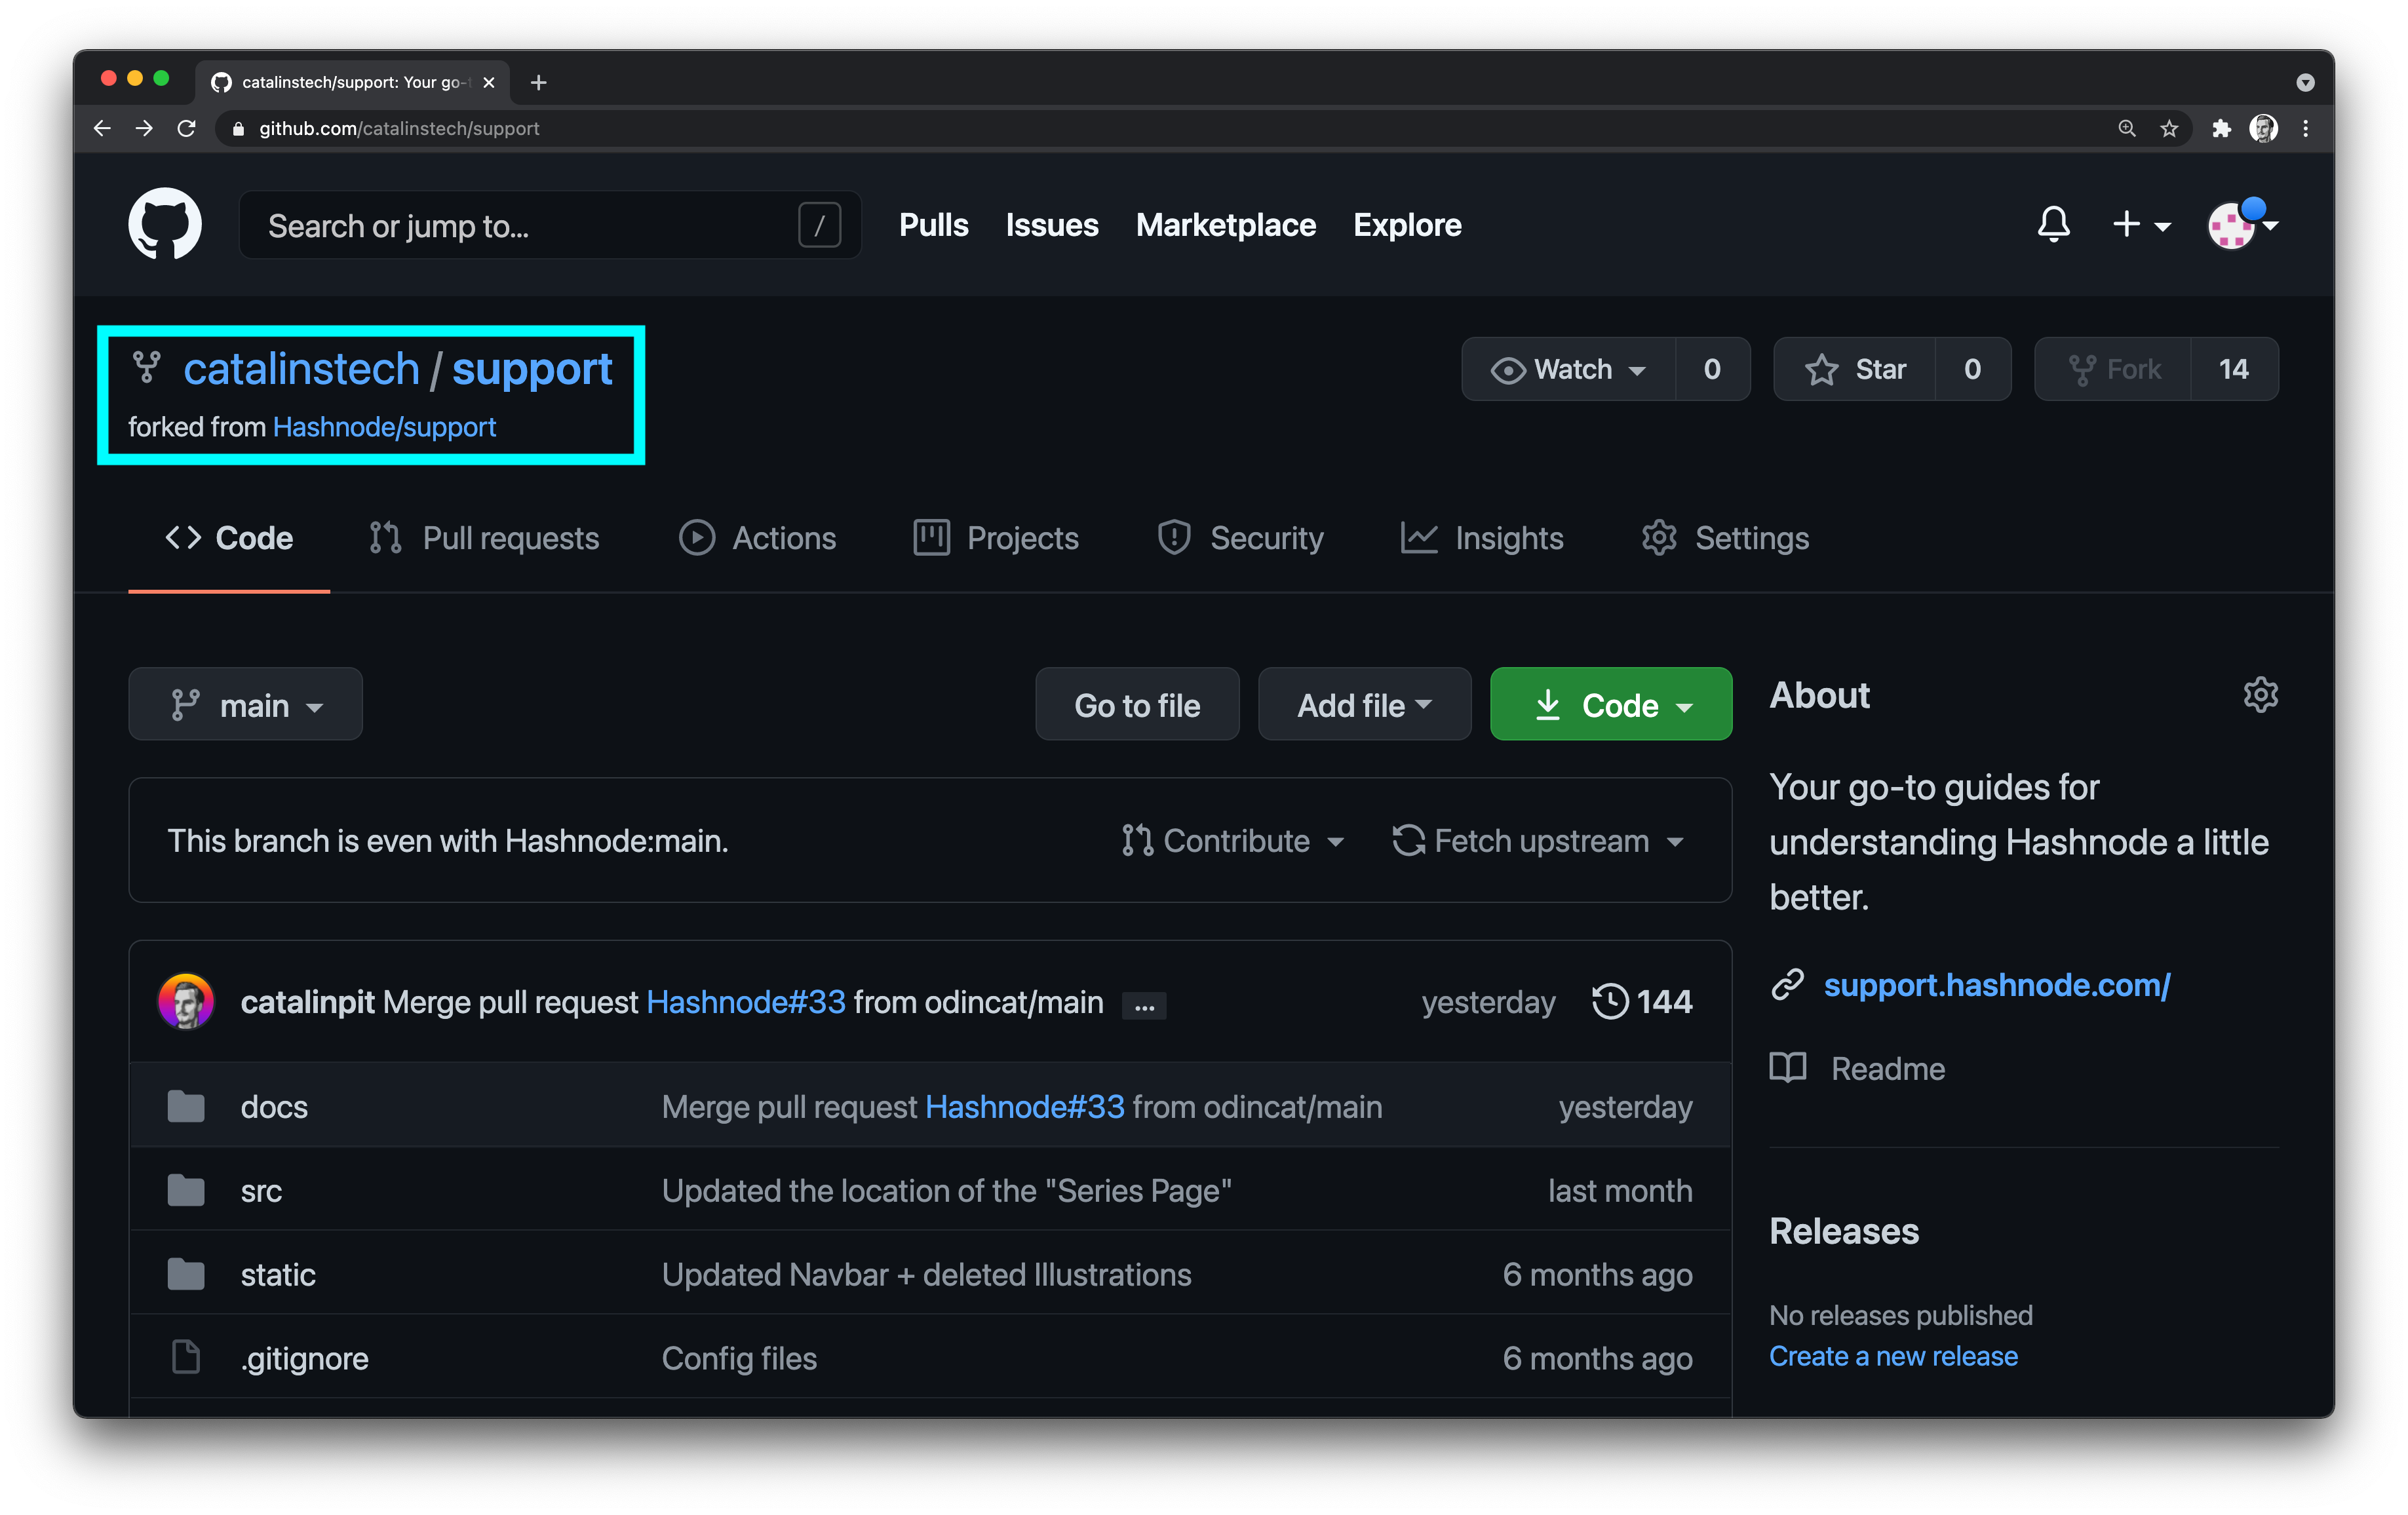
Figure 2
The next step is to clone the repository on your machine.
Clone the project
Since you forked the repository and now you own the copy, you can clone it on your machine and make changes.
To get your repository link, go to the forked repository, and click on the green button saying "Code". Once you click on the button, you should get the repository URL. See figure 3 for reference.
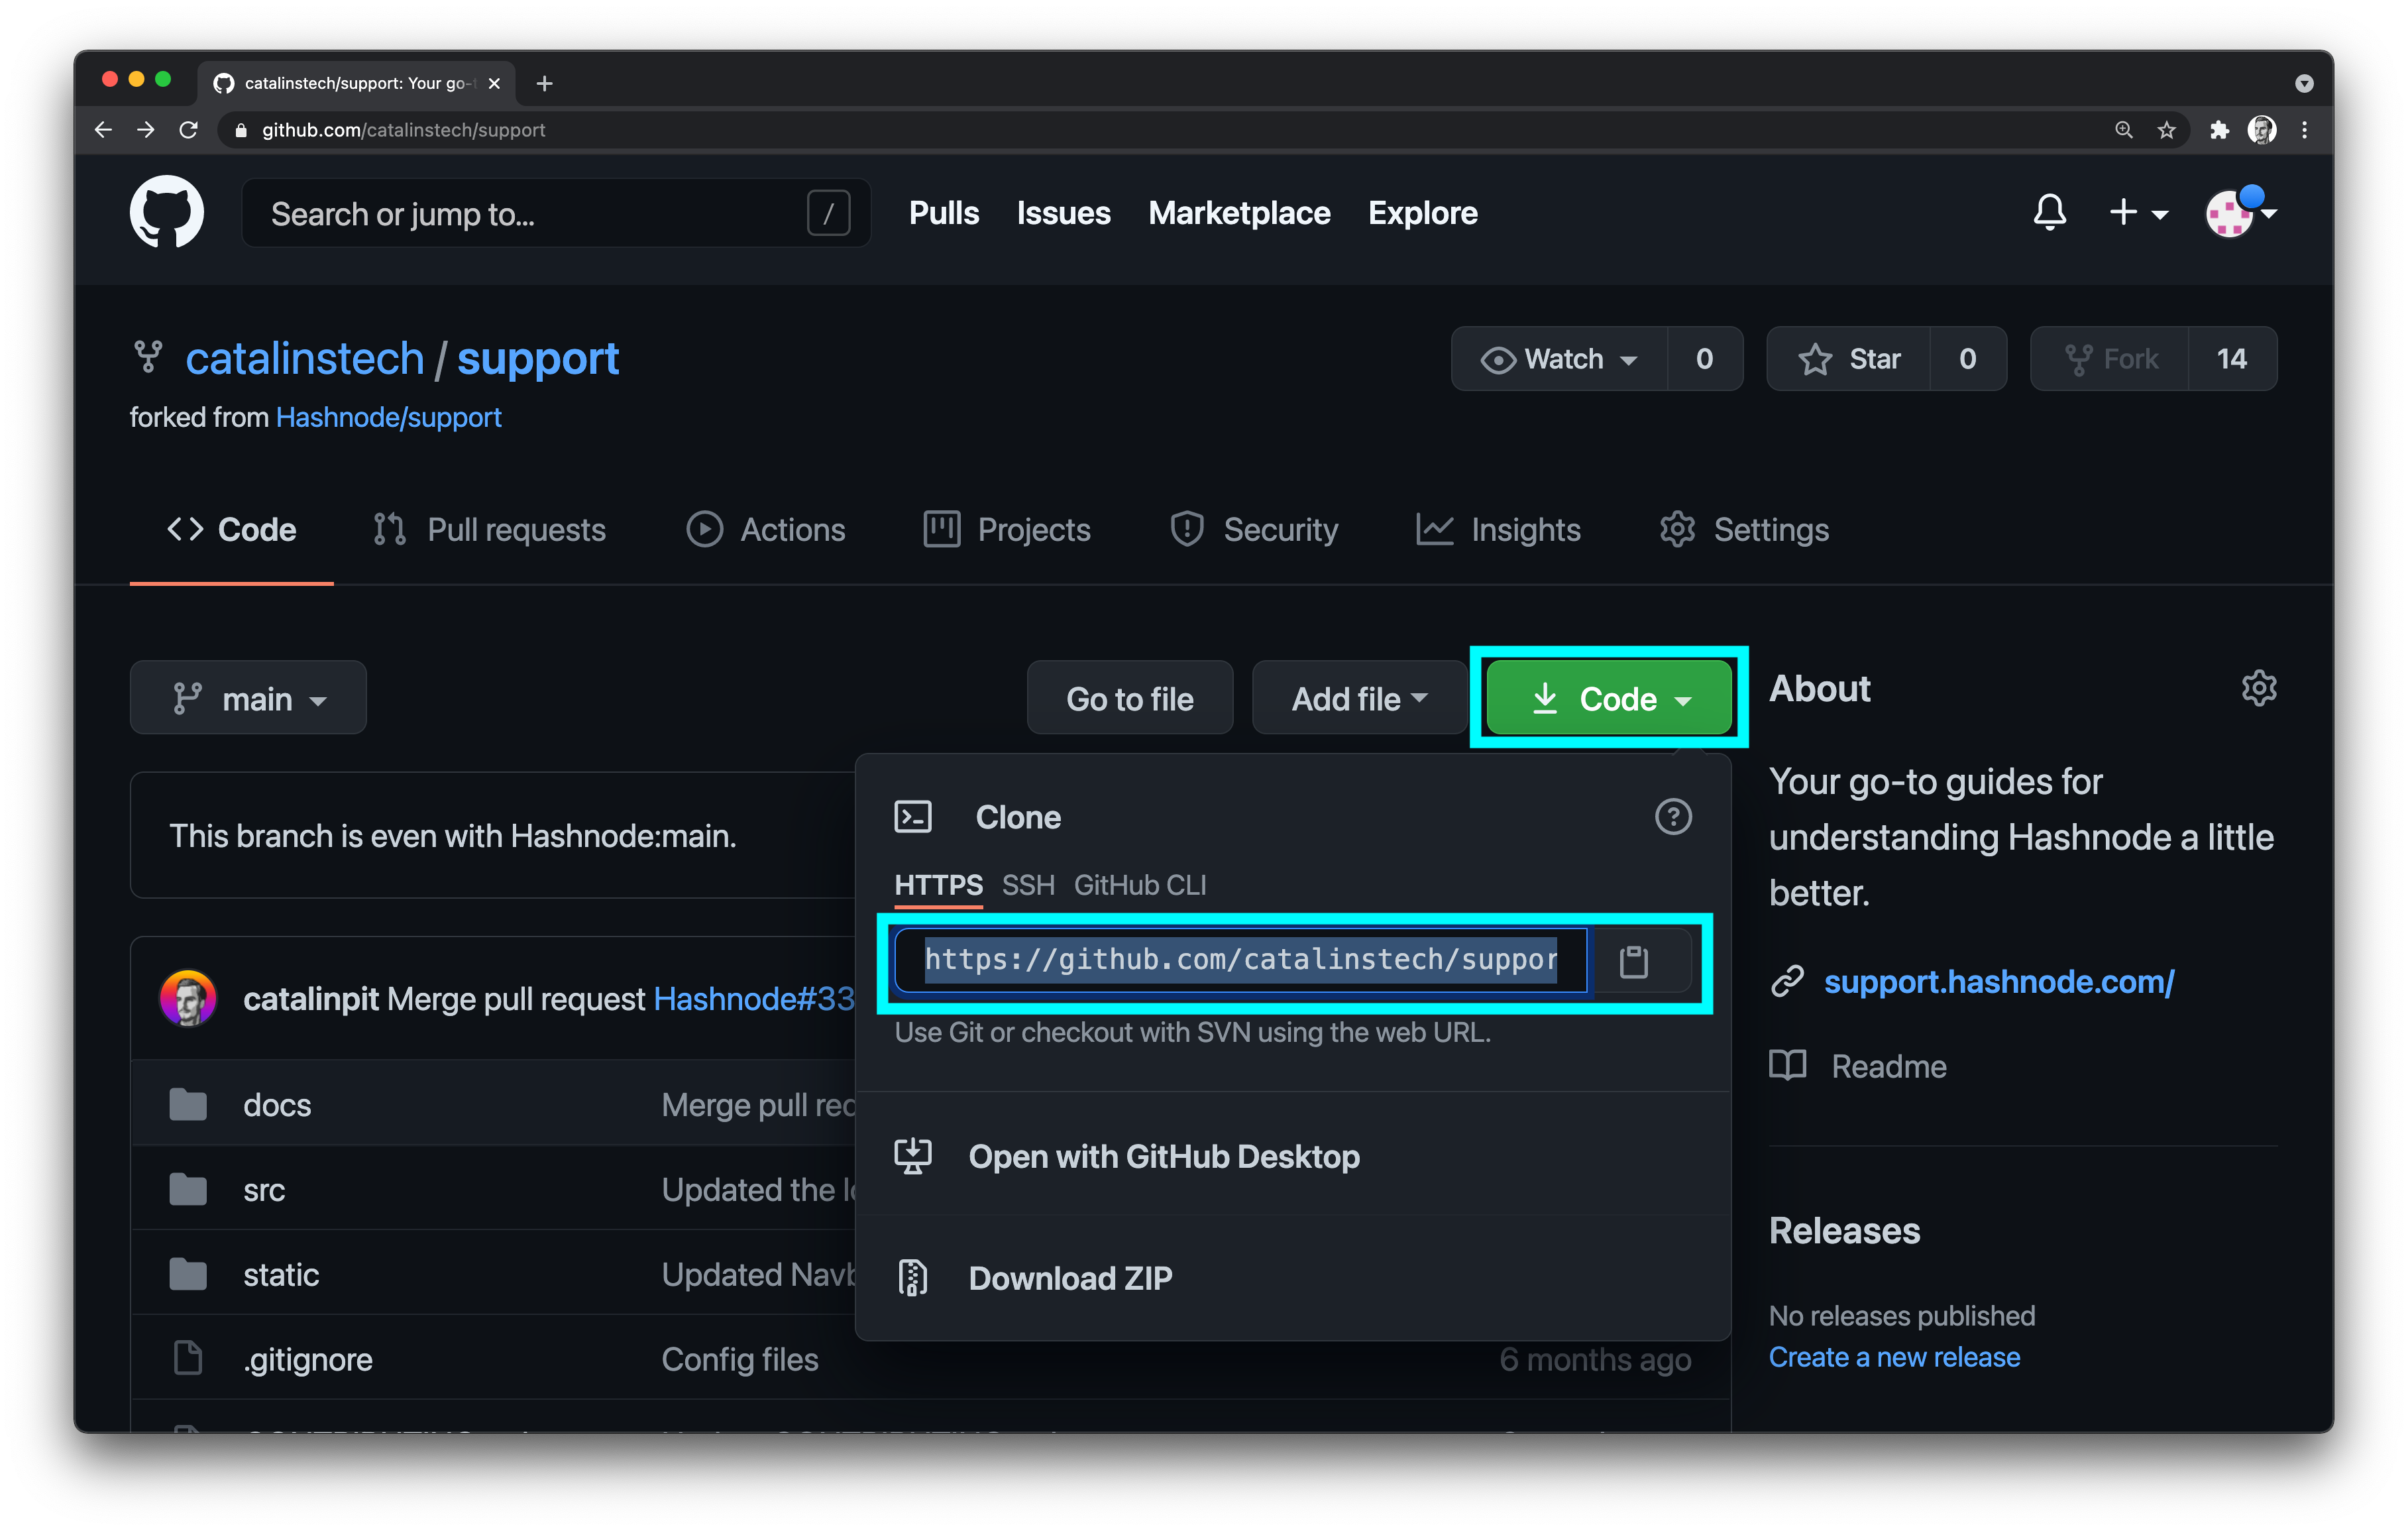
Figure 3
Copy the URL, open your terminal and run the following command:
git clone https://github.com/catalinstech/support.git
Note: Replace the above URL with your URL. If you copy my repository URL, it will not work as intended.
Wait for the repository to download on your machine, and once it's done, open it in your favourite code editor. Then, it's time to make some changes!
Create a branch
When you make a change to the codebase, you usually do it in a separate branch.
Each branch is independent of the others, which means that the changes in one branch are not visible to the other branches. Thus, branches allow people to work on the project without getting in conflict with each other.
Also, each project uses branch naming conventions, which specifies how you should name your branches. Naming your branches properly is important because it speeds the code review and collaboration.
Some examples of branch naming conventions are as follows:
username/branchName-issueID- for instance, an example would be catalinpit/add-login-1234issueID-issue- an example would be 7777-fix-broken-authentication
The issueID represents the number/ID of the issue from Github. Each repository has a dedicated page to issues, and each issue has a unique ID. Thus, you can link the branch and the issue, which helps you avoid any confusion.
Moving further, you can create a new branch and switch to it as follows:
git checkout -b branch_name
Alternatively, you can create a new branch as follows:
git branch branch_name
git checkout branch_name
What's the difference between the two commands? You can think of the first command as a shortcut for the second example.
After you create the new branch and switch to it, you can start making changes.
Make the changes
The next step is to make changes to the documentation. Thus, open the repository in your favourite code editor.
When it comes to making changes, it depends on the project you are contributing to. In this article, you will see a small example of fixing a typo in the Hashnode documentation.
In figure 4 below, you can see there is a typo - "CodeSanbox" should be "CodeSandbox".
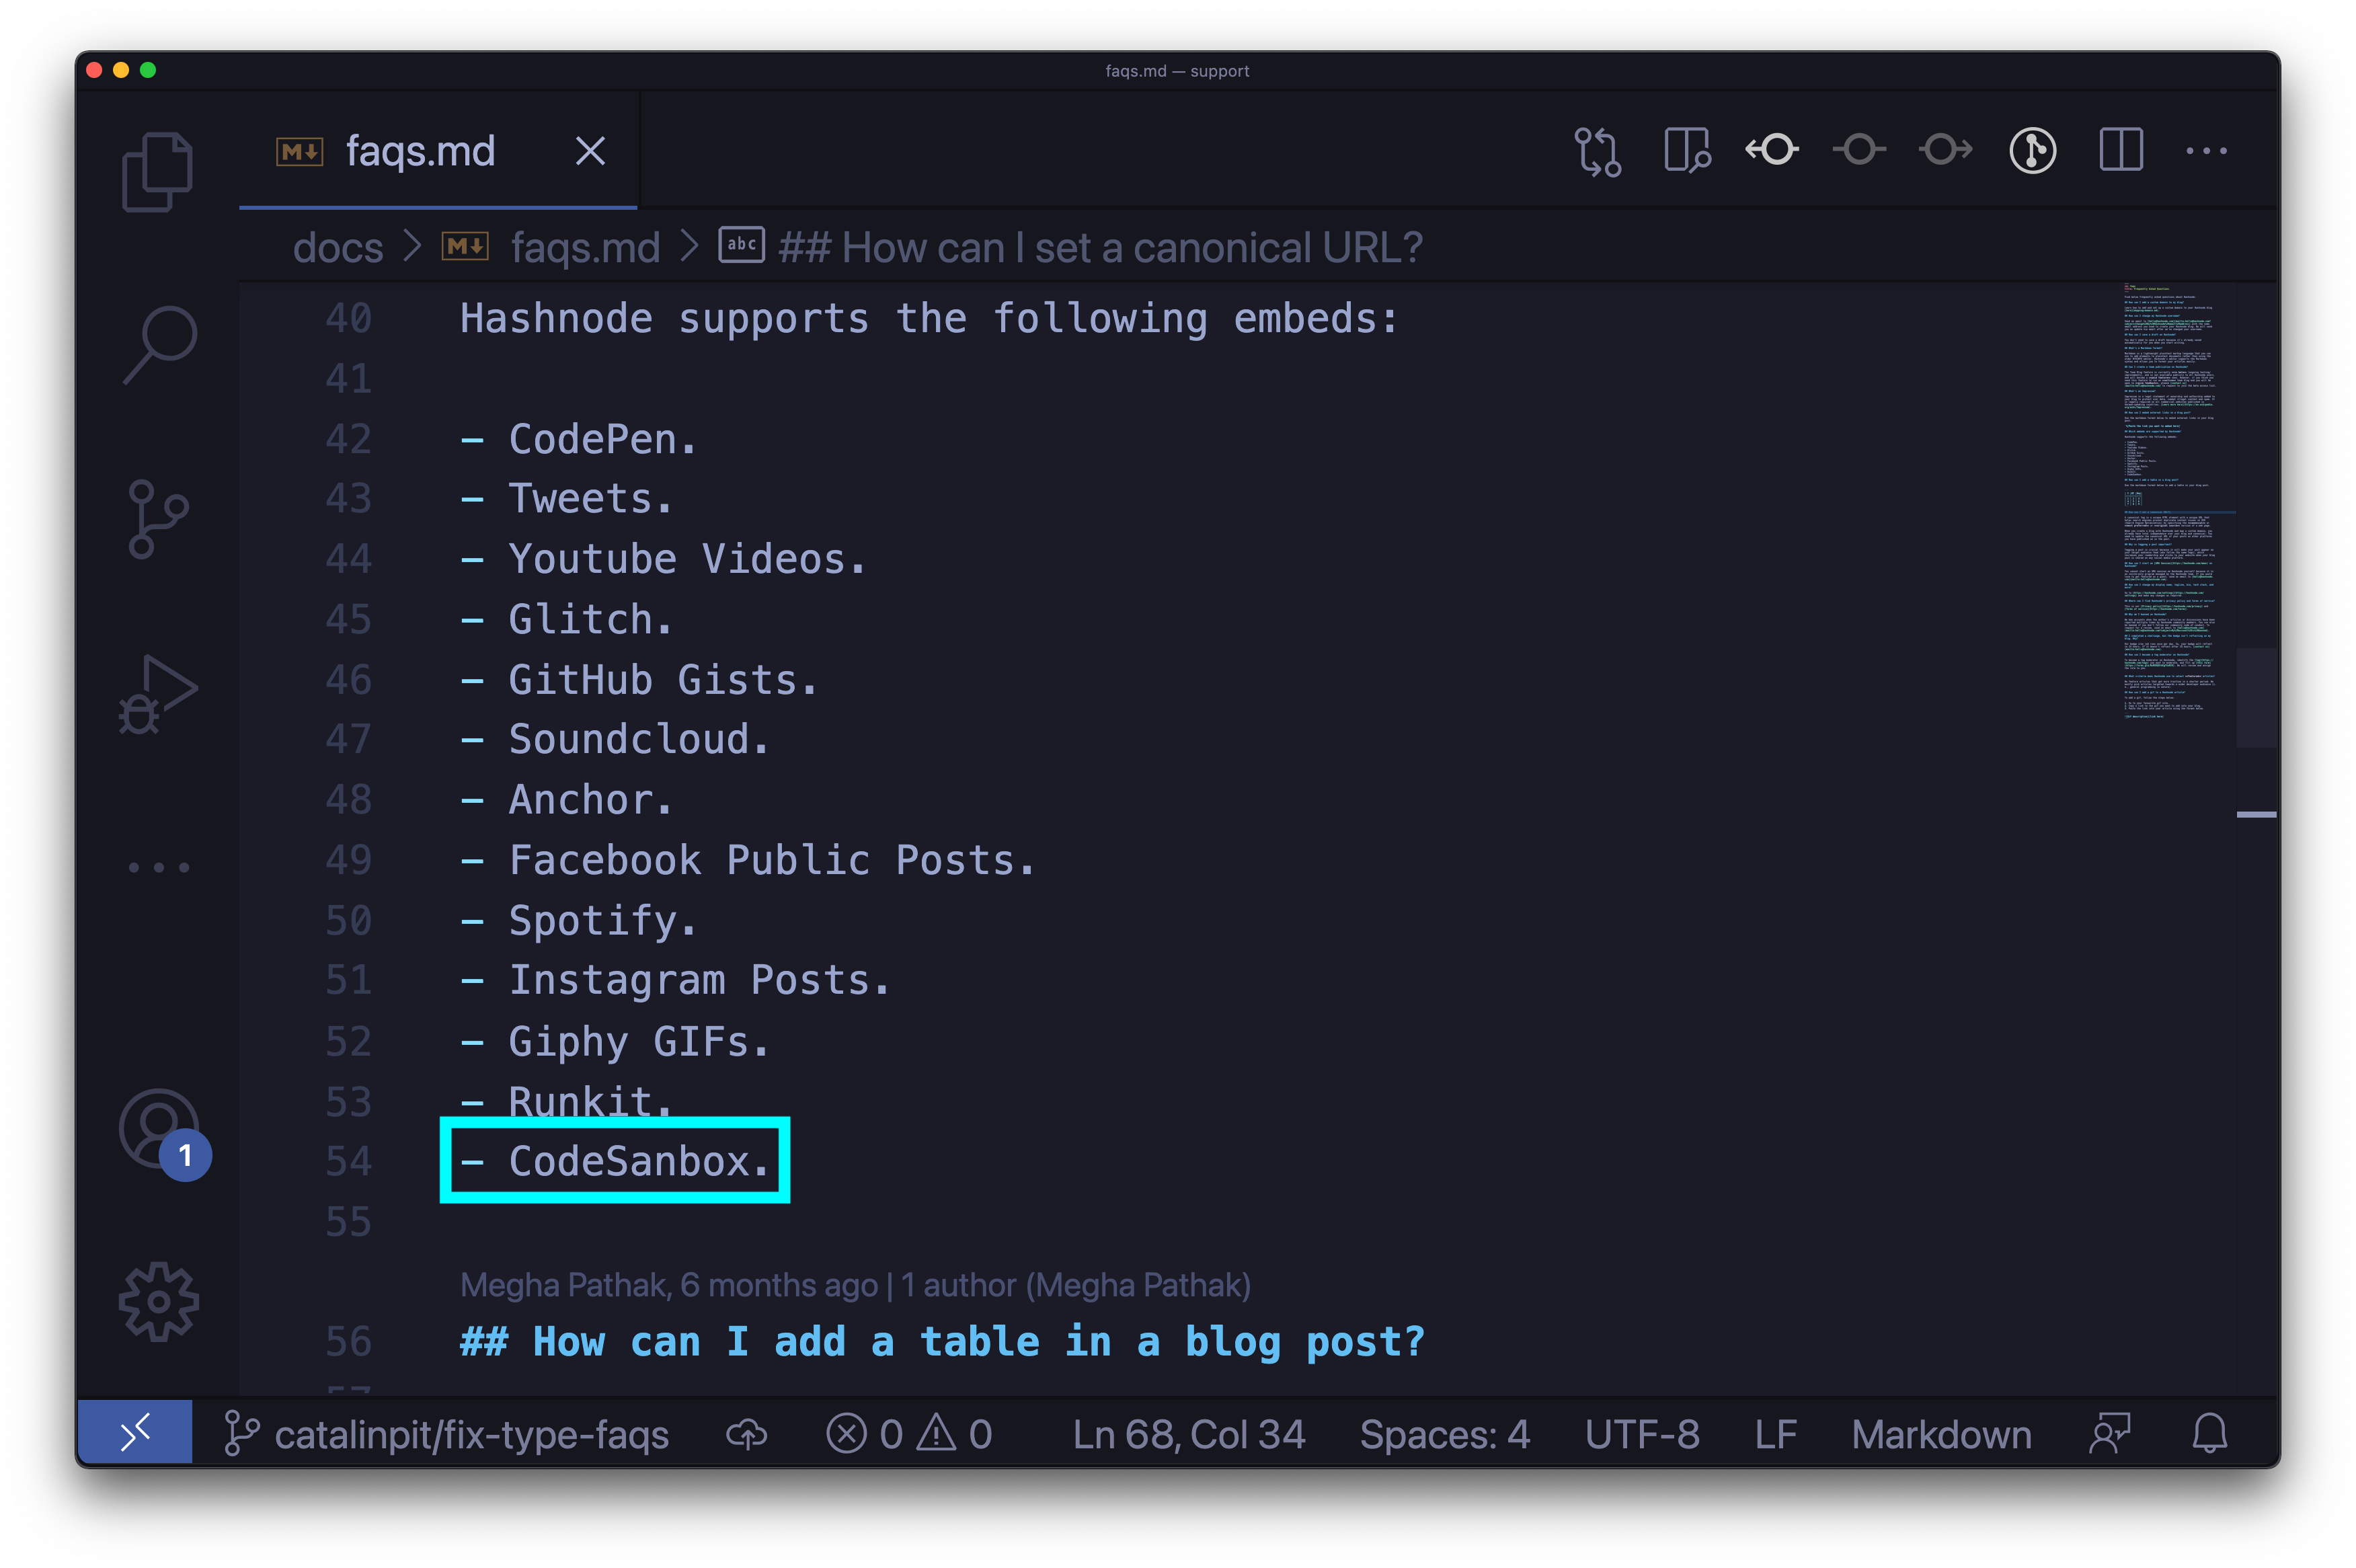
Figure 4
Thus, after adding the correct name, you save the file and commit it. That takes us to the next step!
Publish your changes
The first step of publishing your changes is to add them to the staging area. The staging area is a space where you can add the changes you want to include in your next commit.
The command git add allows us to do that - it adds your changes to the staging area. In simpler terms, it specifies what files to include in the next commit.
If you run git status in your terminal, it will show you what files are not staged for commit. See figure 5 for reference.
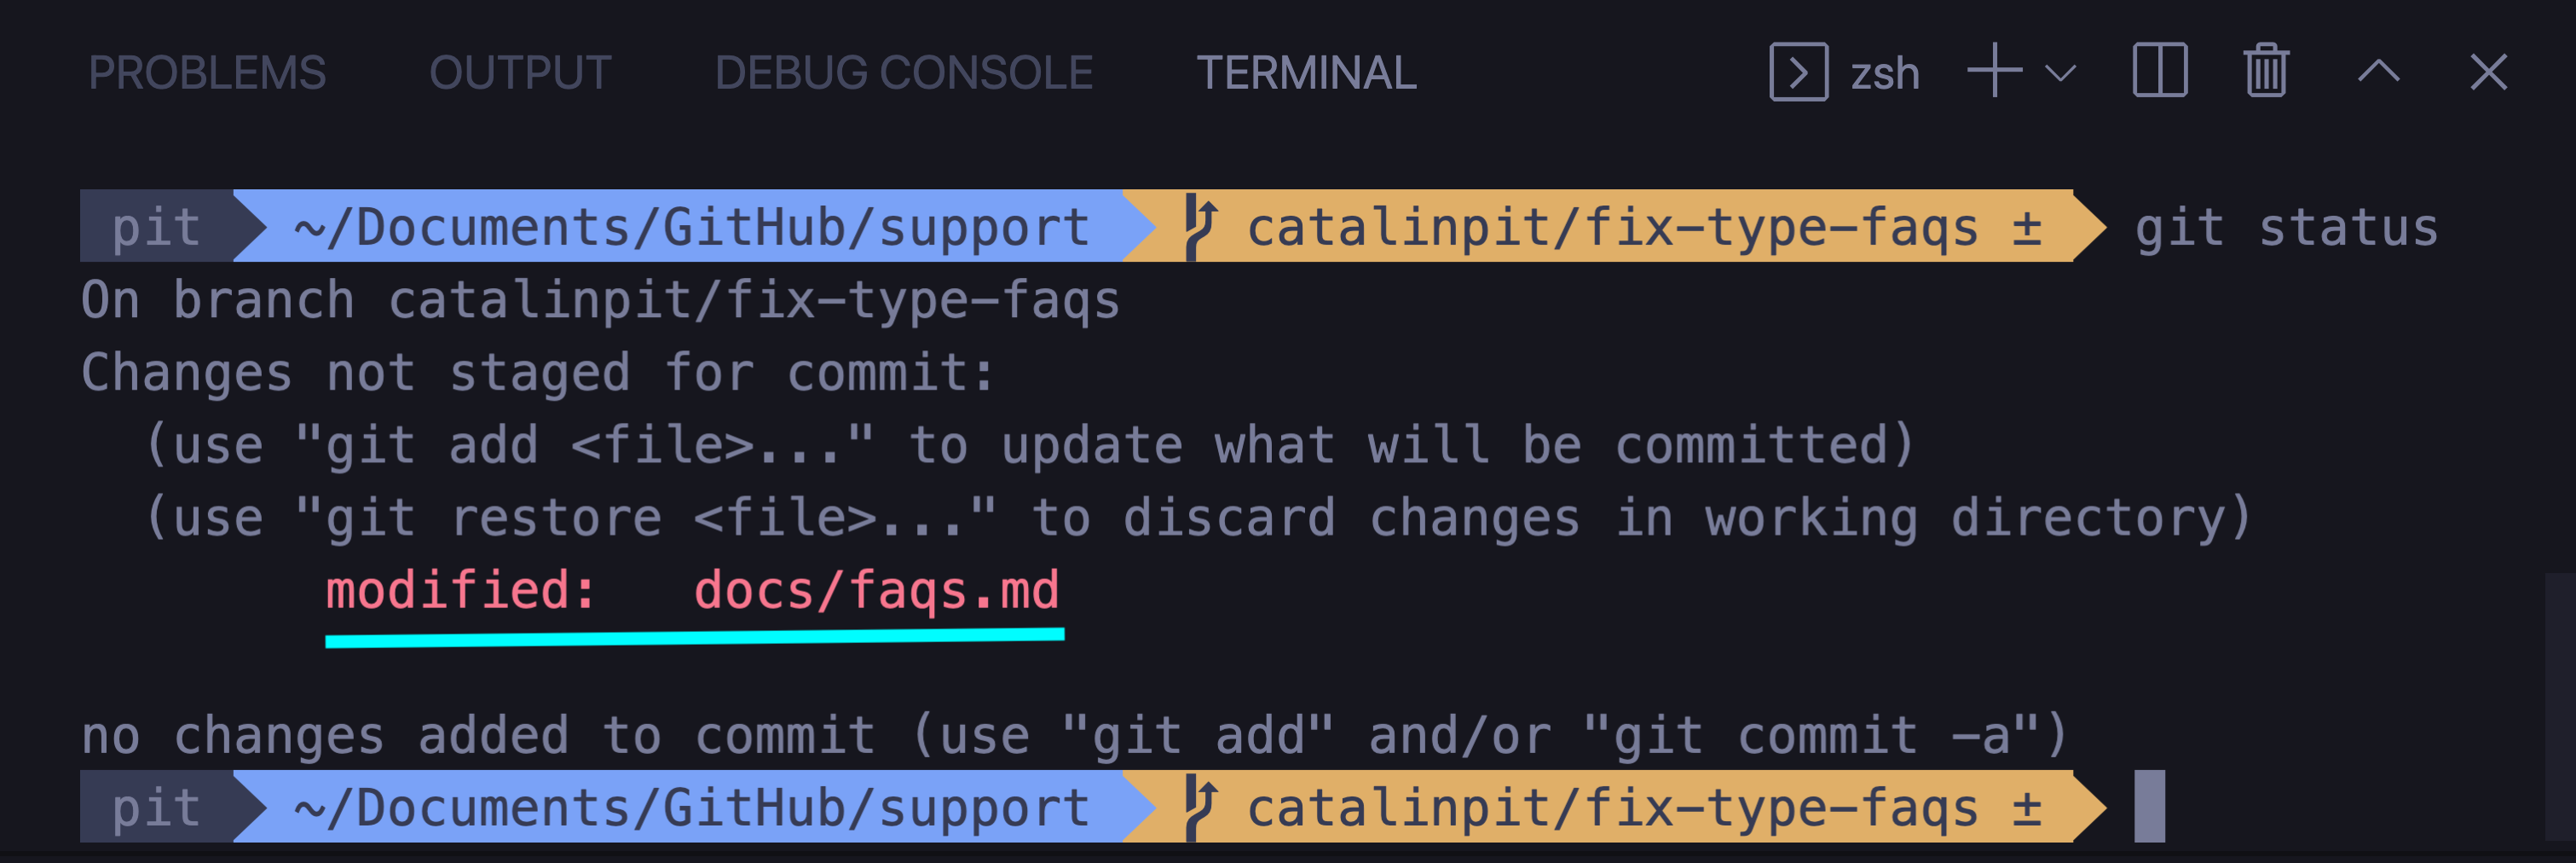
Figure 5
You can add your changes to the staging area in two ways. The first option is as follows:
git add .
If you run the above command, it adds all the changes to the staging area. For instance, if you modified five files, it adds all those files to the staging area.
However, sometimes you might not want to do that. For example, you may want to only add specific changes. You can do it as follows:
git add your_file_name
With the above command, you add a specific file to the staging area instead of including all changes. In this example, I would run the command git add faqs.md because I made the changes in the faqs.md file.
After you add your changes to the staging area, you can commit them!
Committing the changes
The next step is to commit the changes. But what is a "git commit"?
Simply saving the file is not enough for git. Thus, the command "git commit" allows us to save the project changes. According to the Atlassian website - "the git commit command captures a snapshot of the project's currently staged changes."
The command below is how you commit your changes:
git commit -m "Fixed CodeSandbox typo"
When you commit your changes, you also need to provide a message describing your changes. The -m flag in the command above stands for "message", and it allows you to add a summary of your changes.
Once you run the "commit" command, you should get a summary of your changes, as shown in figure 6 below.

Figure 6
Now you are ready to push the changes and create the pull request!
Push your changes
The committed changes are only available in your local repository at the moment. That means they are only available to you.
If you want to send them to the remote repository, you need to "push" them. You can push changes to the remote repository with the following command:
git push --set-upstream origin catalinpit/fix-type-faqs
Note: Replace catalinpit/fix-type-faqs with your branch name!
After running the command, you should get a message in the terminal from where you can create a pull request. See figure 7 below for reference.
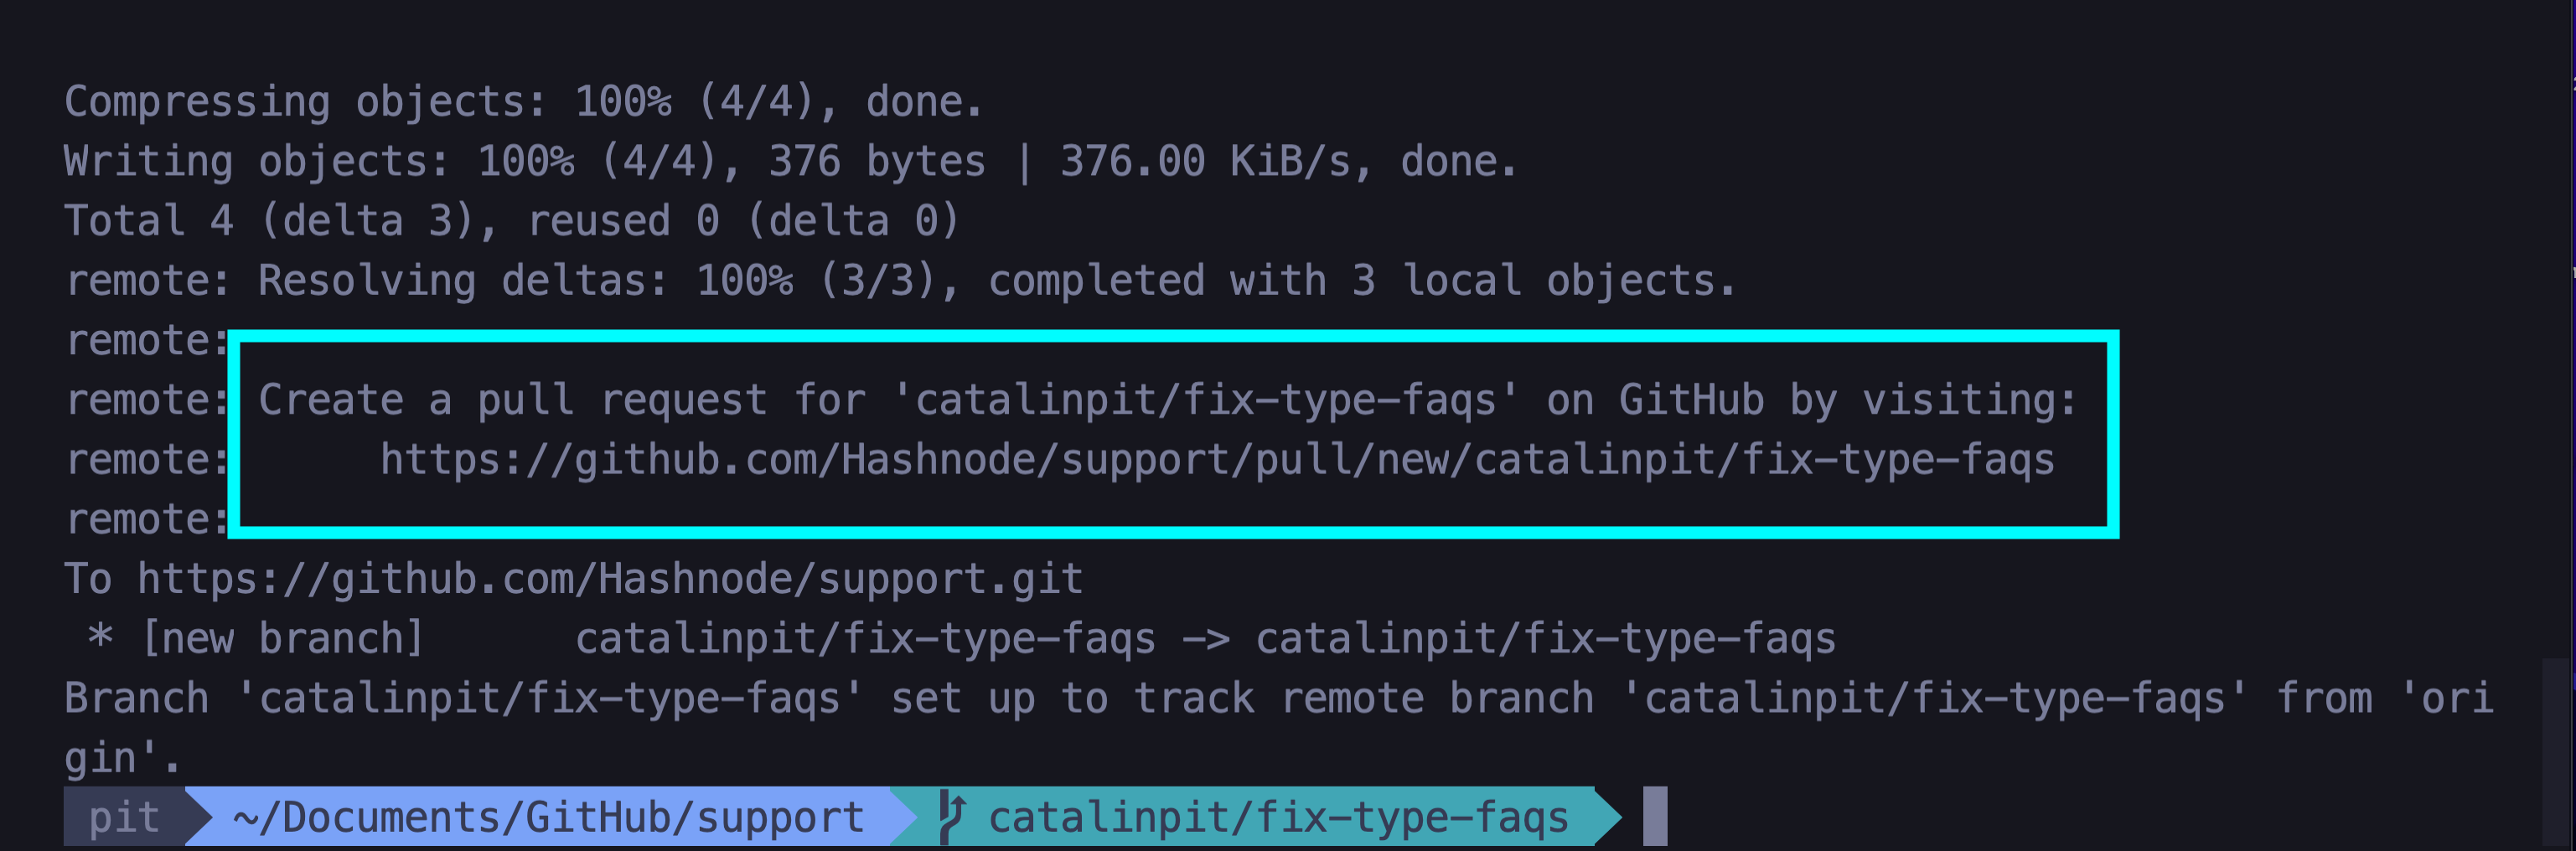
Figure 7
Click on the link, and it will take you to GitHub to open the pull request.
Open the pull request
Let's start by talking about why you need a pull request in the first place. So, why are pull requests required?
When you work in a collaborative environment, you should not make direct changes to the codebase. By making direct changes without opening pull requests, there are high chances of introducing inefficient, poor code, bugs and other issues.
However, by creating pull requests, you avoid those issues. When you open a pull request, fellow team members and developers can see your changes. They can review your code and spot issues or suggest improvements. Thus, it's a win for everybody - you improve your programming skills and avoid improper code entering the database.
Thus, by opening pull request, the team:
- Keeps the codebase to a high-quality standard
- Avoids poor, inefficient code, bugs and other issues
- Can get valuable feedback and thus improve their skills
Now that you know the importance of pull requests, let's create one!
Create the pull request
When you click on the link from the terminal (as shown in figure 7), you are taken to Github to open the pull request.
Before opening the pull request, read the contribution guidelines and make sure you respect them. Most projects have a template that you can use for pull requests.
In figure 8, you can see the pull request for the change I made to the Hashnode documentation.
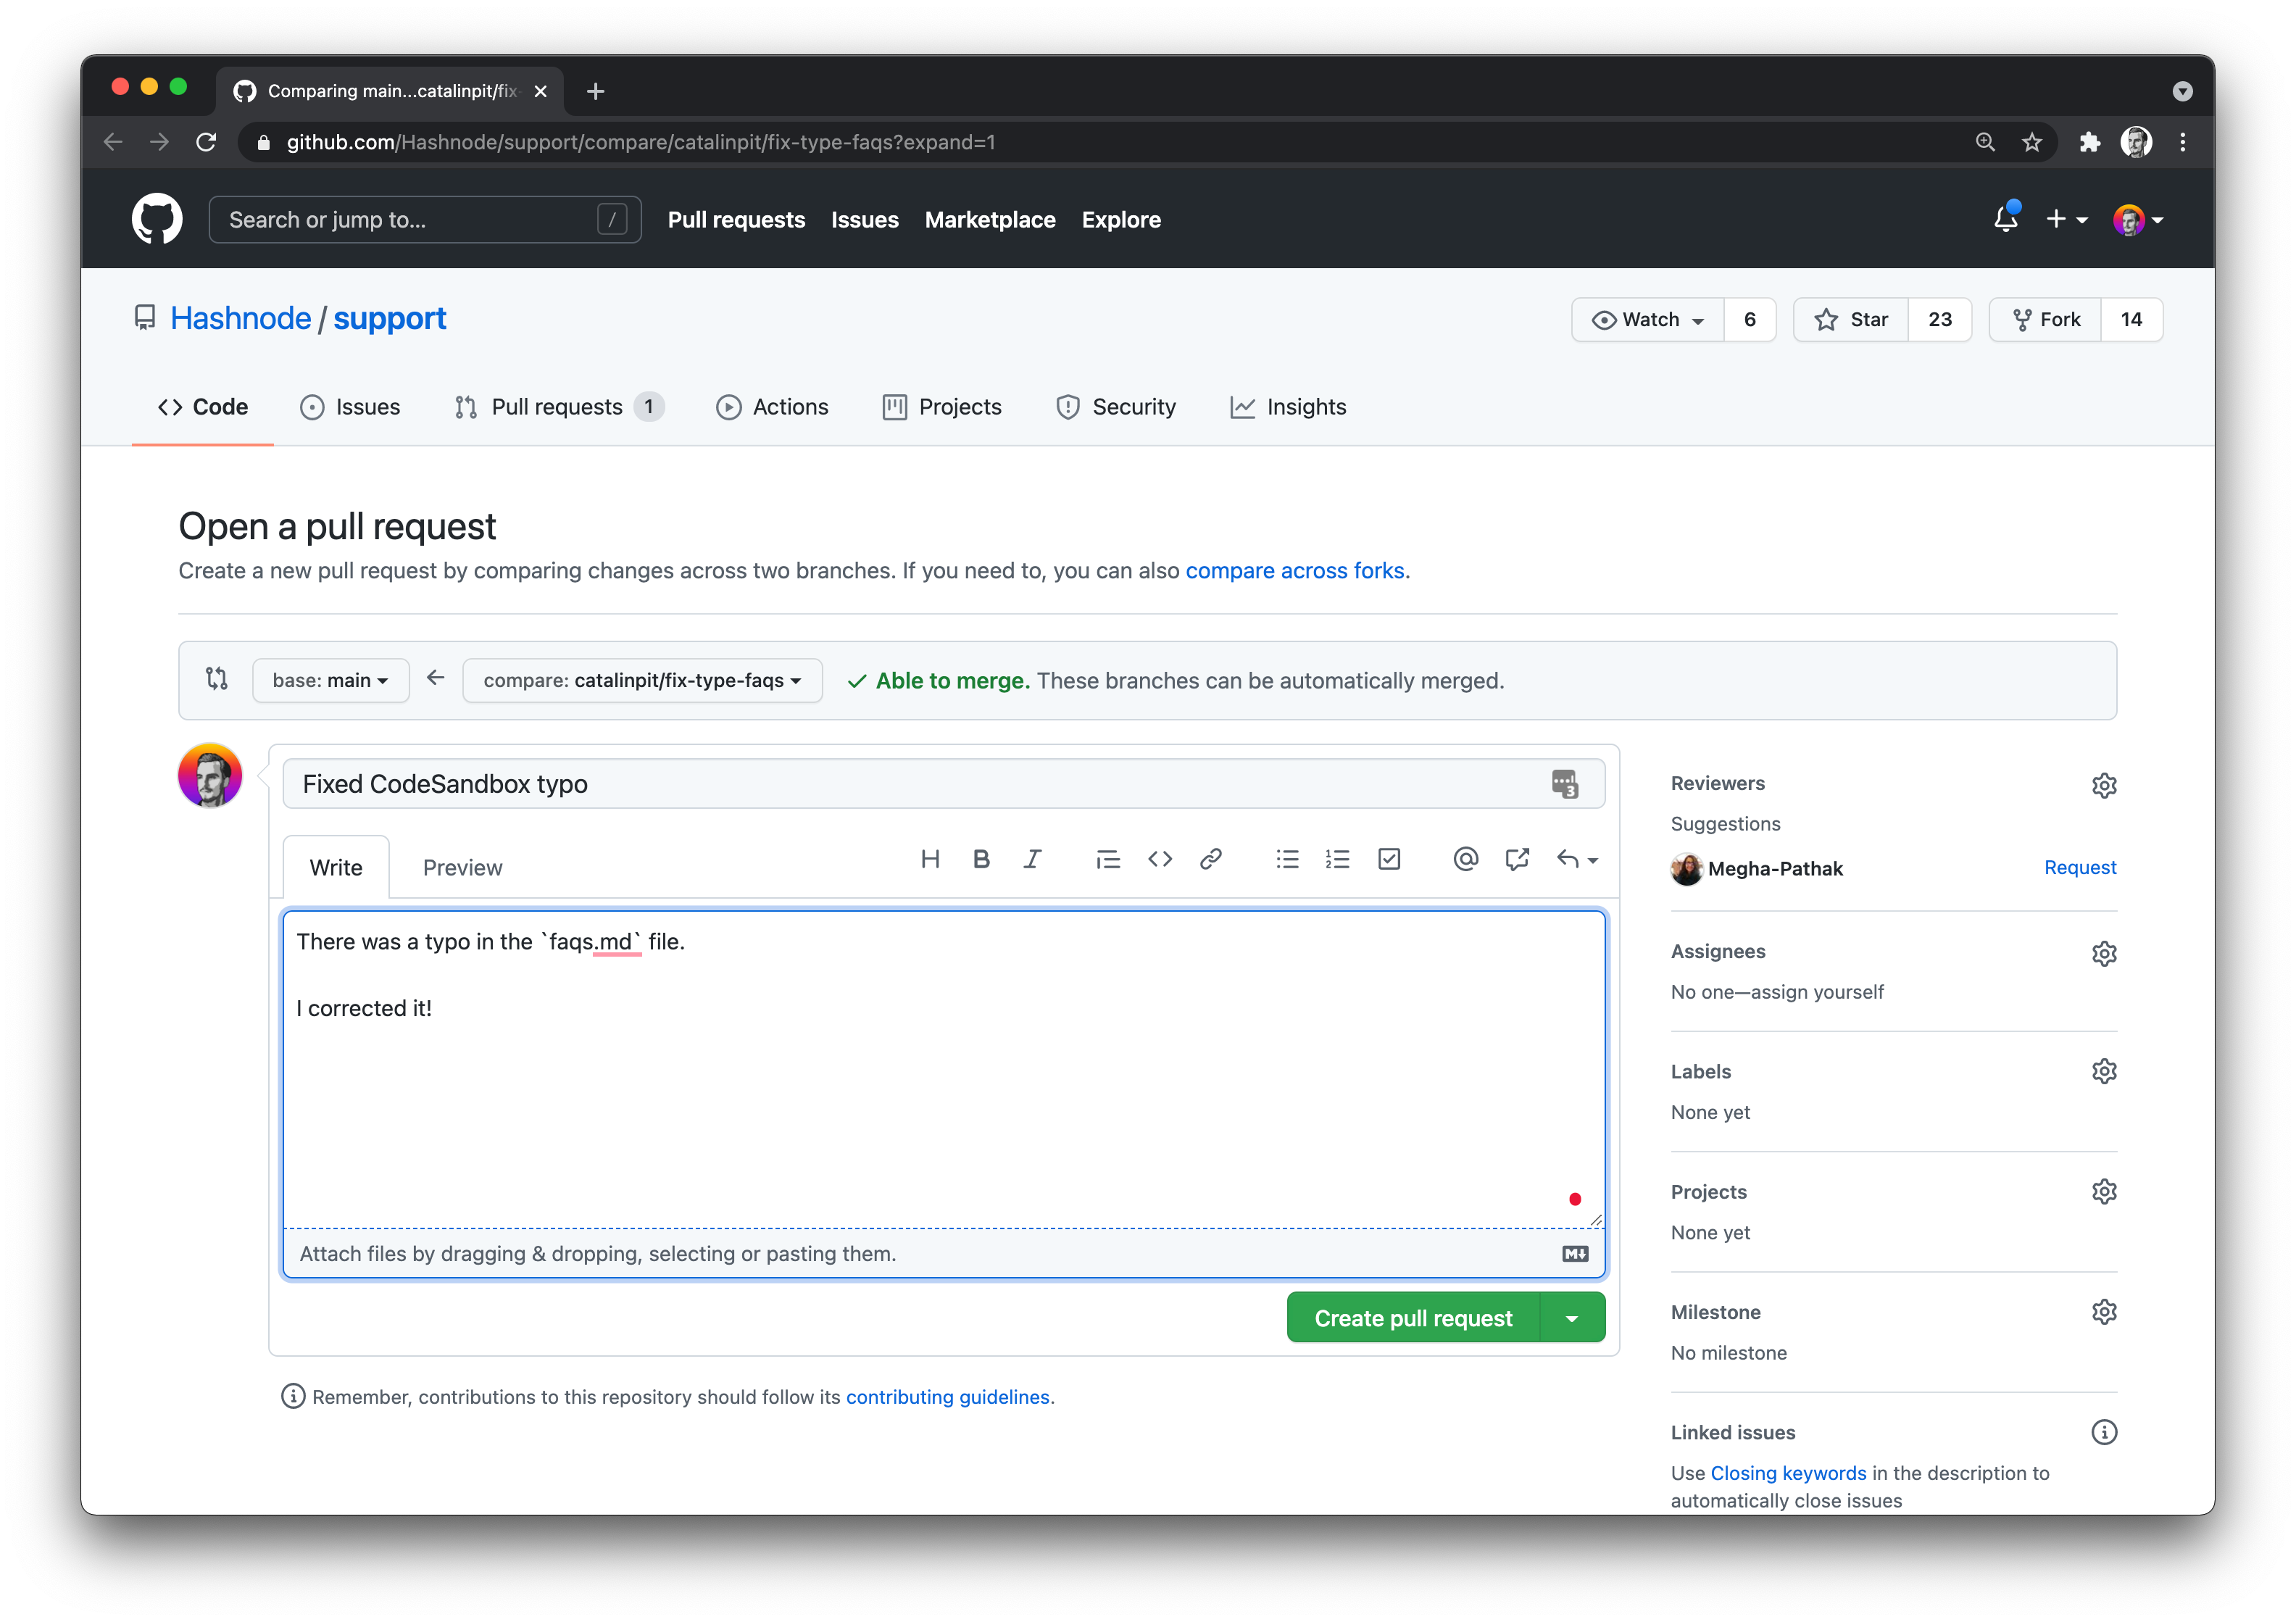
Figure 8
After adding a descriptive name and description, click on the green button saying "Create pull request" to create it.
Now, you are done, and you need to wait for project maintainers to review your code. If everything is fine, the reviewers will merge your changes to the codebase. If there are improvements needed, you will have to implement them before your code is merged.
One tip for code reviews - do not attach to your code and do not take the feedback personally. Other developers want to help you!
Conclusion
In this article, you learnt the basic Git workflow required to make open-source contributions. It's not the only way, and there are other ways of doing it. However, the workflow is enough to start contributing.
Also, remember that contributing to open source is not only about writing code. You can contribute to open-source in other ways as well.
Do you want to make Open-Source contributions to other projects? Learn how to find Open Source projects to contribute.