Hashnode blogs have a lot of features, which you might not be aware of. Thus, in this article, I want to highlight the best features of Hashnode.
By the way, you can read my article about why Hashnode is different from other blogging platforms.
1. Custom Page Rules

Figure 1
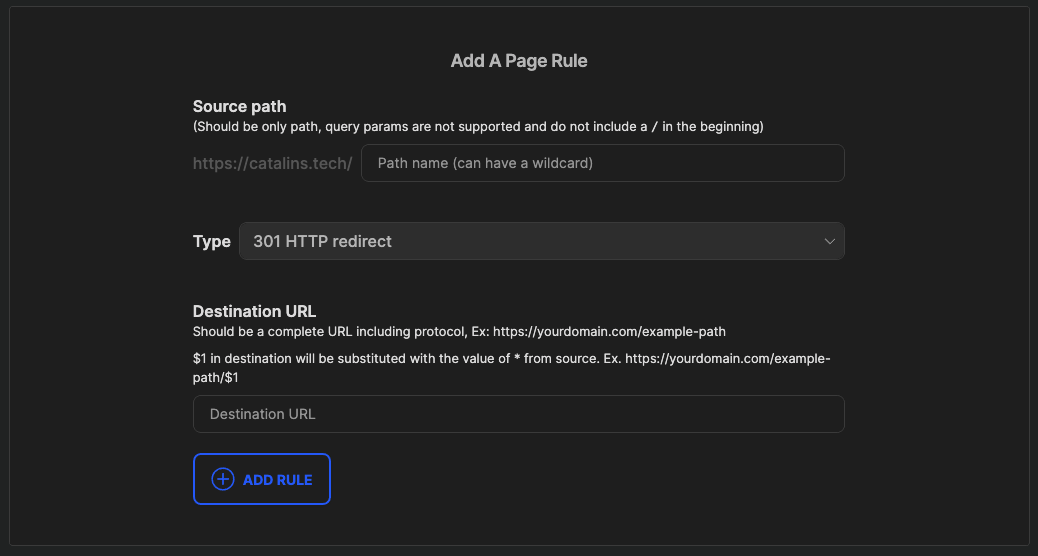
One of the additions I enjoy the most is the custom page rules. The custom page rules allow you to create custom URLs for generic URLs.
One example from my case is the following YouTube URL:
https://youtube.com/channel/UCl1IRCSmm74qhcFNPTHcbMg?sub_confirmation=1
This link simply represents my channel address. Then it prompts the user with a subscription pop-up when the user accesses the link. However, the link is quite long and ugly. But, you can solve that thanks to the Hashnode's custom page rules.
Figure 1 illustrates how simple it is to create a custom URL. In my case, the new youtube link is:
https://catalins.tech/youtube
With these page rules, you can create nice, professional-looking custom URLs. Compare the generic YouTube link with the custom one I made.
2. Custom Widgets
One of the things I enjoy the most about Hashnode is the custom widgets. The widgets give you the possibility of adding embeds into your articles.
For instance, I embedded my newsletter signup form in my articles for a long time. Recently, I changed the widget to a banner that advertises my YouTube channel. You can use the widget option in a lot of ways. You can even make money by promoting other products/services.
It's a great feature that can help you in many ways, whether that is:
- collecting signups
- advertising
- announcements
... or any other things.
3. GitHub Integration
Hashnode allows you to publish articles straight from Github. Now, you might ask - why should I do it?
One of the main reasons is that you can easily edit multiple articles at once! Imagine you have to edit 100 articles and add something. With the Hashnode editor, you would have to:
- open each article individually
- make the change
- save the article
- wait for it to save
- go back to all articles
- select an article
- repeat the process
That sounds super time-consuming! However, by publishing articles from GitHub, you would:
- open all articles in your favourite code editor
- copy > paste the changes
- save the changes
- update all articles in one go
From my point of view, it sounds better! You save a lot more time this way.
Additionally, if you decide to move away from Hashnode, you have a backup of your articles. There is no extra step you need to do to back up your articles! And before moving further, integrating GitHub is super simple! Go to Blog Dashboard > Integrations > Publish articles from GitHub, and you'll see!
4. Article importers

Figure 2
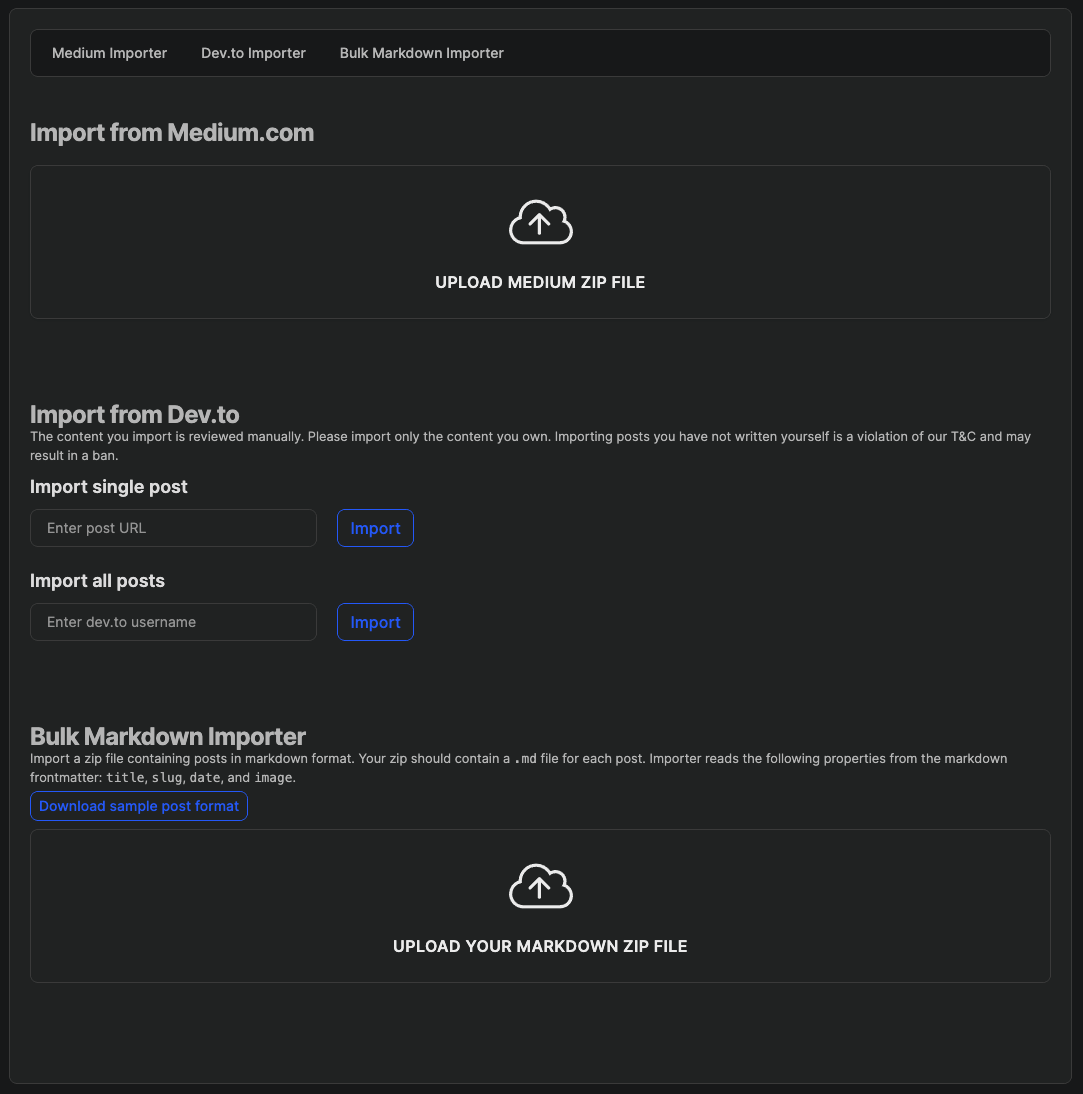
Republishing on or moving articles to Hashnode is very simple. Figure 2 illustrates the different importers on Hashnode.
Besides that, an RSS feed importer is in the works too! That means you will be able to import articles from any RSS feed.
5. Reading history
It would be a shame if you read a great article and then lose it! Not to worry, you are in great hands.
Hashnode keeps track of the articles you are reading, so you do not lose any article. You can access your reading history and see all the articles you've read on Hashnode!
6. Improved Navbar

Figure 3
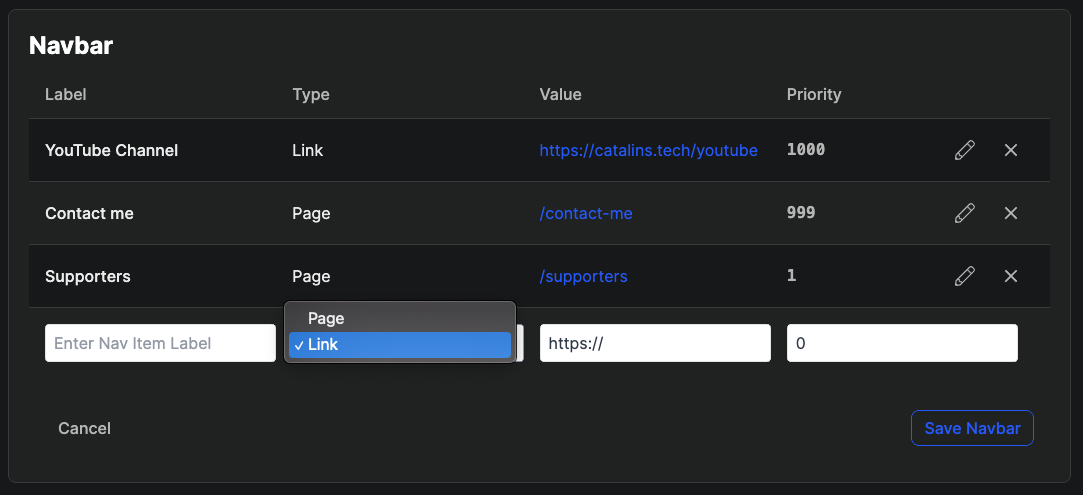
Figure 3 illustrates the improved navigation bar. You can either create a new page or a redirect link. For instance, in figure 3, you can see that I have two pages - Contact me and Supporters - and a redirect link to my YouTube channel.
Having redirect links in the navigation bar allows you to advertise your other work/social media platforms/and so on. In my case, I want to promote my YouTube channel, so I added it as the first link in the navbar (except the Home button). See figure 4.

Figure 4
The new navbar is super helpful, so make the most of it!
7. Audio articles
People might not feel like reading, or they might work on other tasks. Thus, they might want to "listen" to an article and work on their tasks simultaneously.
How can you let people "listen" to your articles? You can do so by going to the Blog Dashboard > Advanced tab > Enable "listen to this article" feature on all your articles.

Figure 5
After you enable the option, your articles should include the widget shown in figure 5. The widget is automatically added at the top of all your articles. You just need to enable the option, and Hashnode does the rest!
From now on, people can listen to your articles!
8. Article series
Lastly, you can split long articles into a series. The series has a:
- custom URL
- specific page
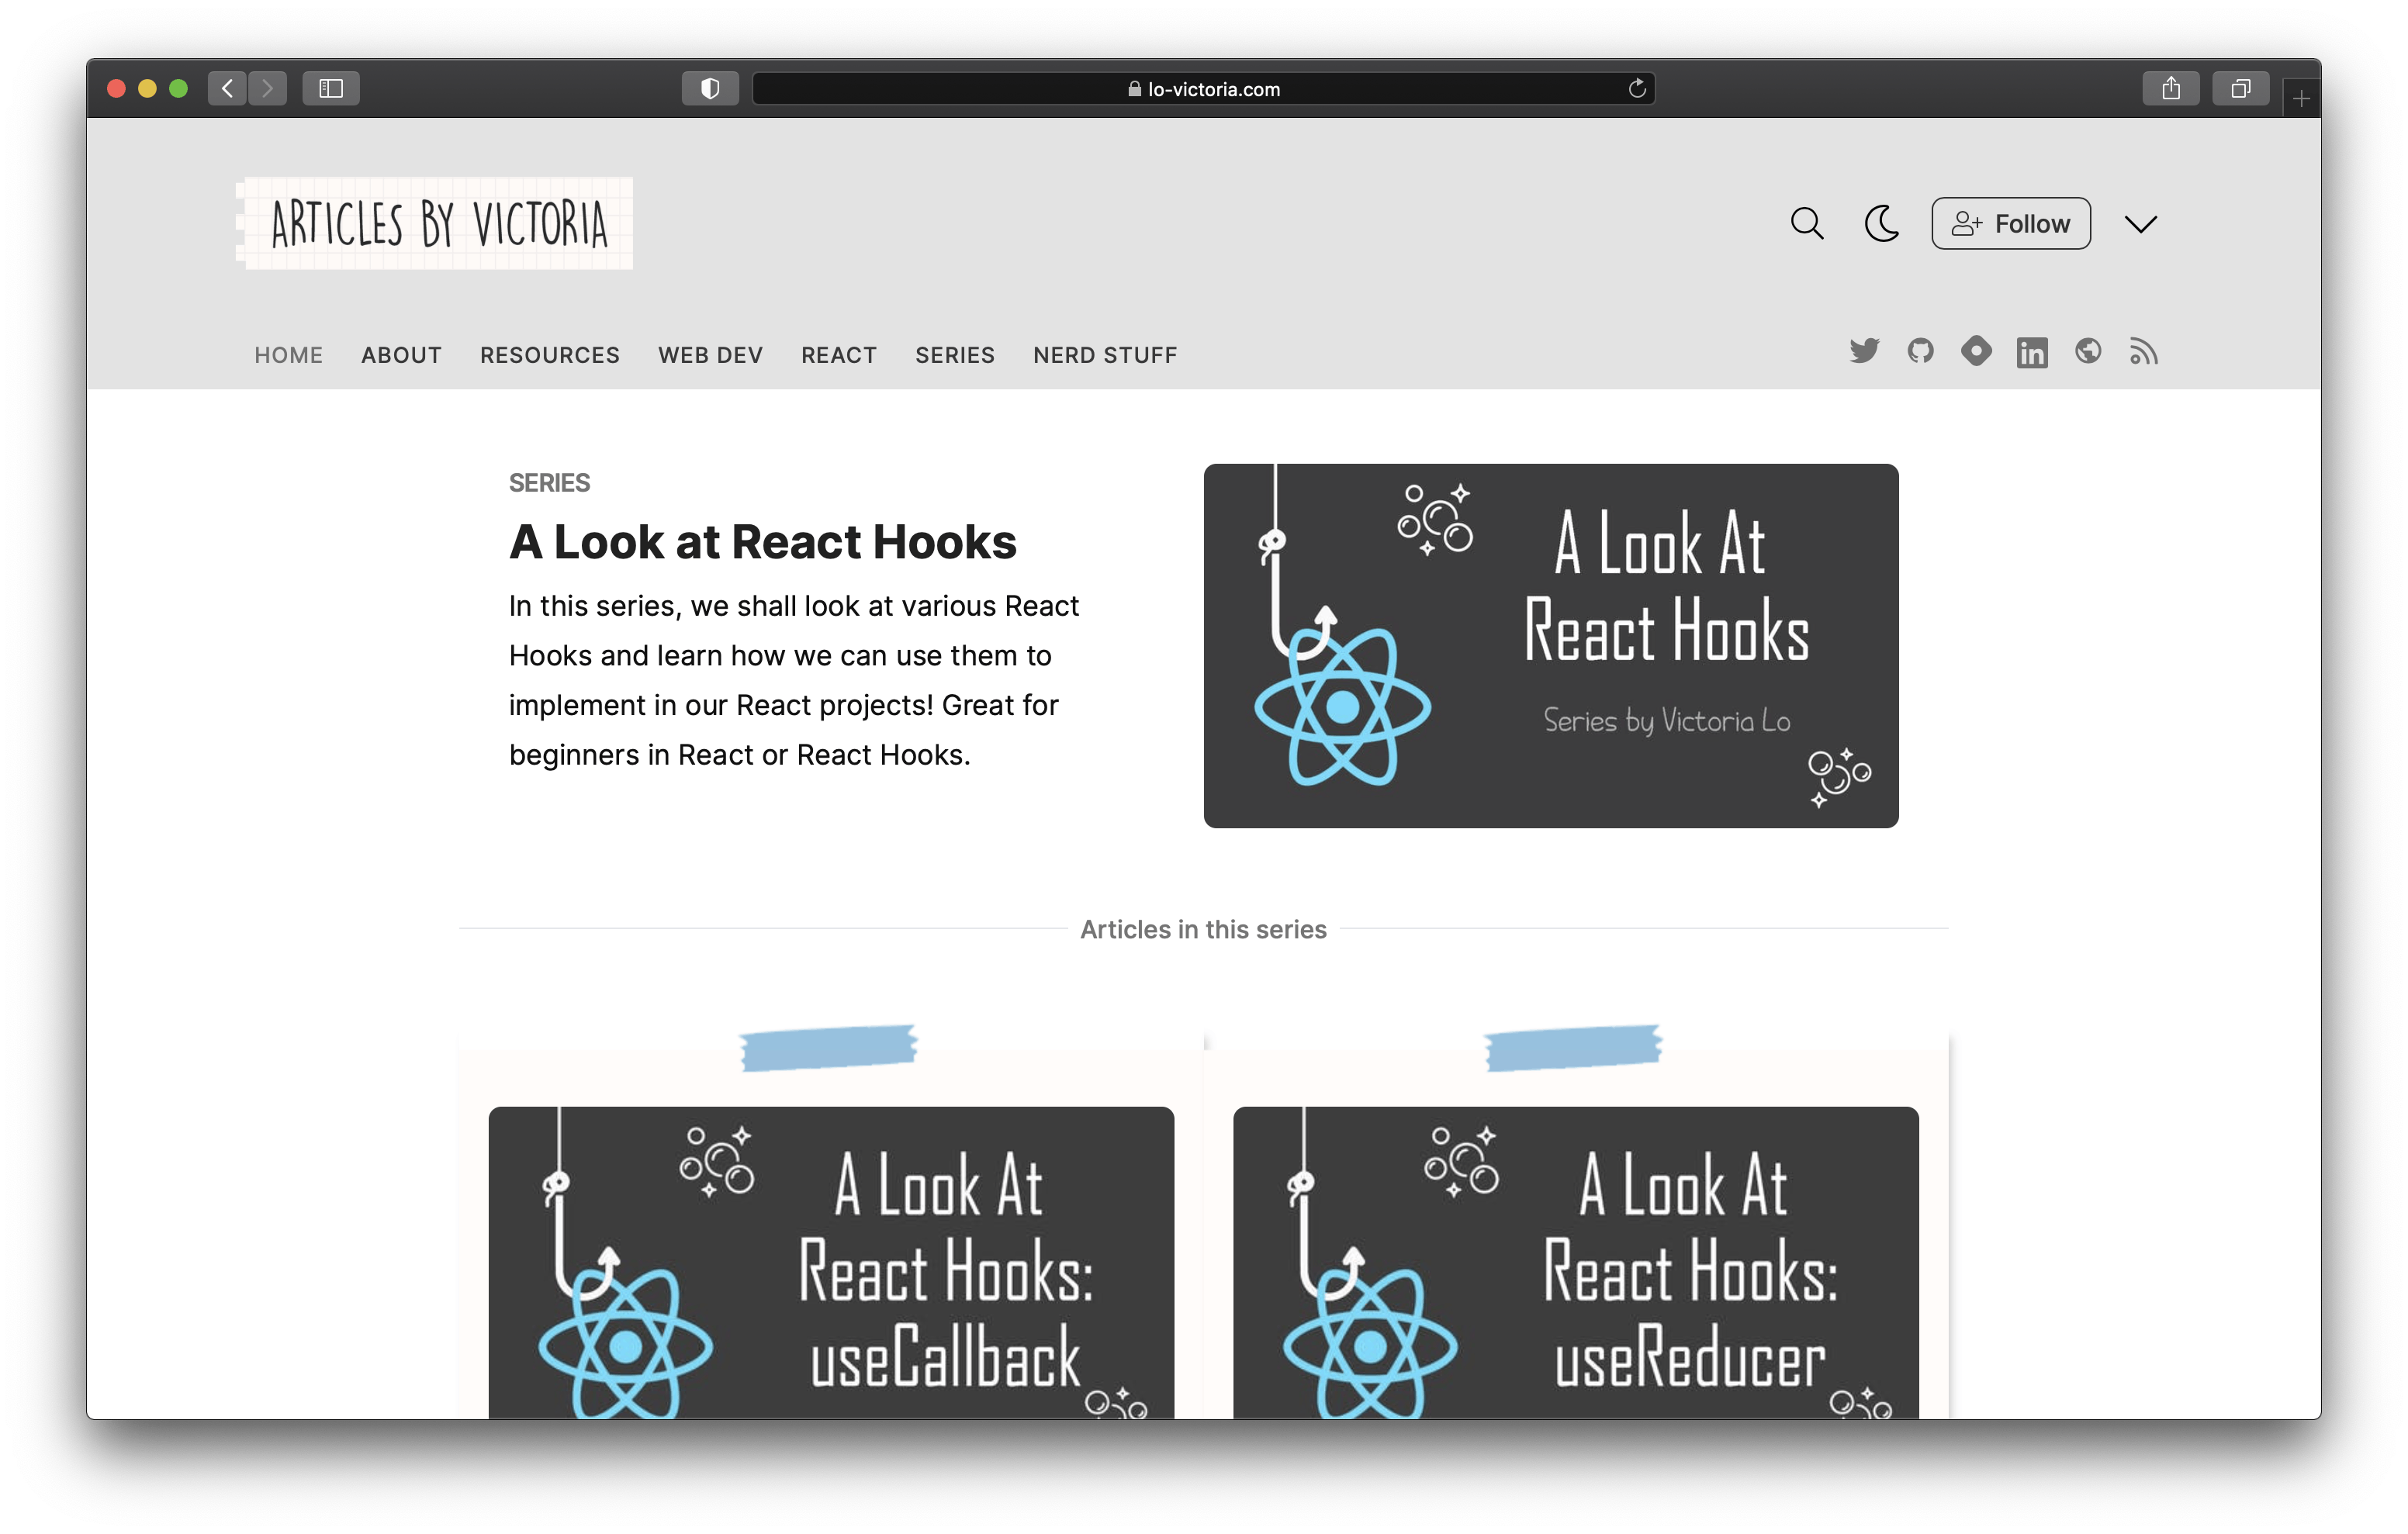
See figure 6 below for a visual example! The series has a custom link as well - lo-victoria.com/series/a-look-at-react-hooks.

Figure 6
Series are a great way to keep related information in one place. For instance, if you want to blog about Web Development and Cloud Computing, you could create a series for each! It keeps your blog organised, and people can find related information easier.
If you want to read more about them, I recommend reading this article.
9. Sharing your drafts
Did you know you can share your drafts? Thus, you can improve the quality of your articles by getting feedback from other people.
You can find the option at the top of your browser window. See figure 7 below:

Figure 7
I regularly share my drafts with other writers to get an extra pair of eyes to check my article. I encourage you to use this feature because it helps you improve your writing!
10. Custom CSS
There are bad and good news about custom CSS. The bad news is that it is only available to Hashnode ambassadors. The good news is that you can easily become one and unlock all the extra features!
How can you become an ambassador:
- Use your referral link to invite your friends.
- Invite three friends to join Hashnode using your referral link and unlock the ambassador role instantly.
- Win an exclusive Hashnode T-Shirt if you are the top referrer of the day. Check the leaderboard to see your status.
For example, you can see the feature in action on my blog. I used custom CSS to change most of the stuff. It's a handy feature to customise and personalise your blog.
11. Make money
With your Hashnode blog, you can make money in a non-intrusive way. Of course, you are not going to get rich, but being able to pay for your domain + hosting, does not sound that bad, right?
Once you create a Coil + wallet account, all you have to do is include your Web Monetisation Payment Pointer in the Integrations tab. After that, you are ready to make money.
If you are interested in making money with your Hashnode blog, read this article that explains how to set everything up!
Conclusion
These are the most valuable features, in my opinion. If you have other favourite features, I encourage you to drop them in the replies!
