I wanted to use Vim for a while, but I've always been put off by its complexity, unfamiliarity, and steep learning curve.
Since I started coding, I have used integrated development environments (IDEs) and text editors such as IntelliJ, VS Code, and Sublime Text. As a result, navigating and writing code using only the keyboard felt unnatural. If you read this article, you're probably in the same position.
However, that changed a while ago when I came across this article from Takuya Matsuyama, also known as Devaslife. In the article, Takuya showed his Neovim setup, which changed my perception of Vim. I was pleasantly surprised by the sleek aesthetics, the variety of available plugins, and the ability to move faster with the keyboard than with the mouse.
As a result, I picked bits and pieces from the article and then dived deeper into Neovim plugins and configurations. In this article, I'll share everything I learnt, plus my configuration.
Why LazyVim Over Other Options?
Frankly, I've never used bare Vim or other distros and configurations until now. I can't compare LazyVim to others, but I can explain why I chose it.
First, let's see what LazyVim is according to their GitHub repository:
LazyVim is a Neovim setup powered by 💤 lazy.nvim to make it easy to customize and extend your config. Rather than having to choose between starting from scratch or using a pre-made distro, LazyVim offers the best of both worlds - the flexibility to tweak your config as needed, along with the convenience of a pre-configured setup.
🔥 Transform your Neovim into a full-fledged IDE
💤 Easily customize and extend your config with lazy.nvim
🚀 Blazingly fast
🧹 Sane default settings for options, autocmds, and keymaps
📦 Comes with a wealth of plugins pre-configured and ready to use
From my understanding, LazyVim is a pre-configured Neovim setup that transforms Vim into an IDE. It comes with pre-installed plugins and themes, helping you to get started quicker with coding. It has features such as syntax highlighting, linter, auto-completion, prettier, and Git integration, among others.
Besides the plugins for coding, it also has pre-installed plugins for a better Vim experience. For instance, it comes with the which-key plugin, which displays the available keybindings for various Vim commands. As a result, it helps you learn the commonly used keybindings quicker and allows you to explore new ones.
It's one of the plugins I use the most, and it helps me tremendously. Otherwise, I'd have to go back and forth between LazyVim and the documentation to explore the keybindings.
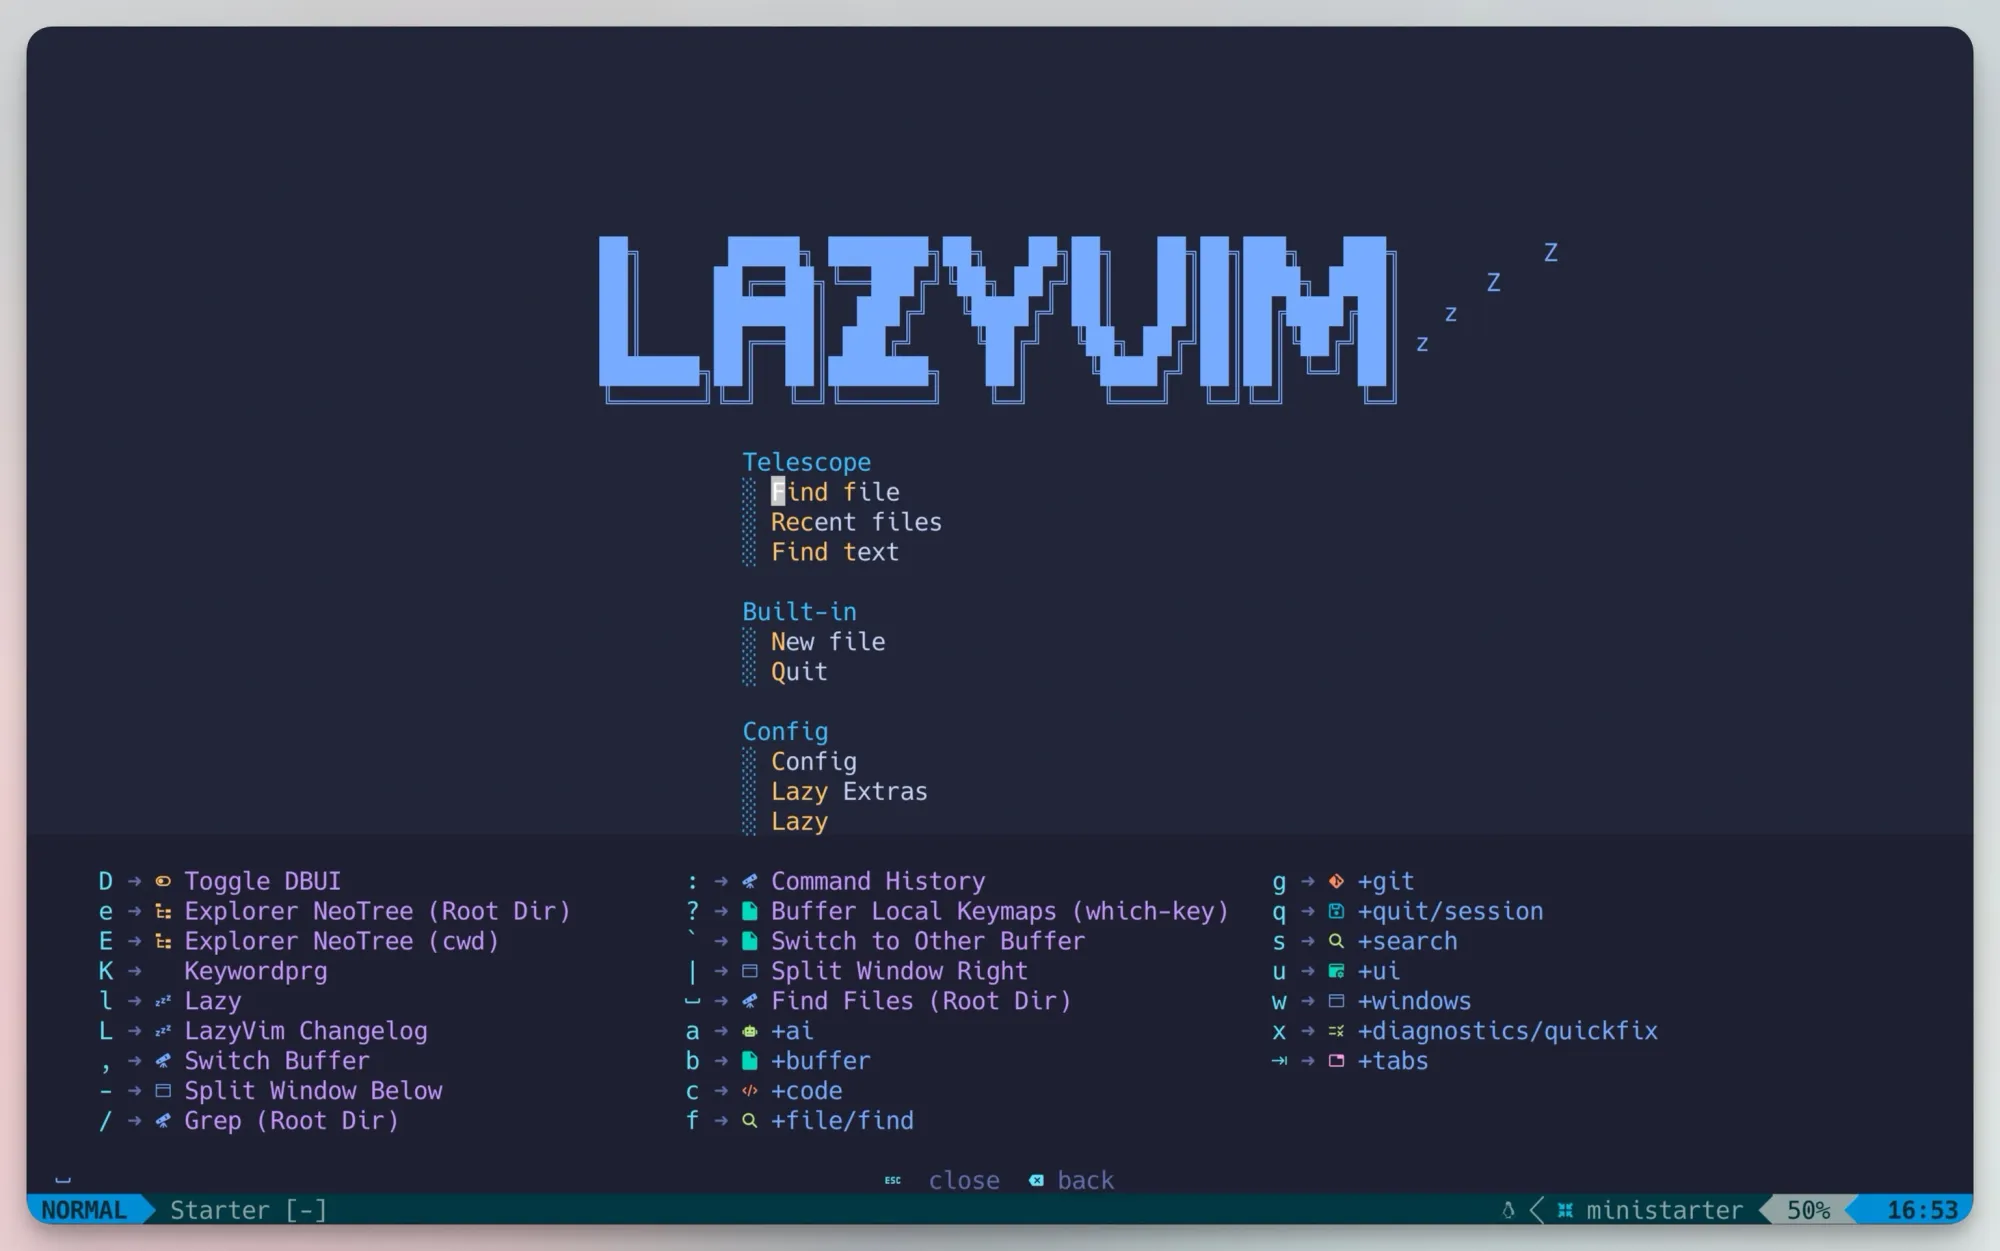
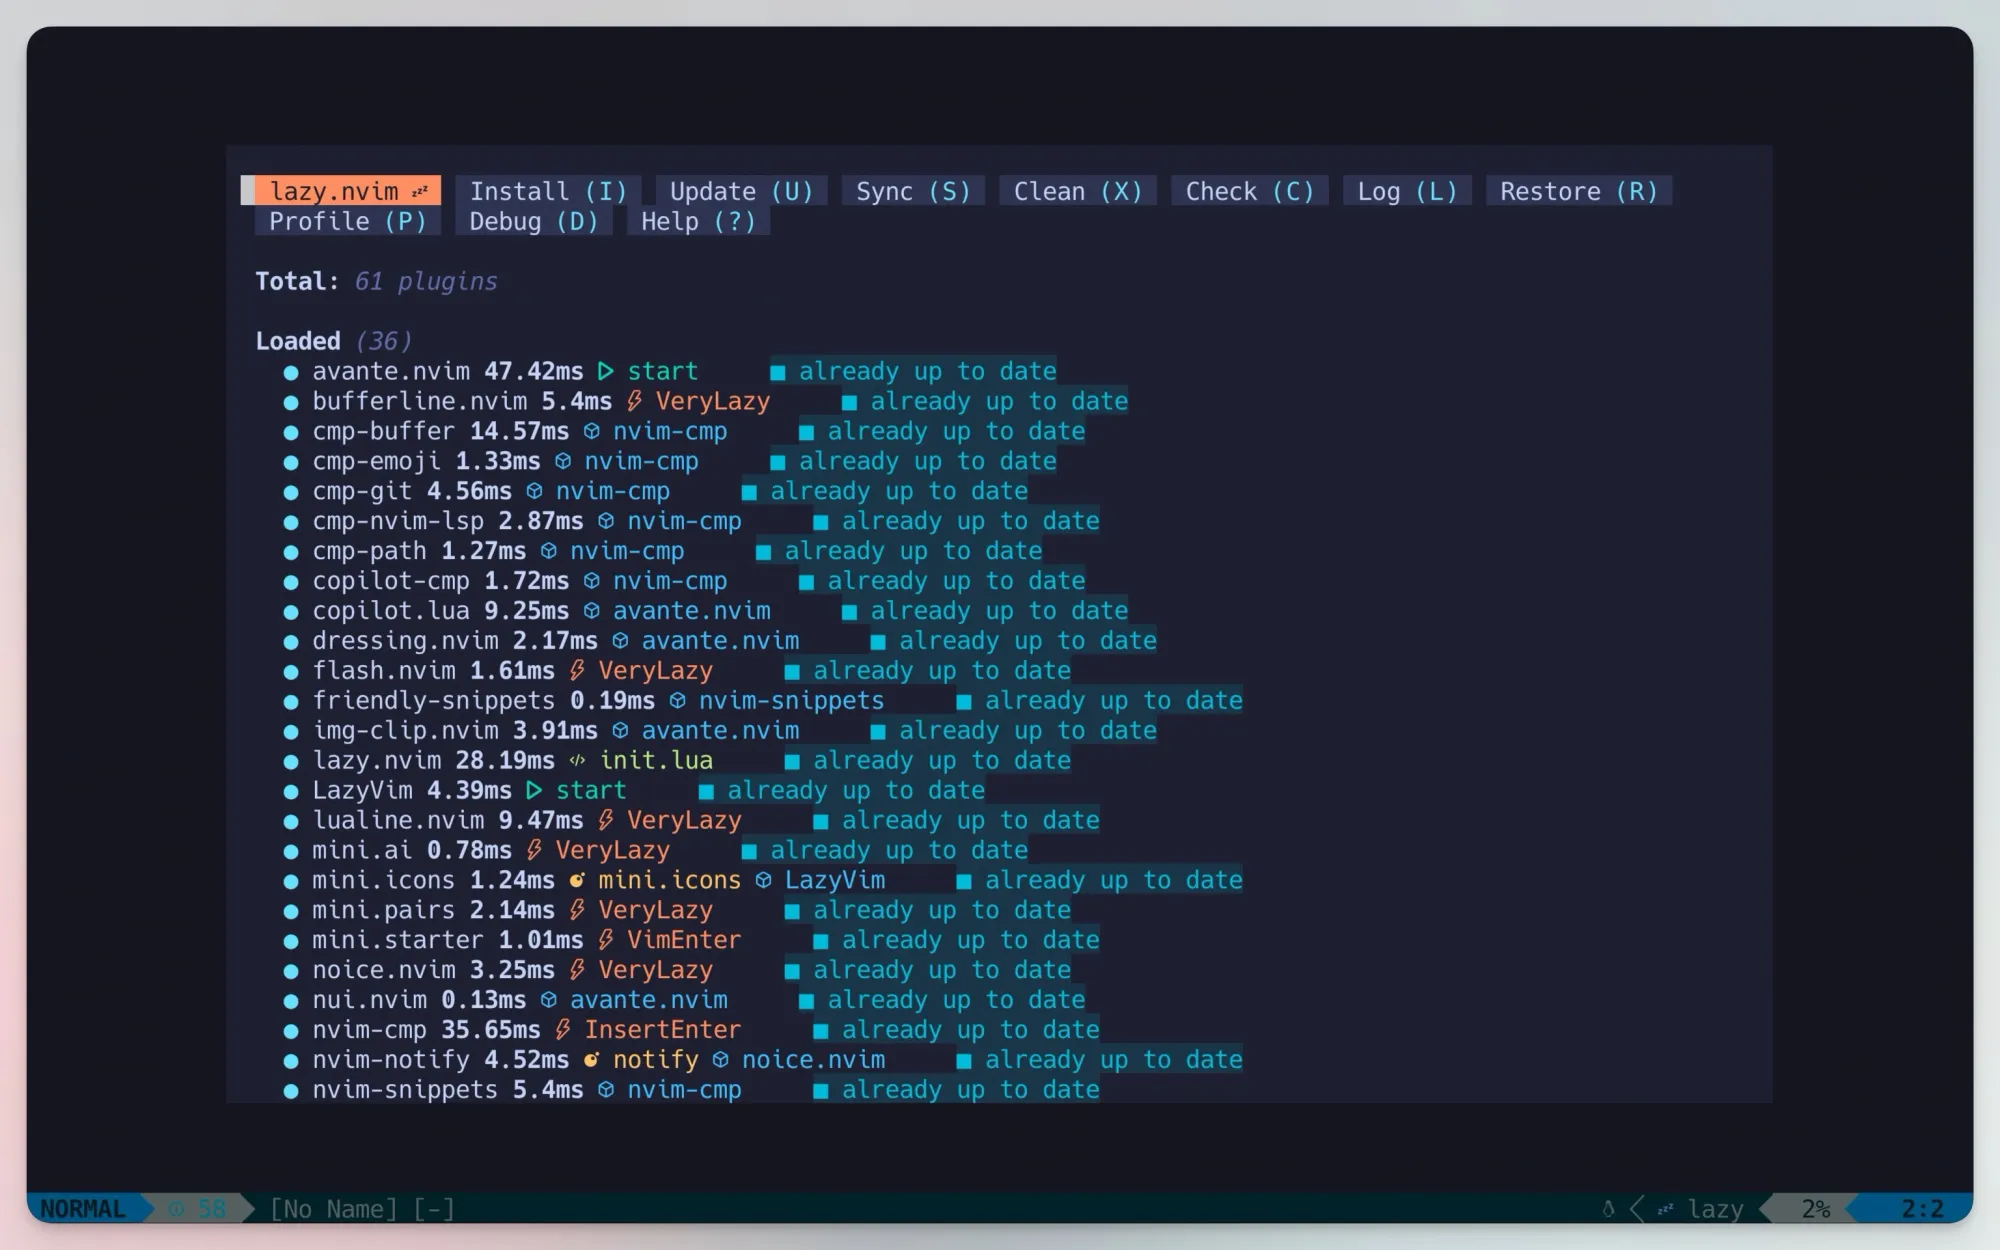
LazyVim is based on 💤 lazy.nvim, a plugin manager for Neovim, which makes it easier to extend your configuration and enable new plugins. For example, it allows you to install plugins such as Avante to bring AI capabilities to Neovim. Avante enables you to chat with the code and get a similar experience to Cursor, but more on that later.
The image below shows the interface for the plugin manager, with its commands and the plugins installed on my machine.
In my case, LazyVim marks the sweet spot between the usual IDEs and Vim.
Optional: Install Neovim
If you already have Neovim installed on your machine, I suggest you back up your files.
mv ~/.config/nvim ~/.config/nvim.bak
mv ~/.local/share/nvim ~/.local/share/nvim.bak
Otherwise, you need to install it before moving to the next step. You can install it on macOS with the brew command.
brew install neovimThe official GitHub repository has more installation options for Windows, Linux, and other Mac architectures.
Install LazyVim
To install LazyVim, you need to clone the starter template on your machine. Run the following command in your terminal:
git clone https://github.com/LazyVim/starter ~/.config/nvimOnce the repository is cloned, navigate to the directory and remove the .git folder.
cd ~/.config/nvim/
rm -rf .git
Removing the .git folder allows you to add the template to your GitHub account.
Fix Broken Icons in LazyVim
Most likely, you'll see broken icons if you open LazyVim. You can fix that by installing the Nerd Fonts:
brew install font-hack-nerd-fontFor more installation options, check out the Nerd Fonts repository.
Once the fonts are installed, you need to configure your terminal to use one of the Nerd Fonts. If you use iTerm2, like me, you can change the font by navigating to the "Text" tab in the "Profiles" section.
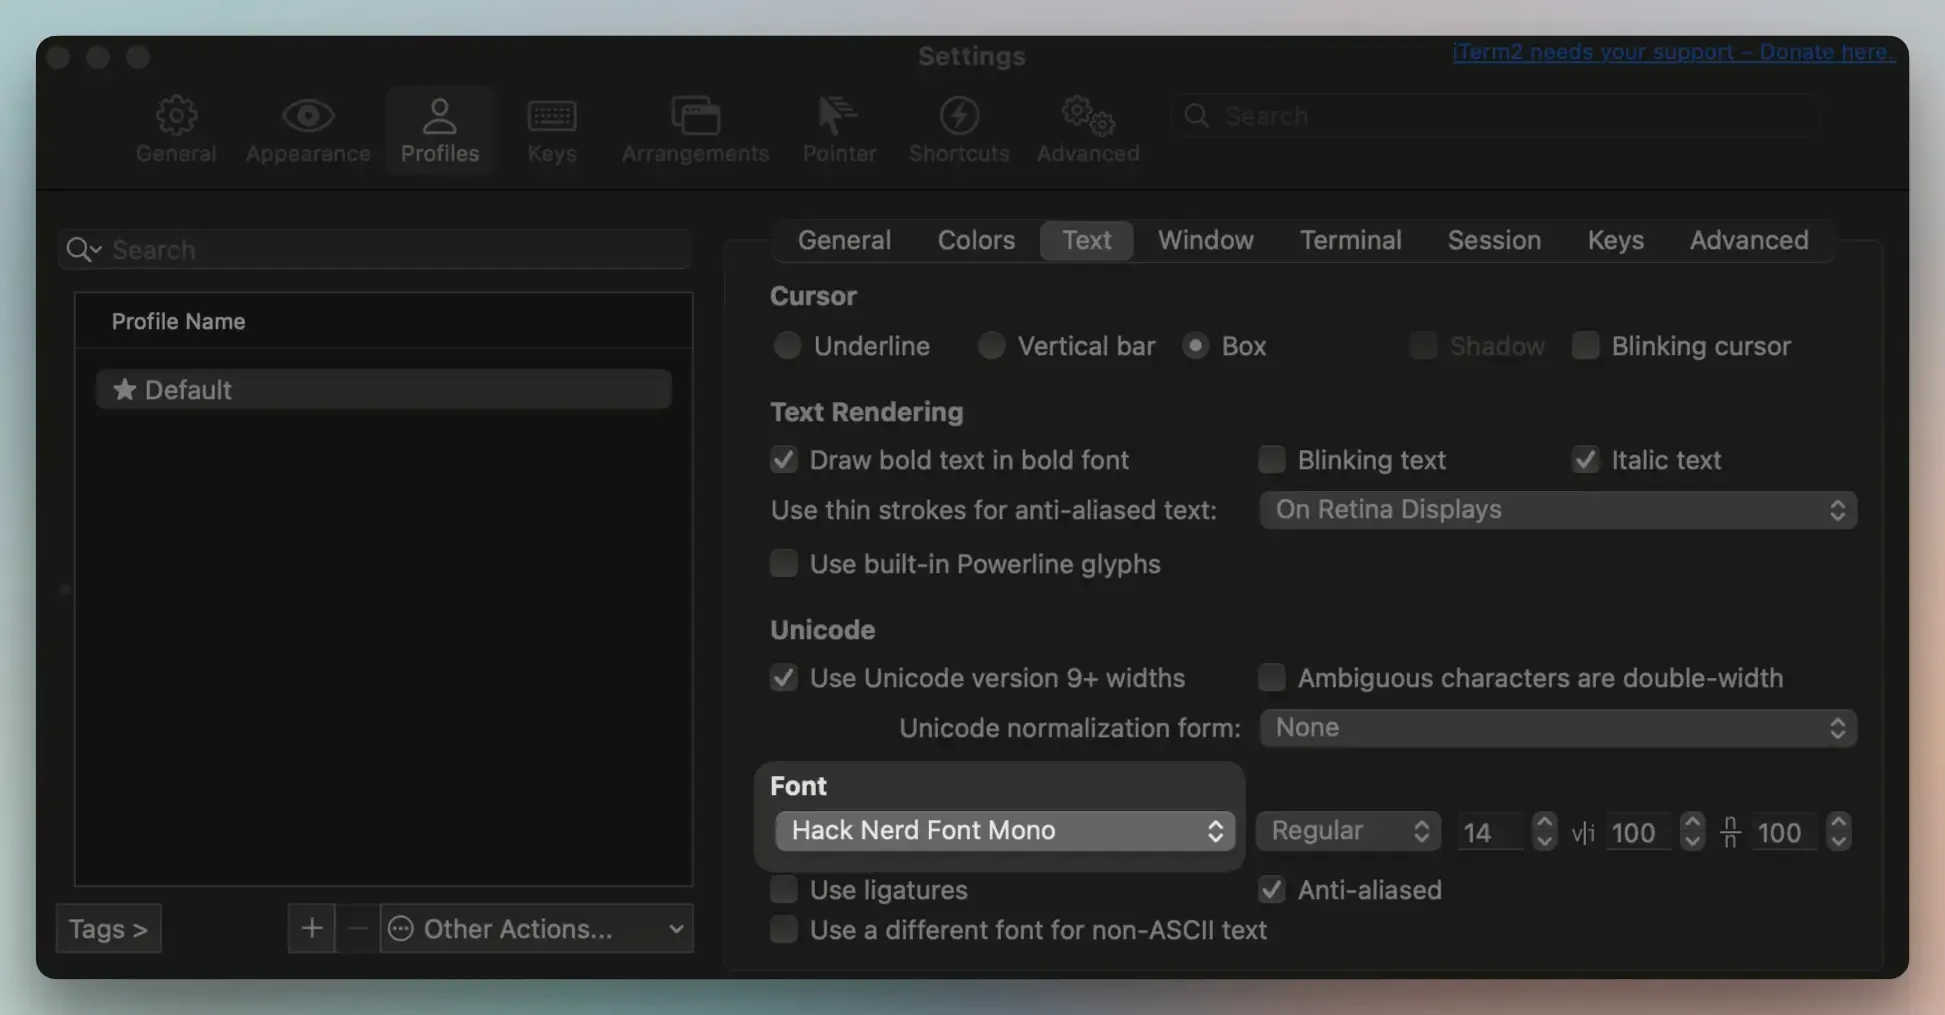
I chose "Hack Nerd Font Mono", but you can pick any font from the list of patched fonts. By the way, the default Mac terminal is not the best for dev work. You can improve it with iTerm2 and Oh My Zsh.
Considering that you followed all the steps up to this point, this is how your LazyVim should look.
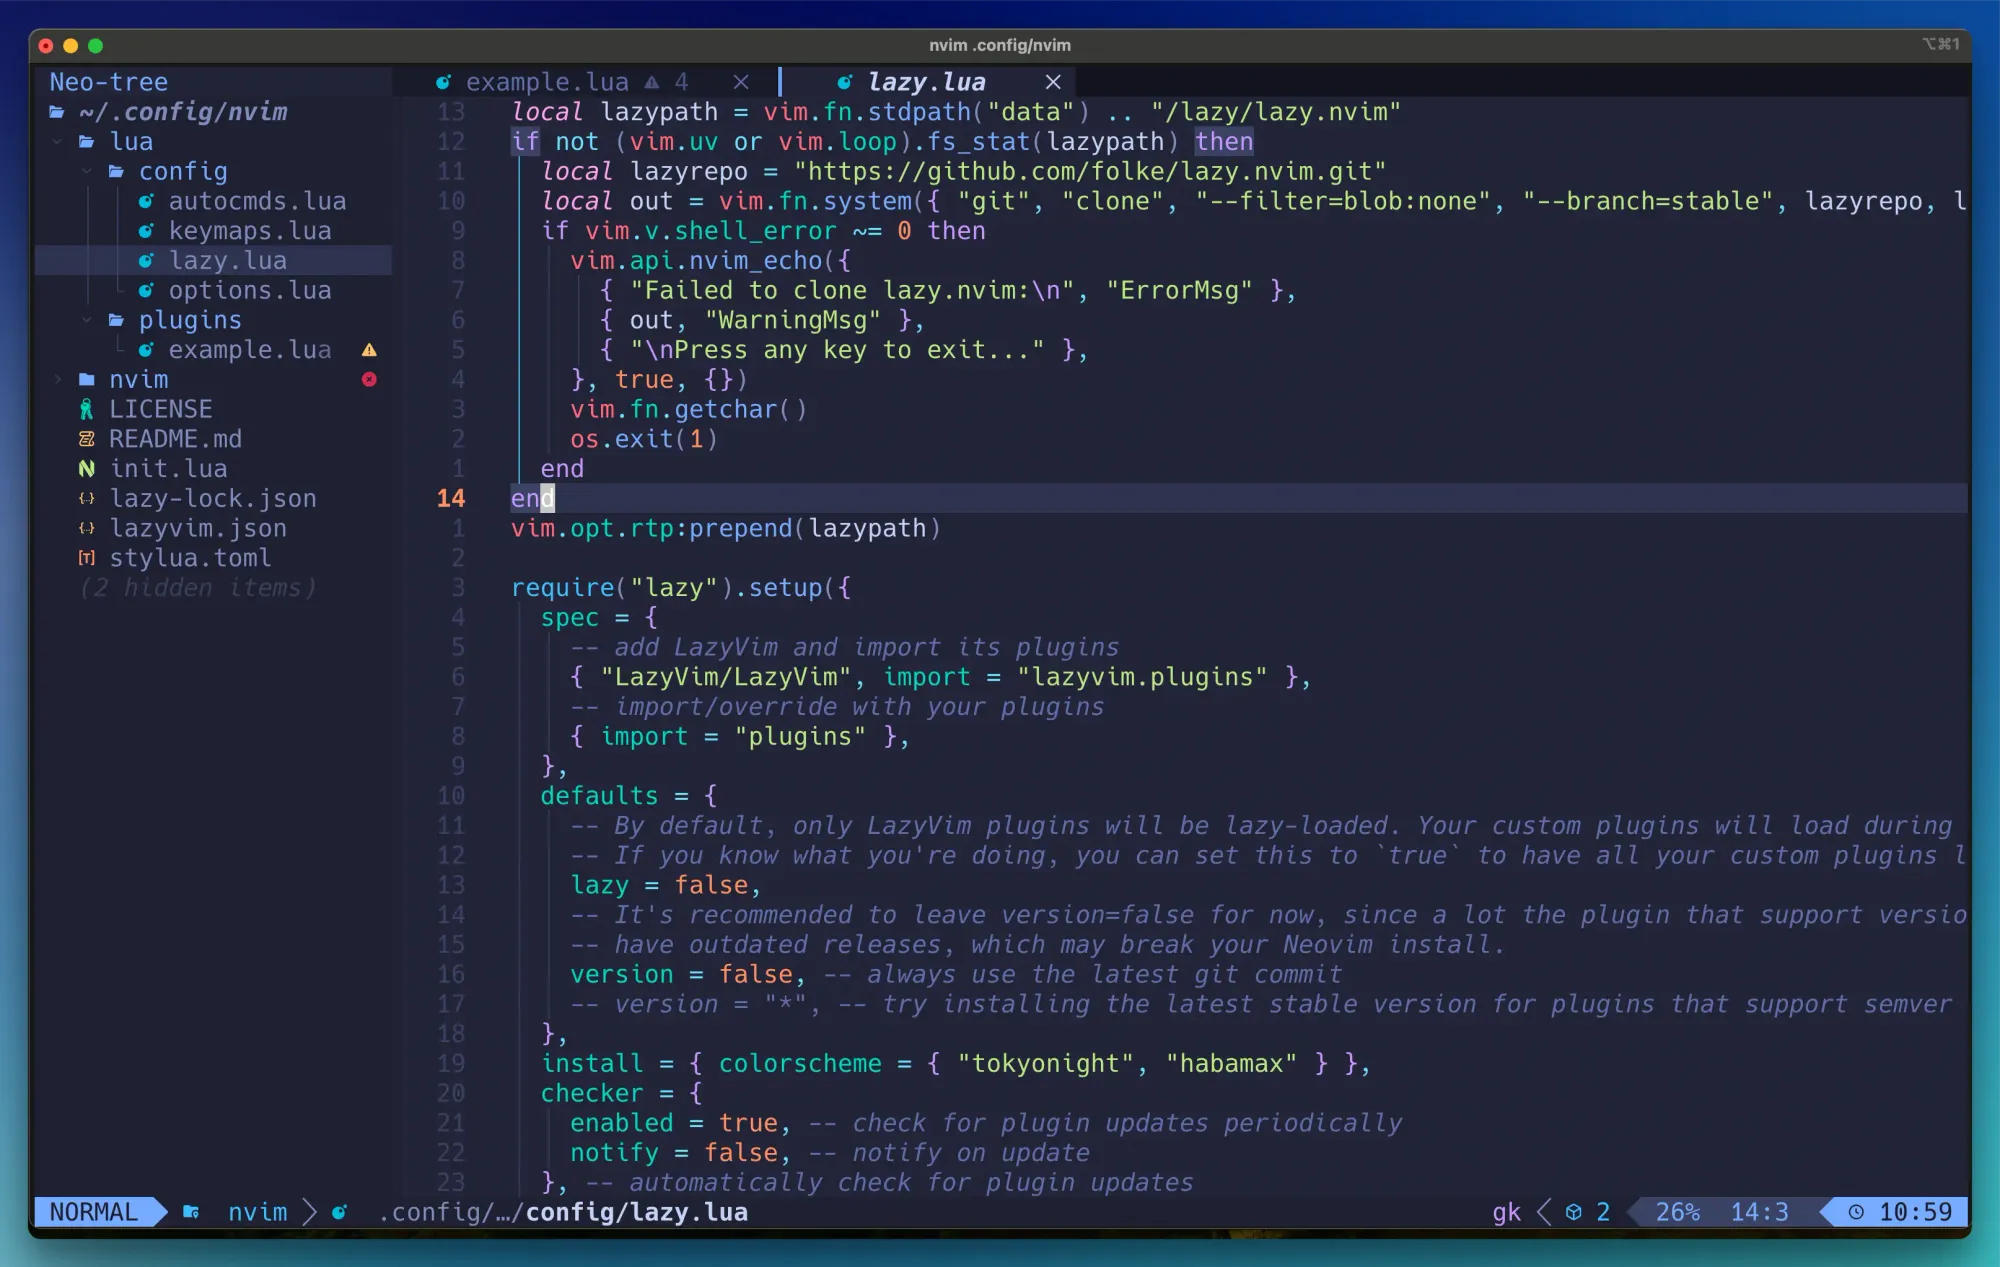
Now it's time for the fun part - installing plugins and tweaking the LazyVim configuration.
Optional: Install LazyGit
LazyGit is a terminal (or text-based) user interface (TUI) that makes it easier and more enjoyable to use Git.
It provides a visual representation of branches, commits, changes and the log. You interact with Git through this TUI instead of using the usual Git commands that don't offer feedback and interactivity.
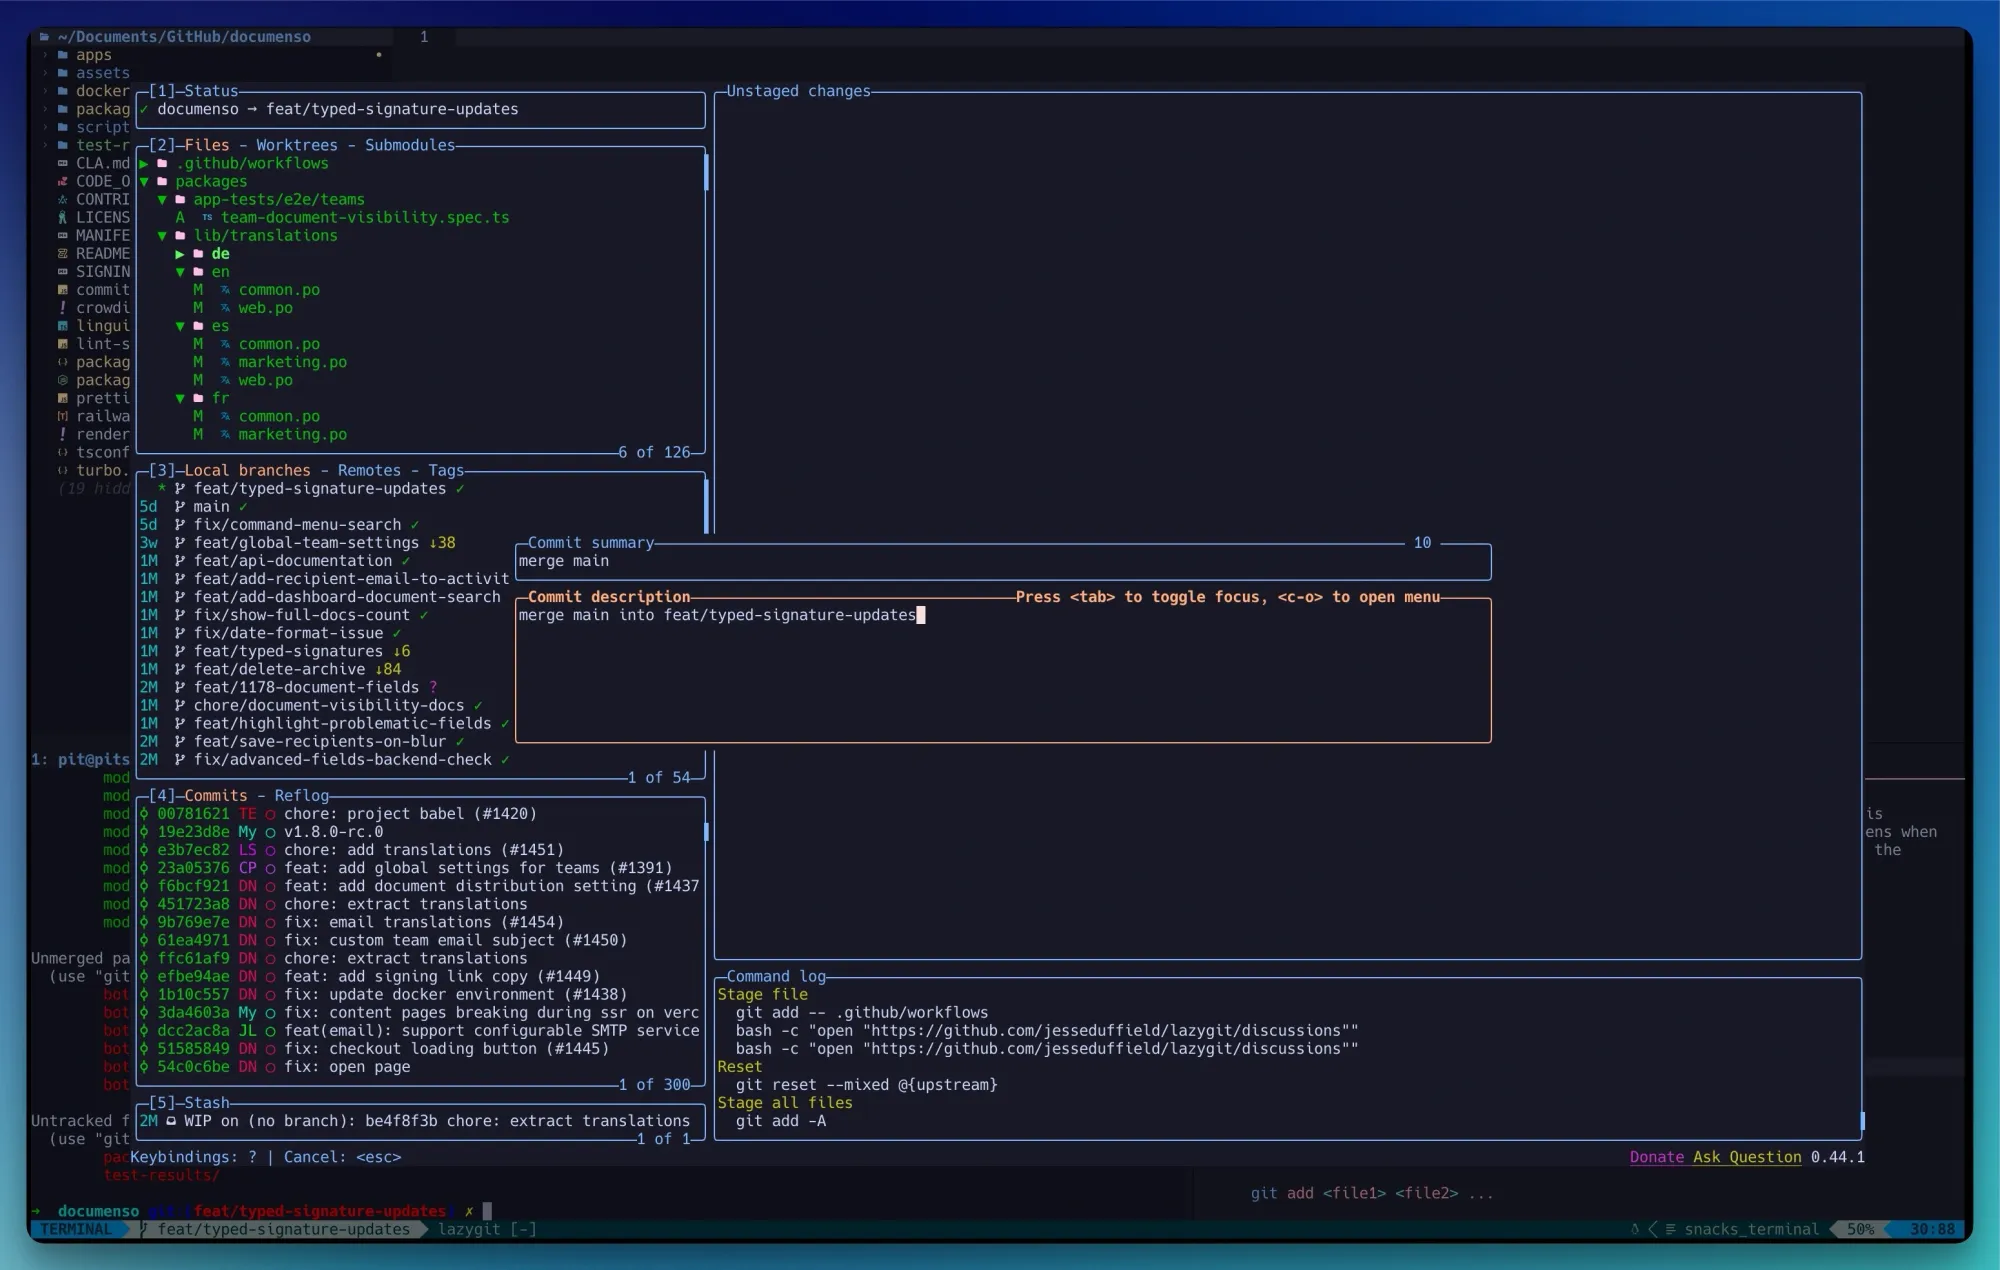
To use LazyGit, you need to install it on your machine separately. At first, I thought it comes pre-installed with Neovim/LazyVim since most tutorials show it but don't mention that it needs to be installed separately.
If you are on macOS, you can install it as usual via homebrew:
// recommended way
brew install jesseduffield/lazygit/lazygit
I recommend checking the official repository for more installation options and information about LazyGit. It contains helpful information about the available features and how to make the most of them.
After installing it, restart LazyVim and the terminal. You can then access it with the lazygit command in the terminal or with the leader + g + g sequence in LazyVim.
Optional: Install Extra Tools
You can install extra tools to make you more productive with the terminal and Neovim. I have the following ones installed:
- ripgrep - "ripgrep is a line-oriented search tool that recursively searches the current directory for a regex pattern. By default, ripgrep will respect gitignore rules and automatically skip hidden files/directories and binary files." - (source: ripgrep GitHub repository)
- fd - "fd is a program that finds entries in your filesystem." - (source: fd GitHub repository)
- ast-grep - "ast-grep is an AST-based tool to search code by pattern code. Think of it as your old-friend grep, but matching AST nodes instead of text." - (source: ast-grep GitHub repository)
You can install them as follows:
brew install ripgrep fd ast-grepUseful Vim Plugins
LazyVim comes with some useful pre-installed plugins, meaning you can use it without any changes. I'm still discovering Neovim, so I made minimal changes to the installed plugins.
I'll show you the ones I use, but before that, you need to create a new file, custom.lua (you can name your file differently) in the ~/.config/nvim/lua/plugins/ directory. You'll add the plugins and their configuration in this file.
Open the file and add the following code:
return {
  {
    "LazyVim/LazyVim",
    opts = {
      colorscheme = "catppuccin",
    },
  },

  { "catppuccin/nvim", name = "catppuccin", priority = 1000, opts = {
    flavour = "mocha",
  } },

  -- change trouble config
  {
    "folke/trouble.nvim",
    -- opts will be merged with the parent spec
    opts = { use_diagnostic_signs = true },
  },

  {
    "folke/which-key.nvim",
    event = "VeryLazy",
    opts = {
      -- your configuration comes here
      -- or leave it empty to use the default settings
      -- refer to the configuration section below
    },
    keys = {
      {
        "<leader>?",
        function()
          require("which-key").show({ global = false })
        end,
        desc = "Buffer Local Keymaps (which-key)",
      },
    },
  },

  {
    "folke/noice.nvim",
    event = "VeryLazy",
    opts = {
      -- add any options here
    },
    dependencies = {
      -- if you lazy-load any plugin below, make sure to add proper `module="..."` entries
      "MunifTanjim/nui.nvim",
      -- OPTIONAL:
      --   `nvim-notify` is only needed, if you want to use the notification view.
      --   If not available, we use `mini` as the fallback
      "rcarriga/nvim-notify",
    },
  },

  -- override nvim-cmp and add cmp-emoji
  {
    "hrsh7th/nvim-cmp",
    dependencies = { "hrsh7th/cmp-emoji" },
    ---@param opts cmp.ConfigSchema
    opts = function(_, opts)
      table.insert(opts.sources, { name = "emoji" })
    end,
  },

  -- change some telescope options and a keymap to browse plugin files
  {
    "nvim-telescope/telescope.nvim",
    keys = {
      -- add a keymap to browse plugin files
      -- stylua: ignore
      {
        "<leader>fp",
        function() require("telescope.builtin").find_files({ cwd = require("lazy.core.config").options.root }) end,
        desc = "Find Plugin File",
      },
    },
    -- change some options
    opts = {
      defaults = {
        layout_strategy = "horizontal",
        layout_config = { prompt_position = "top" },
        sorting_strategy = "ascending",
        winblend = 0,
      },
    },
  },

  {
    "neovim/nvim-lspconfig",
    opts = {
      inlay_hints = { enabled = false },
      servers = {
        pyright = {},
        tsserver = {},
      },
      setup = {
        tsserver = function(_, opts)
          require("typescript").setup({ server = opts })
          return true
        end,
      },
    },
    dependencies = {
      "jose-elias-alvarez/typescript.nvim",
      init = function()
        require("lazyvim.util").lsp.on_attach(function(_, buffer)
          -- stylua: ignore
          vim.keymap.set( "n", "<leader>co", "TypescriptOrganizeImports", { buffer = buffer, desc = "Organize Imports" })
          vim.keymap.set("n", "<leader>cR", "TypescriptRenameFile", { desc = "Rename File", buffer = buffer })
        end)
      end,
    },
  },

  -- for typescript, LazyVim also includes extra specs to properly setup lspconfig,
  -- treesitter, mason and typescript.nvim. So instead of the above, you can use:
  { import = "lazyvim.plugins.extras.lang.typescript" },

  -- add more treesitter parsers
  {
    "nvim-treesitter/nvim-treesitter",
    opts = {
      highlight = { enable = true },
      indent = { enable = true },
      ensure_installed = {
        "bash",
        "html",
        "javascript",
        "json",
        "lua",
        "markdown",
        "markdown_inline",
        "python",
        "query",
        "regex",
        "tsx",
        "typescript",
        "sql",
        "vim",
        "yaml",
      },
      rainbow = {
        enable = true,
        disable = { "html" },
        extended_mode = false,
        max_file_lines = nil,
      },
      incremental_selection = {
        enable = true,
        keymaps = {
          init_selection = "<C-space>",
          node_incremental = "<C-space>",
          scope_incremental = false,
          node_decremental = "<bs>",
        },
      },
      textobjects = {
        move = {
          enable = true,
          goto_next_start = { ["]f"] = "@function.outer", ["]c"] = "@class.outer", ["]a"] = "@parameter.inner" },
          goto_next_end = { ["]F"] = "@function.outer", ["]C"] = "@class.outer", ["]A"] = "@parameter.inner" },
          goto_previous_start = { ["[f"] = "@function.outer", ["[c"] = "@class.outer", ["[a"] = "@parameter.inner" },
          goto_previous_end = { ["[F"] = "@function.outer", ["[C"] = "@class.outer", ["[A"] = "@parameter.inner" },
        },
      },
    },
  },

  {
    "nvim-lualine/lualine.nvim",
    event = "VeryLazy",
    opts = {
      options = {
        theme = "catppuccin",
      },
    },
  },

  -- use mini.starter instead of alpha
  { import = "lazyvim.plugins.extras.ui.mini-starter" },

  -- add jsonls and schemastore packages, and setup treesitter for json, json5 and jsonc
  { import = "lazyvim.plugins.extras.lang.json" },

  -- add any tools you want to have installed below
  {
    "williamboman/mason.nvim",
    opts = {
      ensure_installed = {
        "stylua",
        "shellcheck",
        "shfmt",
        "flake8",
        "prettier",
      },
    },
  },

  {
    "akinsho/bufferline.nvim",
    event = "VeryLazy",
    keys = {
      { "<Tab>", "<Cmd>BufferLineCycleNext<CR>", desc = "Next tab" },
      { "<S-Tab>", "<Cmd>BufferLineCyclePrev<CR>", desc = "Prev tab" },
    },
    opts = function(_, opts)
      -- Set default options first
      opts.options = {
        mode = "tabs",
        show_buffer_close_icons = false,
        show_close_icon = false,
      }

      -- Add the catppuccin highlights
      if (vim.g.colors_name or ""):find("catppuccin") then
        opts.highlights = require("catppuccin.groups.integrations.bufferline").get()
      end

      return opts
    end,
  },

  -- Add the new plugin configuration
  {
    "yetone/avante.nvim",
    event = "VeryLazy",
    lazy = false,
    version = false, -- set this if you want to always pull the latest change
    opts = {
      -- add any opts here
    },
    build = "make",
    -- build = "powershell -ExecutionPolicy Bypass -File Build.ps1 -BuildFromSource false" -- for windows
    dependencies = {
      "stevearc/dressing.nvim",
      "nvim-lua/plenary.nvim",
      "MunifTanjim/nui.nvim",
      "nvim-tree/nvim-web-devicons",
      "zbirenbaum/copilot.lua",
      {
        "HakonHarnes/img-clip.nvim",
        event = "VeryLazy",
        opts = {
          default = {
            embed_image_as_base64 = false,
            prompt_for_file_name = false,
            drag_and_drop = {
              insert_mode = true,
            },
            use_absolute_path = true,
          },
        },
      },
      {
        "MeanderingProgrammer/render-markdown.nvim",
        opts = {
          file_types = { "markdown", "Avante" },
        },
        ft = { "markdown", "Avante" },
      },
    },
  },
}
I developed the habit of installing, updating and syncing every time I update the plugin file.
So, press the <leader> (spacebar by default) + l (letter L) combination to open the Lazy plugin manager. Then press I (letter i) to install the plugins. Wait for them to install, and then press U. Wait for the plugins to update, and then press S to sync them.
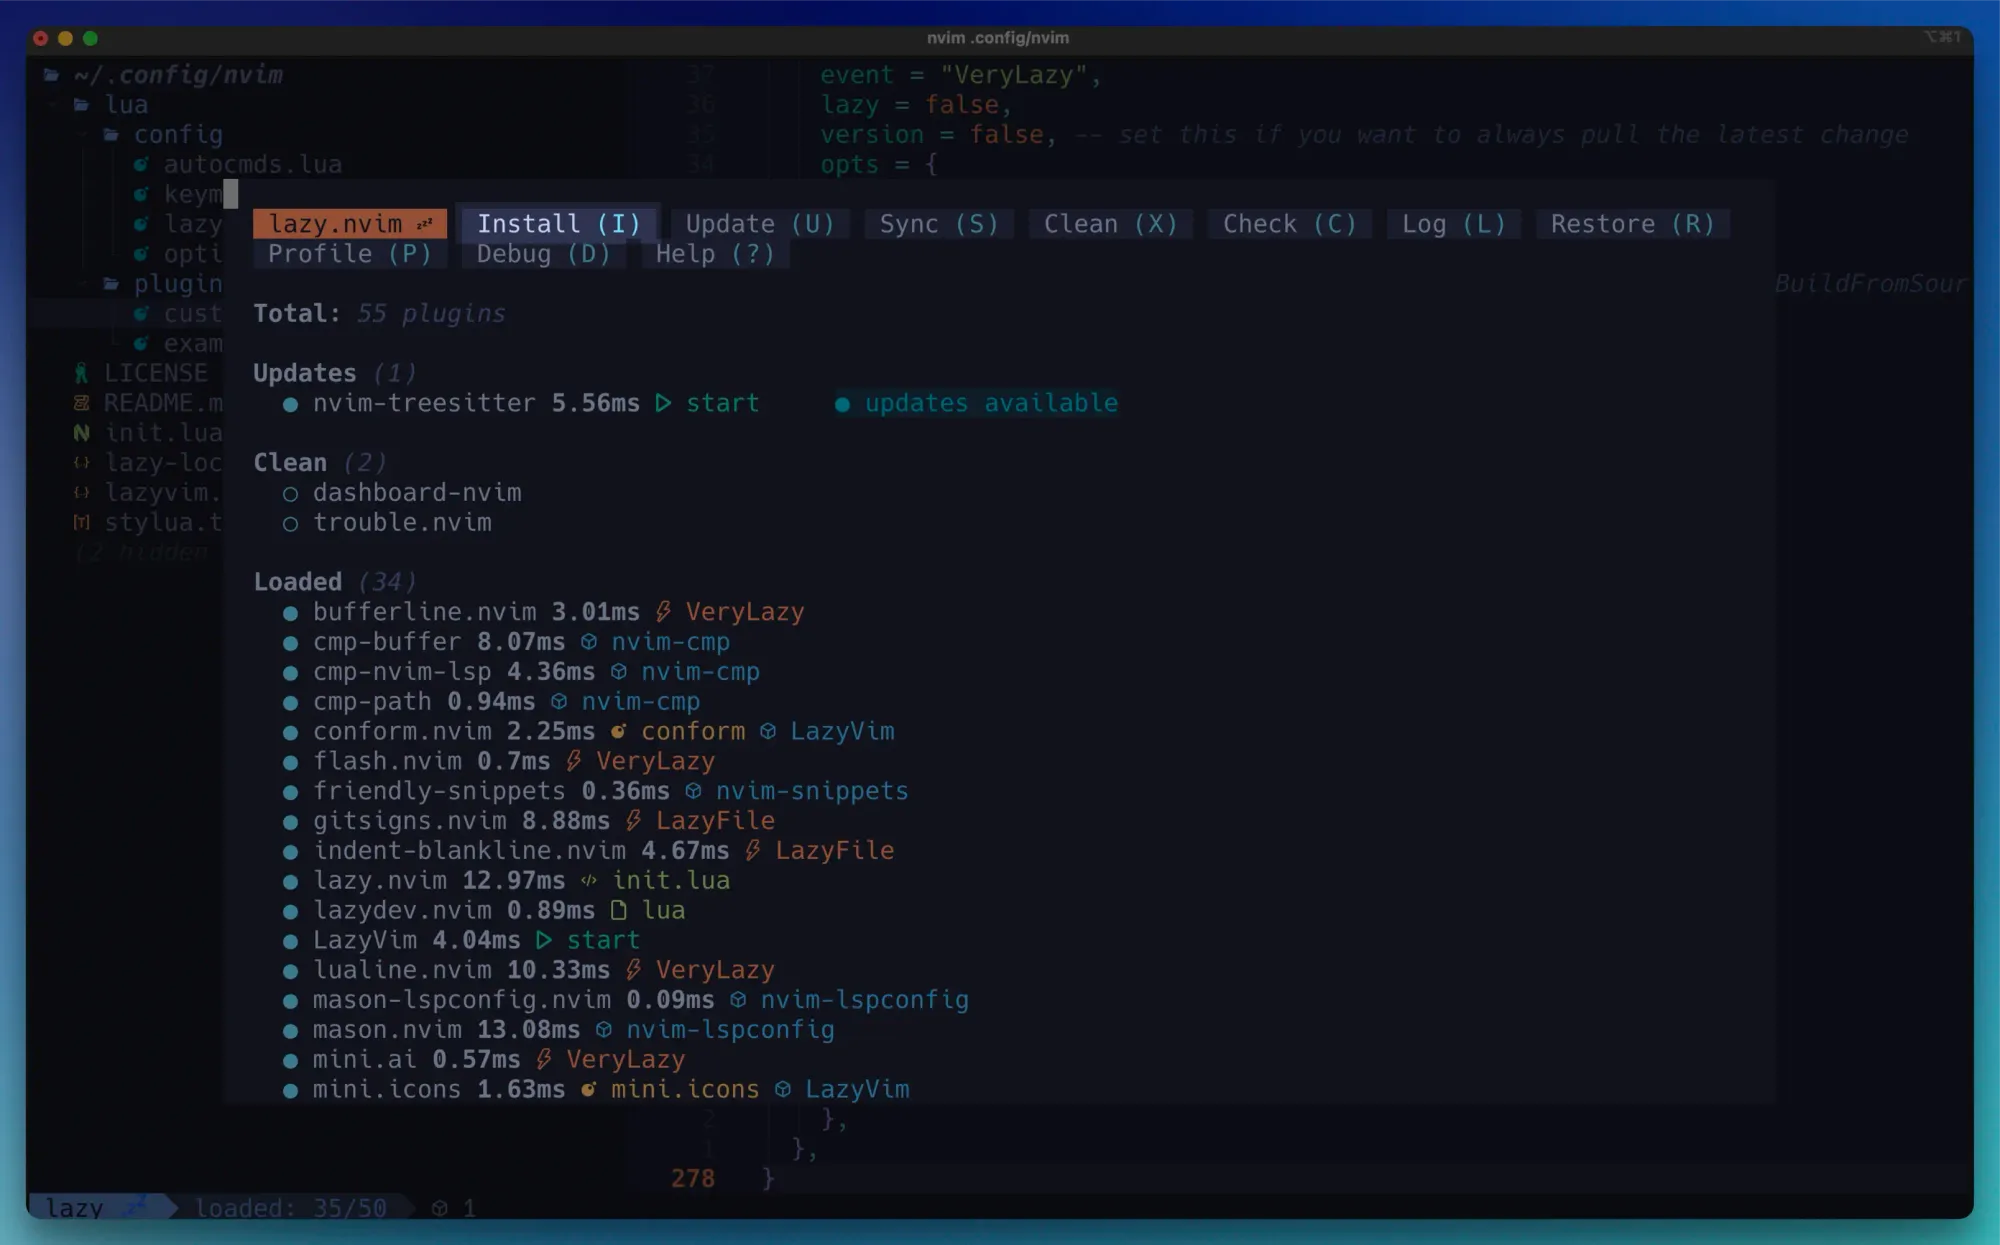
You should now be able to use the installed plugin. If you get errors, quit LazyVim and start it again.
Now, let's briefly go over the plugins to understand what they do:
- The catppuccin-related code sets the LazyVim colorscheme to the "mocha" (dark) variant of the catppuccin theme. The
priority = 1000color scheme property loads the colorscheme early to prevent the flashing effect when LazyVim starts. - folke/trouble.nvim is a diagnostics viewer that provides a better and clearer way of visualizing code warnings, errors, and diagnostics. The property
use_diagnostic_signssets it to use the same icons as your LSP setup. - folke/which-key.nvim is one of the most helpful plugins. Especially for beginners. This plugin shows a popup with the available keybinding for various actions. It includes both the keymaps you define and the default ones. It's handy because you don't have to memorize all the keybindings and can easily find the ones you forget or explore new ones.
- folke/noice.nvim improves Neovim's UI by providing a better-looking user interface for the command line, notifications and popups.
- hrsh7th/nvim-cmp is an auto-completion plugin that adds code completion functionality to Neovim. It provides code suggestions while you type.
- nvim-telescope/telescope.nvim is a fuzzy finder plugin which adds advanced search and navigation capabilities to Neovim. It enables you to find files, search plugin files, search through the file contents, and switch between open buffers (tabs for IDE users), among others.
- neovim/nvim-lspconfig is a plugin that adds quickstart configurations for various Language Server Protocol (LSP) servers. As I understand it, it provides IDE features to Neovim, such as code completion, error checking, code formatting, and other similar stuff.
- nvim-treesitter/nvim-treesitter builds upon treesitter to bring advanced code analysis, indentation and syntax highlighting to Neovim.
- nvim-lualine/lualine.nvim adds a status line that includes a couple of things, such as the Vim mode, Git branch, file name, and the programming language, among others.
- williamboman/mason.nvim is a package manager that allows you to install and manage tools to make coding more efficient. As their GitHub repository mentions, you can "install and manage LSP servers, DAP servers, linters, and formatters".
- akinsho/bufferline.nvim is a plugin for buffer (tab) management that displays the open buffers (tabs) at the top of the editor window. This way, you can see the files you opened at a quick glance.
- yetone/avante.nvim is the plugin that "emulates the behaviour of the Cursor AI IDE", as mentioned in the official repository. That means you can chat with your code inside LazyVim and apply its suggestions directly to your source code.
We just glanced over the plugins in this article, but I'll publish an article about my favourite plugins and go more in-depth. Make sure you don't miss it!
Configuration
By default, LazyVim comes pre-configured and has some settings I didn't particularly like. So, I added the following configuration to the options.lua file:
--- Disable hiding of markup
vim.opt.conceallevel = 0

--- Break lines at word boundaries
vim.opt.wrap = true
vim.opt.linebreak = true

--- Copy the indent of the current line when inserting a new line
vim.opt.autoindent = true

--- Disable the inlay hints (additional information about types and parameters names) because it clutters my view

vim.g.lazyvim_no_inlay_hints = true
In LazyVim, the markdown and code symbols are hidden by default. For example, if you make a word bold using the asterisks (**) from the Markdown syntax, LazyVim hides the asterisks and shows the word bold directly.
I like seeing the text as it is, so I turned off the option by setting the conceallevel to 0:
vim.opt.conceallevel = 0The following settings, wrap and linebreak, break the text into multiple lines instead of going off-screen and having to scroll horizontally. It also prevents the words from being split in the middle, thus making the text more readable.
The vim.opt.autoindent = true option sets the new lines to use the same indentation level as the previous line.
Lastly, I turned off the inlay hints, which display extra information, such as parameter names and return types.
vim.g.lazyvim_no_inlay_hints = true
They only clutter my view, especially on a small laptop screen. If you find them useful, you can remove/omit the line as they're enabled by default.
Neovim Keybindings
The keybindings from this section are in no particular order. They're the ones that I find the most useful and use frequently.
By default, the leader key is the spacebar in LazyVim.
| Keybinding | Description |
|---|---|
<leader>ff |
Search a file from the root directory |
<C-w>h |
Go to the left window |
<C-w>l |
Go to the right window |
gg |
Go to the first line (top of the file) |
vd |
Delete selected text |
vy |
Yank (copy) the selected text |
<leader>, |
Browse open buffers/Switch buffers |
gd |
Go to the definition |
<leader>sg |
Search root dir |
ggyG |
Go to top and copy whole content |
ggdG |
Go to top and delete whole content |
<leader>| |
Split panes |
<leader><space> |
Find files in root directory |
<leader>sG |
Grep in root dir (search for text) |
<leader>e |
Show file tree from root directory |
<leader>a |
AI functionality |
<leader>aa |
Toggle Copilot Chat sidebar |
<leader>aq |
Quick chat |
<leader>xx |
Trouble plugin (diagnostics) |
<leader>cr |
Rename all occurrences (LSP) |
<leader>cc |
Code actions |
<leader>uC |
Change color theme |
<leader>sk |
Find keymaps |
<leader>sr |
Global search and replace |
For more, check out this collection of Neovim keybindings.
What's Next
I'm still learning and discovering Neovim and its ecosystem, meaning that I'll update the article regularly as I discover new things.
Meanwhile, please comment below if you know a better way of doing things or have other suggestions.
Here are some useful resources:
