

In this tutorial, you learn how to use a MySQL database in your Node.js project with Docker. You will build a simple application that allows you to collect email addresses from people.
The technologies used in this tutorial are as follows:
- Node.js
- Docker
- Express
- MySQL
Note: If you decide to use the API or an improved version to collect email addresses, make sure you comply with all the relevant regulations. I am not responsible for misusing the API, for using it maliciously or for any other use.
Create the project structure
The first step is to create the project structure. For the moment, you need:
- the overall folder including all files
- an
.envfile - a file with the server/database configuration
Thus, you can create all the files and folders as follows:
take nodejs-mysql
touch index.js
touch .env
Now the next step is to run MySQL.
Run MySQL with Docker
To avoid inconsistencies and installing new stuff on your machine, you will use the official Docker image for MySQL.
Before going further, run the following command in your terminal:
docker run -p 3306:3306 --name nodejs-mysql -e MYSQL_ROOT_PASSWORD=pass -e MYSQL_DATABASE=emails_db -d mysql:5.7
The above command does the following things:
- It pulls the image
mysql:5.7from DockerHub and then runs it. - It starts the MySQL database on port
3306. - It sets the database password to
pass. - Lastly, it creates a new database called
emails_db.
Now you can access your database from the terminal and from your application. If you want to run the container bash and play directly with MySQL, run the following command:
docker container exec -it nodejs-mysql bash
After that, start the MySQL monitor as follows:
mysql -u root -p
You will be prompted to enter the password. Enter the same password you mentioned in the first command above. In this example, the password is pass.
Now you can run MySQL commands and play around with the database. Also, you are ready to use MySQL in your Node.js application.
Initialize the project and install dependencies
The next step is to initialize your Node.js project and install the required dependencies. You can initialize the project with the following command:
npm init -y
The above command initializes your project and it auto-completes the package.json file with the default values.
The dependencies you need for this project are mysql, express, express-validator and dotenv. Install them with the following command:
npm install mysql dotenv express express-validator
You will use the mysql package to manipulate your database. You will also use the express package to create two endpoints:
- read data
- add data to the database
Lastly, you need the package express-validator to sanitize user input. For instance, you would not want someone to add a SQL query instead of email address because it could create issues.
Thus, you are ready to build the application!
Build the application
The first step is to open the file index.js and import the packages. Thus, add the following imports at the top of the file:
const express = require('express');
const mysql = require('mysql');
const { body, validationResult } = require('express-validator');
const app = express();

require('dotenv').config();
The next step is to open the .env file and add the database details such as the username, password and database name.
DB_USER=admin
DB_PASSWORD=pass
DB_NAME=emails_db
The above details should work for you as well. However, feel free to change the details.
The next step is to create the database connection in the application. Go to the file index.js and add the following code:
const database = mysql.createConnection({
    user: process.env.DB_USER,
    password: process.env.DB_PASSWORD,
    database: process.env.DB_NAME
});
Now you can use the database to create tables, add, edit, remove data and other operations.
Initialize the database
The first step is to initialize the database by creating a new table. You need a table to store people's emails.
Thus, open the file index.js and add the following route:
app.get('/init', (req, res) => {
    const sqlQuery =  'CREATE TABLE IF NOT EXISTS emails(id int AUTO_INCREMENT, firstname VARCHAR(50), lastname VARCHAR(50), email VARCHAR(50), PRIMARY KEY(id))';

    database.query(sqlQuery, (err) => {
        if (err) throw err;

        res.send('Table created!')
    });
});
Now, when you access the route /init, the application creates a new table called emails only if it does not already exist. The table contains the following fields:
- an id
- the first and last name of the person
- the email address
Once the table is created, you can collect email addresses from people. Thus, let's see how you can do that!
Add emails
One of the most important parts of the application is to allow people to subscribe to your services/newsletter. You can do so by writing the following piece code in index.js:
app.post('/subscribe',
    body('email').isEmail().normalizeEmail(),
    body('firstname').not().isEmpty().escape(),
    body('lastname').not().isEmpty().escape(),
    (req, res) => {
        const errors = validationResult(req);

        if (errors.array().length > 0) {
            res.send(errors.array());
        } else {
            const subscriber = {
                firstname: req.body.firstname,
                lastname: req.body.lastname,
                email: req.body.email
            };

            const sqlQuery = 'INSERT INTO emails SET ?';

            database.query(sqlQuery, subscriber, (err, row) => {
                if (err) throw err;

                res.send('Subscribed successfully!');
            });
        }
});
You can observe that this route does quite a lot of stuff, so let's take it step by step.
- First of all, you allow people to make a
POSTrequest to the/subscribeendpoint. - Secondly, you sanitize the input from people by using the methods from the
express-validatorpackage. They make sure the fields are not empty, and it also escapes the inputs. - Lastly, you check if there are any errors. If there are errors, you return those errors. Otherwise, you subscribe the person to the newsletter/service.
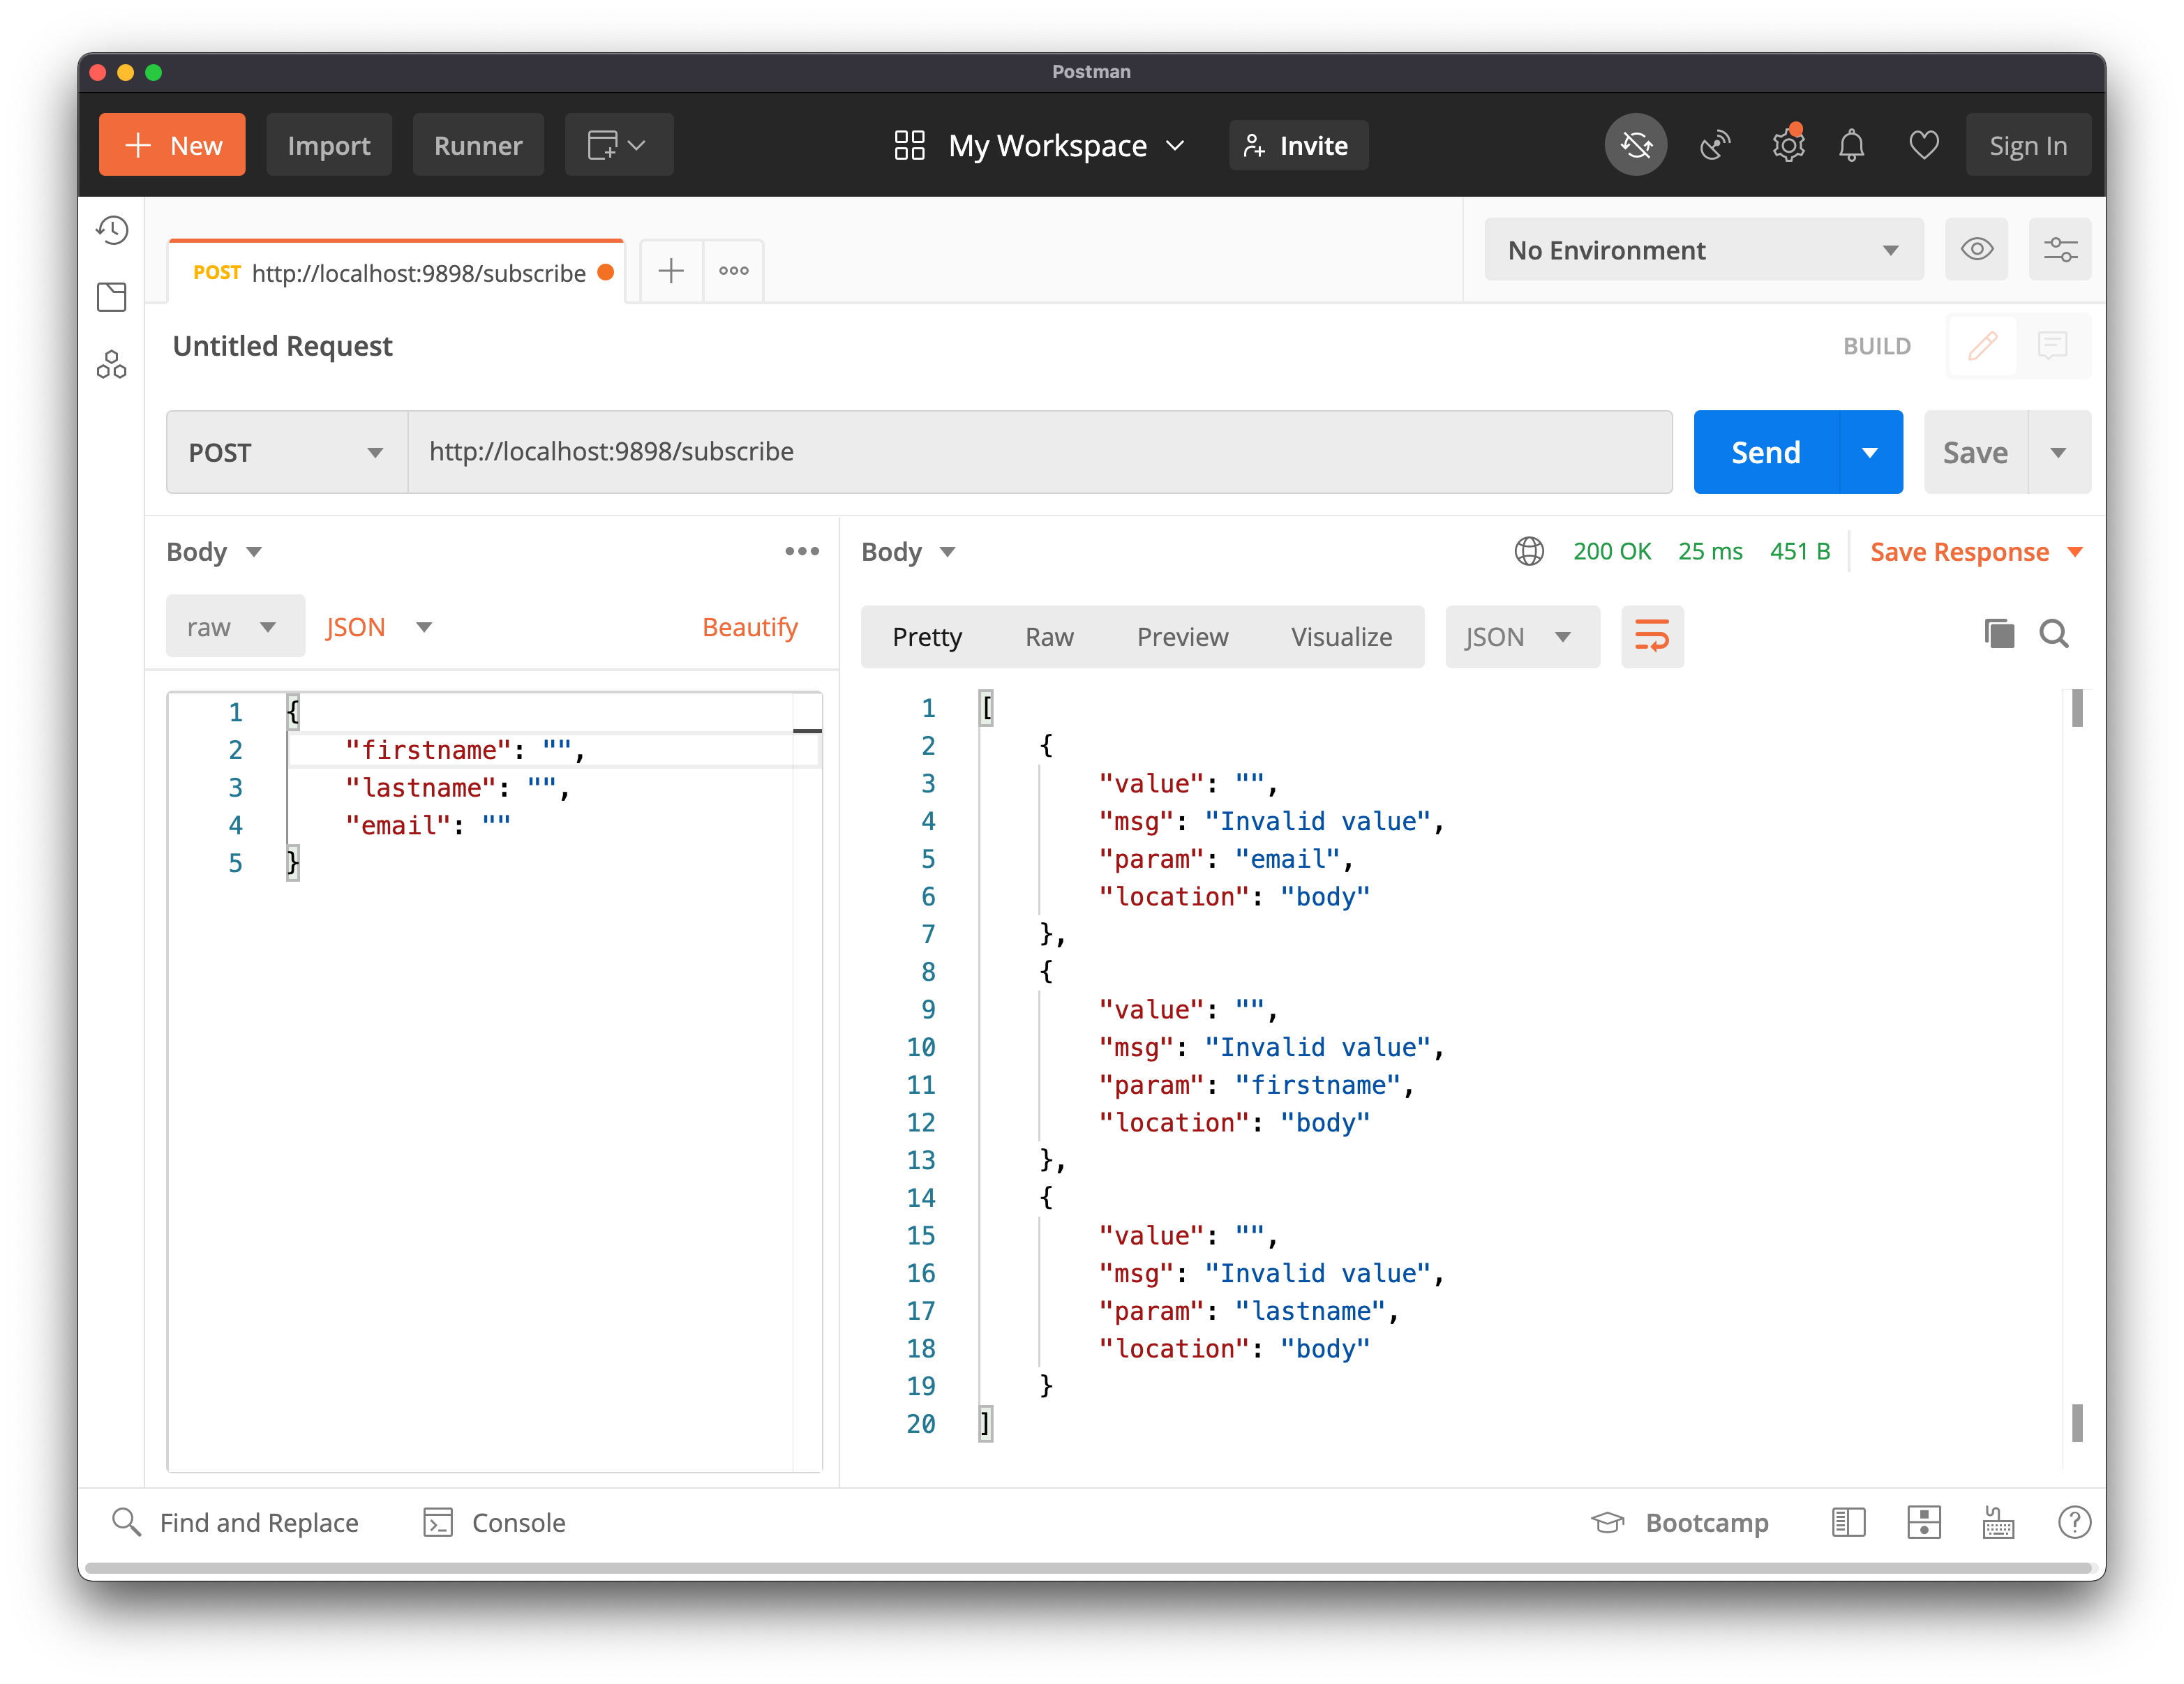
The figure above shows an example of submitting empty data. You can see that you get a handful of errors, depending on what is wrong with the request.
On the other side, if you make a request with valid data, the subscriber is added to the list. See the example below.
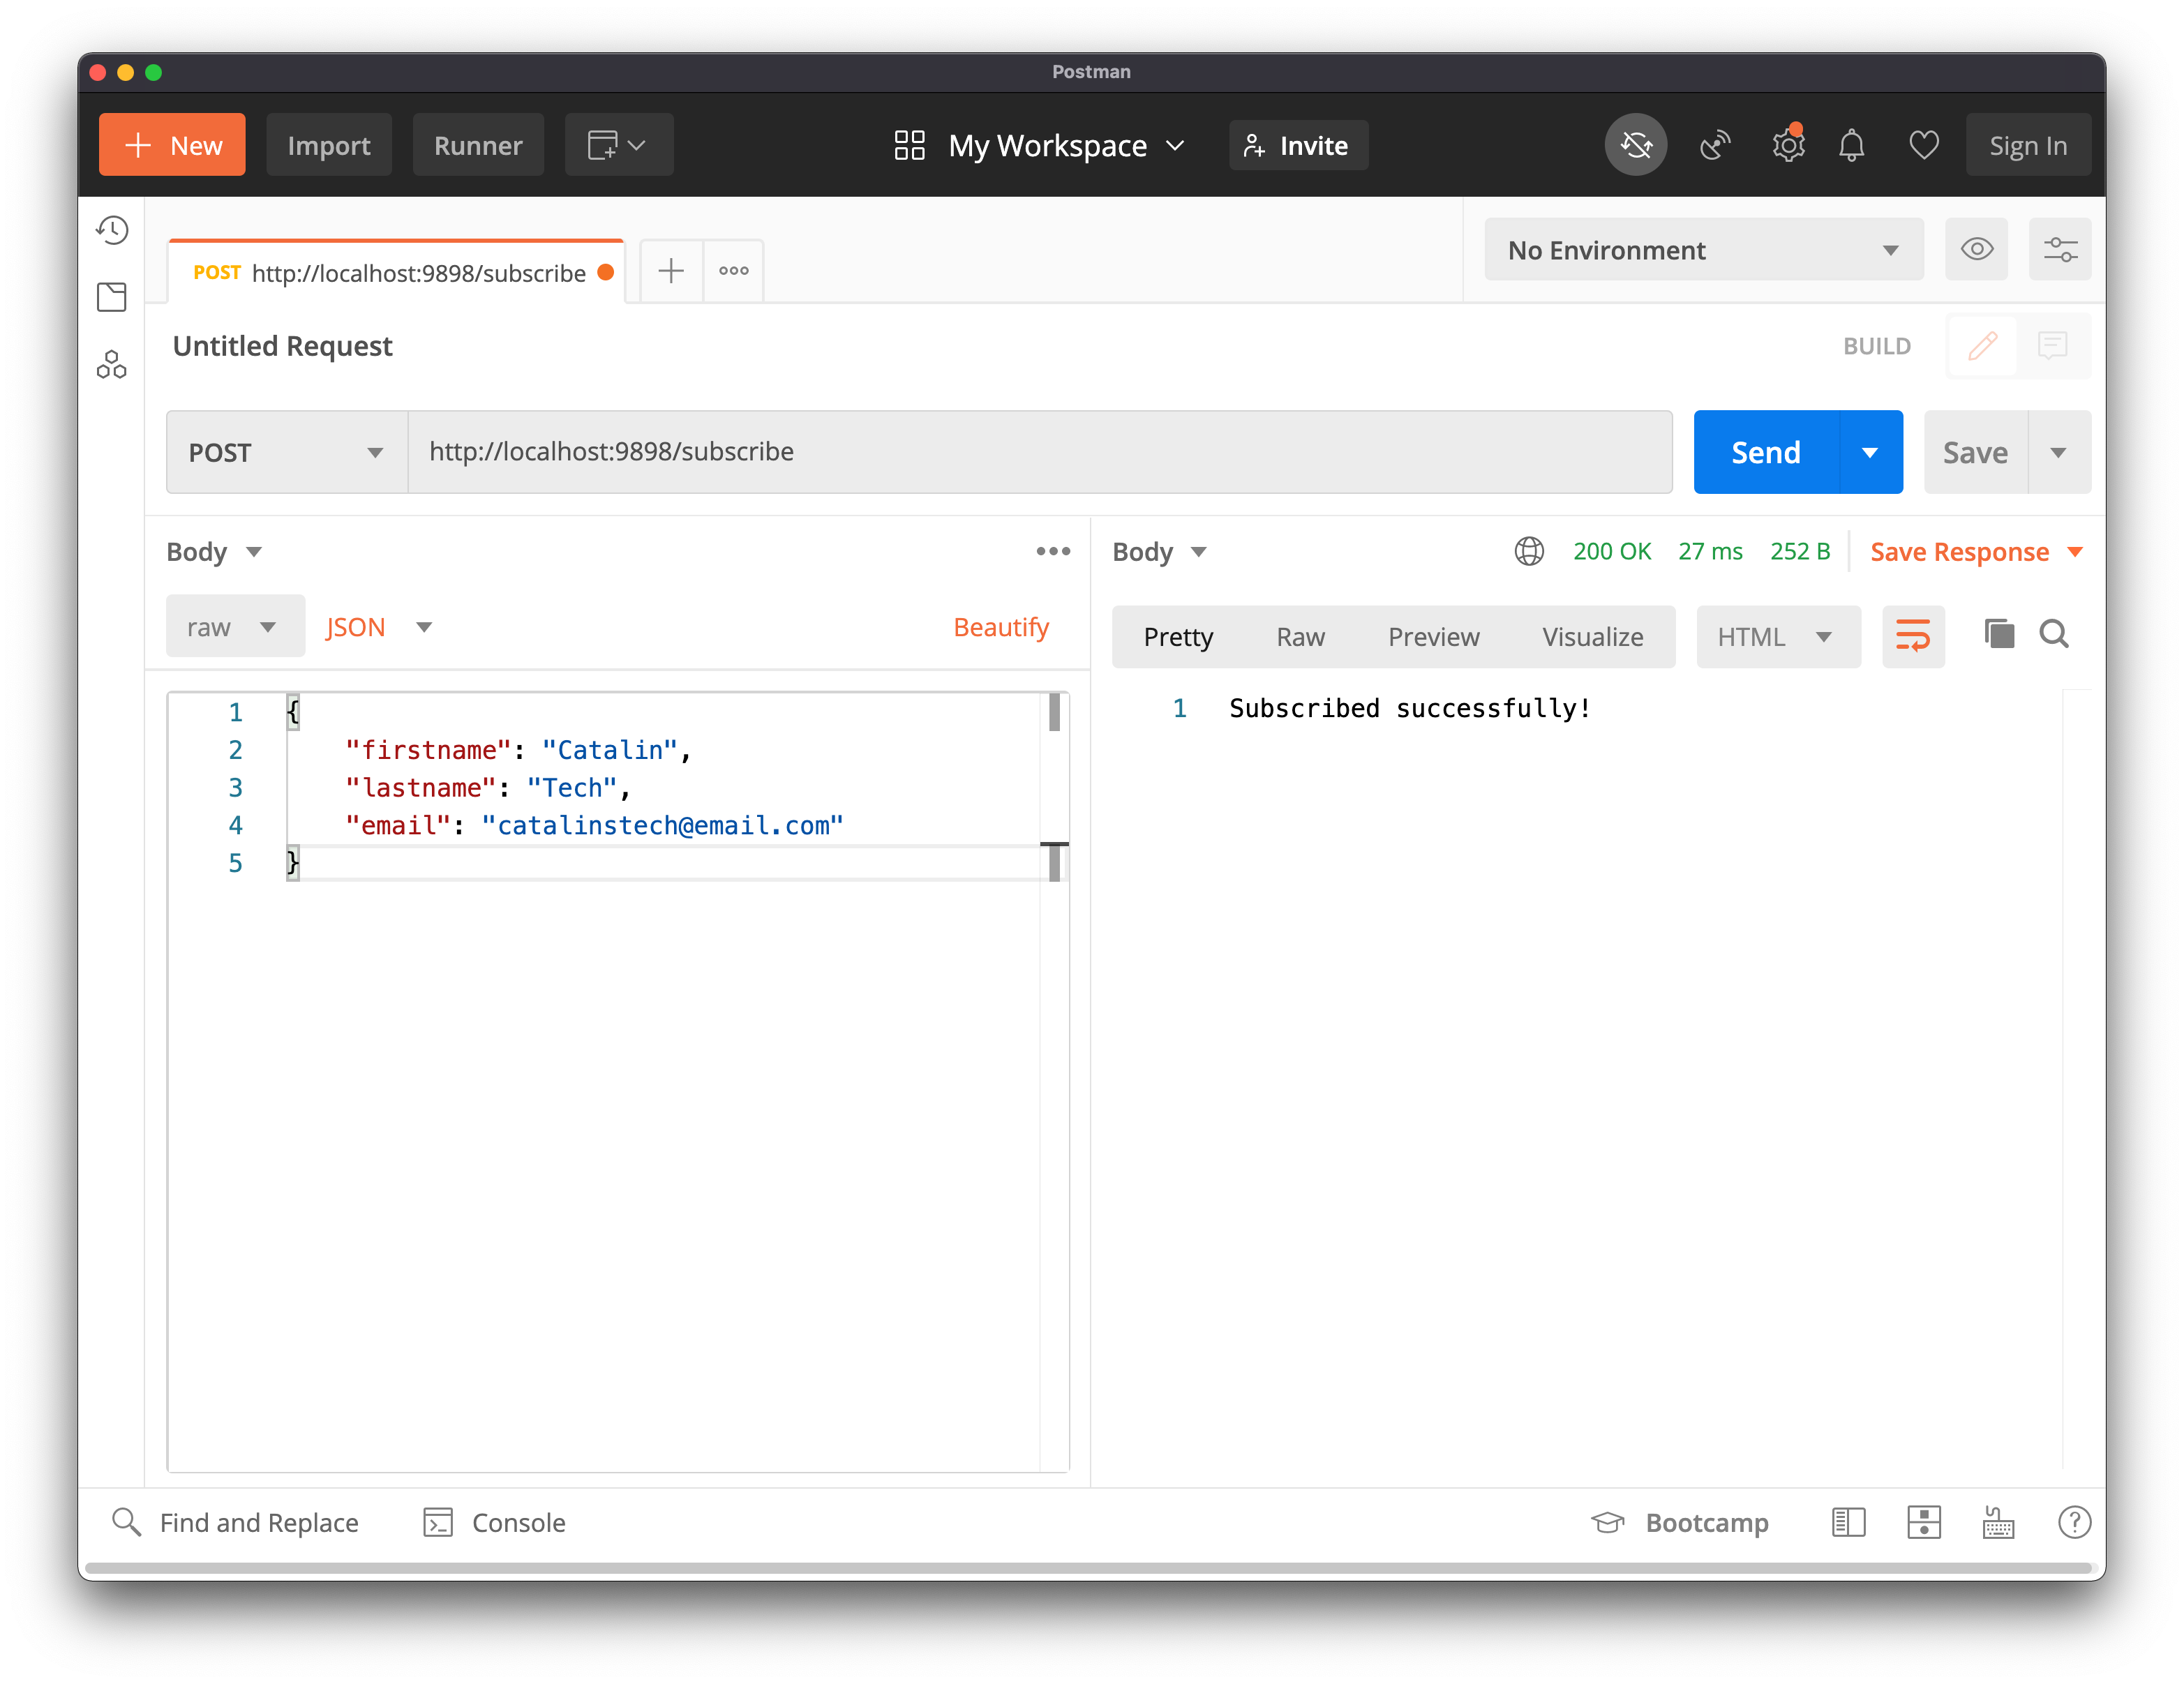
Therefore, the endpoint works correctly. People can subscribe to your email/service.
Get all emails
Lastly, you need a route to get a list with all the email addresses collected. Thus, add the following code in index.js:
app.get('/', (req, res) => {
    const sqlQuery = 'SELECT * FROM emails';

    database.query(sqlQuery, (err, result) => {
        if (err) throw err;

        res.json({ 'emails': result });
    });
});
The SQL query SELECT * FROM emails selects all the records from the table. The query returns the following information for each query:
- the id
- the first and last name
- the email address
If you access the URL http://localhost:9898/, you get all the subscribers. Below, you can see an example:
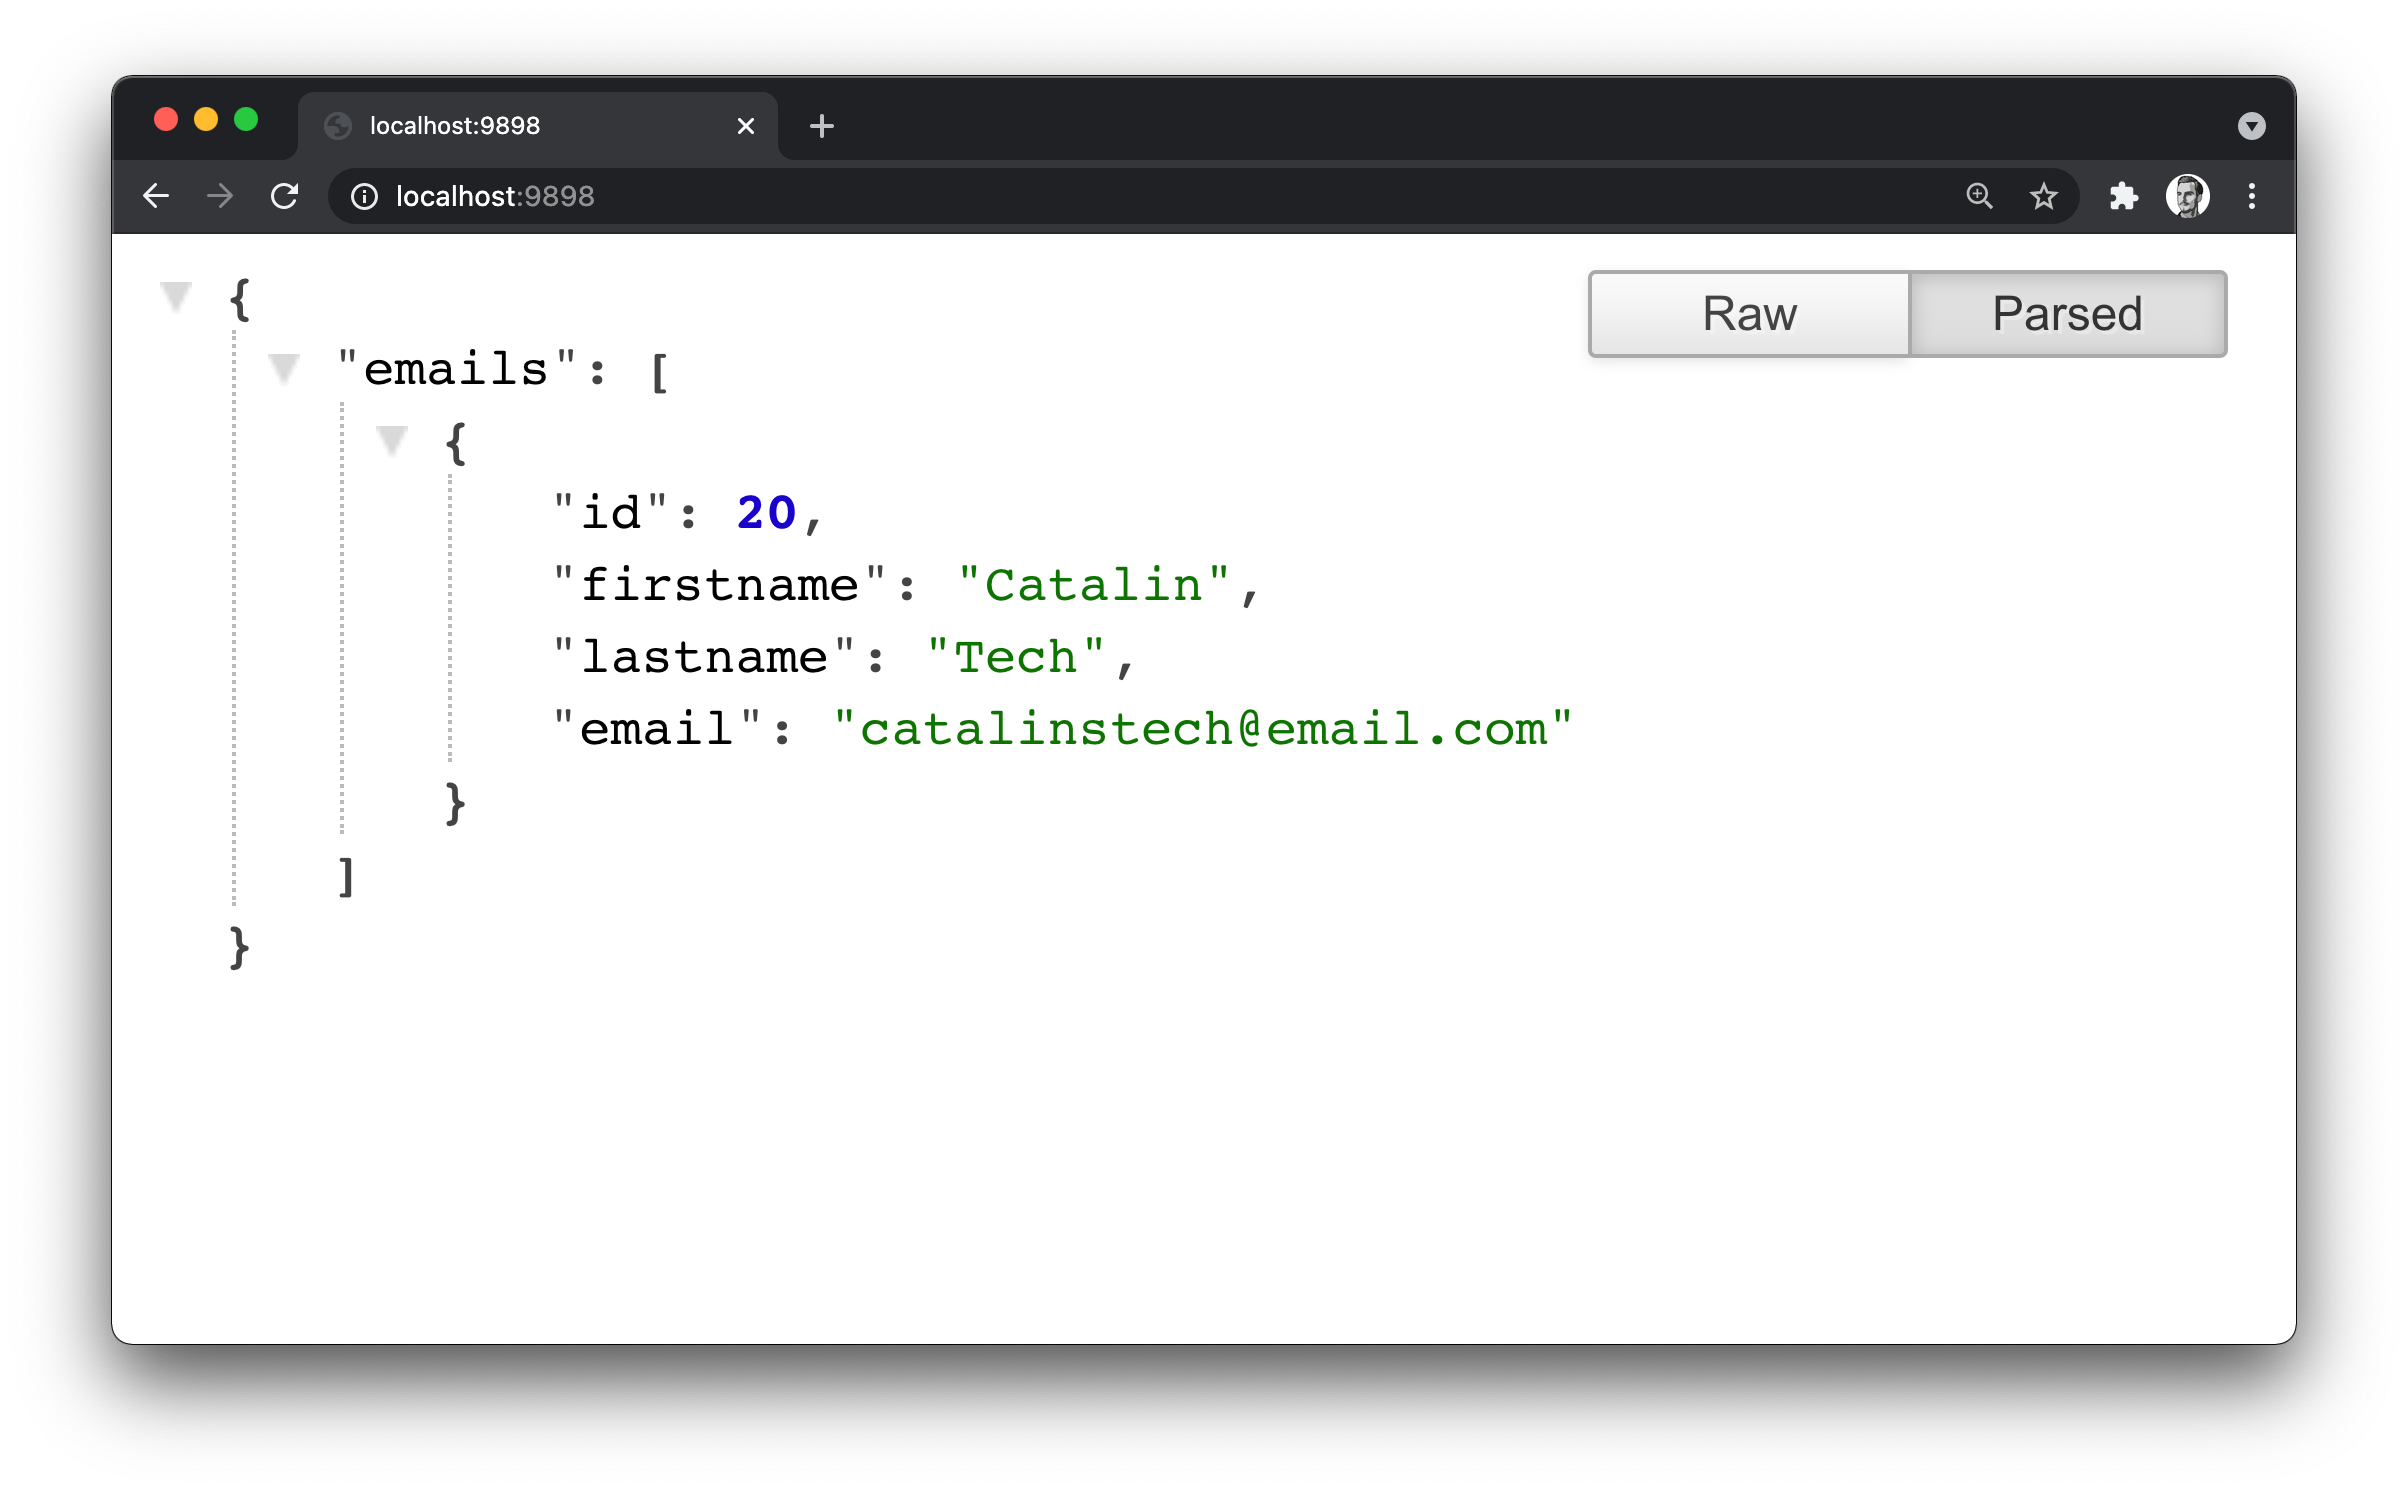
Thus, with this route, you can see all the people that subscribed using your application.
Note: It's not a good idea to have this endpoint available for everyone to see because you expose personal information. Thus, one improvement could be to secure this endpoint and only make it available to yourself.
Clean the application
Before finishing, you could improve the application by reorganising the code. Even though it might be overkill for a small application like this one, it helps when it grows larger.
Let's start by cleaning the index.js file. Open it and replace everything with the following:
const express = require('express');
const app = express();

const routes = require('./src/routes/routes');

app.use(express.json());
app.use(routes);

app.listen(9898, () => {
    console.log('Server running!');
});
The next step is to create a special place for the database configuration. In the root of the project, create the src folder. You can do it as follows:
take src
The above command creates the directory and then opens it. Inside the src folder, create another file db.js. Open it and add the following code:
const mysql = require('mysql');

require('dotenv').config();

const database = mysql.createConnection({
    user: process.env.DB_USER,
    password: process.env.DB_PASSWORD,
    database: process.env.DB_NAME
});

module.exports = database;
In the file db.js you configure the database and create a connection. After that, you export it so it can be used in other places.
Lastly, you need to create the controllers and routes. Thus, create the following folders and files from the root of the project:
take src/controllers/controllers.js
take src/routes/routes.js
Now, you are ready to create the routes and write the controllers.
Create the routes
Let's start with the routes. Open the file routes.js and add the following code:
const express = require('express');
const controller = require('../controllers/controllers');
const { body } = require('express-validator');
const router = new express.Router();

router.get('/init', controller.initDatabase);
router.get('/', controller.getSubscribers);
router.post('/subscribe',
    body('email').isEmail().normalizeEmail(),
    body('firstname').not().isEmpty().escape(),
    body('lastname').not().isEmpty().escape(),
    controller.addSubscriber
);

module.exports = router;
In this file, you import express so you can create the routes. After that, you import the controllers so you can pass the specific controller for each route. Then you import the body function from express-validator and then you create an Express router.
In the next lines, you define the routes and pass the specific controllers. Lastly, you export the router so you can use it in other places.
Write the controllers
The last step is to write the code for the controllers. Actually, you have the code from the previous steps but you need to store them as functions.
Take the code that was previously in index.js and add it as follows:
const { validationResult } = require('express-validator');
const database = require('../db');

const initDatabase = (req, res) => {
    const sqlQuery =  'CREATE TABLE IF NOT EXISTS emails(id int AUTO_INCREMENT, firstname VARCHAR(50), lastname VARCHAR(50), email VARCHAR(50), PRIMARY KEY(id))';

    database.query(sqlQuery, (err) => {
        if (err) throw err;

        res.send('Table created!')
    });
};

const getSubscribers = (req, res) => {
    const sqlQuery = 'SELECT * FROM emails';

    database.query(sqlQuery, (err, result) => {
        if (err) throw err;

        res.json({ 'emails': result });
    });
};

const addSubscriber = (req, res) => {
    const errors = validationResult(req);

    if (errors.array().length > 0) {
        res.send(errors.array());
    } else {
        const subscriber = {
            firstname: req.body.firstname,
            lastname: req.body.lastname,
            email: req.body.email
        };

        const sqlQuery = 'INSERT INTO emails SET ?';

        database.query(sqlQuery, subscriber, (err, row) => {
            if (err) throw err;

            res.send('Subscribed successfully!');
        });
    }
};

module.exports = {
    initDatabase,
    getSubscribers,
    addSubscriber
}
As you can see, the code is the same but now it's stored in separate functions. Then, at the end of the file, you export those functions so you can use them in the routes.js file.
You finished with the refactoring!
Run the code
To run the application, go into the root of the application and run the following command:
node index.js
After that, you should be able to add new subscribers and see the existing subscribers!
You can find the full code on this GitHub page
Conclusion
This is just the beginning of the application, but there are many improvements you could add. Some of the improvements could be:
- add the frontend part for this application
- protect the route that shows all the subscribers
- add tests
- allow people to create individual accounts and collect email addresses
Let me know in the comments if you would like me to build the frontend part as well. If there's enough interest, I will do it!
If you are using MySQL, you might want to use a MySQL GUI client.