

Do you know you can make money by selling your APIs? Building and selling APIs is a great way to create a new source of passive income.
Thus, in this article, you will see how to do that! First, you will create an API from scratch, and then you will sell it on RapidAPI!
What's an API?
Let's start by refreshing our memory on what an API is. The acronym API stands for Application Programming Interface, and it's a way for two computer programs to communicate between them.
In simple terms, it's a piece of software offering its services to other programs through a pre-defined set of functions. The other programs do not need to know about the API implementation because the functions describe how the API can be used. You communicate with APIs through requests, and there are four types of requests:
GETrequests - Get all the informationPOSTrequests - Create new dataPUTrequests - Update existing dataDELETErequests - Delete data
The API exposes different endpoints that are URLs to which you can make any of the four requests.
Whenever you access a webpage on the internet, you are most likely interacting with an API. For example, when you access the newsfeed of a social media platform, you make a GET request to that platform's API to get the people's posts. Or, when you check your email or weather application on your phone, you interact with an API.
A real-world analogy
Let's look at a real-world analogy by taking a flower shop as an example.
You go to the flower shop to buy some flowers. You enter the shop and ask the florist for a custom bouquet. The florist has a list of all the flowers and decorations you can use. You choose the flowers, the decorations, and then you make an order. The florist prepares the custom bouquet you asked for, and once it's ready, it brings it to you. You buy the bouquet and leave the shop.
Thus, you (client) made a request to the florist (API) with custom data. The florist went to the flower shop atelier (server/database) and brought your bouquet back (API response).
Why APIs?
The use of APIs speeds up the development time and process. It also simplifies the work of developers since they can use ready-made solutions. There is no need to re-invent the wheel and spend time building something that already exists.
Let's take as an example Google Maps, which developers can embed in applications and websites. Rather than building a map each time you need one, you can simply use the one provided by Google. Can you see how much time and resources you save this way?
Additionally, it opens ways to monetize your work. You can create an API and monetize its usage. For instance, the first 1000 requests might be free each month. However, after that, you can charge a sum like $0.001 for each additional request.
Thus, by using APIs, you can save time, resources and also monetize your work!
How can you sell the API
RapidAPI is the largest hub for APIs on the internet, so we will use it to monetize our API! What makes RapidAPI different is that they allow developers to sell access to their API. Thus, you can turn your APIs into a revenue stream and even turn them into passive income.
Additionally, their platform allows developers to discover and consume existing APIs.
What does that mean?
You can use the RapidAPI platform to find and use APIs from all categories. For example, they have Translation, Flight Data, Text to Speech APIs and more. Thus, you can find any API you need for your application.
Moreover, you can use multiple APIs without having to worry about different SDKs and API Keys. With RapidAPI, you can use multiple APIs with one SDK, API Key and dashboard, all in one place!
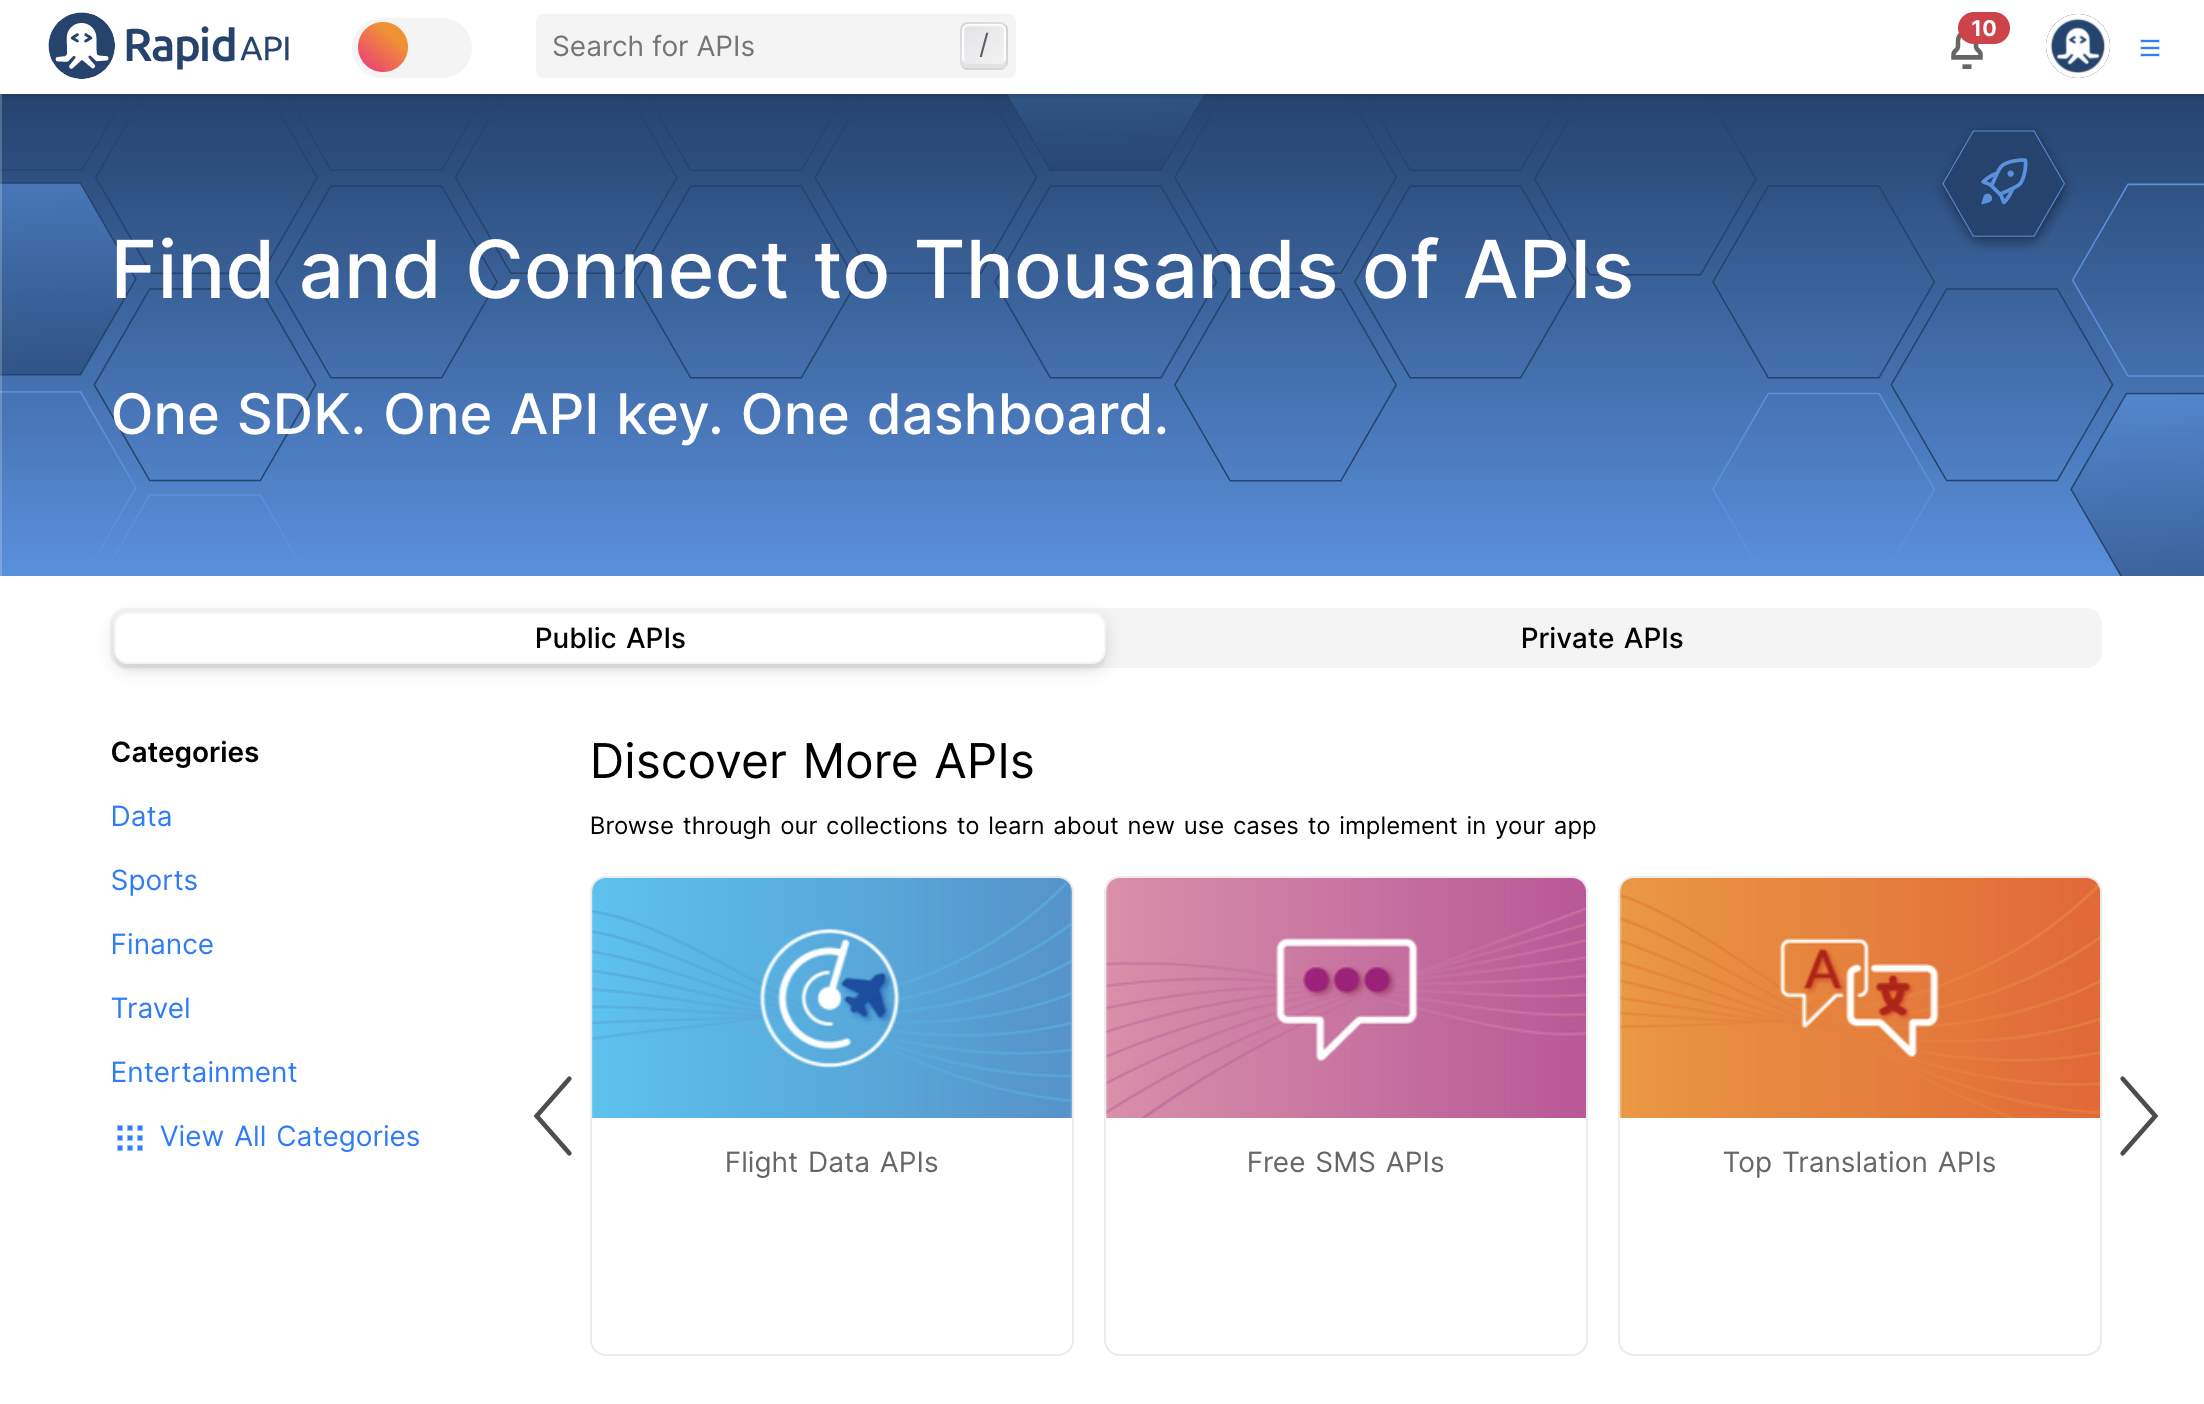 Figure 1
But, there is more! Using their platform, you can also add your APIs and sell access to them through pricing tiers. RapidAPI created the infrastructure for you to monetize your API. You do not need to worry about doing any additional work to sell your API. You can simply upload your API, configure the tiers and let developers use it.
In figure 2 below, you can see an example of Imgur, the online image hosting service, monetizing its API. They have four plans, each with its associated price. You can also see the extra charges for any additional requests and uploads.
Thus, people can choose the plan suited to their needs and start using it. This way, you can transform your APIs into a source of a passive income!
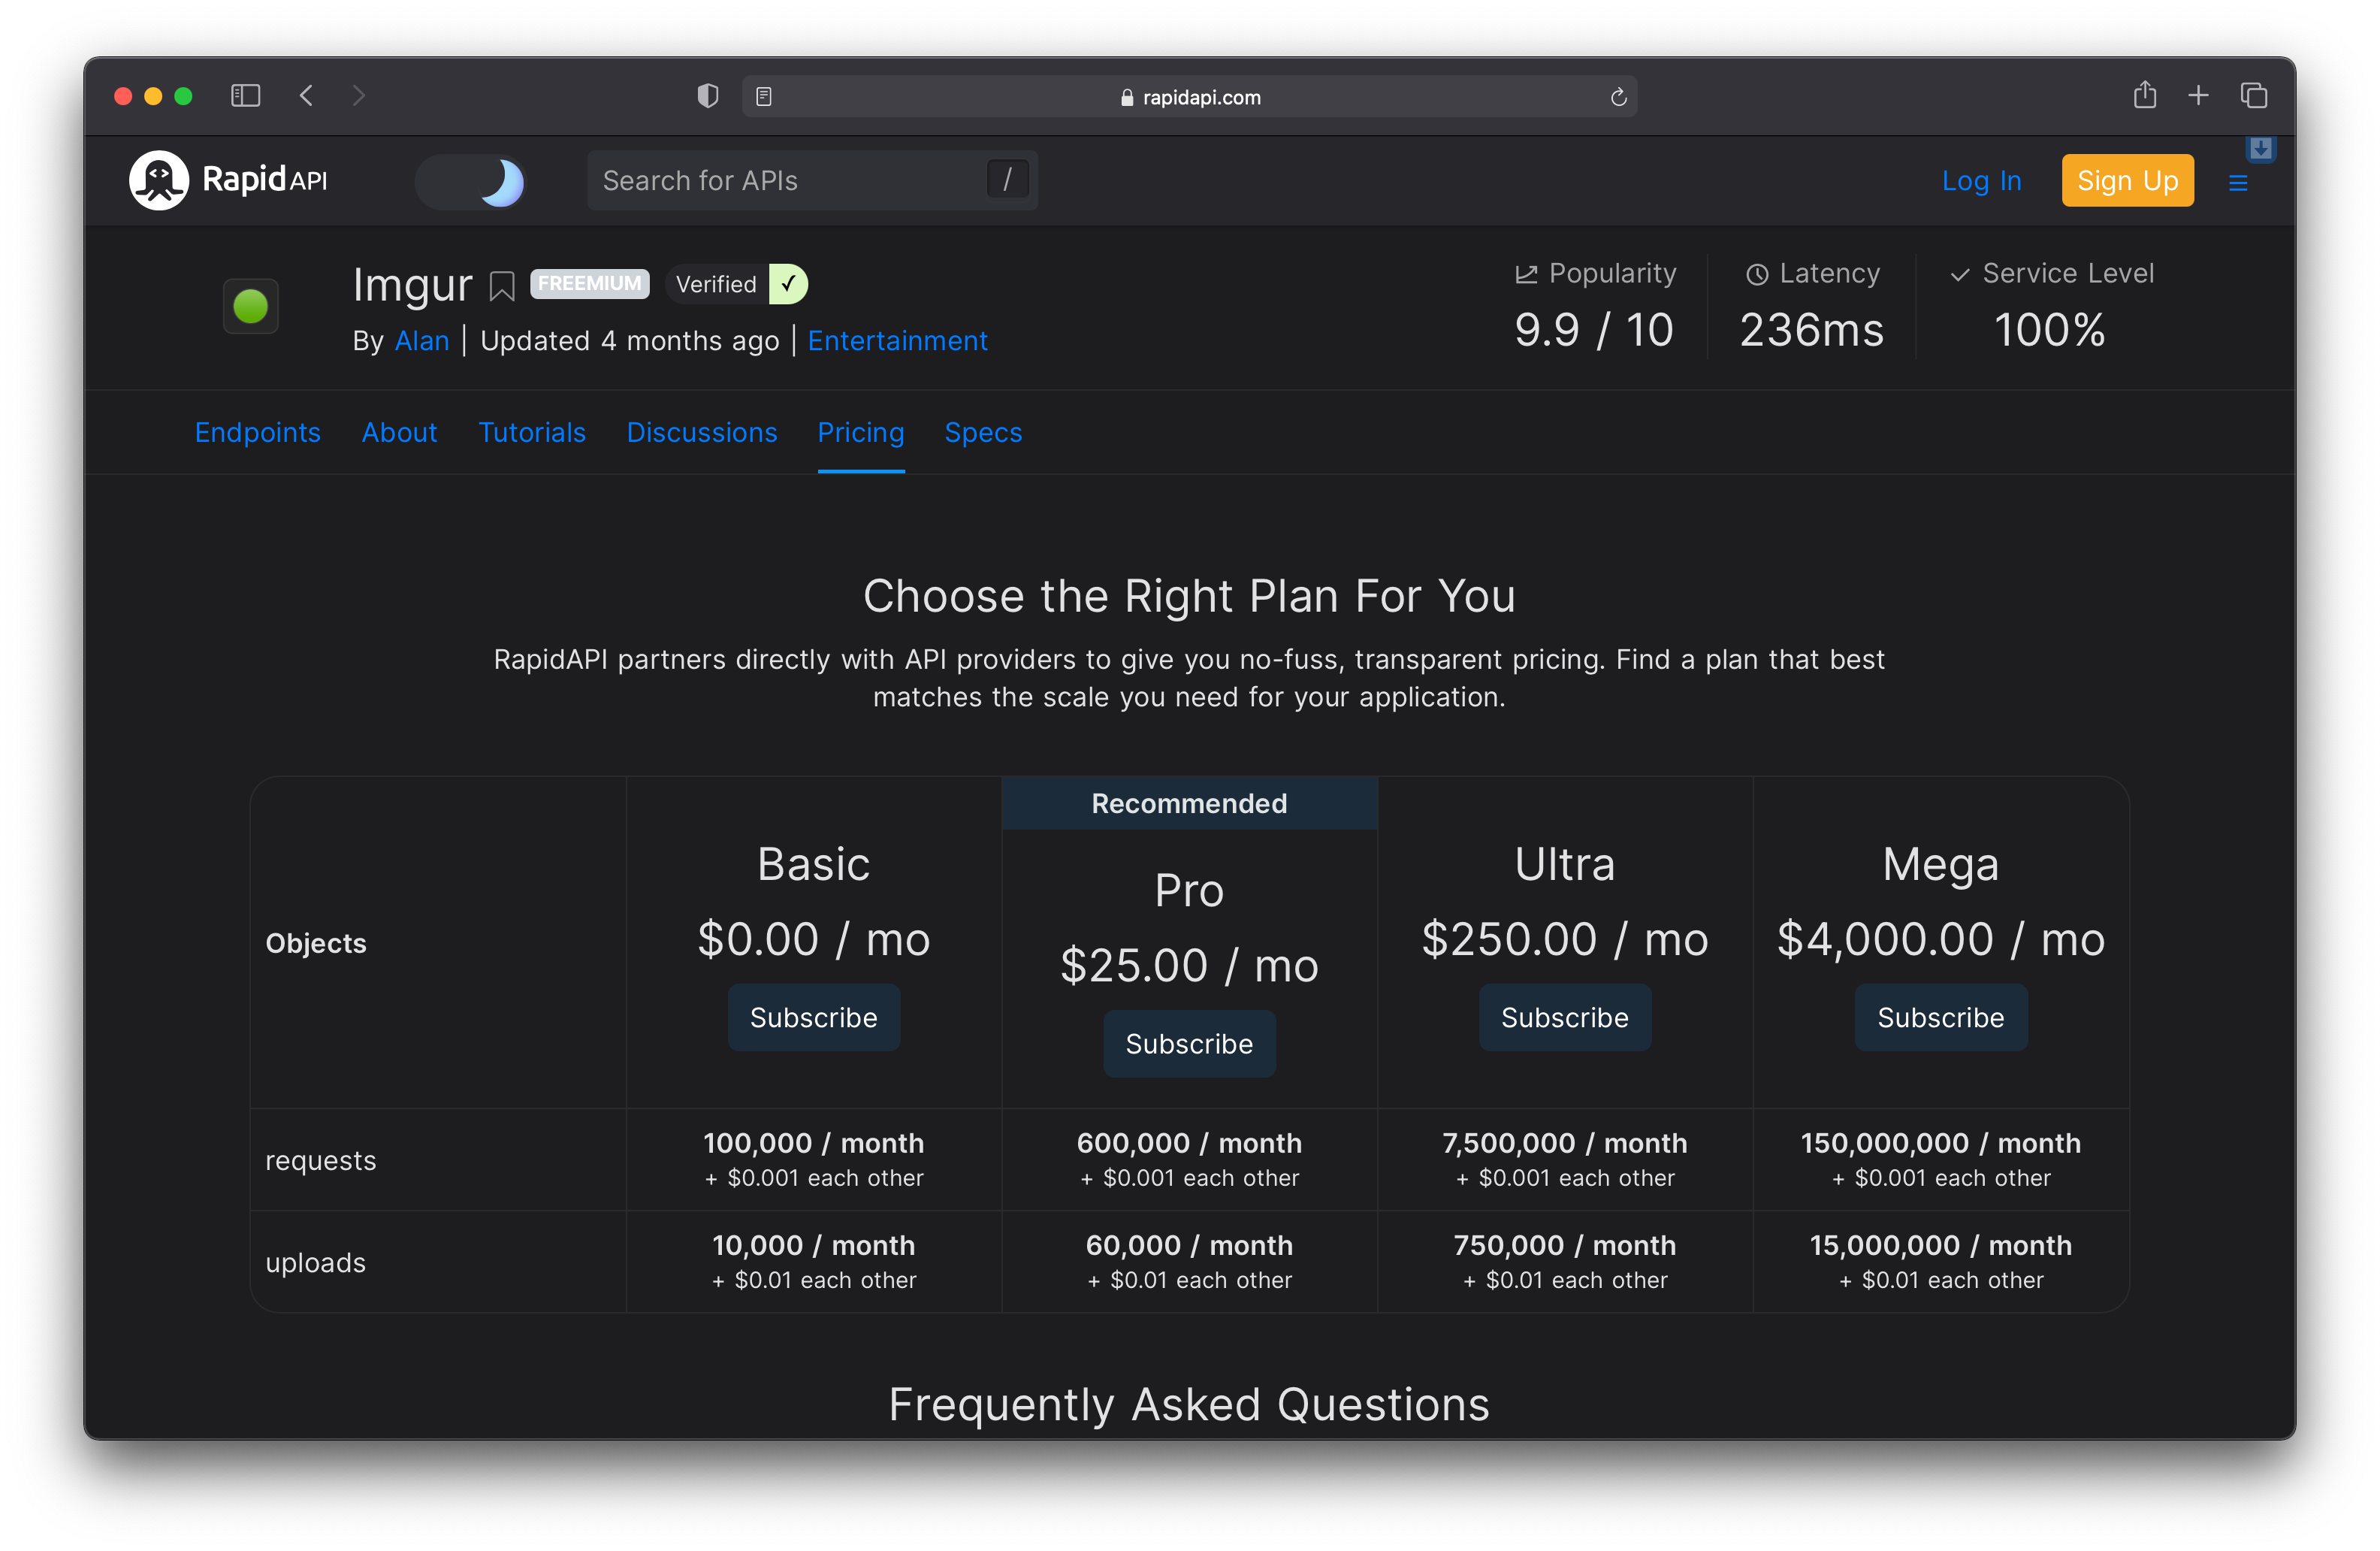 Figure 2
The best thing about RapidAPI is that anyone can sell their APIs. You do not need to be a corporation, a popular developer or anything like that. Anyone can do it!
Thus, let's see how one can sell their API!
Build and deploy the API
If you want to skip straight to the monetization part, you can do it here.
In this article, you will build a very simple application with Node.js and Express. The purpose of this article is to show how you can monetize your API, so you will create a dummy API with only one endpoint.
For this example, you will use the Express application generator, which creates an application skeleton. To start the generator, run the following command in your terminal:
npx express-generator rapidapi-example
The application only exposes one endpoint /users, which returns a list of people with fake details. Thus, developers can use this simple API to test their applications with fake data before making it available to the public.
Let's start by modifying the skeleton application.
Open the project rapidapi-example. After it opened, go to the views folder and open index.jade. Replace the content with the following code:
extends layout

block content
  h1= title
  p Welcome to #{title}
  p See the available list of
    a(href='/users') users
The next step is to create a folder in the root directory. The new folder will contain the JSON file with the fake users. Thus, you can create the new folder and the file as follows:
mkdir data
touch data/users.js
Next, open the users.js file and add the following code:
const users =
[
  {
    "email": "melissa.fleming@example.com",
    "phone_number": "0740-304-475",
    "location": {
      "street": "3655 manchester road",
      "city": "winchester",
      "state": "berkshire",
      "postcode": "YB2 8EJ"
    },
    "first_name": "melissa",
    "last_name": "fleming"
  },
  {
    "email": "christoffer.christiansen@example.com",
    "phone_number": "05761325",
    "location": {
      "street": "3391 pilevangen",
      "city": "overby lyng",
      "state": "danmark",
      "postcode": 88520
    },
    "first_name": "christoffer",
    "last_name": "christiansen"
  }
]

module.exports = users;
In the above code, you create an array of persons and then export it. The reason for doing it is so you can import the data into your API.
Thus, let's import the data into the API. First, go to the routes folder and open the file users.js. After that, import the array of persons by adding the following line under the var router line:
var users = require('../data/users');
Next, replace the line res.send('respond with a resource'); with the following line:
res.json(users);
Now, when people access the endpoint /users, they get back the array of people in JSON format.
Run npm start in the terminal from the project's root directory to start and test the application. Then, after the application starts, go to localhost:3000/users to test it!
Figure 3 below illustrates what you should see!
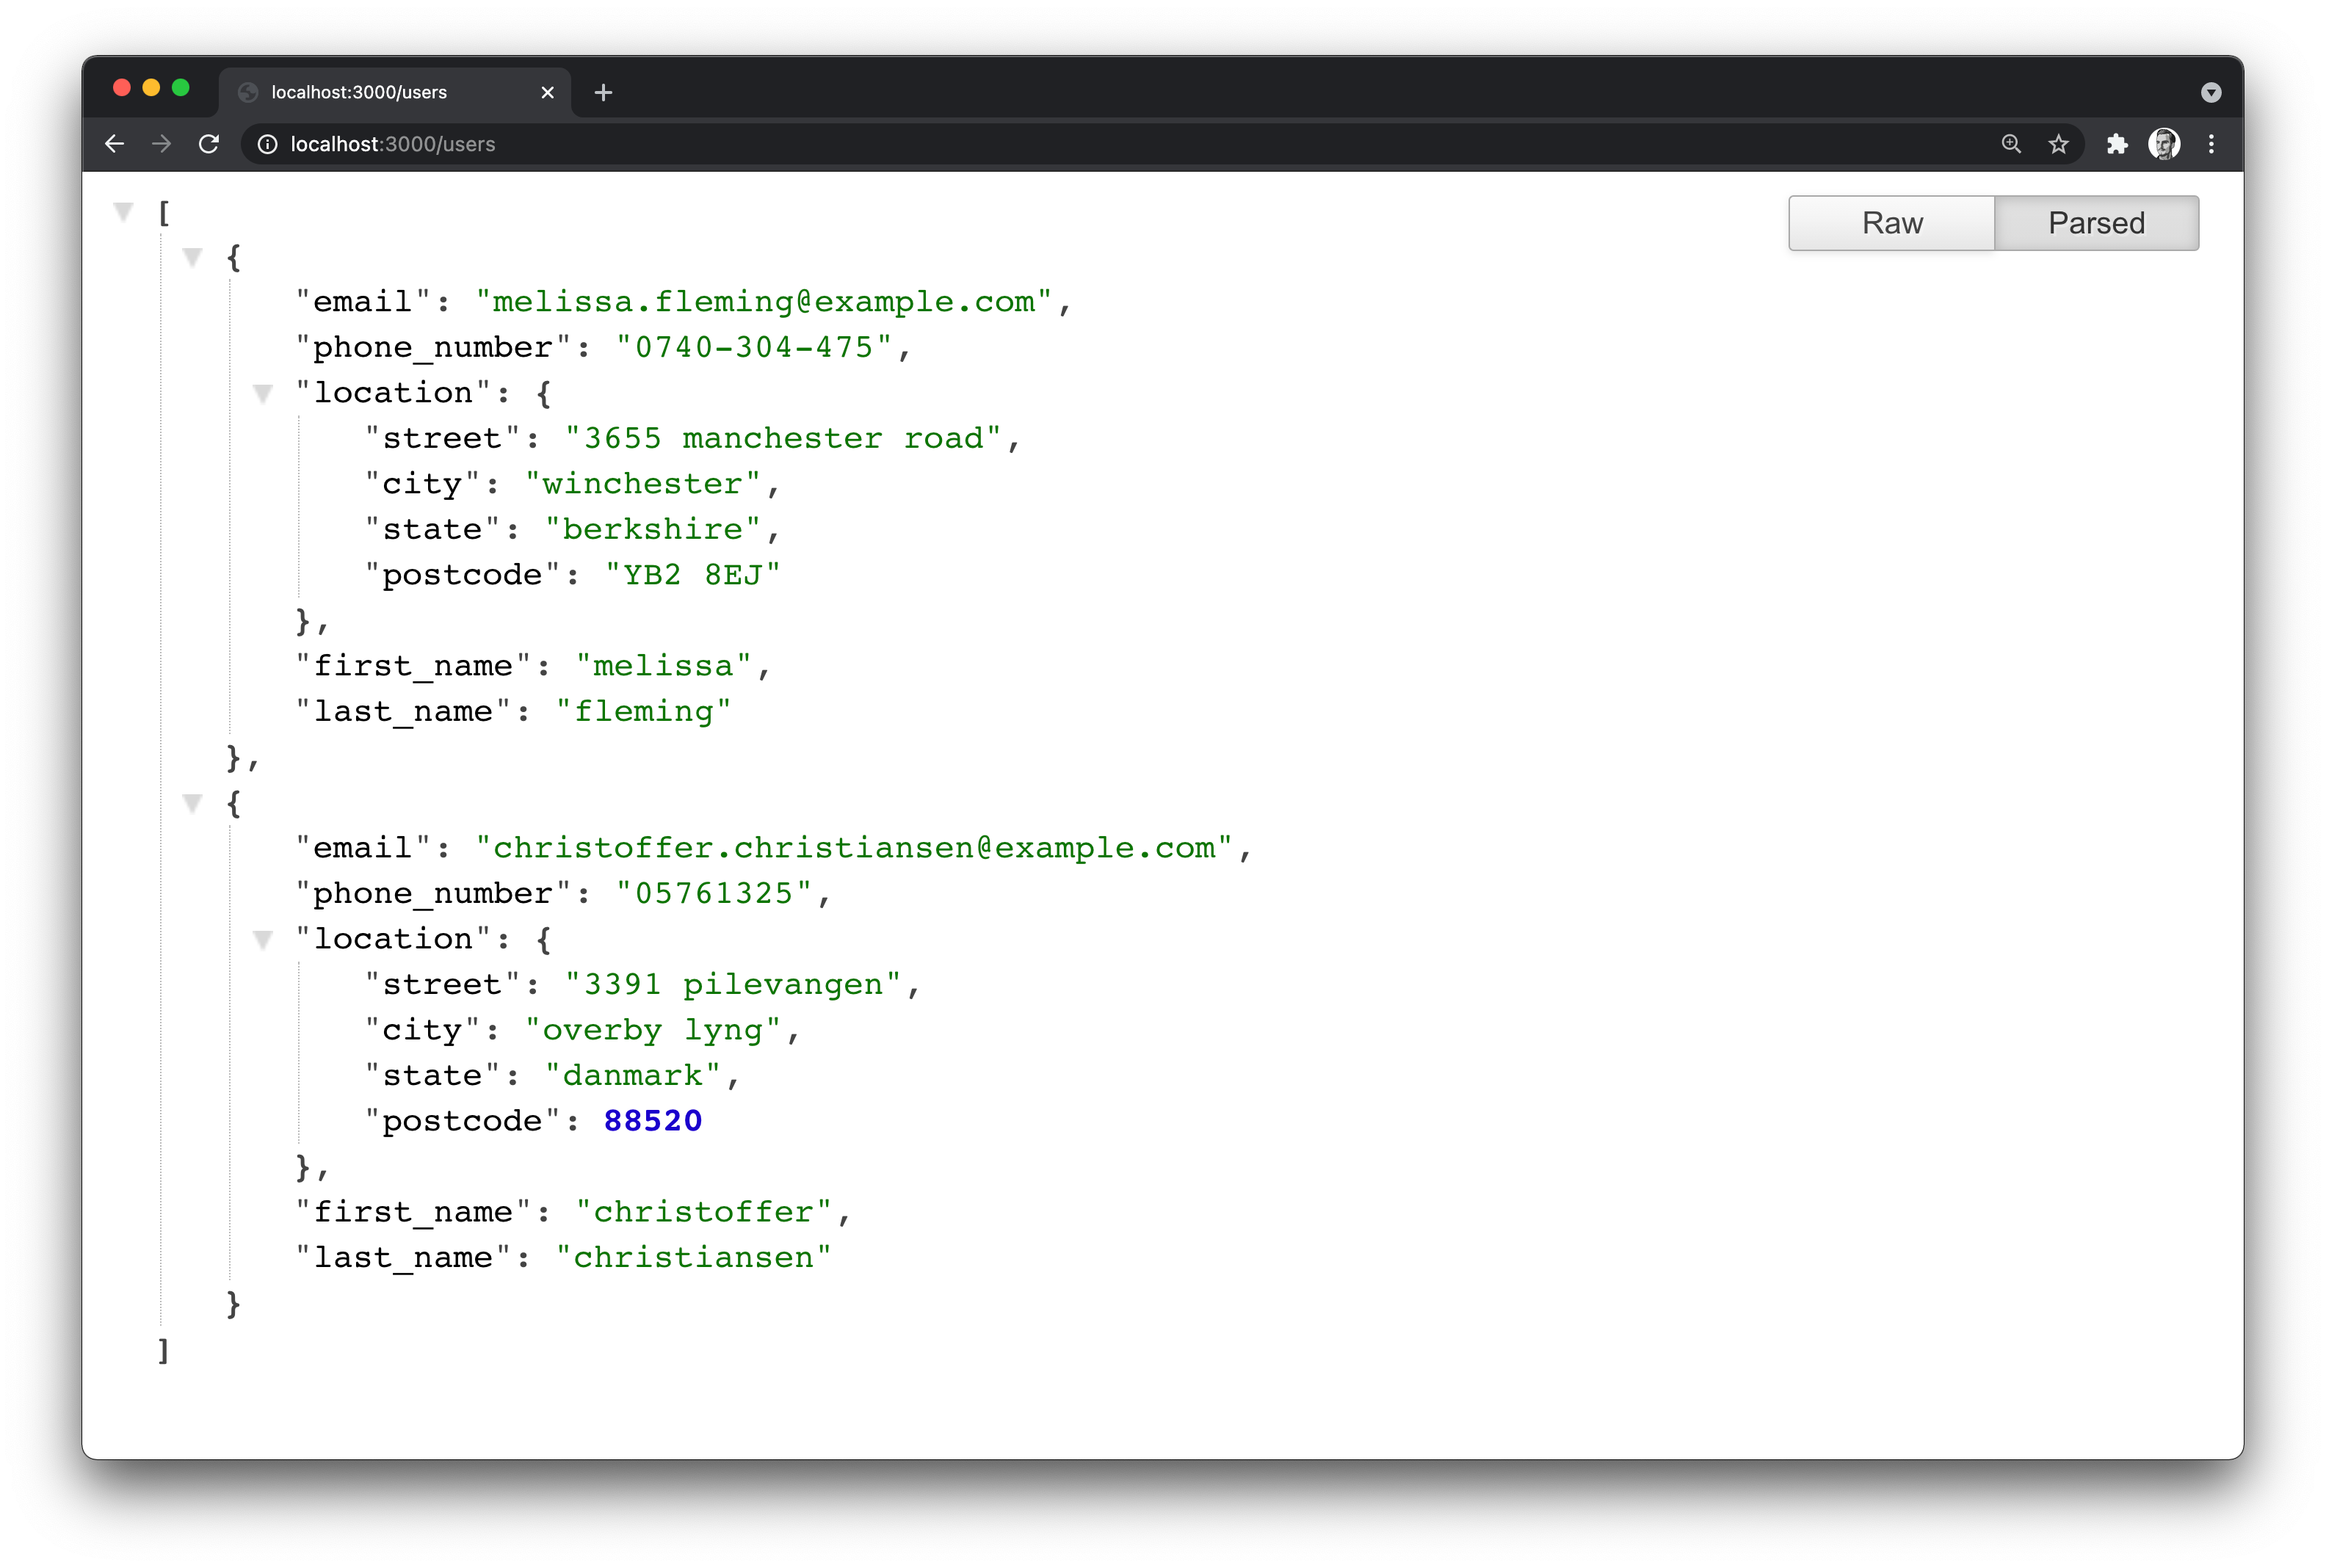 Figure 3
The final file, users.js, should look as follows:
var express = require('express');
var router = express.Router();
var users = require('../data/users');

/* GET users listing. */
router.get('/', function(req, res, next) {
  res.json({ users });
});

module.exports = router;
As you can see, the API has only one endpoint that returns an array of people with fake details. Therefore, before publishing the API on RapidAPI, you need to deploy it on a hosting service.
You can see my repository on Github for reference.
Deploy the API
There are many platforms where you can deploy Node.js applications, but you will see how to deploy on Heroku in this tutorial.
The article shows a high-level overview of deploying to Heroku. If you want an in-depth guide, I recommend checking the official documentation. With that being said, let’s quickly deploy the newly created application!
The first step is to log into Heroku and go to the dashboard. From the dashboard, click on the button saying “New” and select “Create new app”. Figure 4 illustrates what you should see.
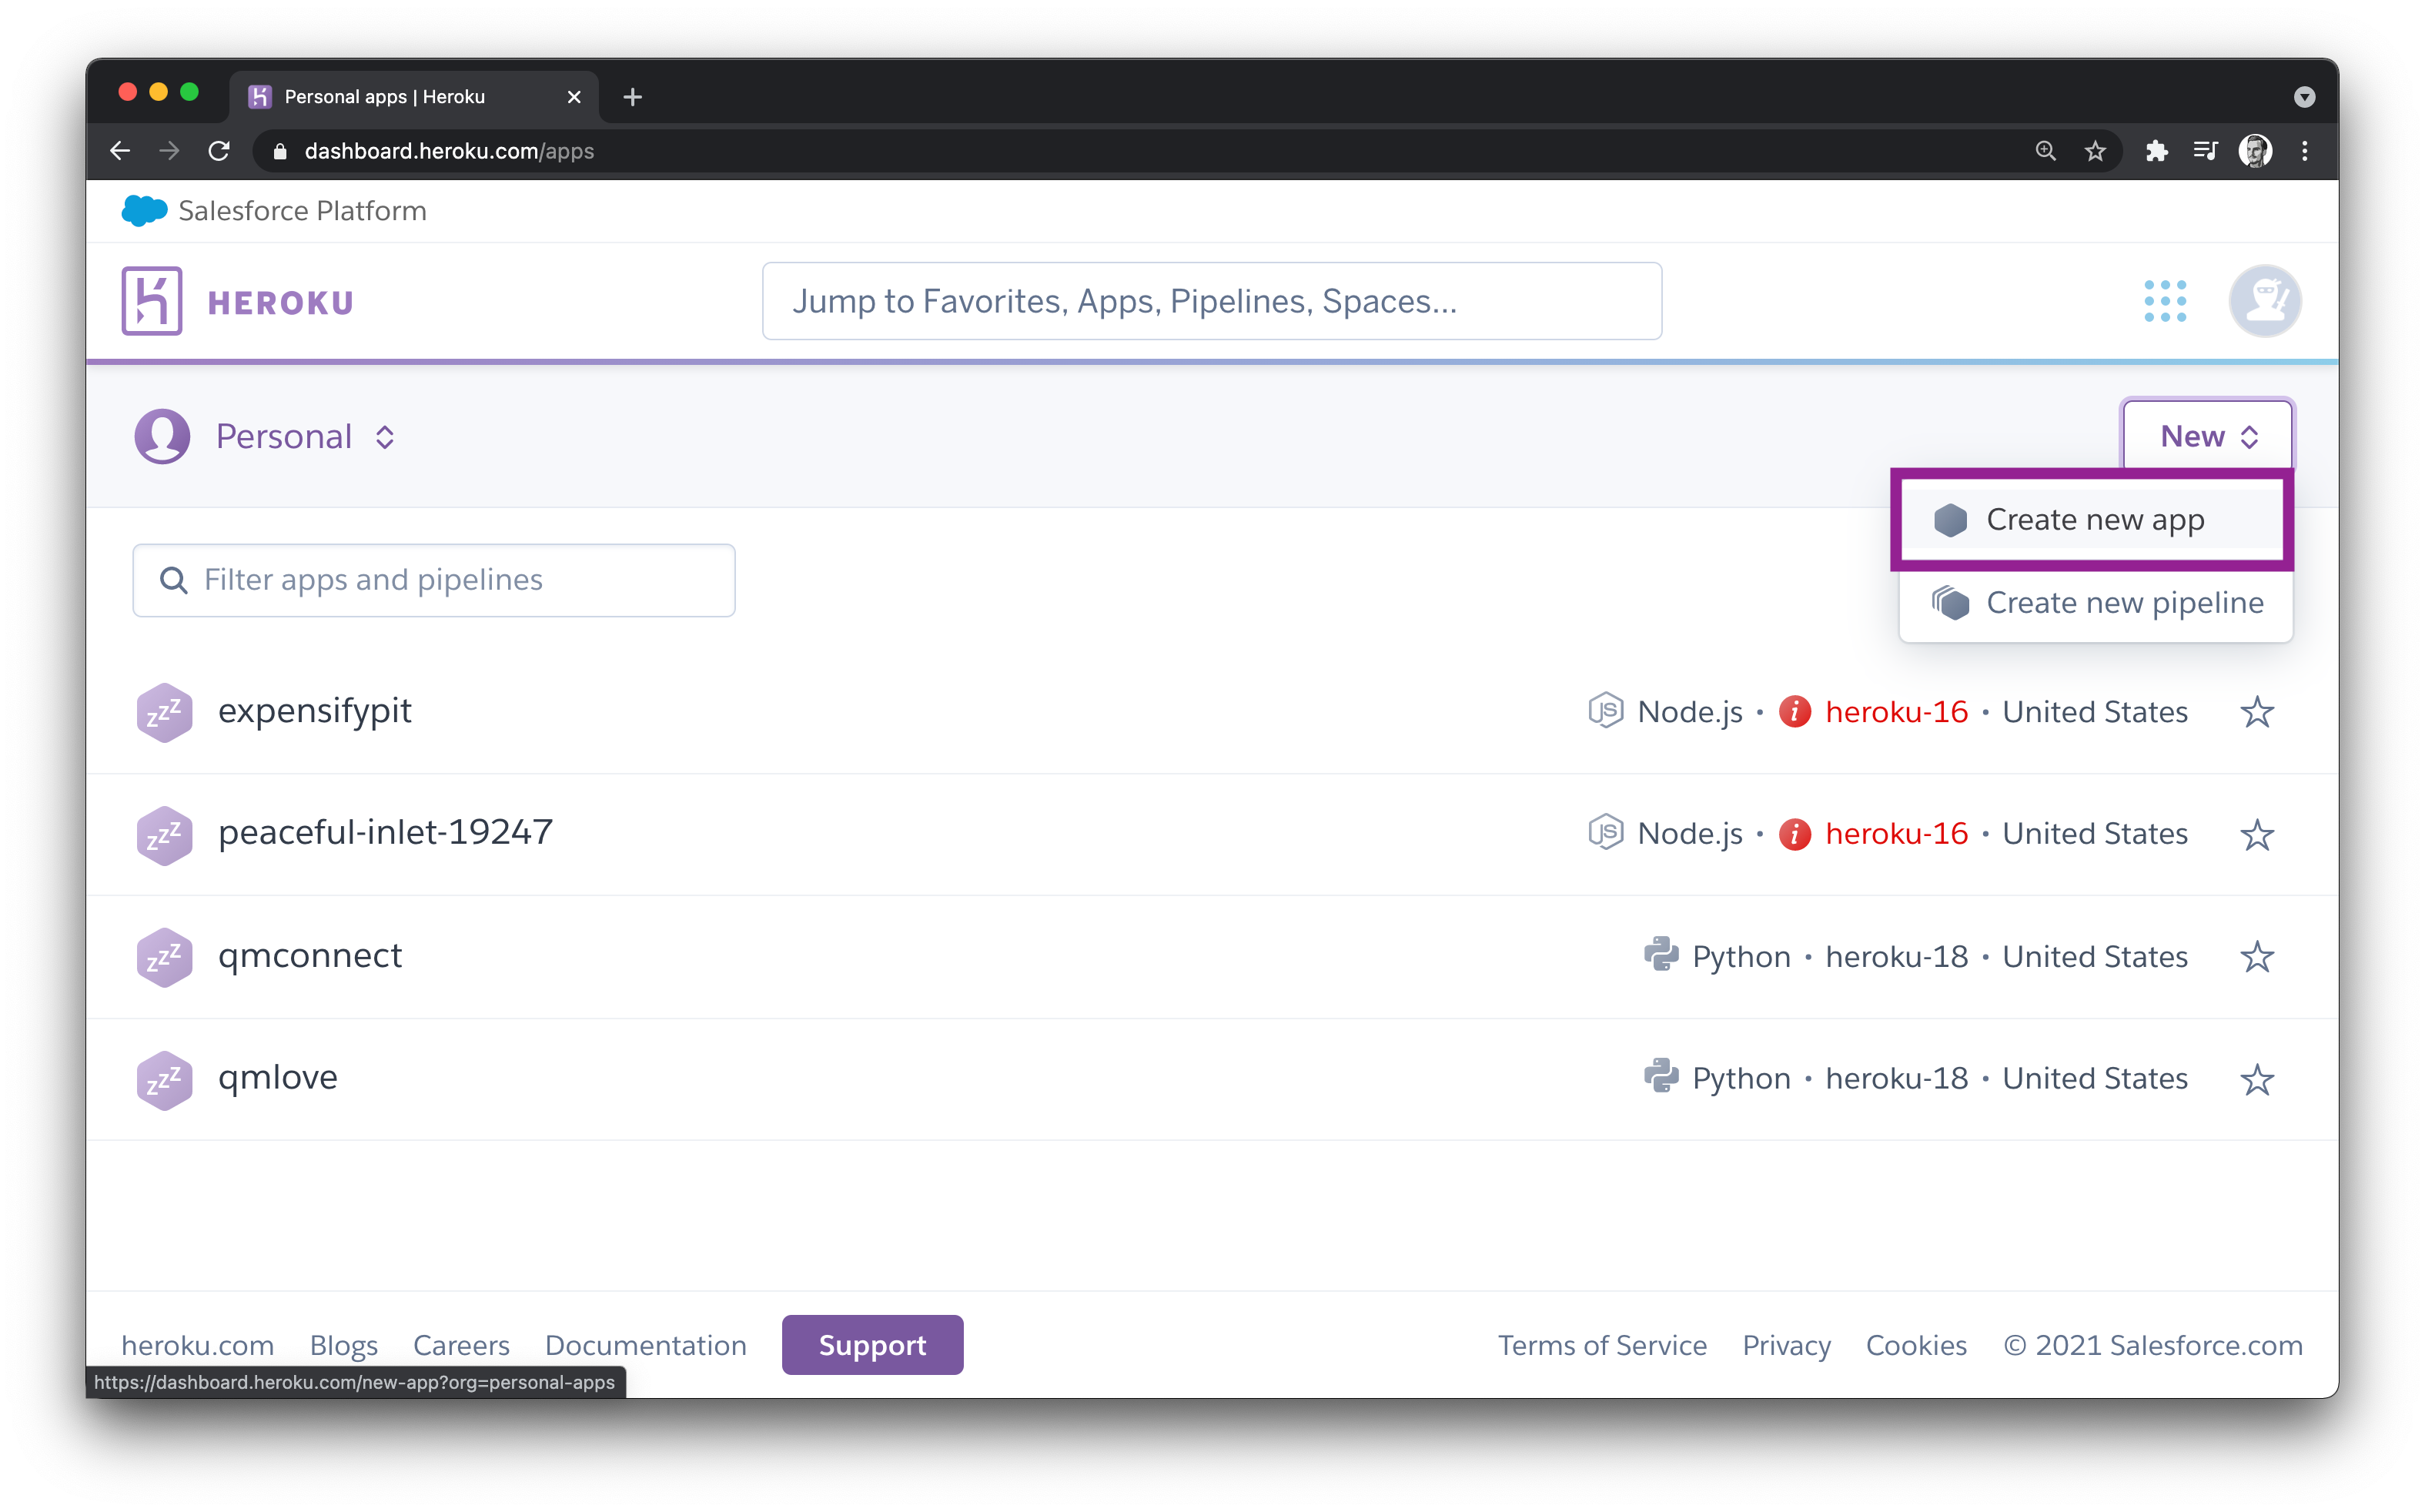 Figure 4
The next step is to choose the app name and the region for your application. You can use the same details from figure 5 below, or you can use custom ones. Once you finish entering the details, click on the “Create app” button, as shown in figure 5.
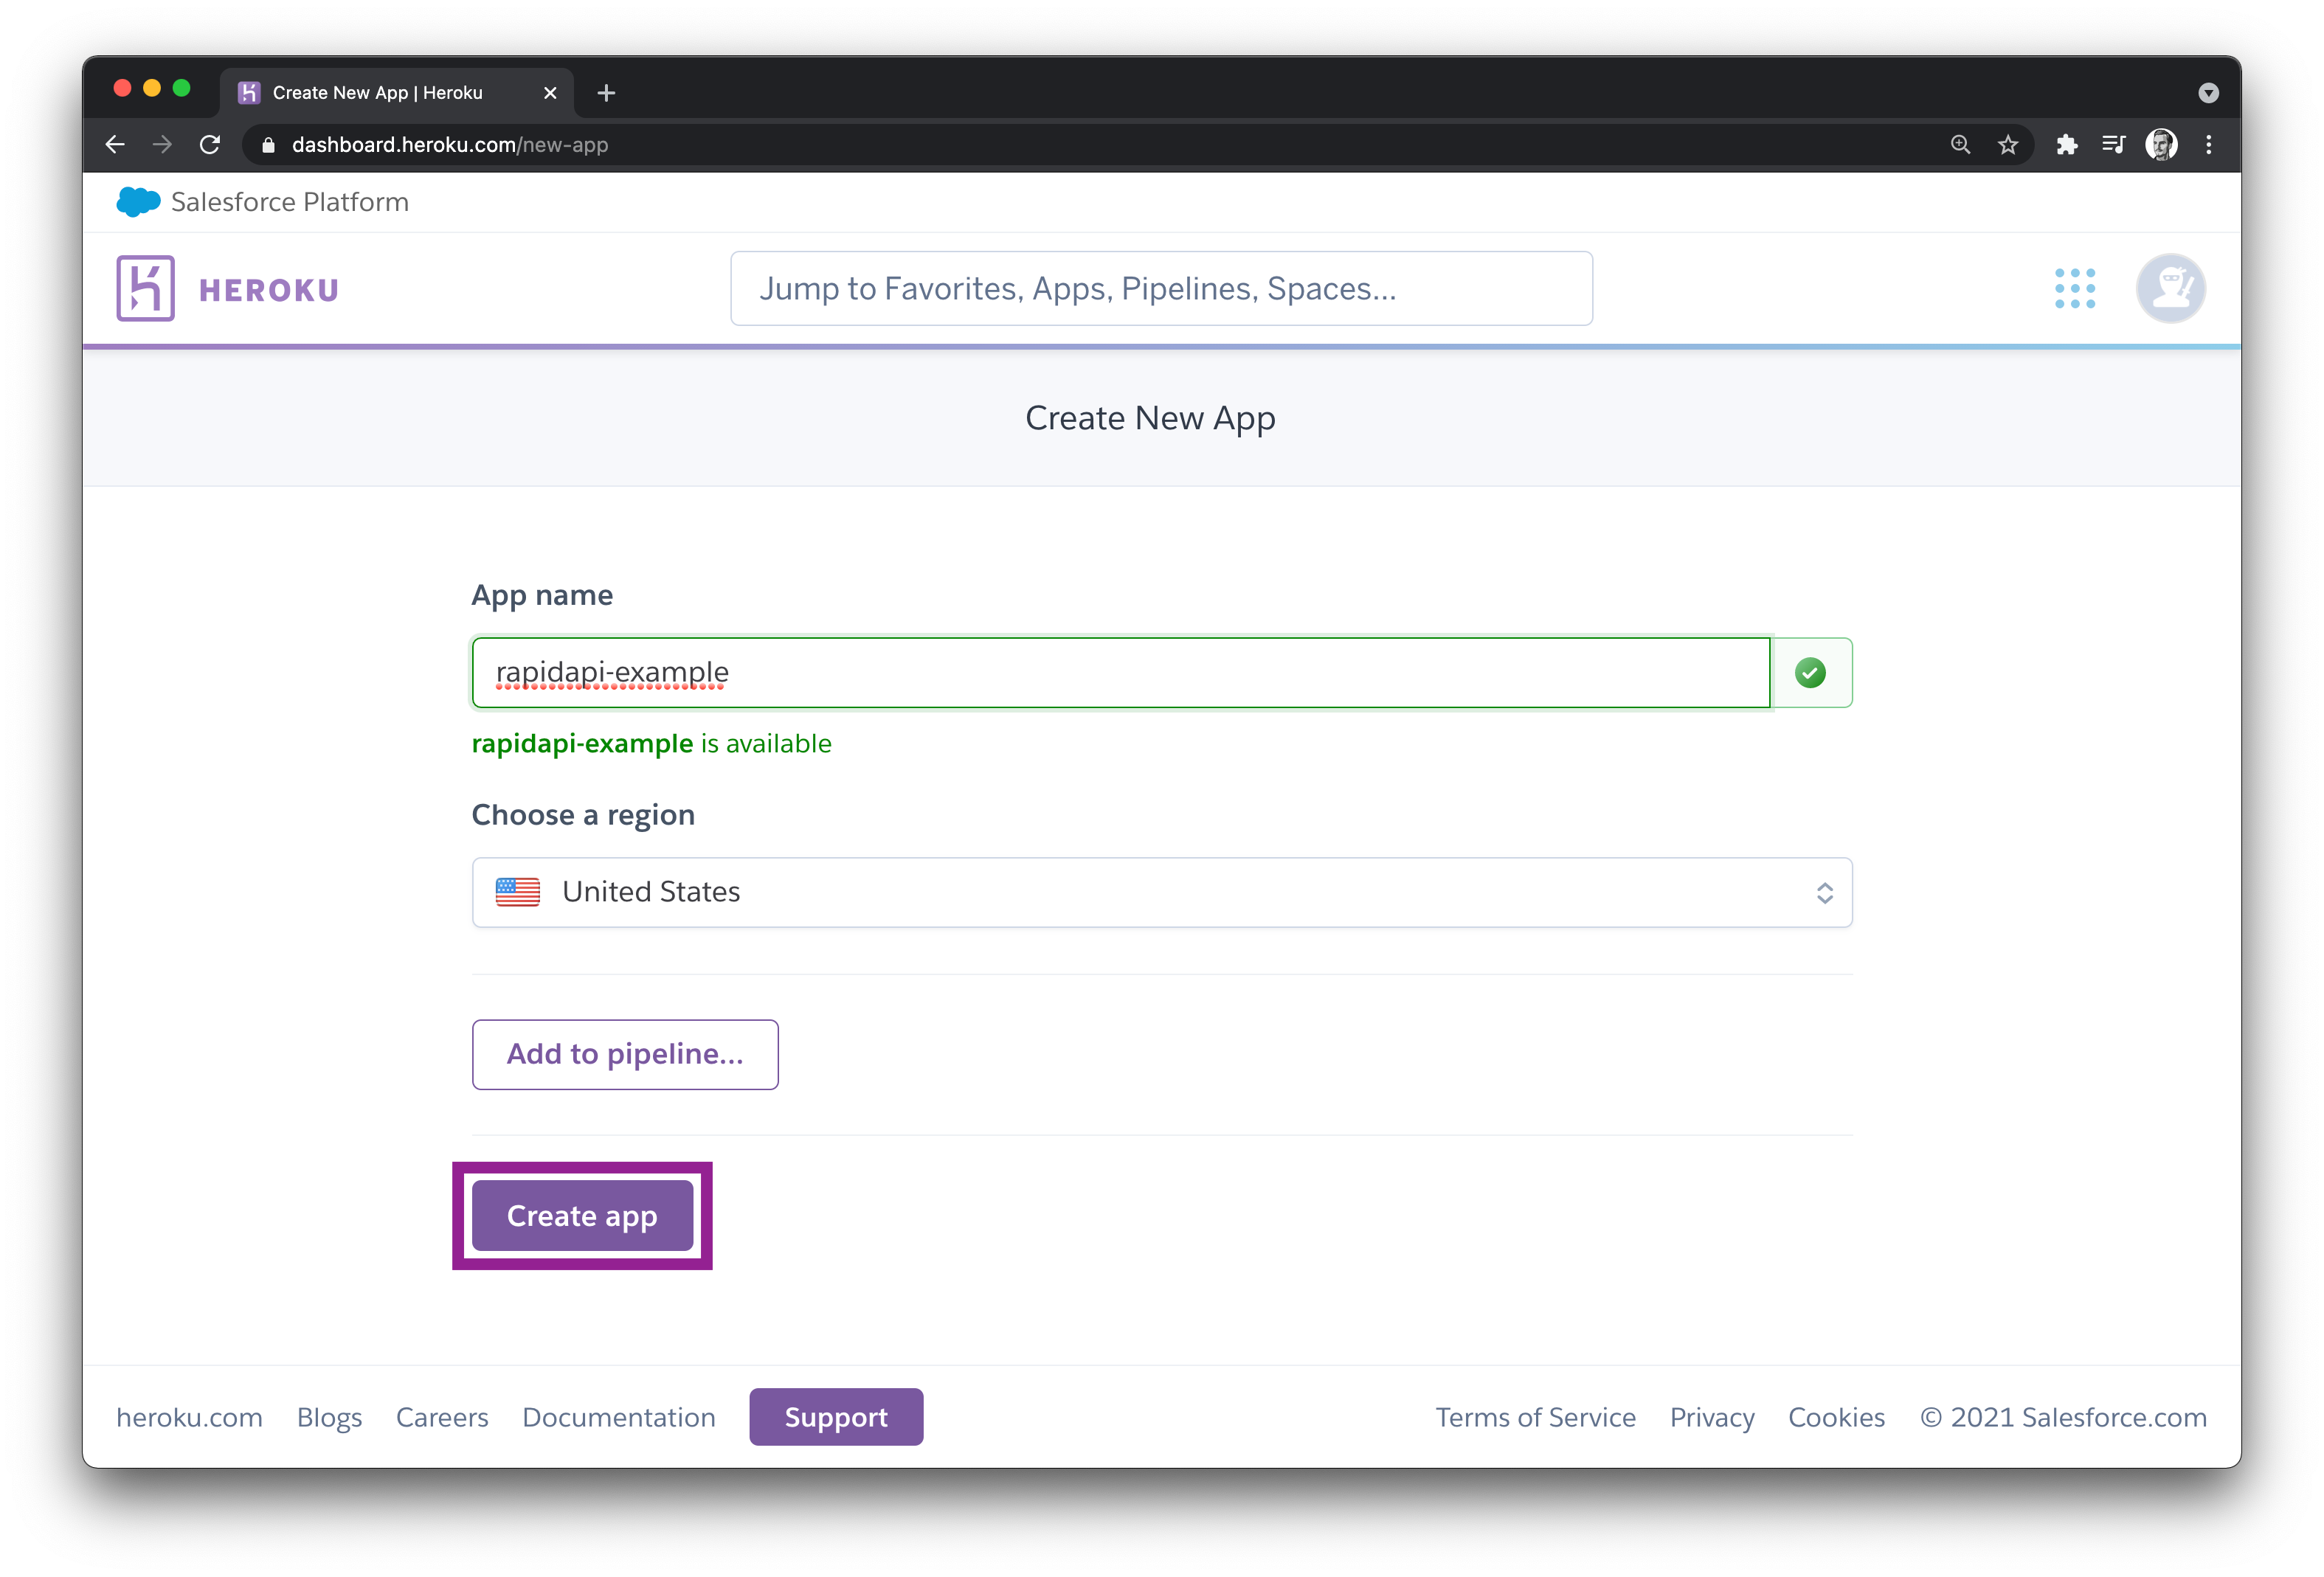 Figure 5
After clicking on the “Create app” button, you are taken to a new page where you can find the deployment details. You can deploy your application using the Heroku CLI or Github. Choose the method that fits your needs.
However, in this tutorial, you will see how to deploy to Heroku using Github. On the "deploy" page, choose the "Github" method for deployment. After that, search for the repository name, and once you find it, click on the "Connect" button.
See figure 6 for reference!
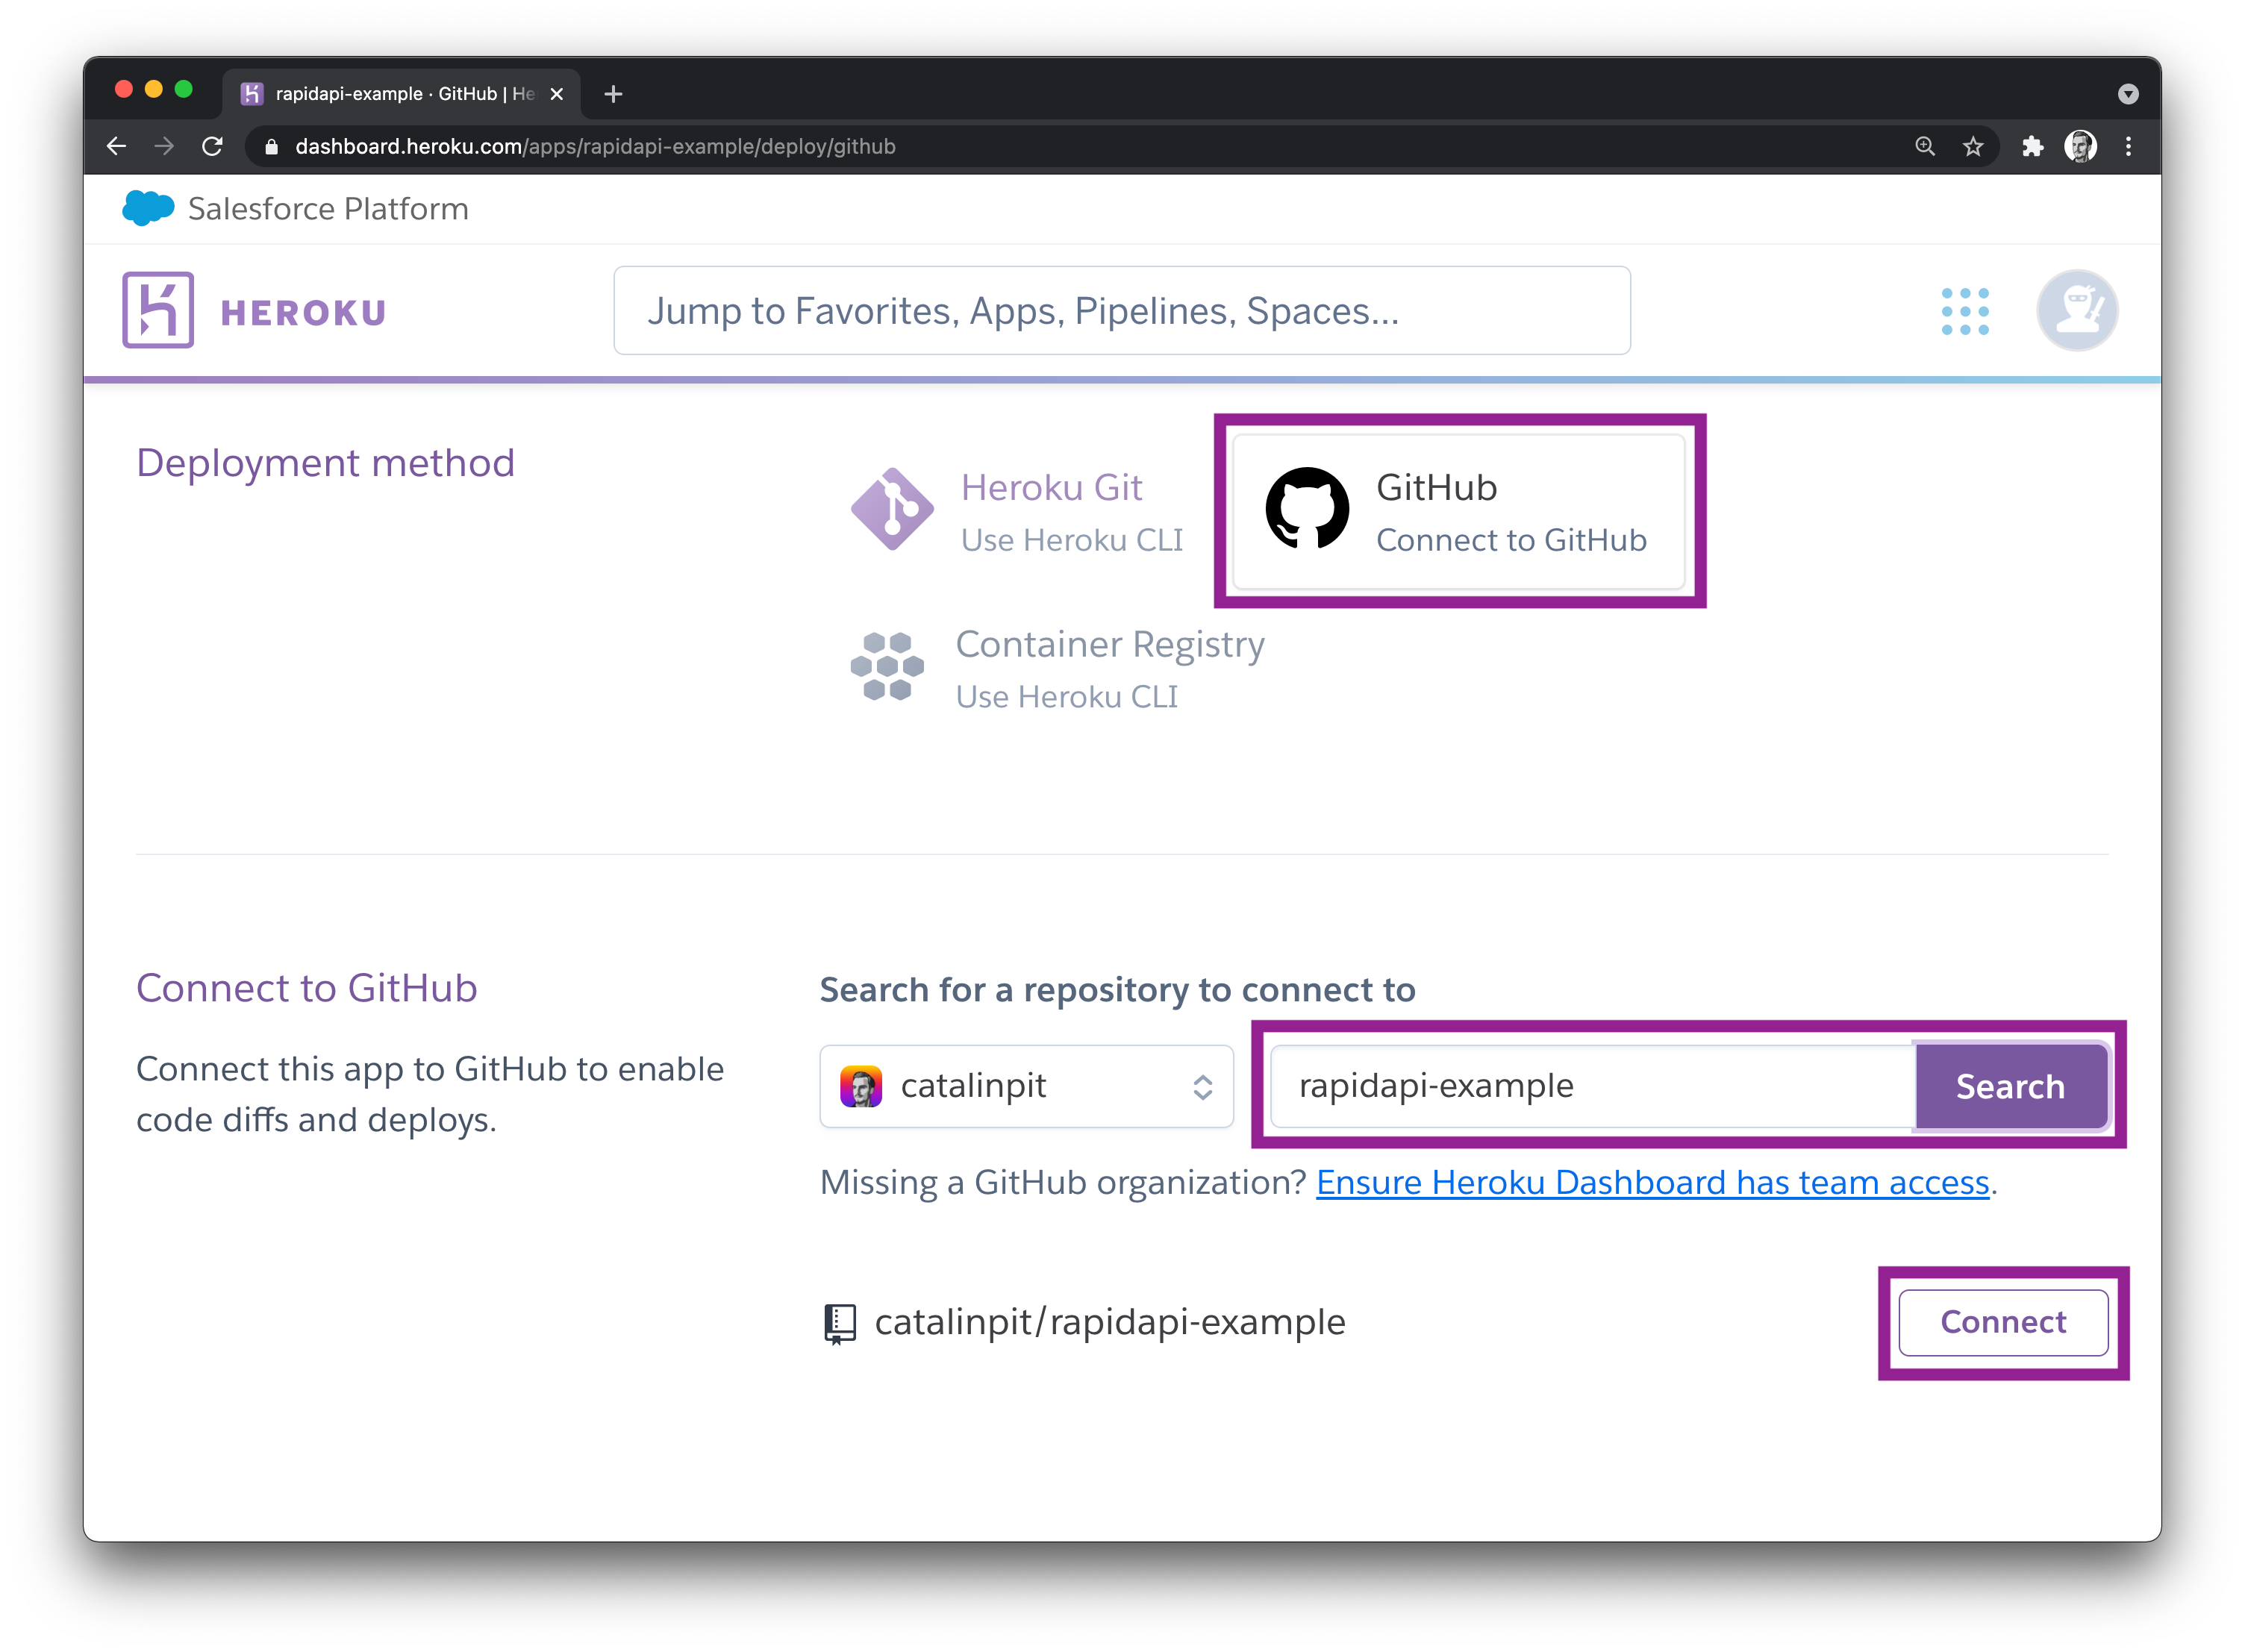 Figure 6
Before going further and deploying the application, you need to choose the buildpack for the API. A buildpack is a script Heroku runs when your application is deployed. It's used to configure your app environment and install the dependencies needed by the application. Since the API is built with Node.js, you will need to install the Node.js buildpack.
As shown in figure 7, go to the settings page and scroll until you see the "Buildpacks" section.
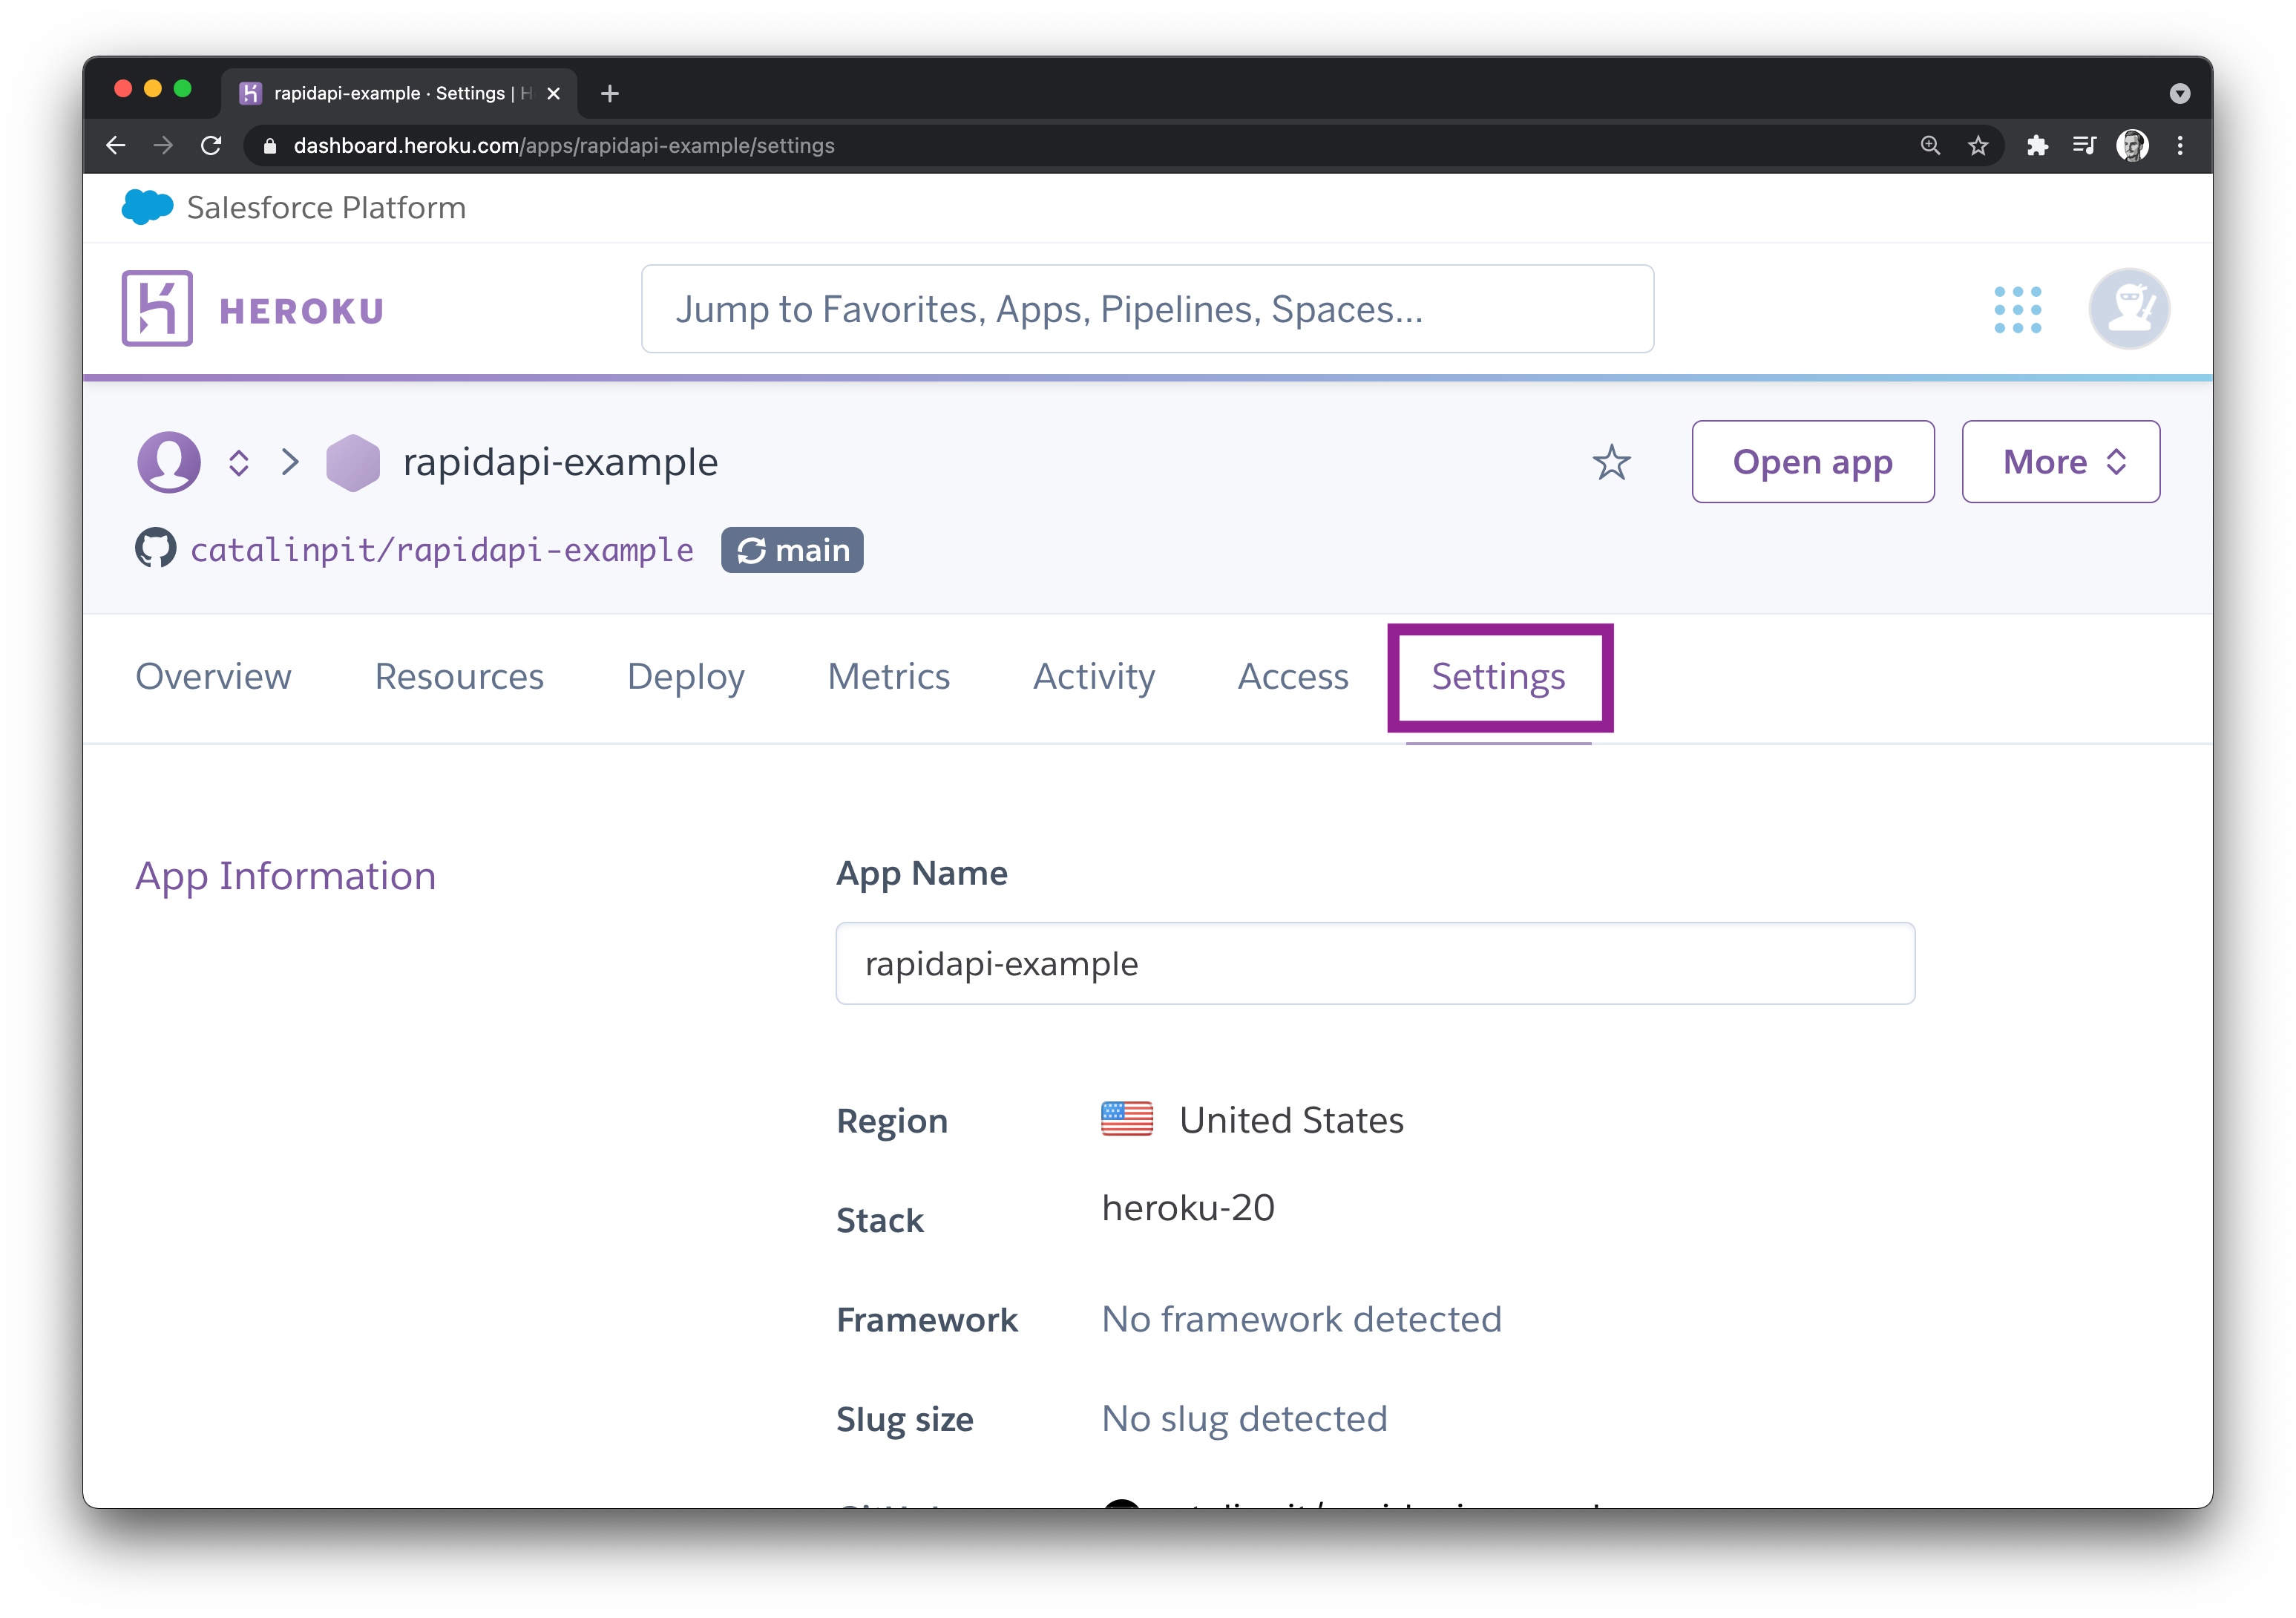 Figure 7
Figure 8 illustrates what you should see when you scroll down the page. Now click on the "Add buildpack" button, as shown in figure 8 below.
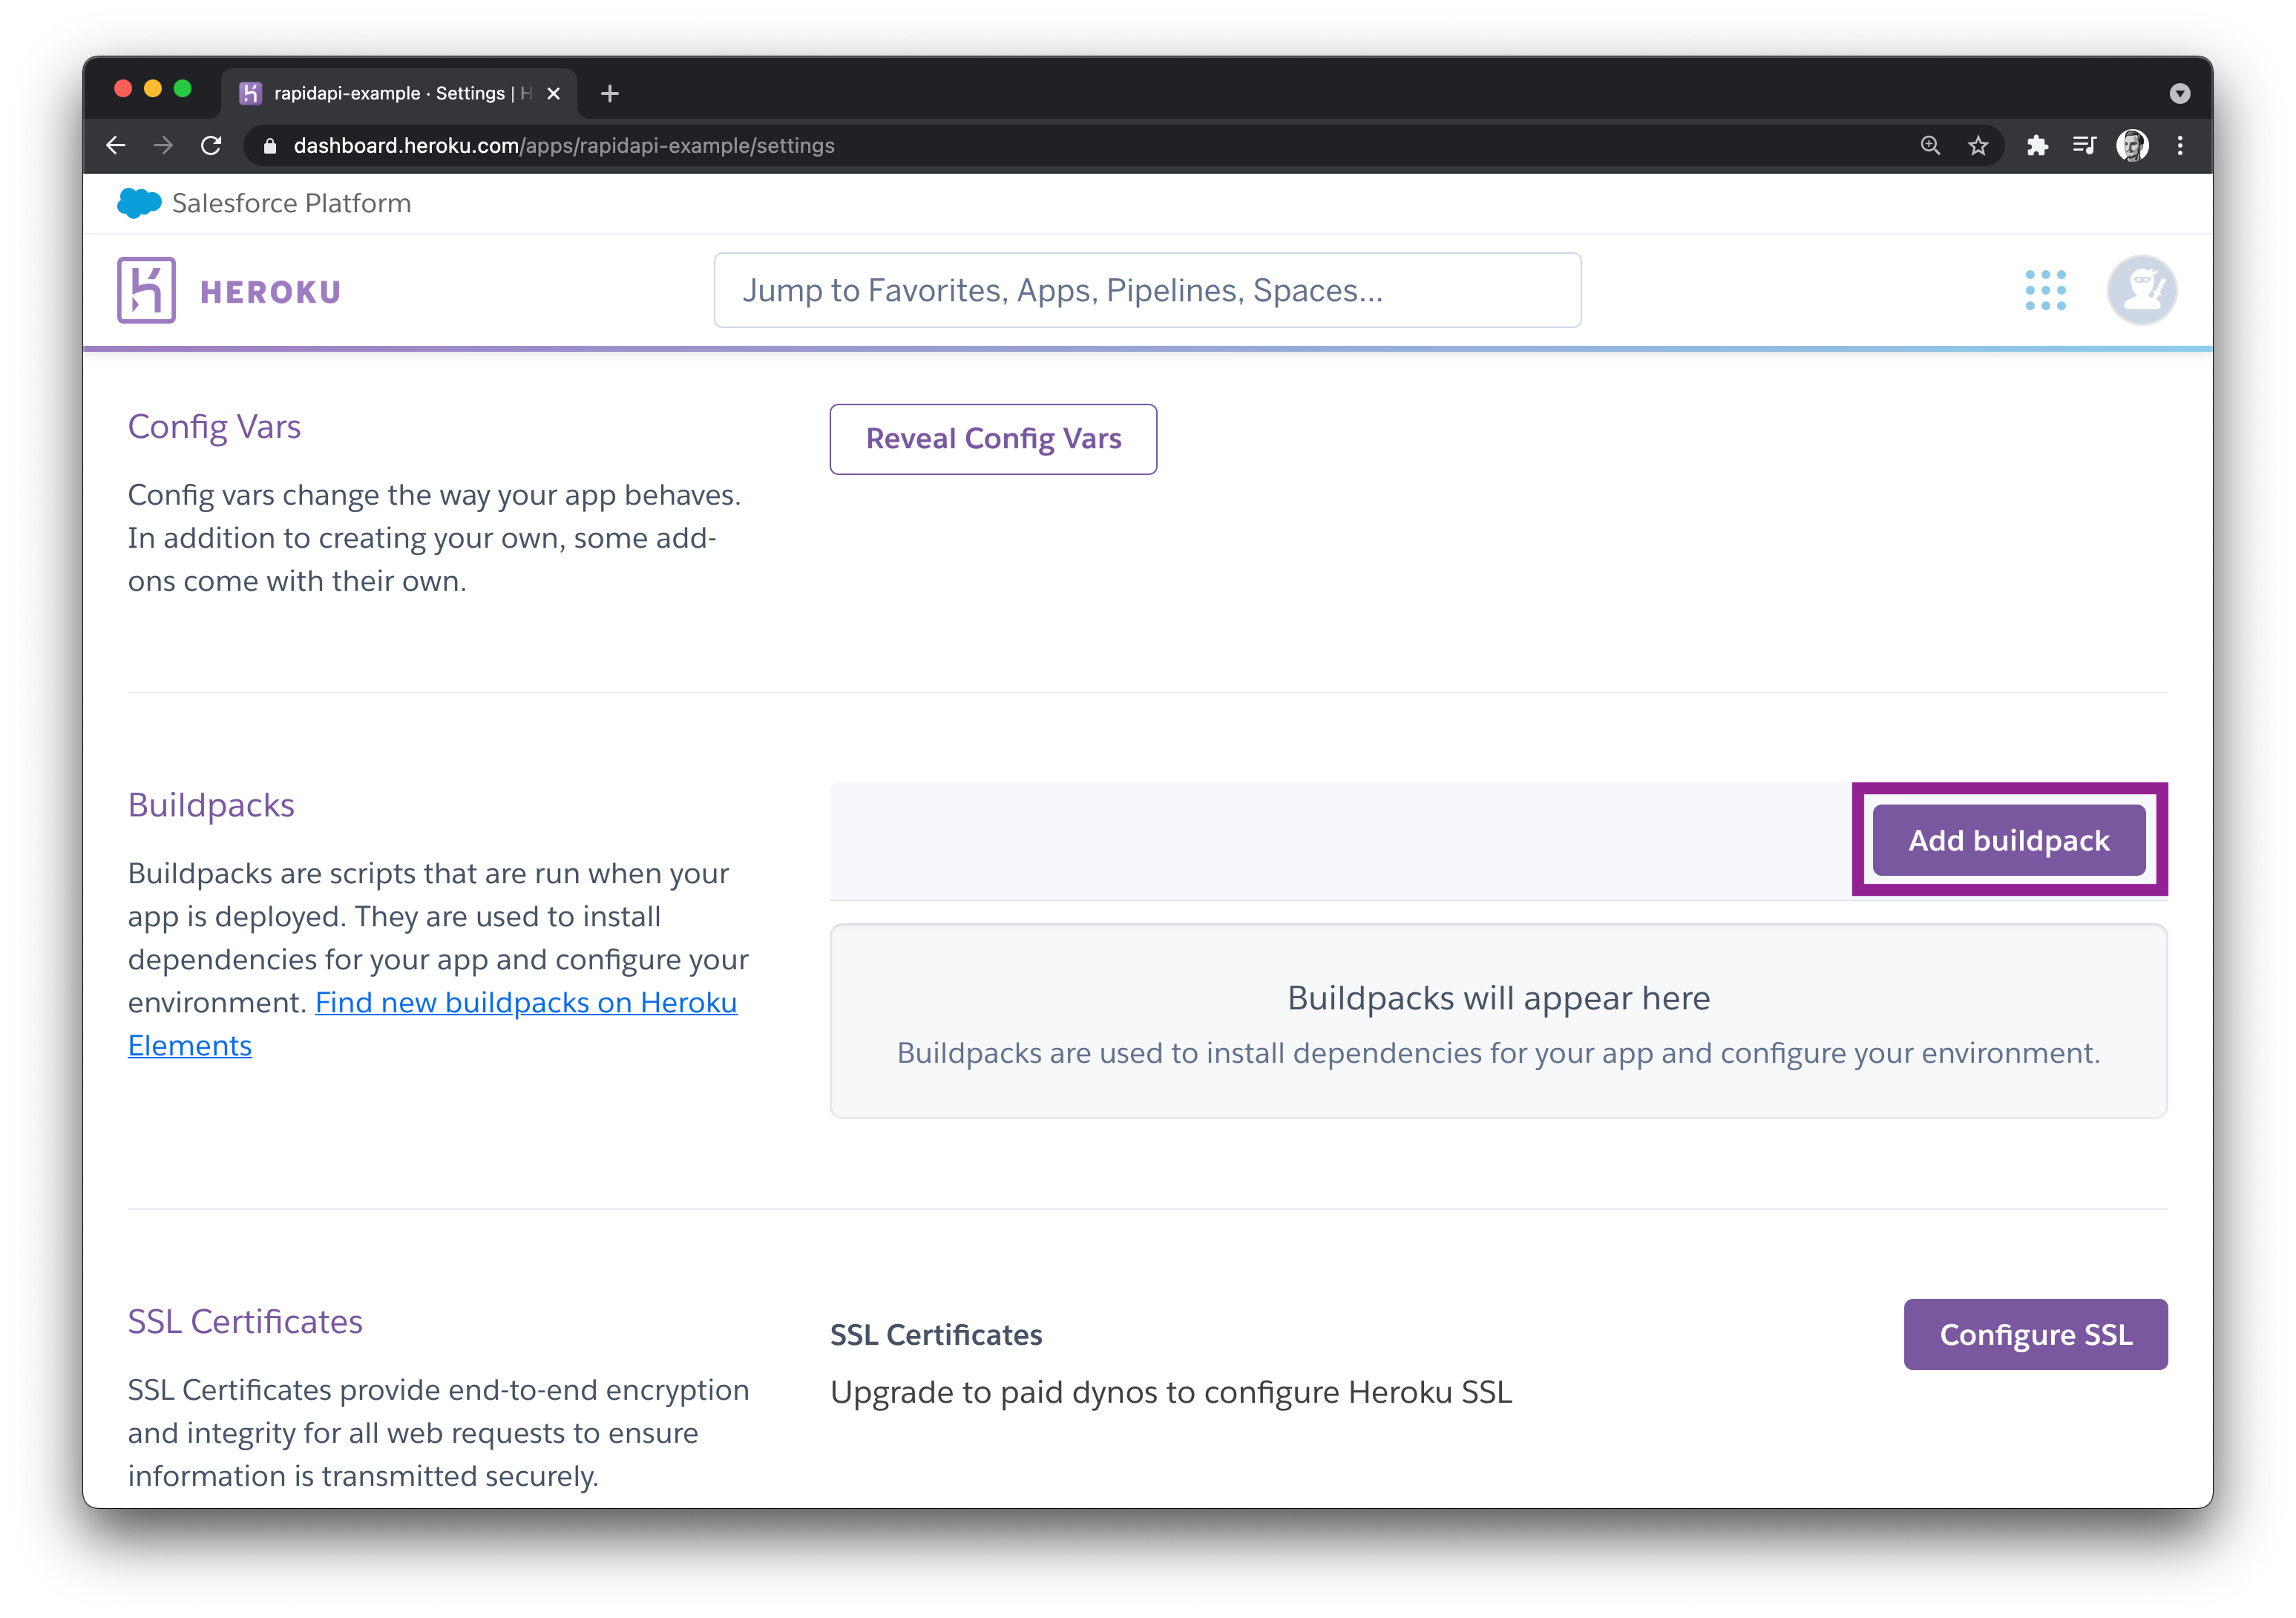 Figure 8
When you click on the "Add buildpack" button, a new window appears from where you can select Node.js - see figure 9 below for reference. Click on it and then click on "Save changes".
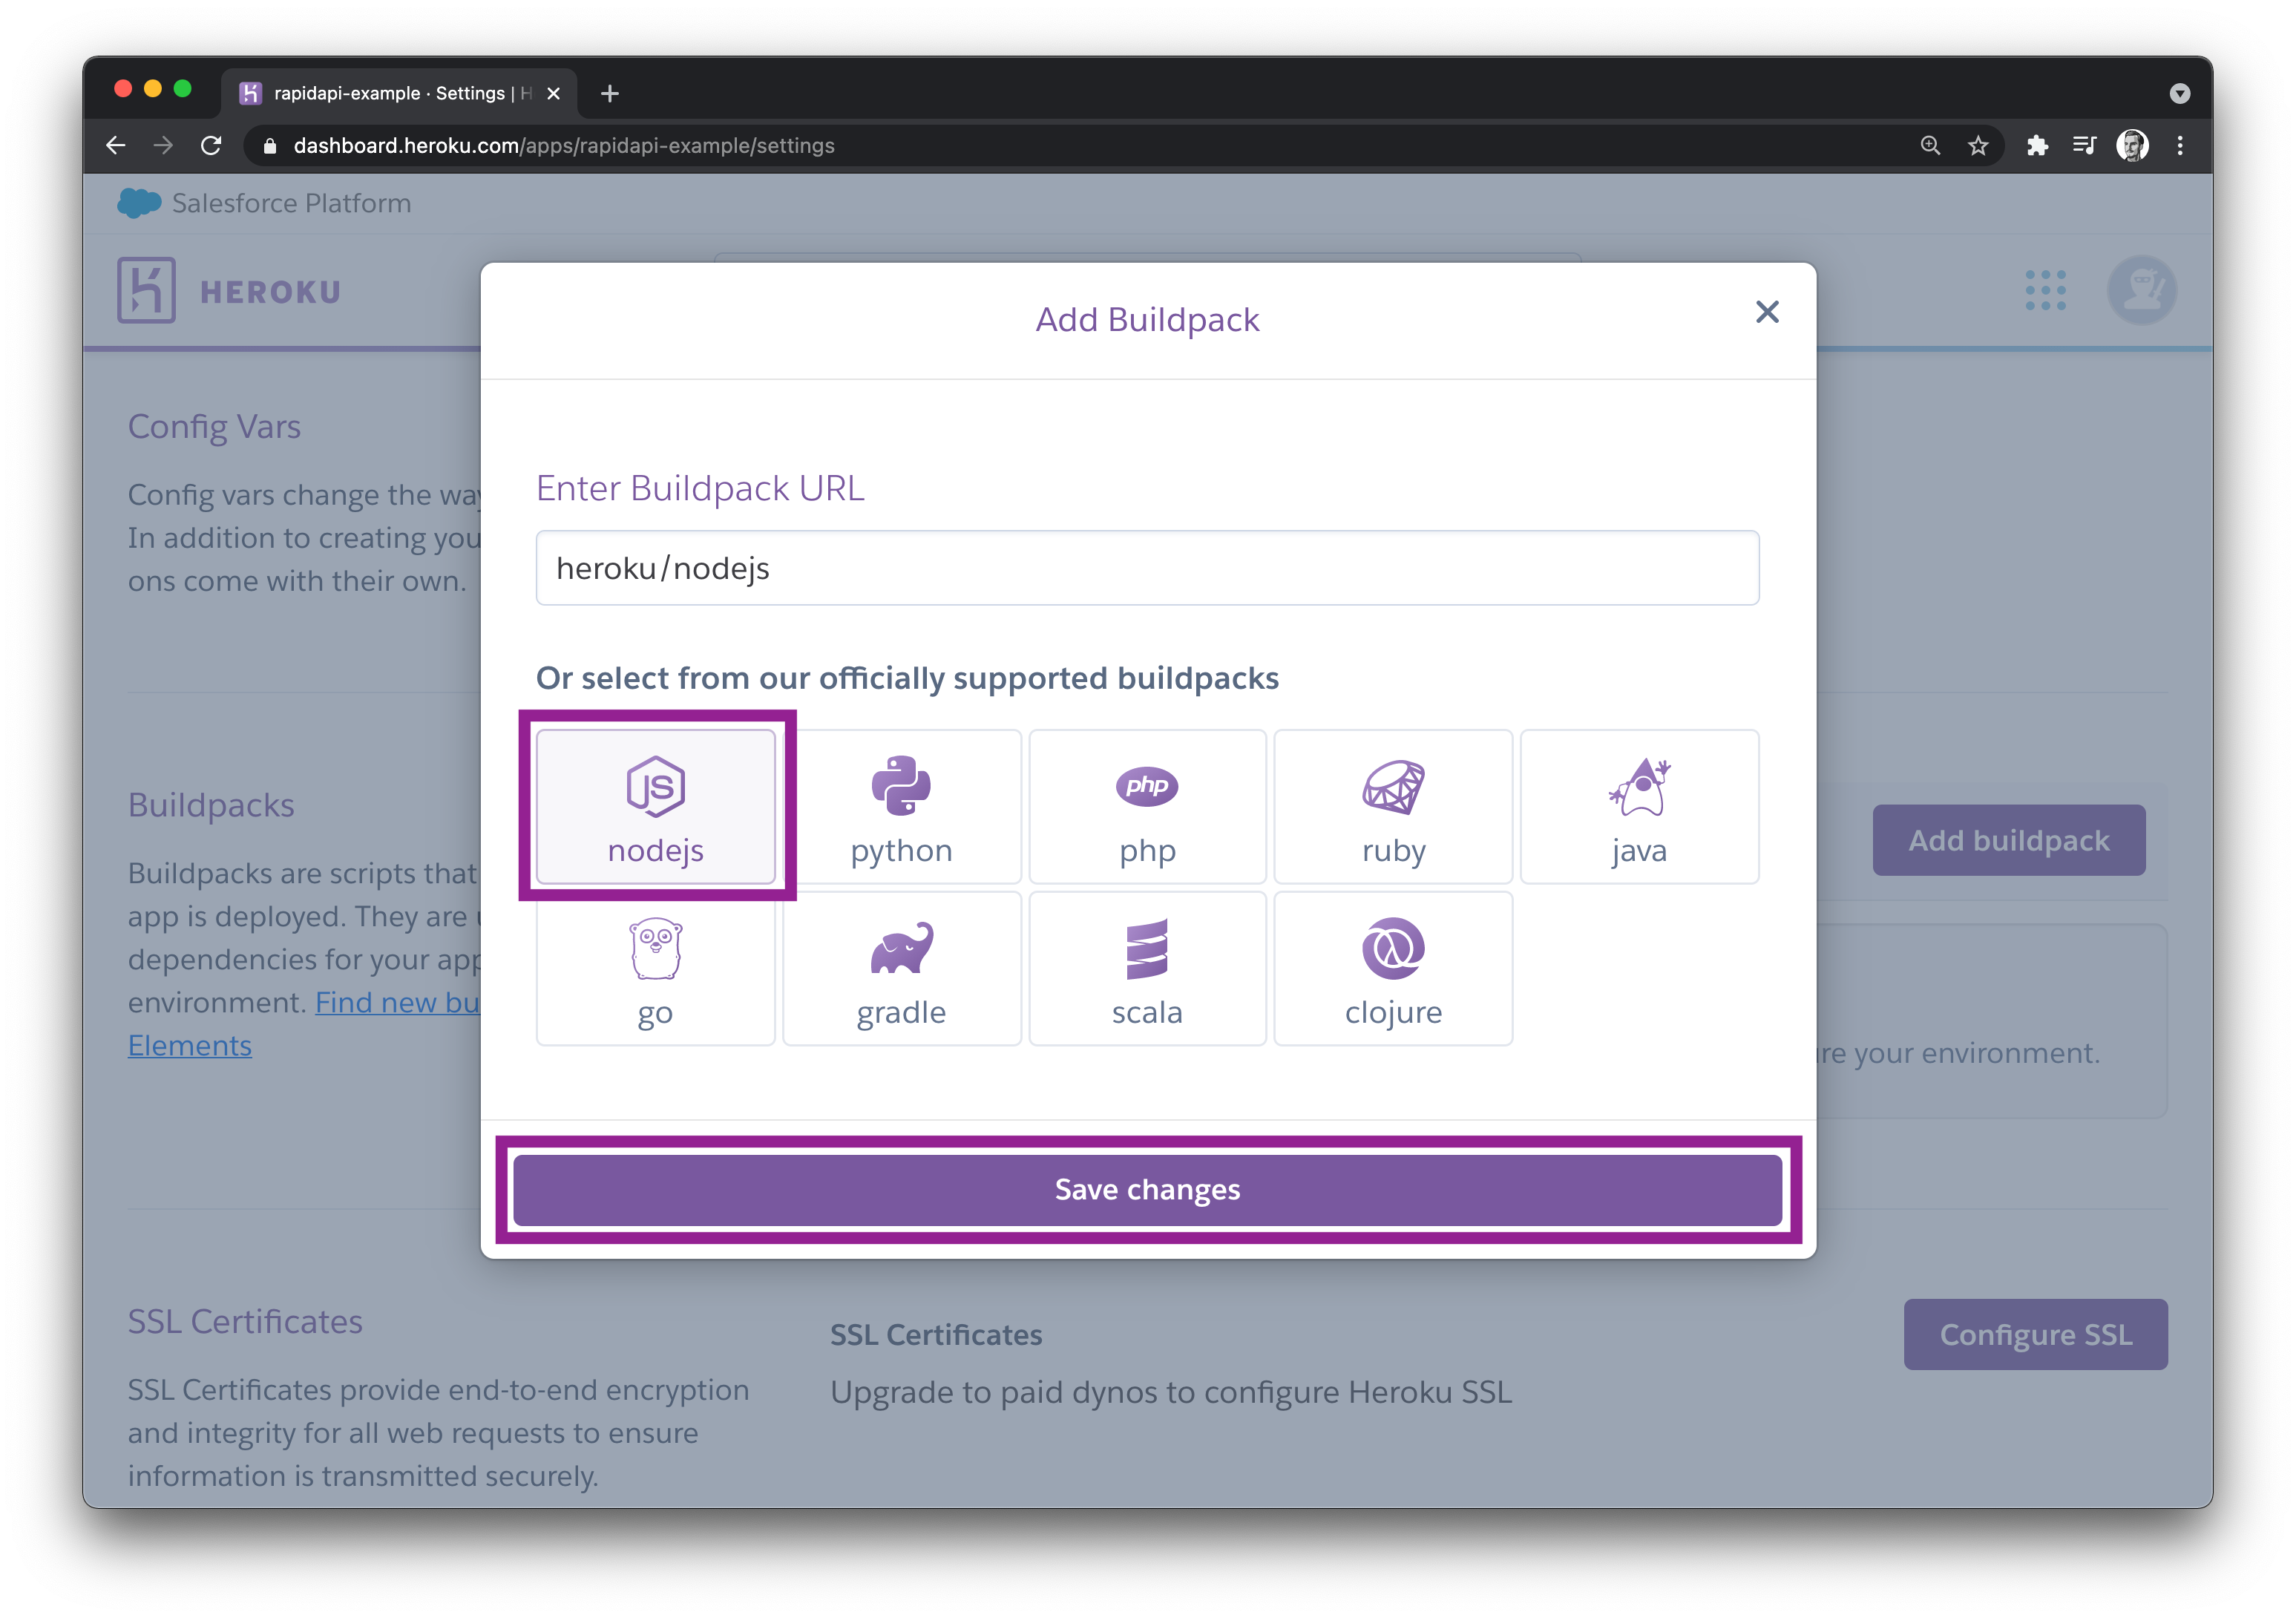 Figure 9
Now, you are ready to deploy the application on Heroku. First of all, go back to the "deploy" section. If you cannot find it, it's the third option in figure 7.
Once you are there, scroll to the bottom of the page to see the section "Manual deploy". At this point, you should see a button saying "Deploy Branch" to deploy your application. See figure 10 for reference.
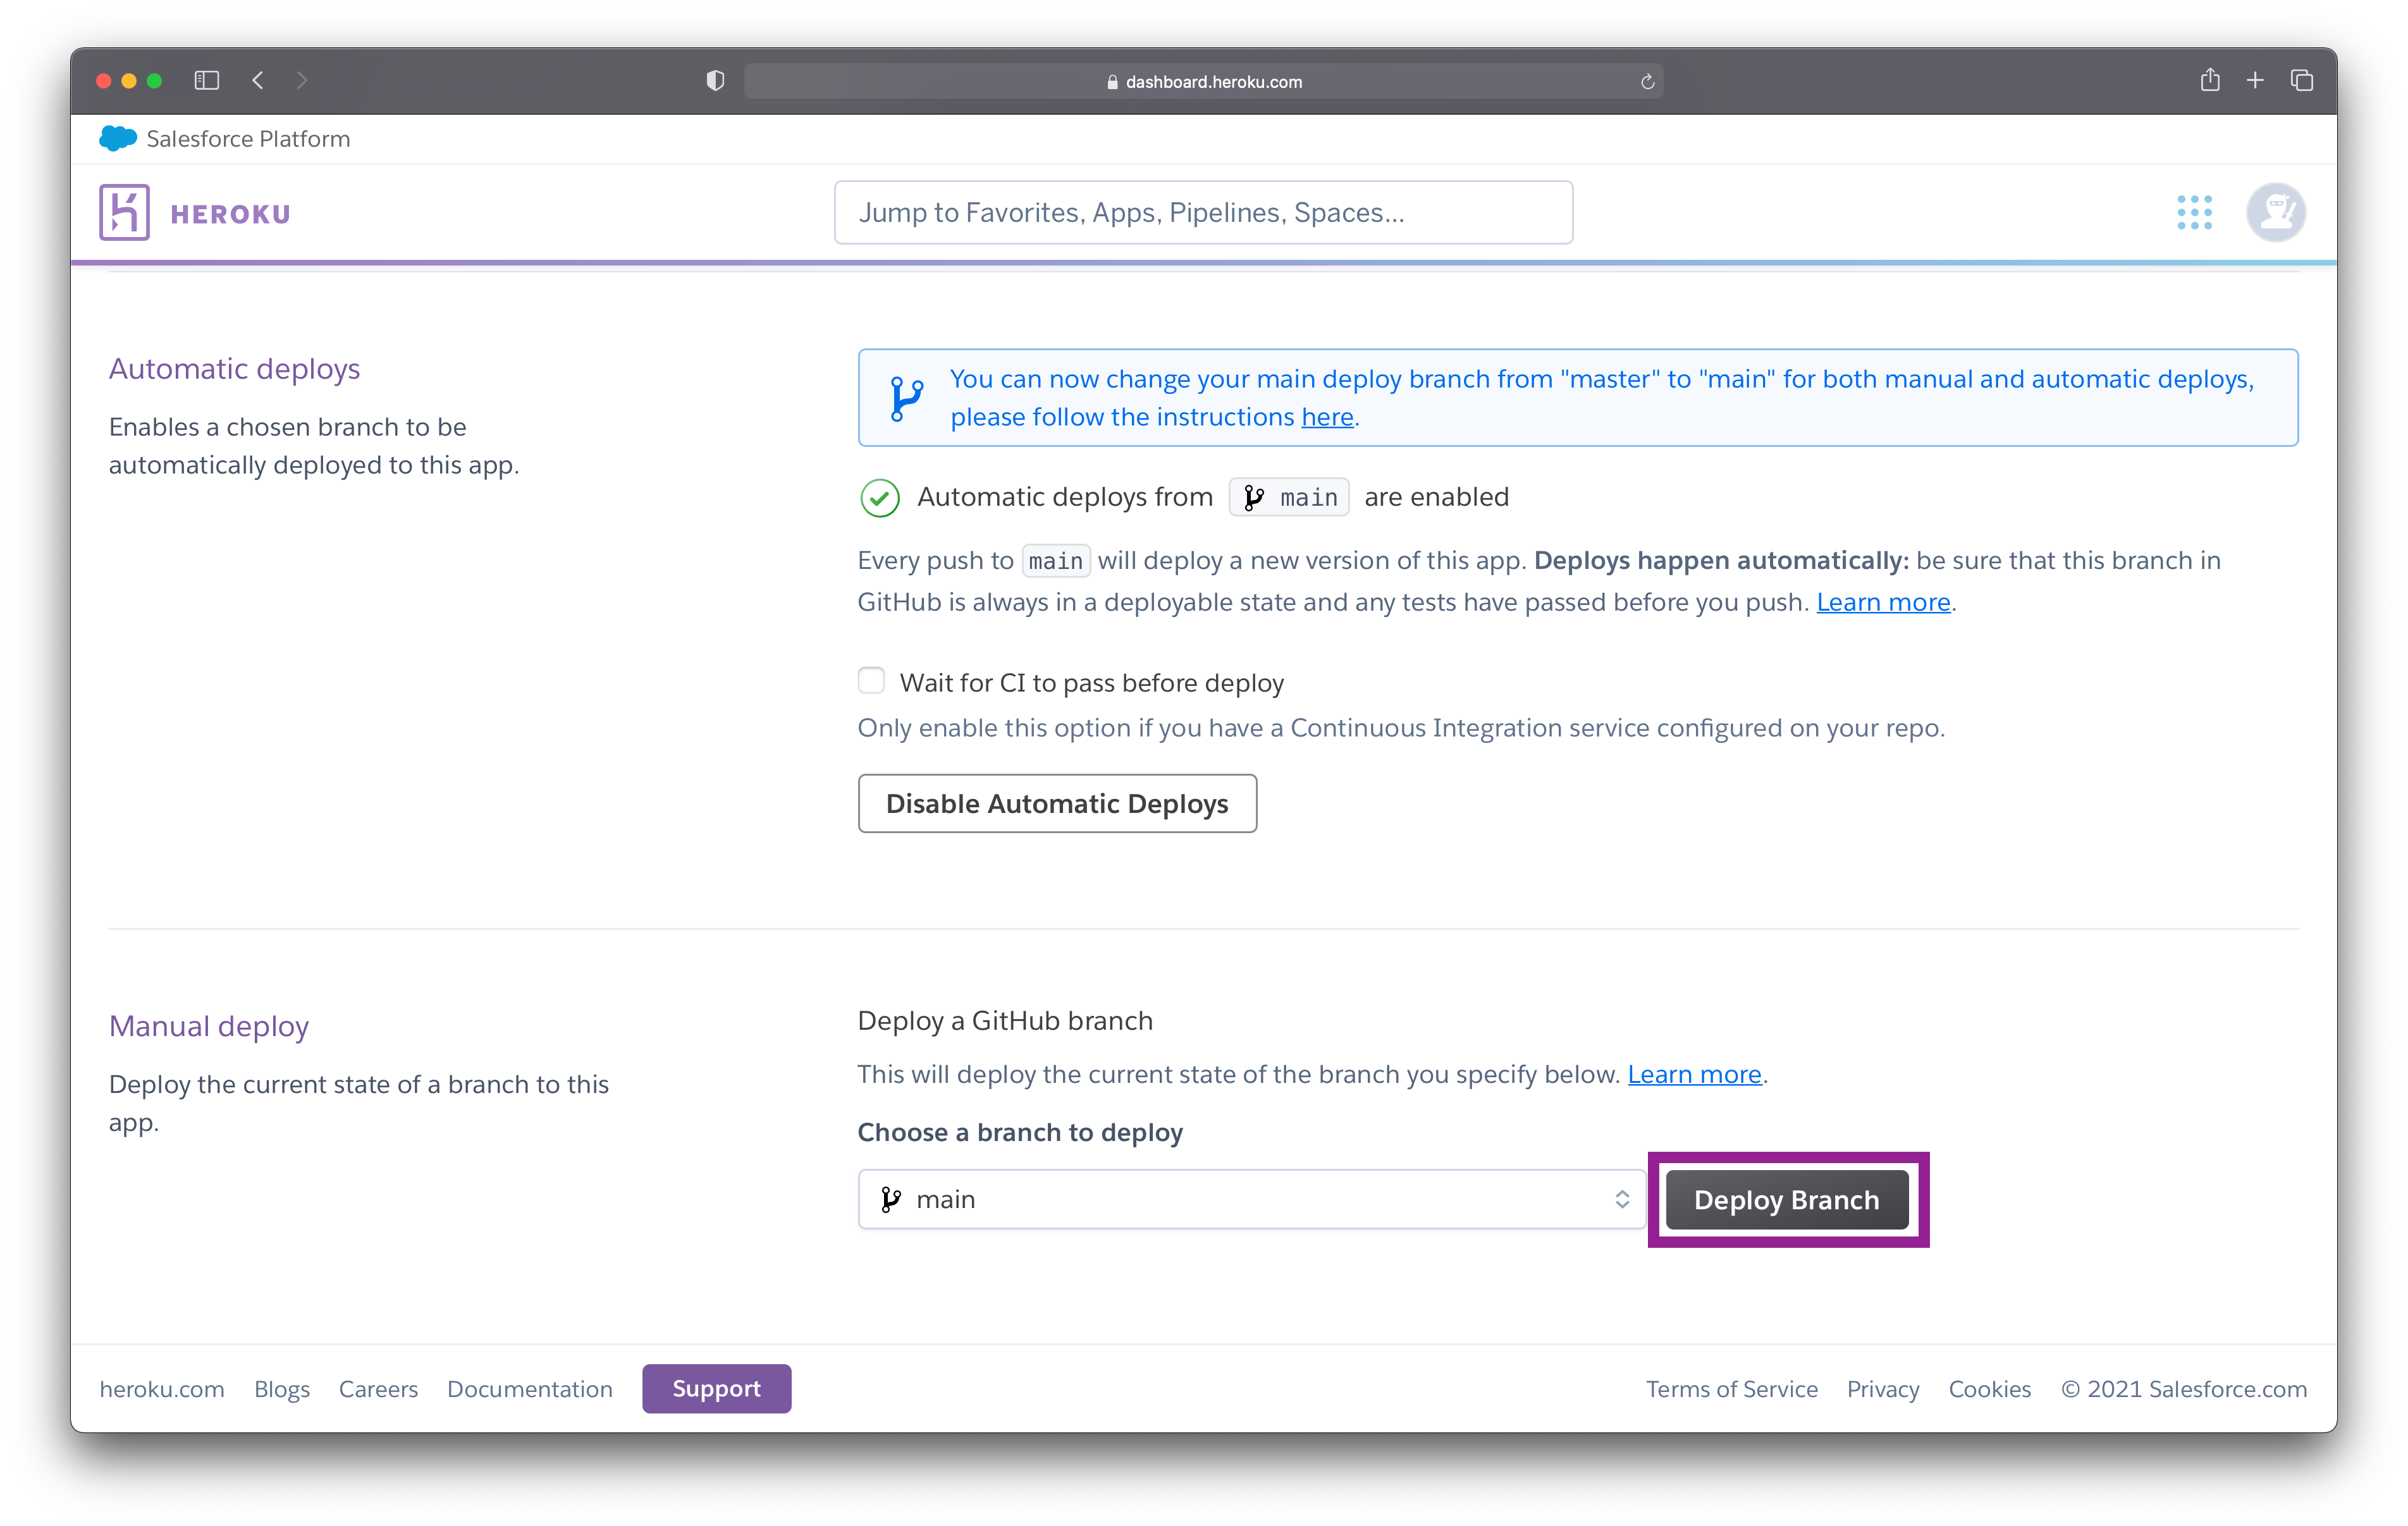 Figure 10
Clicking on the button triggers the deployment, which should be done in a couple of seconds or minutes. Once the application is deployed, you should see a success message, as shown in figure 11.
You can open the API in your browser by clicking on the "View" button!
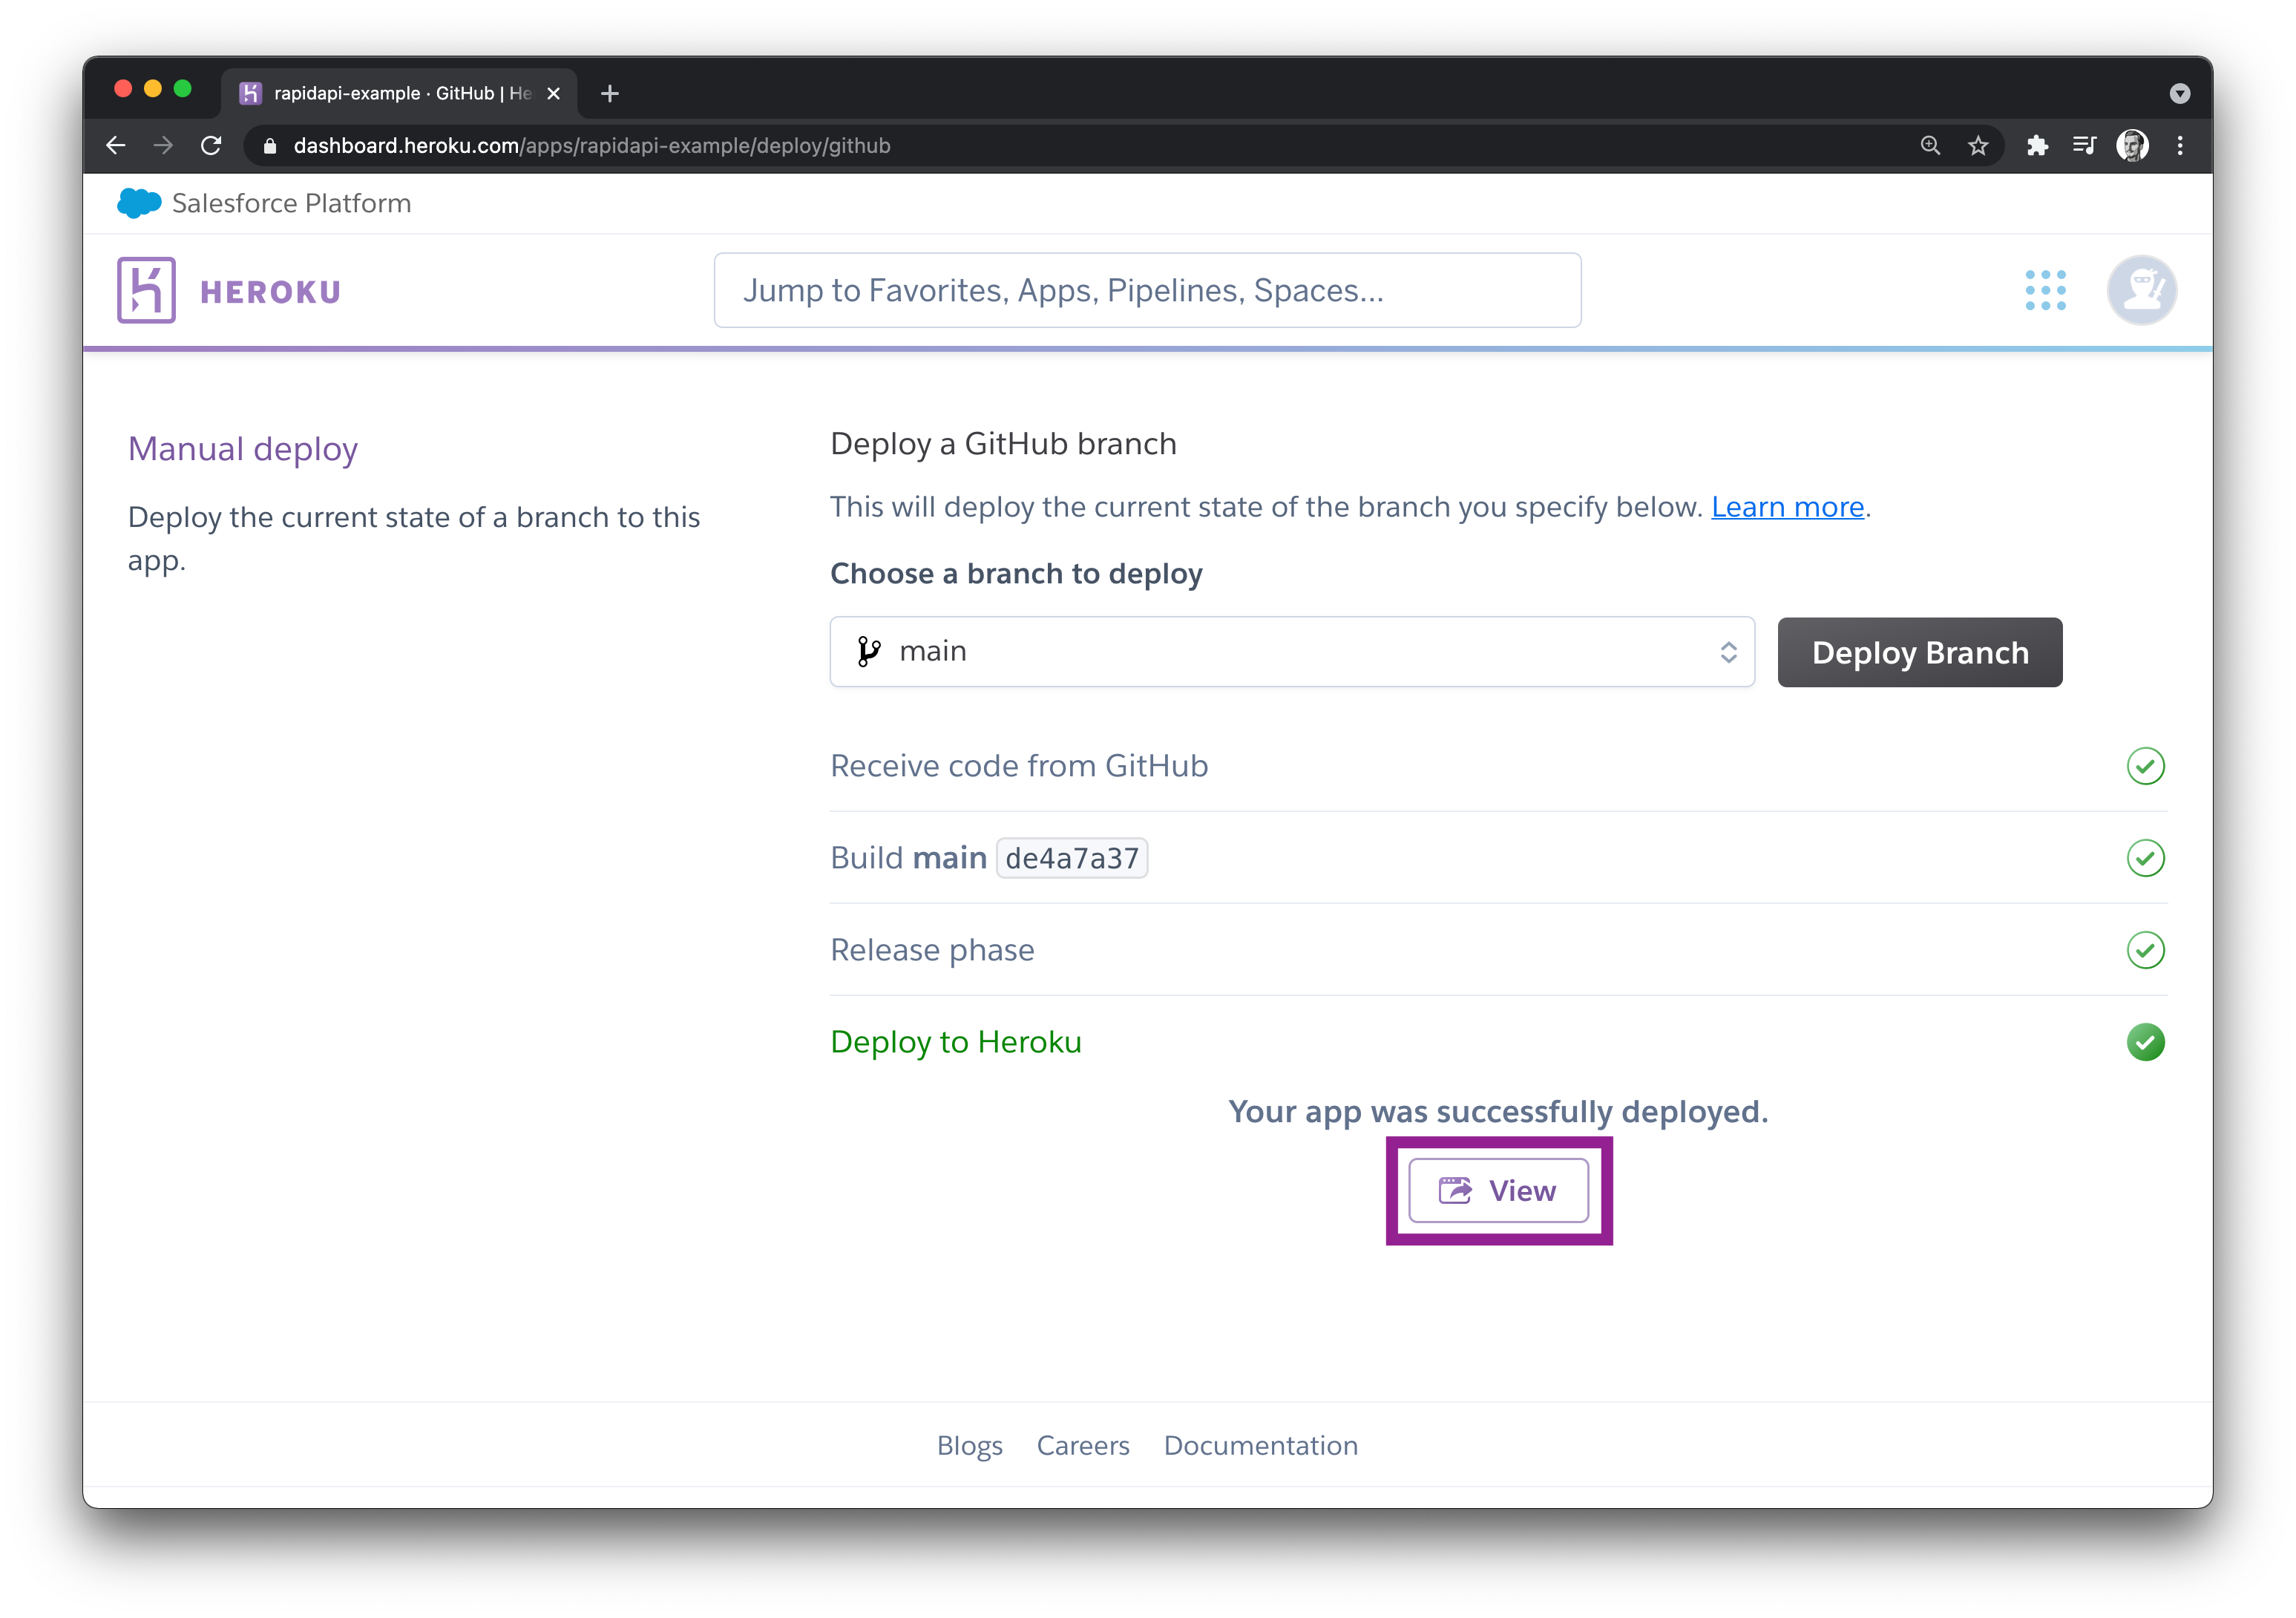 Figure 11
Finally, you are ready to publish and sell your API on the RapidAPI platform.
Setup API on RapidAPI
In this section, you will:
- create a RapidAPI account
- upload the API to the platform
- set the pricing tiers
- release the API to the public
- wait for passive income
Thus, let's start with the first step, which is about creating a RapidAPI account. To create an account, go to the RapidAPI Hub and sign up with your preferred method.
Follow the instructions, and once you signed up successfully, you should see the RapidAPI Hub homepage, as shown in figure 12.
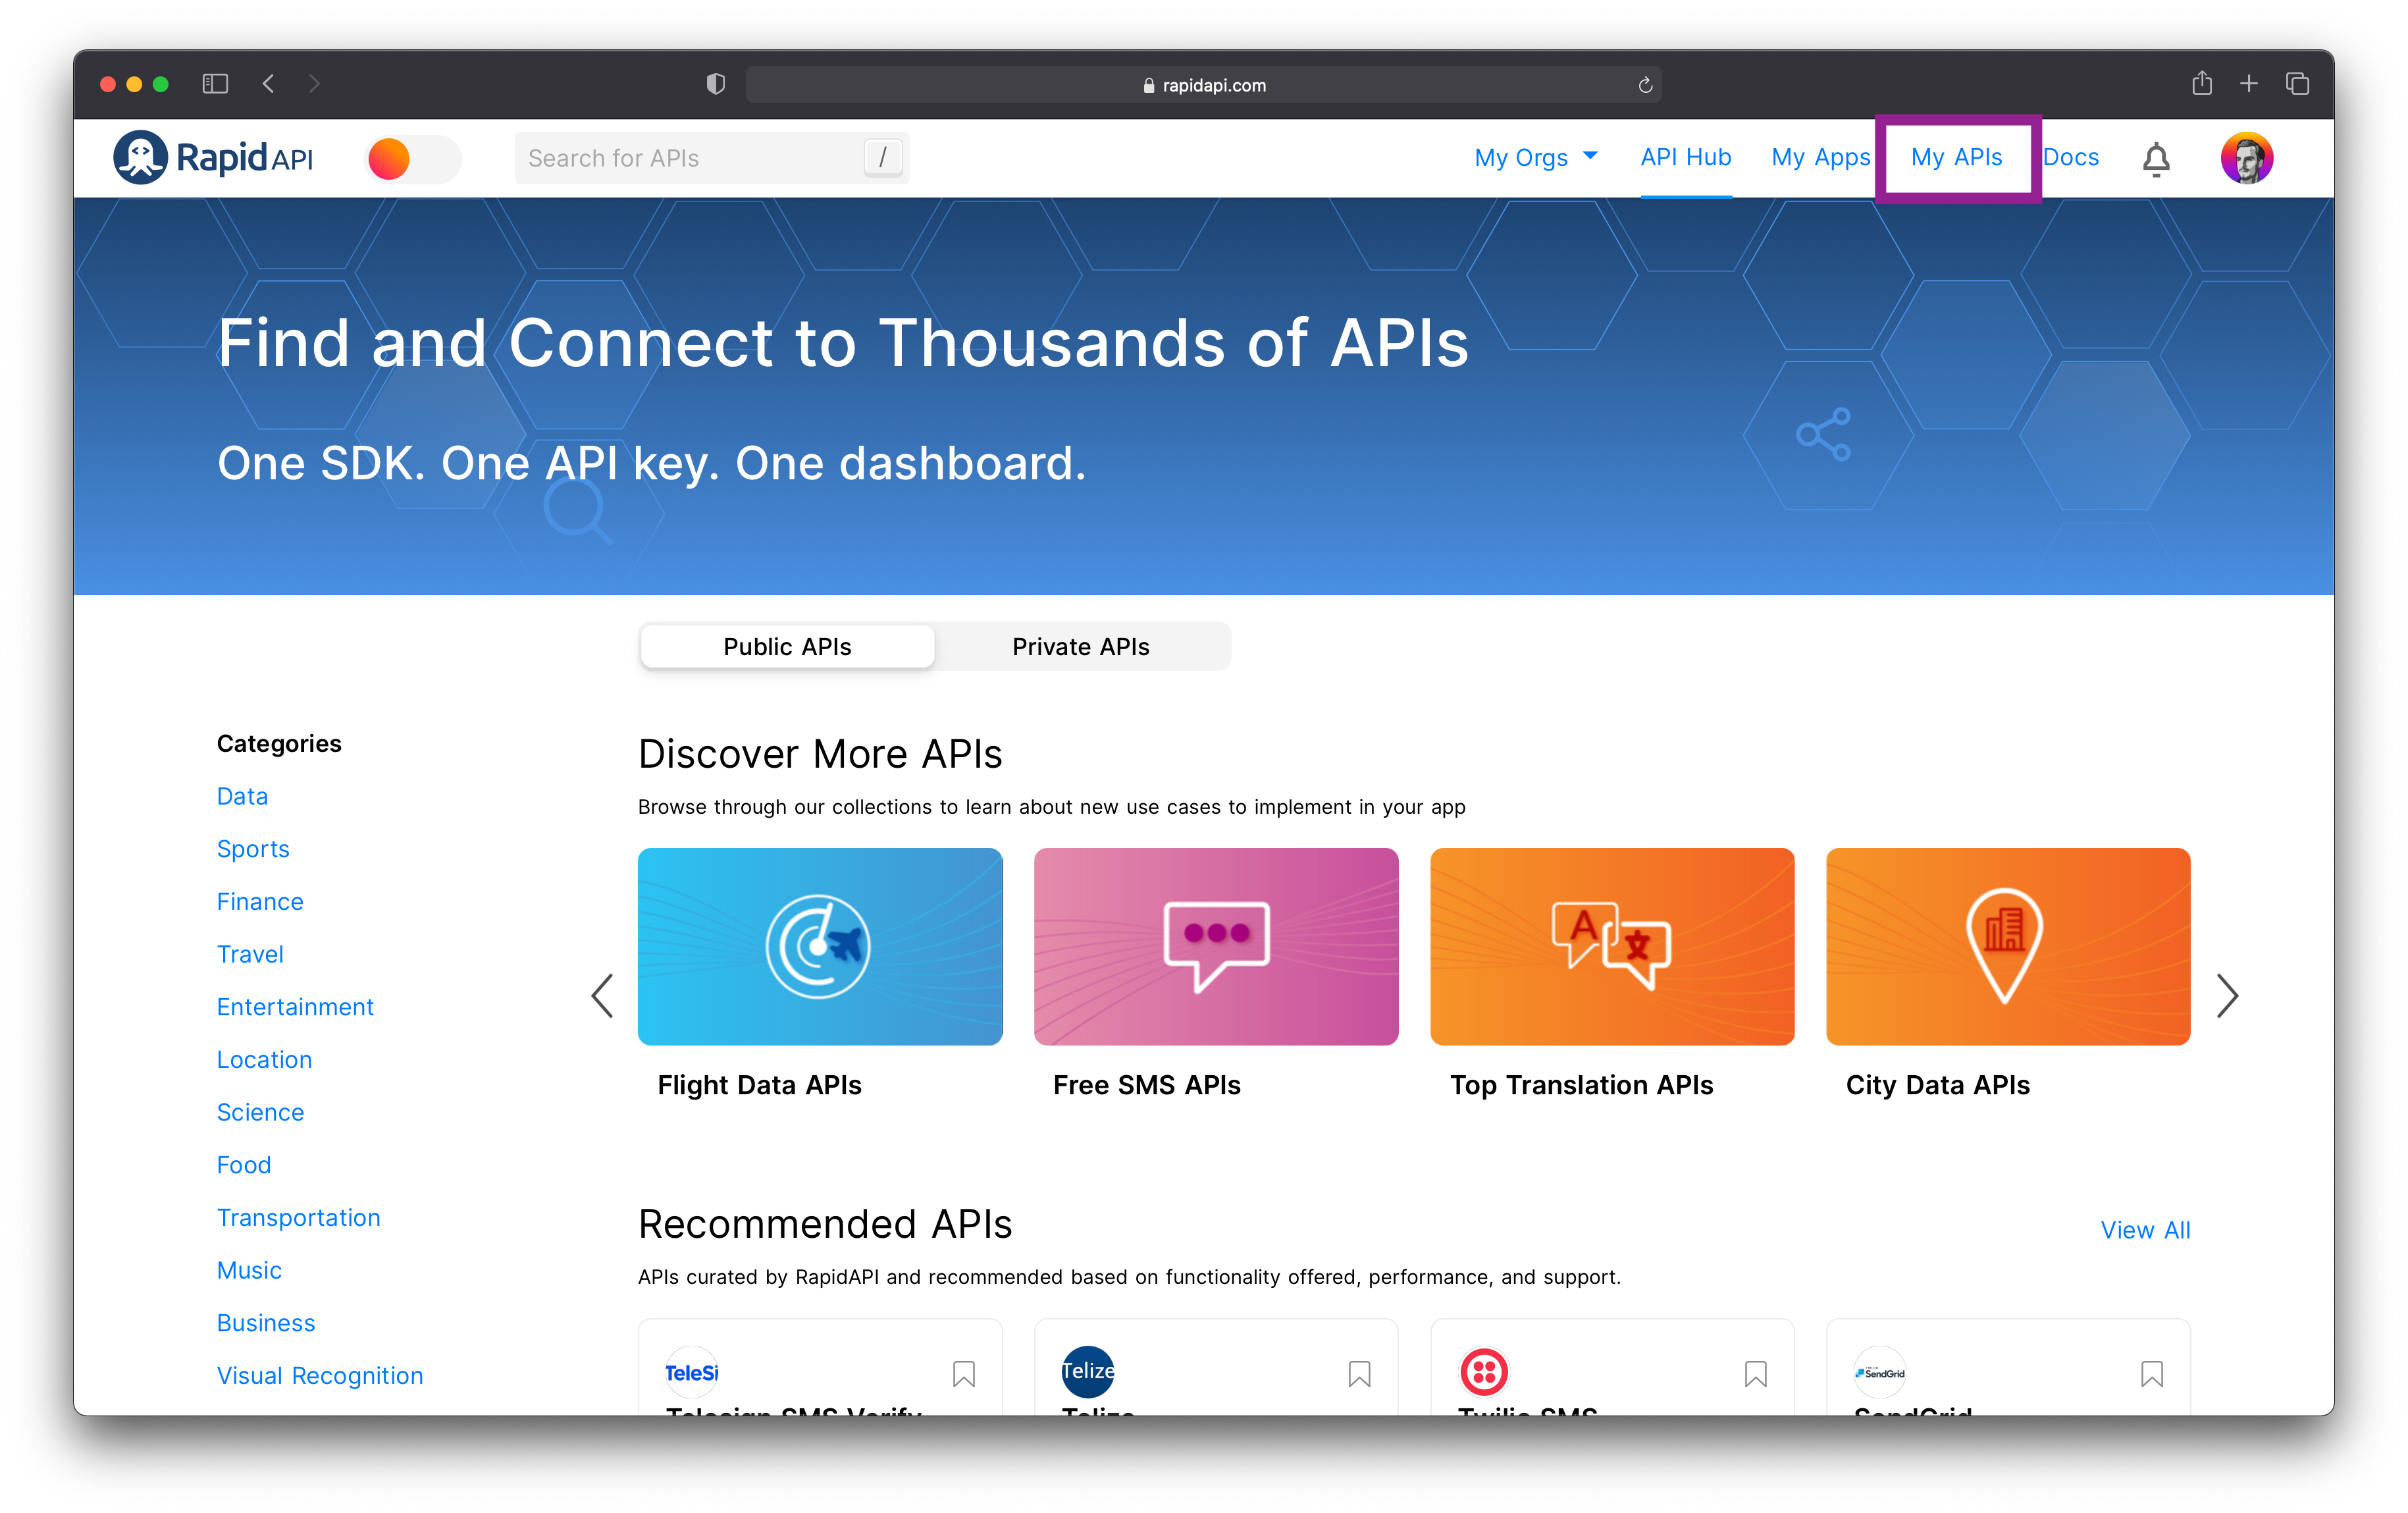 Figure 12
On the homepage, you should see an option called My APIs (highlighted in figure 12). Click on it, and it will take you to a new page where you can add your API.
At this point, you should be on the same page as the one in figure 13 below.
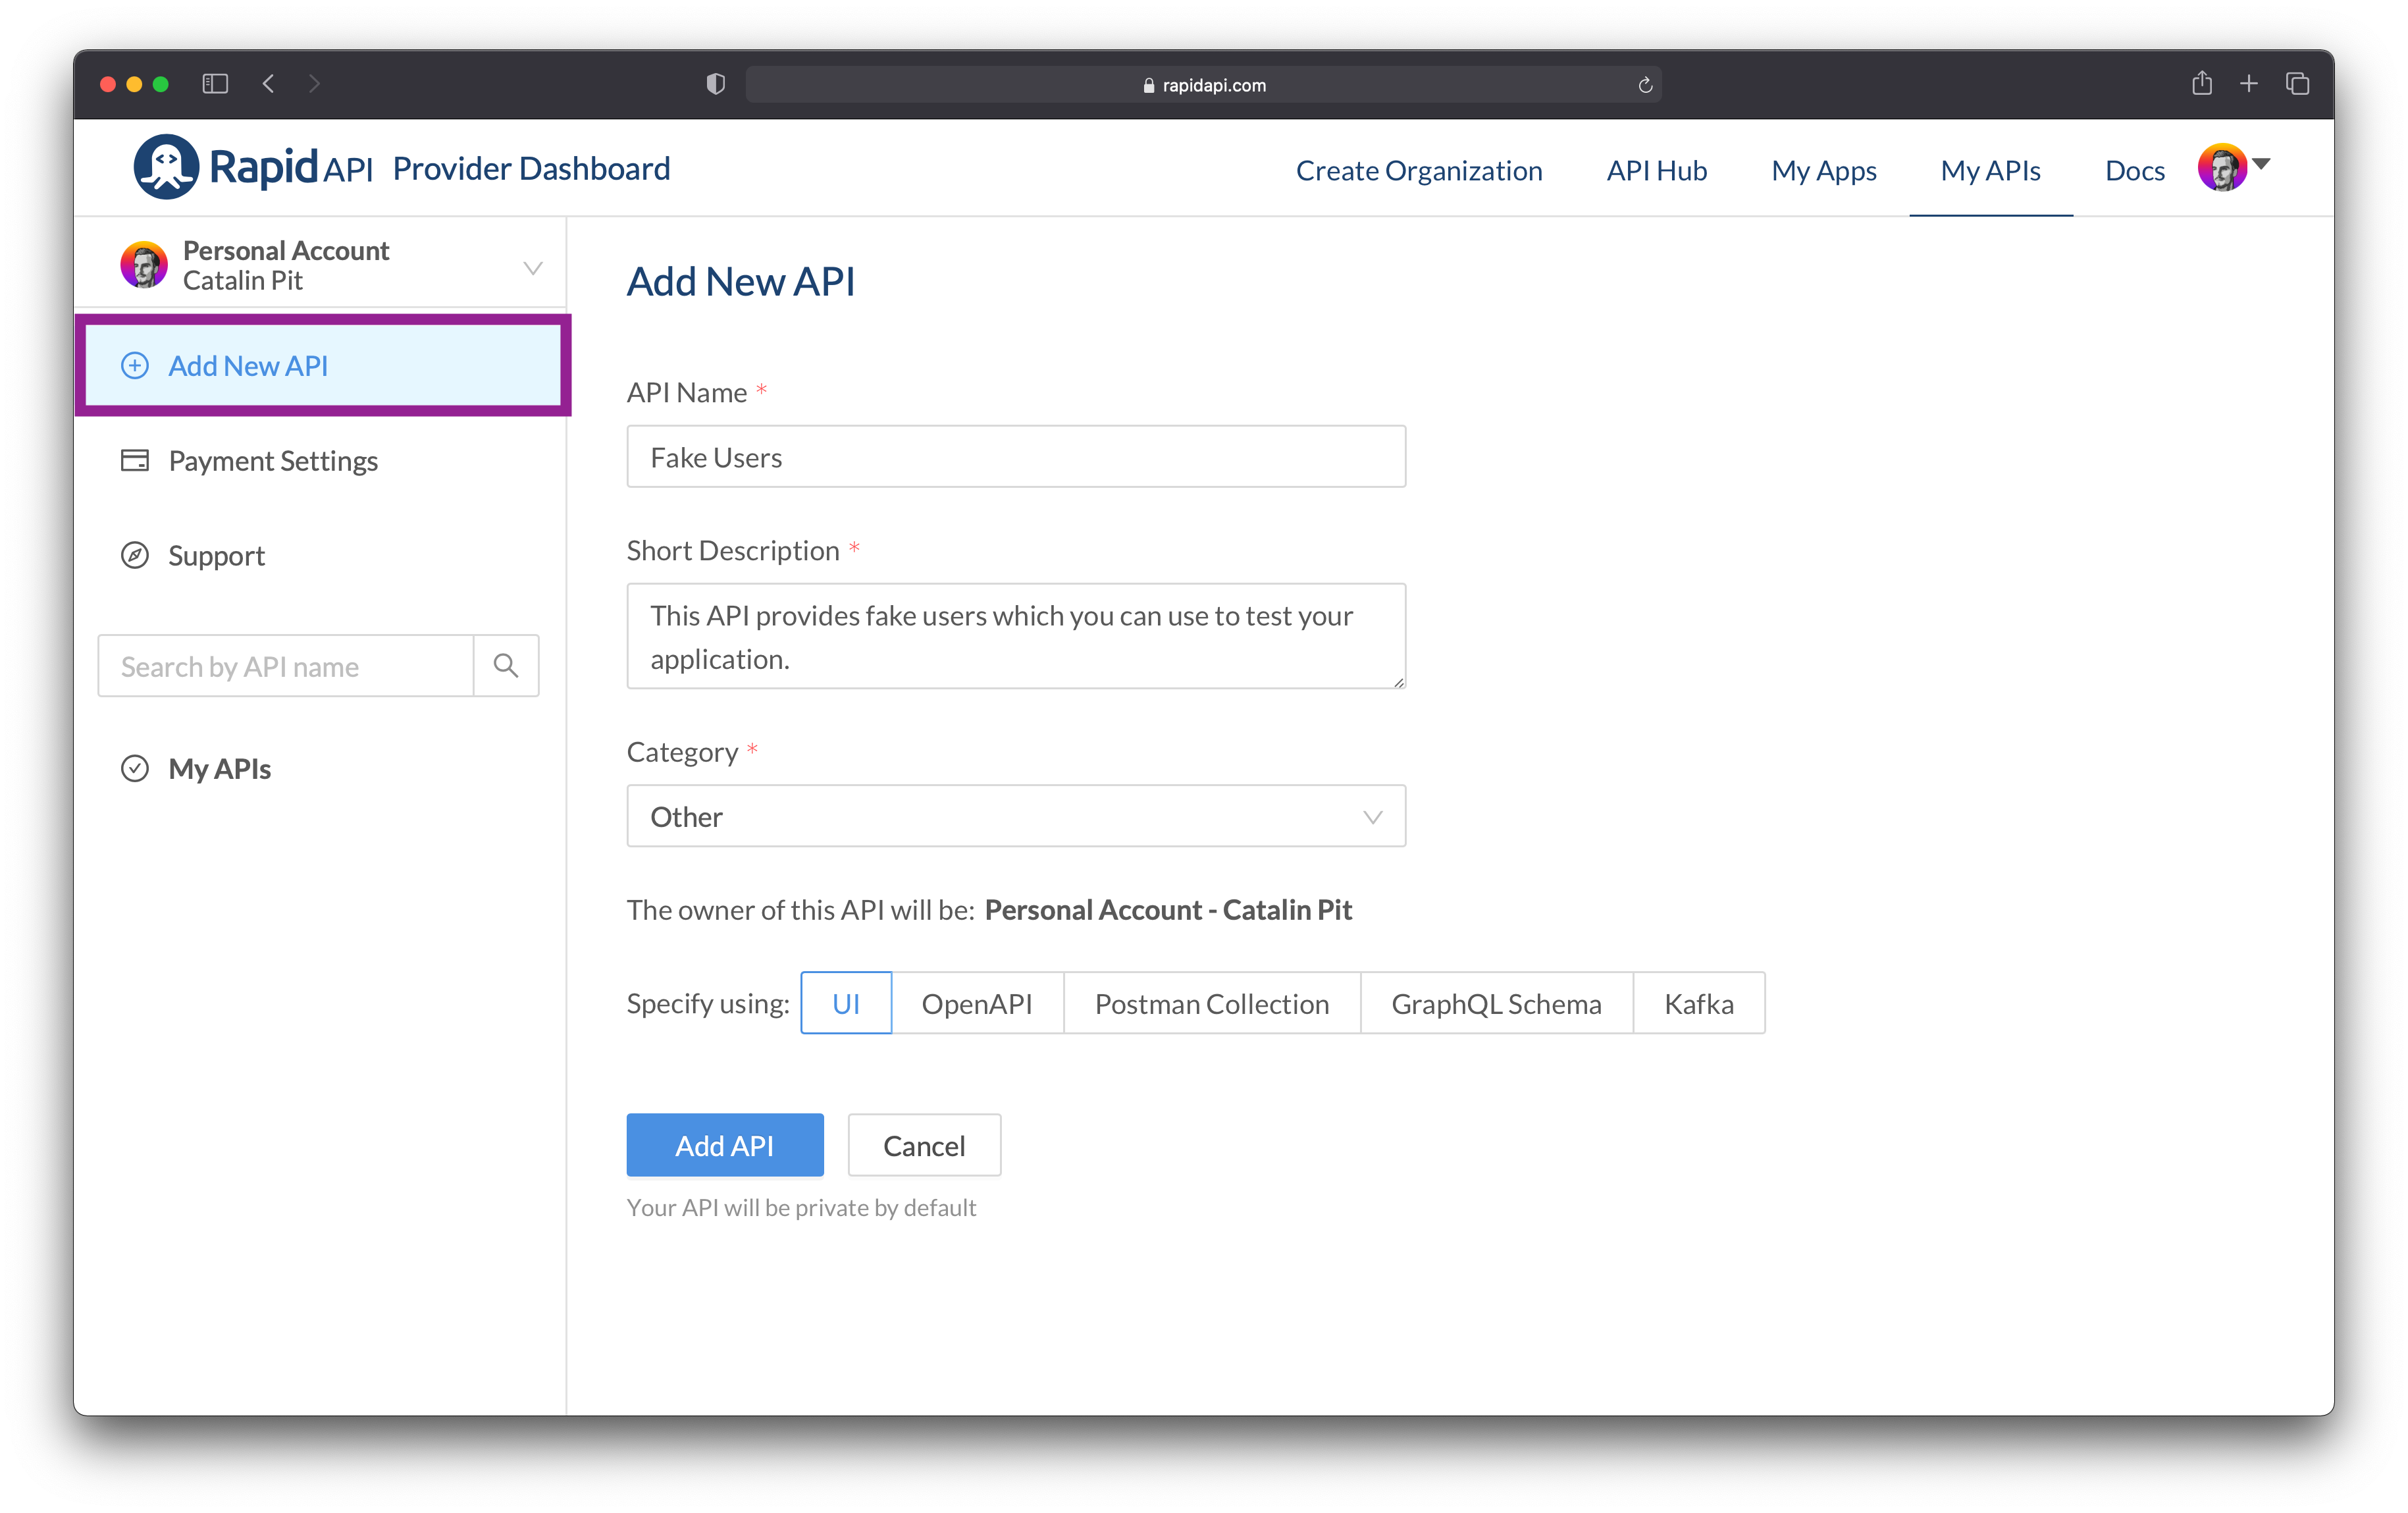 Figure 13
Once on this page, click on the button saying Add New API, which is highlighted in figure 13. The next step is to enter the details about your API:
- API Name - name your API
- Short Description - describe what your API does, so people know its purpose
- Category - select a category for the API
- How to specify the API - you can select any option from those five options. However, in this tutorial, you will see the UI
After you enter all the details, click on the blue button saying Add API. Clicking on the button takes you to the API dashboard, as shown in figure 14 below.
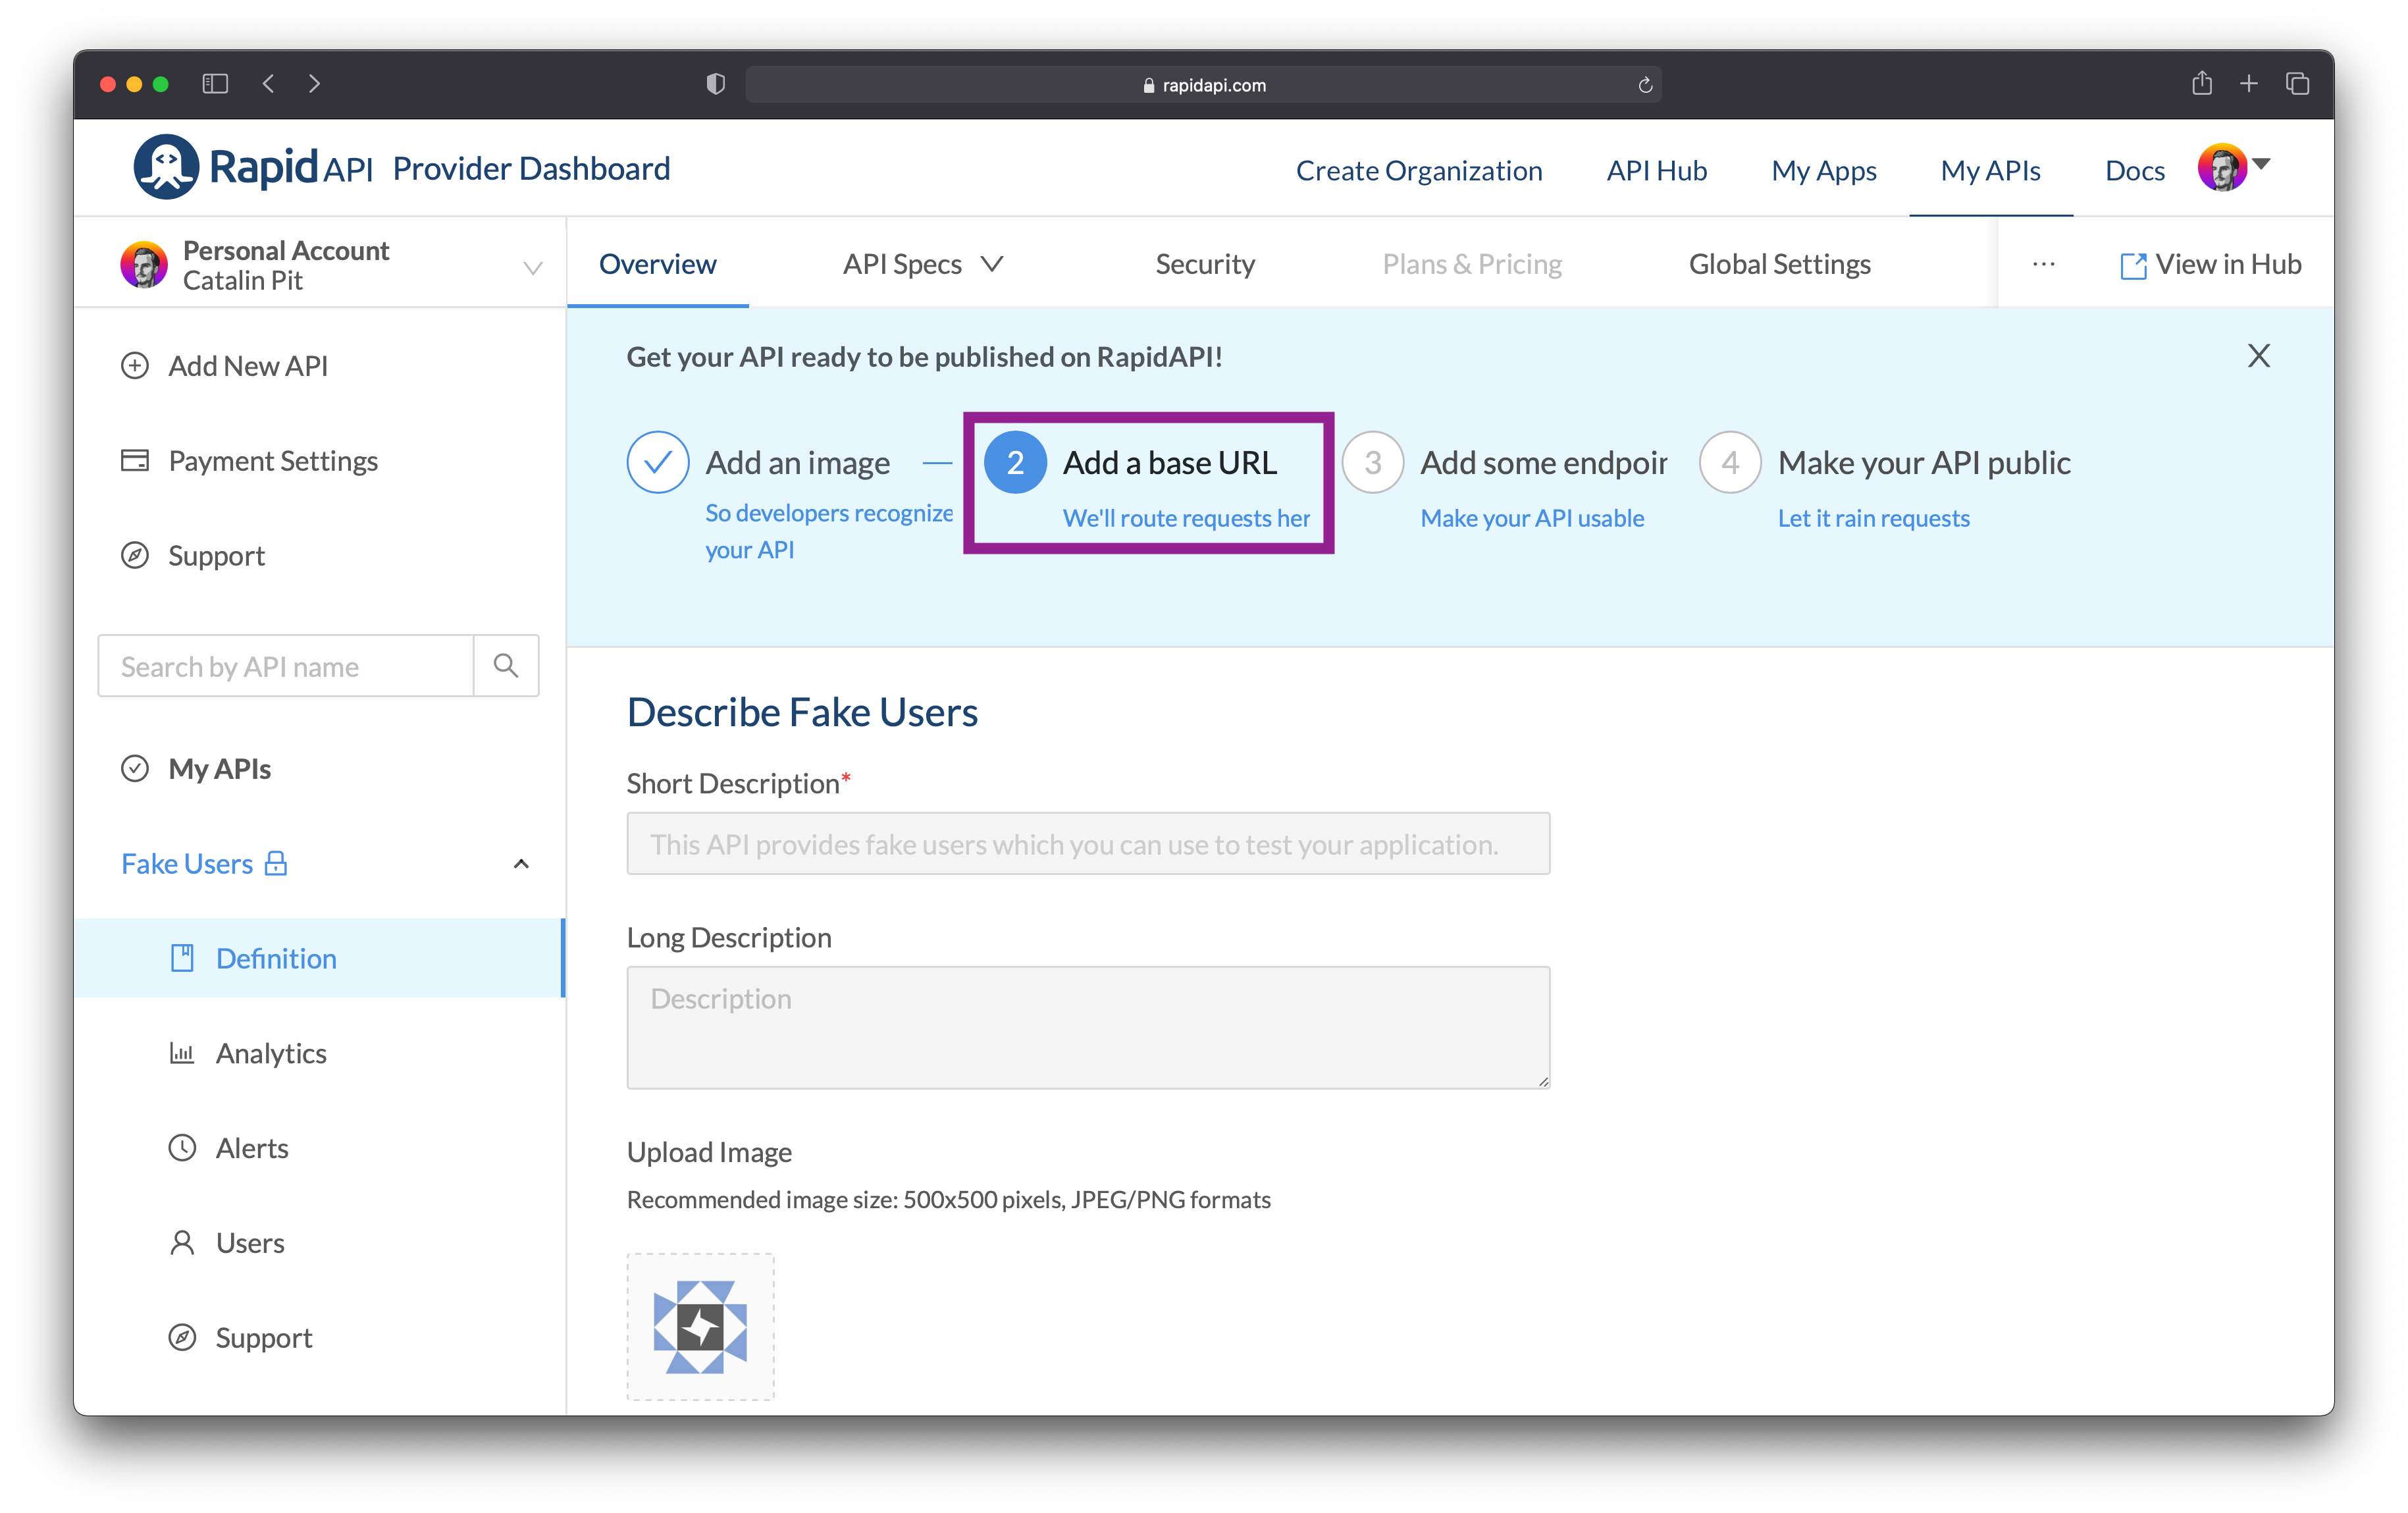 Figure 14
The last steps of the process are to enter your base API URL, add the endpoints, and define the pricing tiers. Thus, click on the second step, which is highlighted in figure 14 above.
Add the base URL
The next step is to add the base URL for your API. The base URL is your API's "homepage". For example, the base URL for the API built in this tutorial is:
https://rapidapi-example.herokuapp.com
The reason why you need to add the base URL is that you will have various endpoints. Then, you will need to configure each endpoint individually in RapidAPI. For instance, the only endpoint for this API is:
https://rapidapi-example.herokuapp.com/users
Moving forward, add the base URL by clicking on the Configure button, as shown in figure 15.
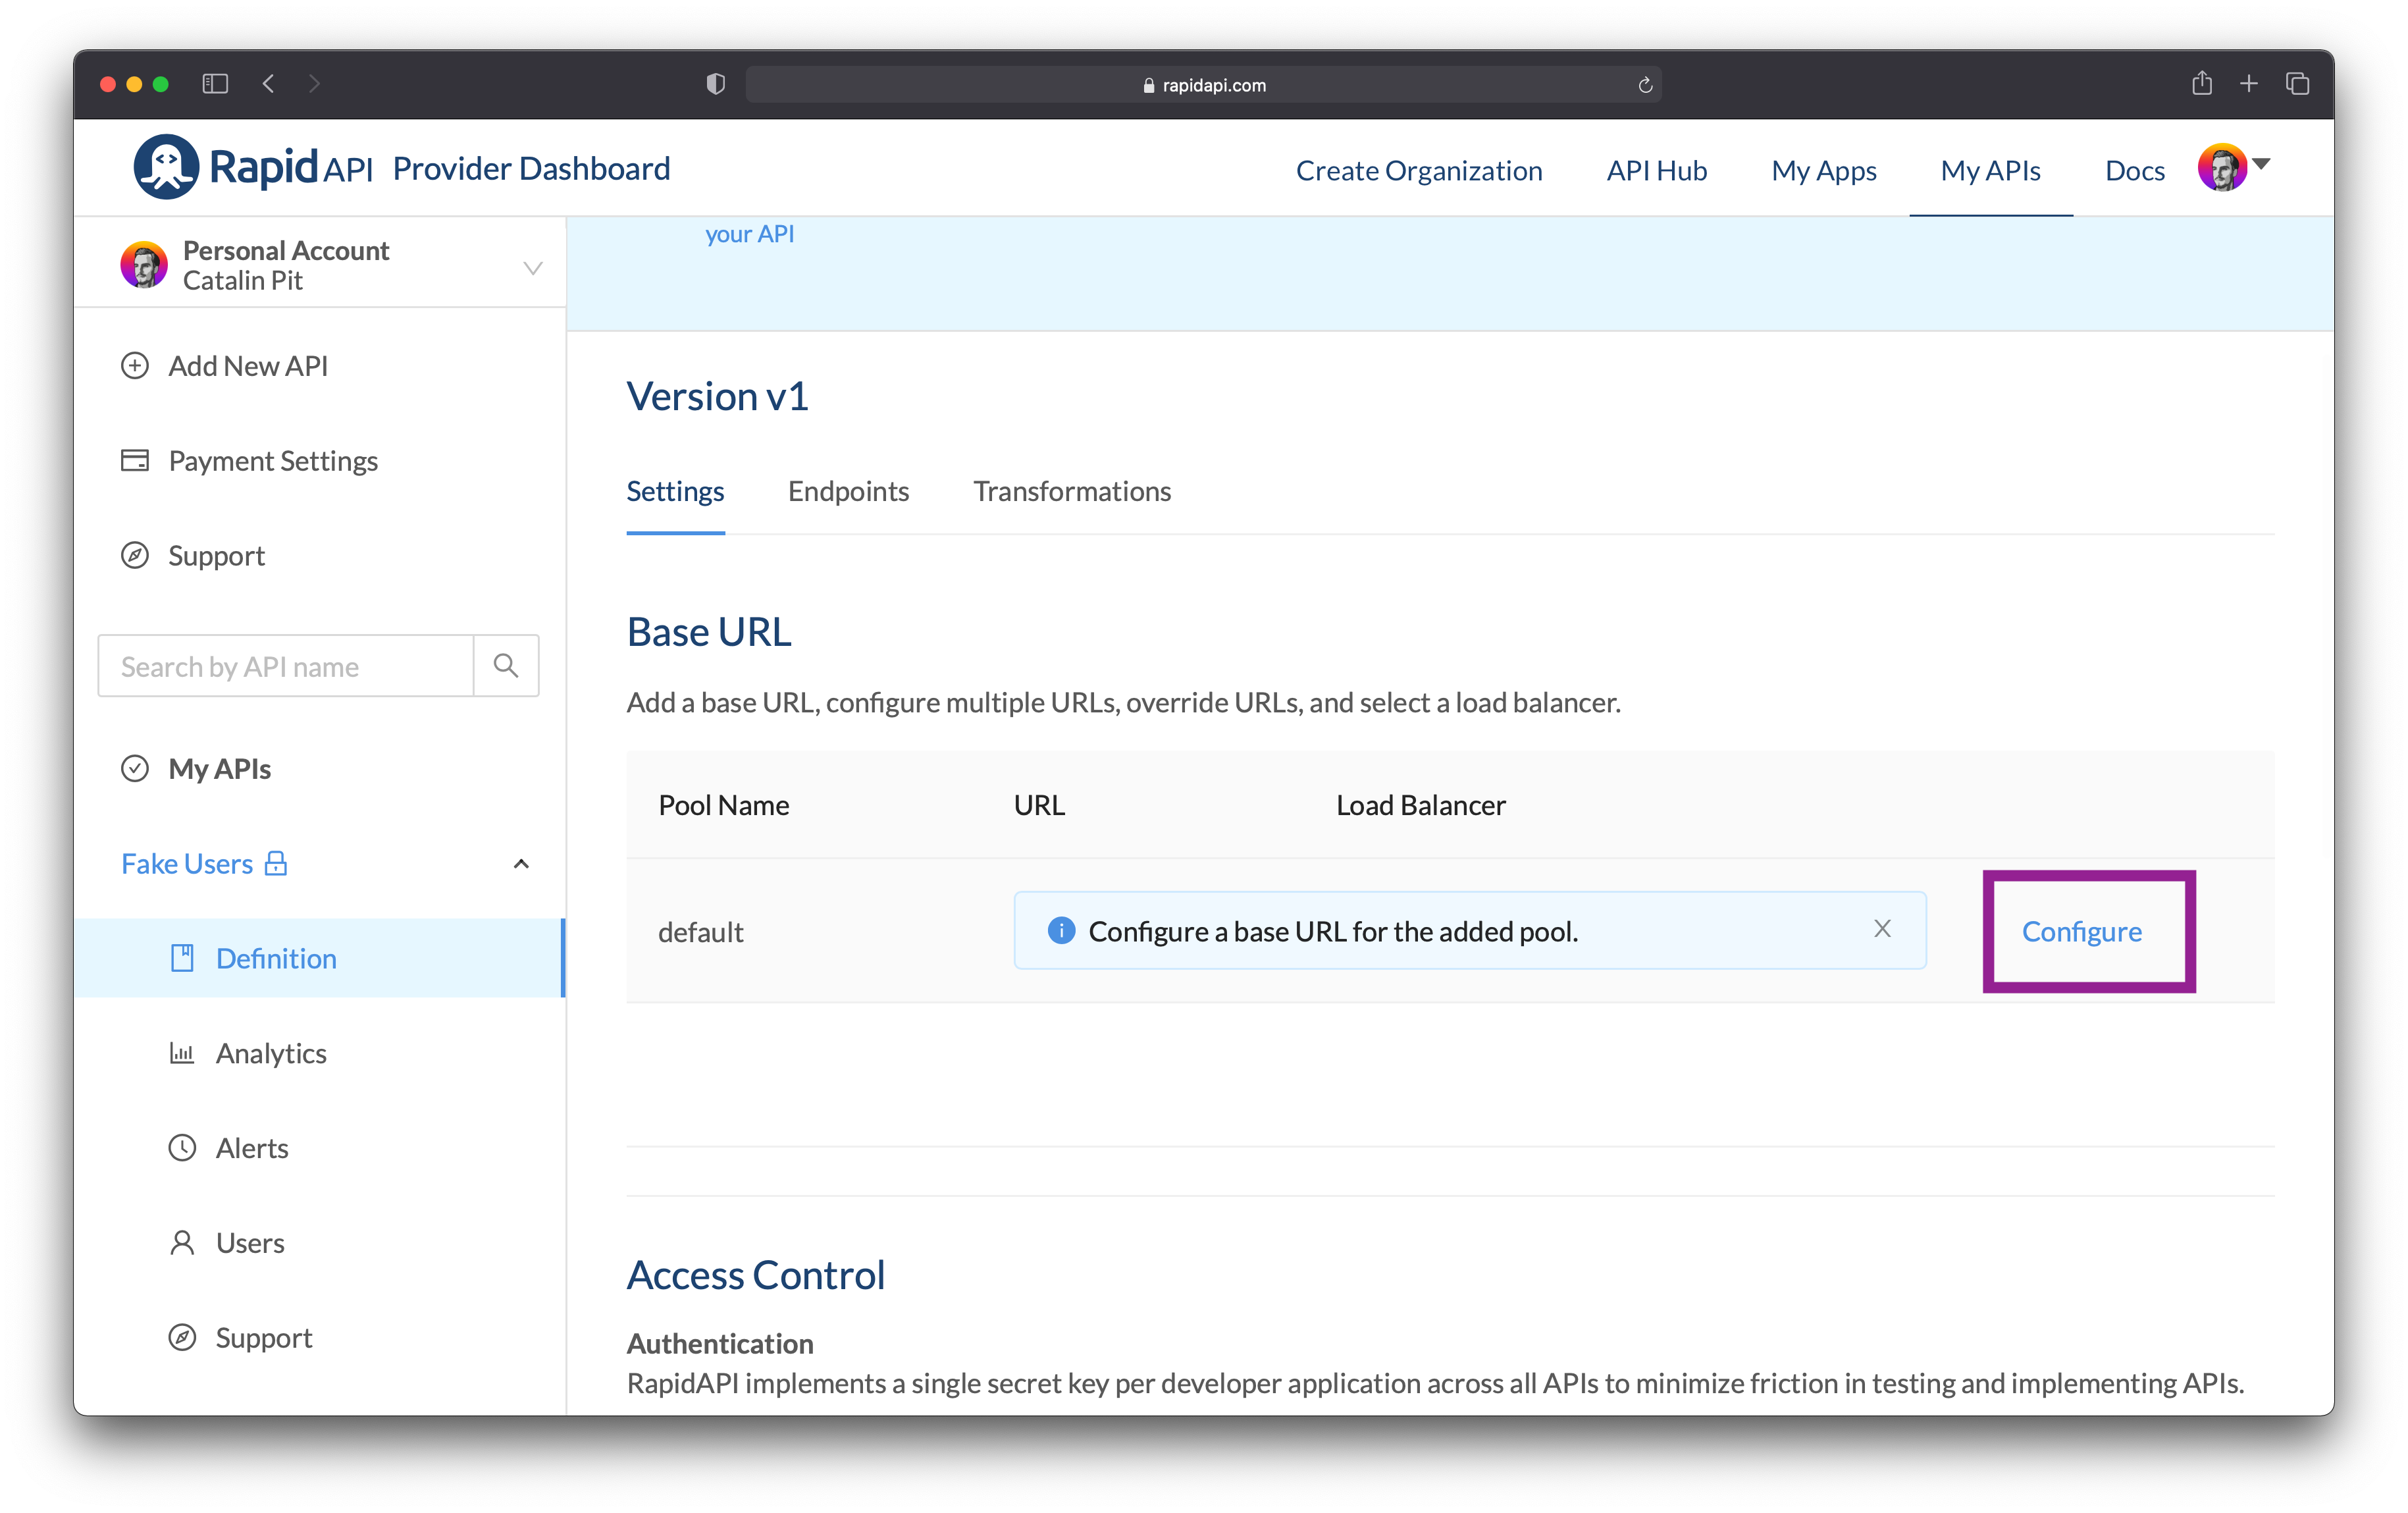 Figure 15
After clicking on the button, a new pop-up appears where you can enter the URL. Enter it and then save it.
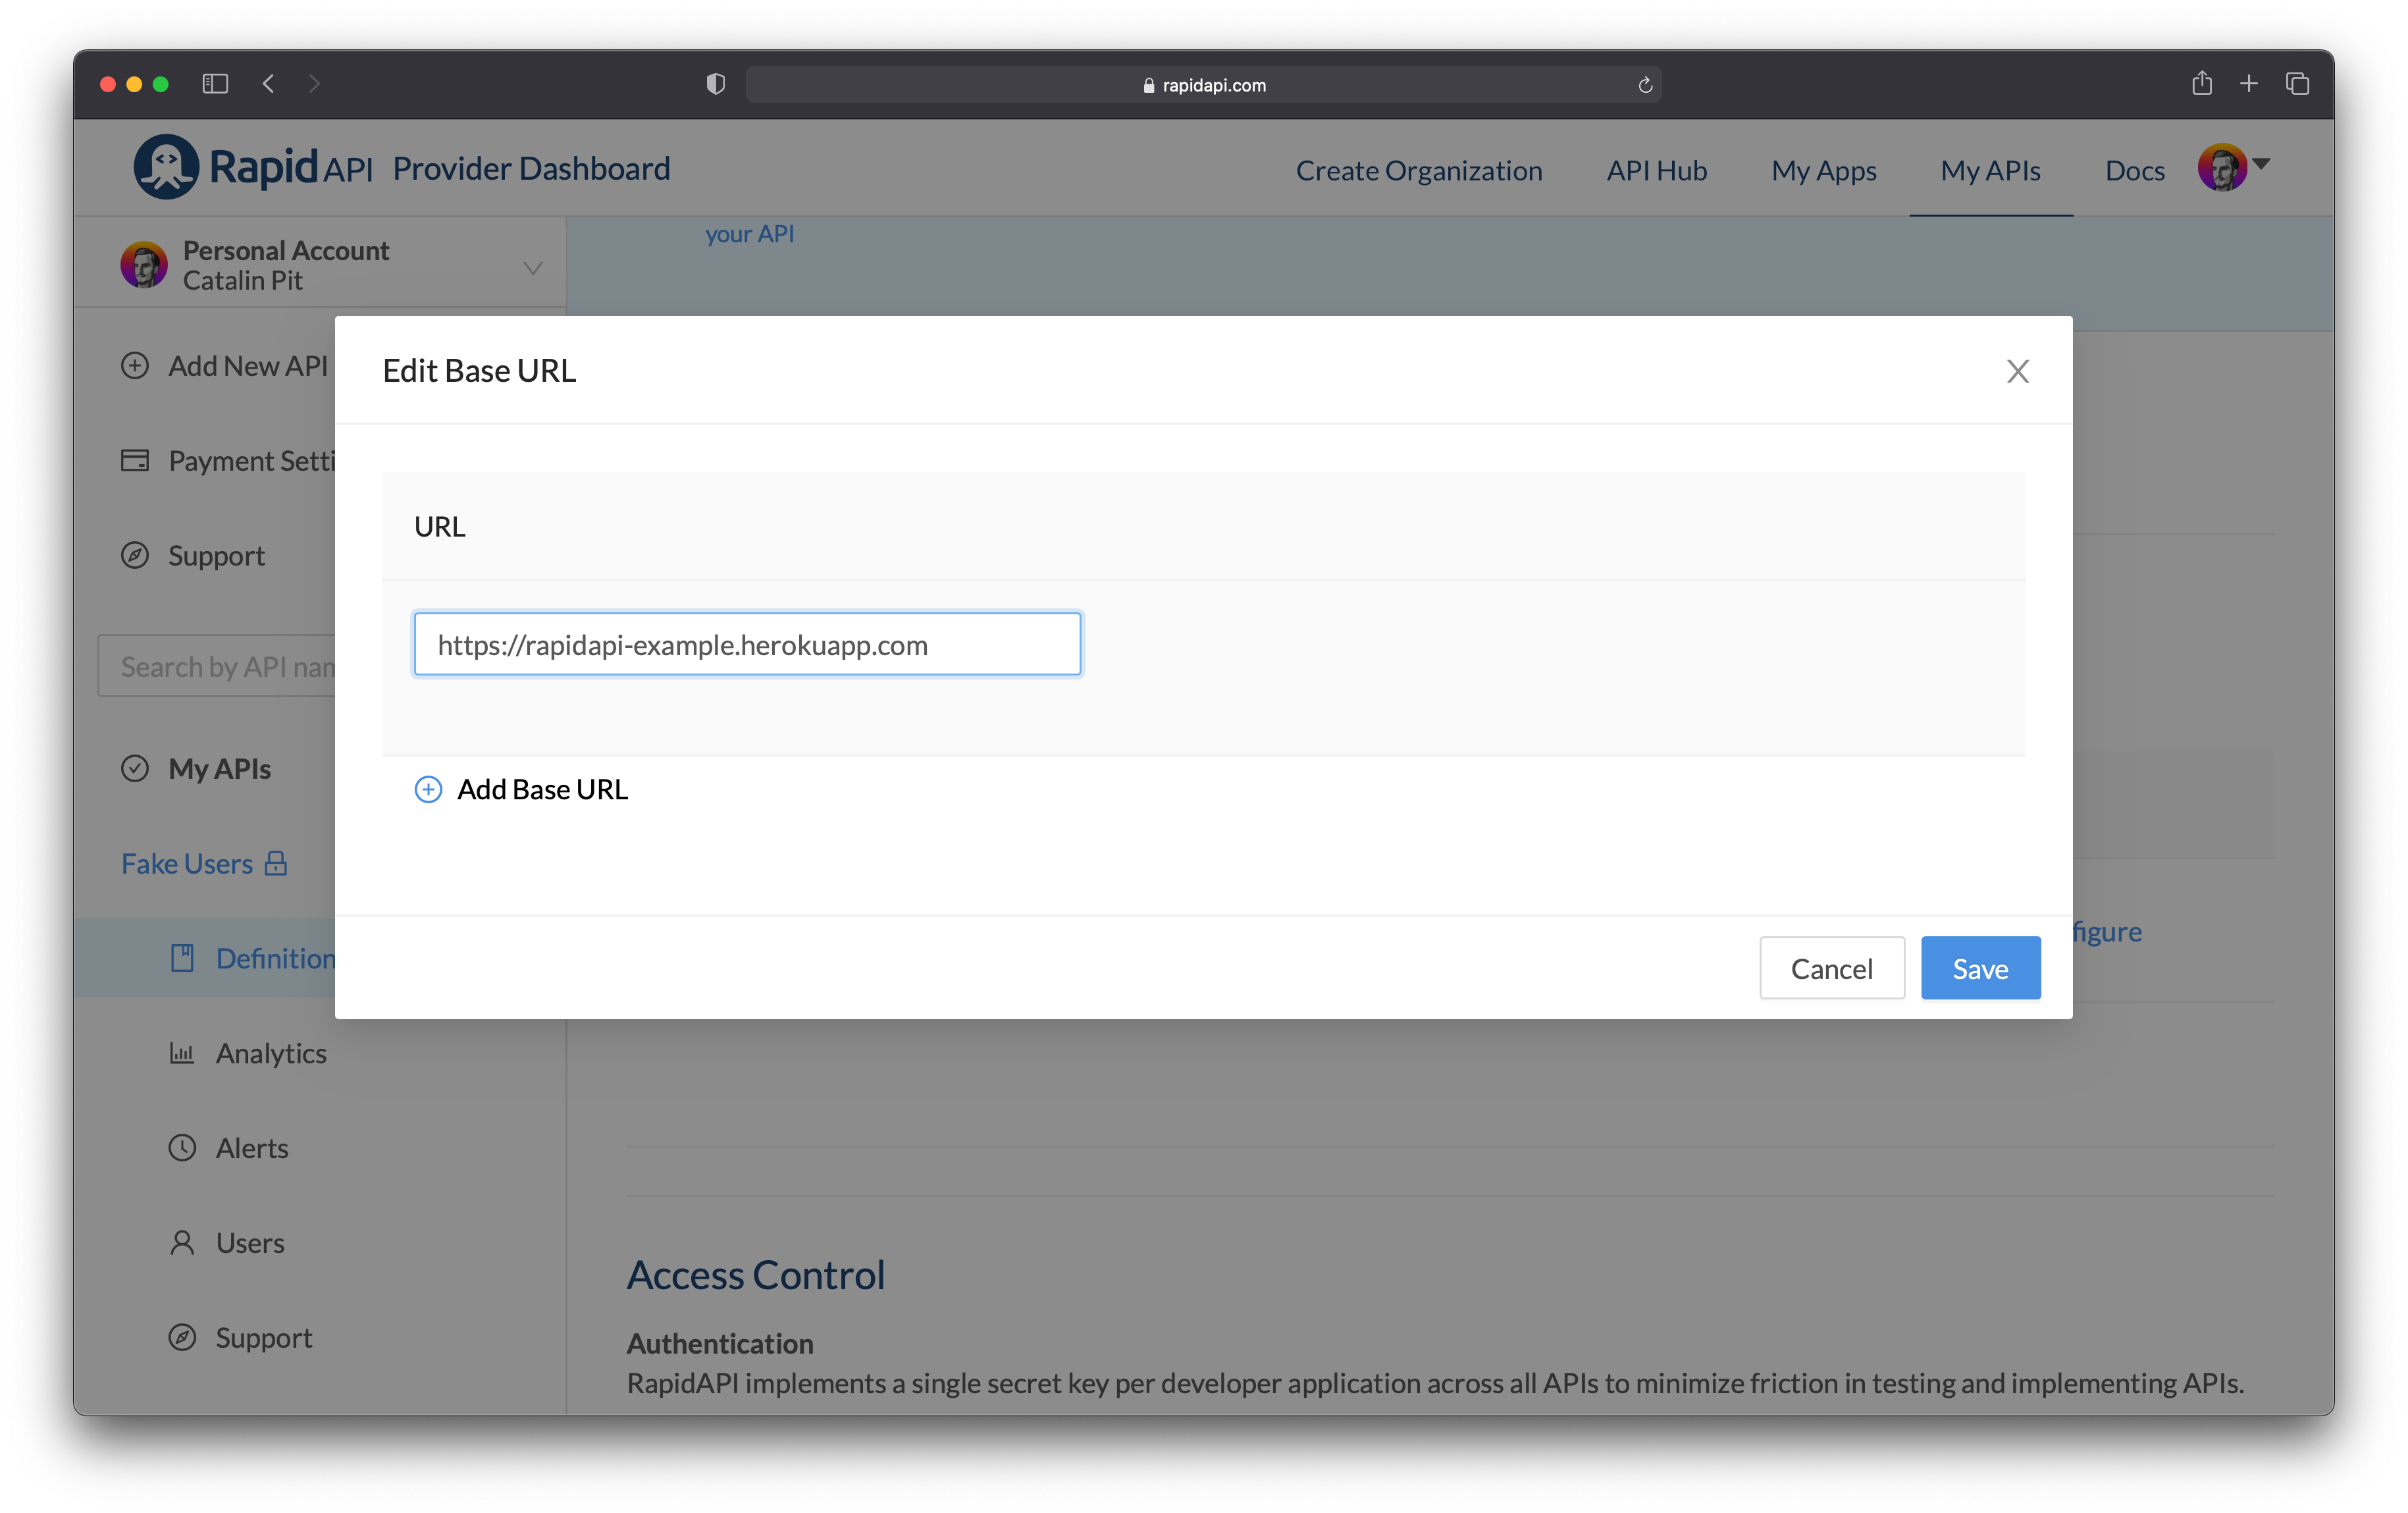 Figure 16
Figure 17 illustrate what you should see on the screen. Now that you have the base URL set, you need to configure each endpoint individually. Click on the Endpoints option, as shown in figure 17.
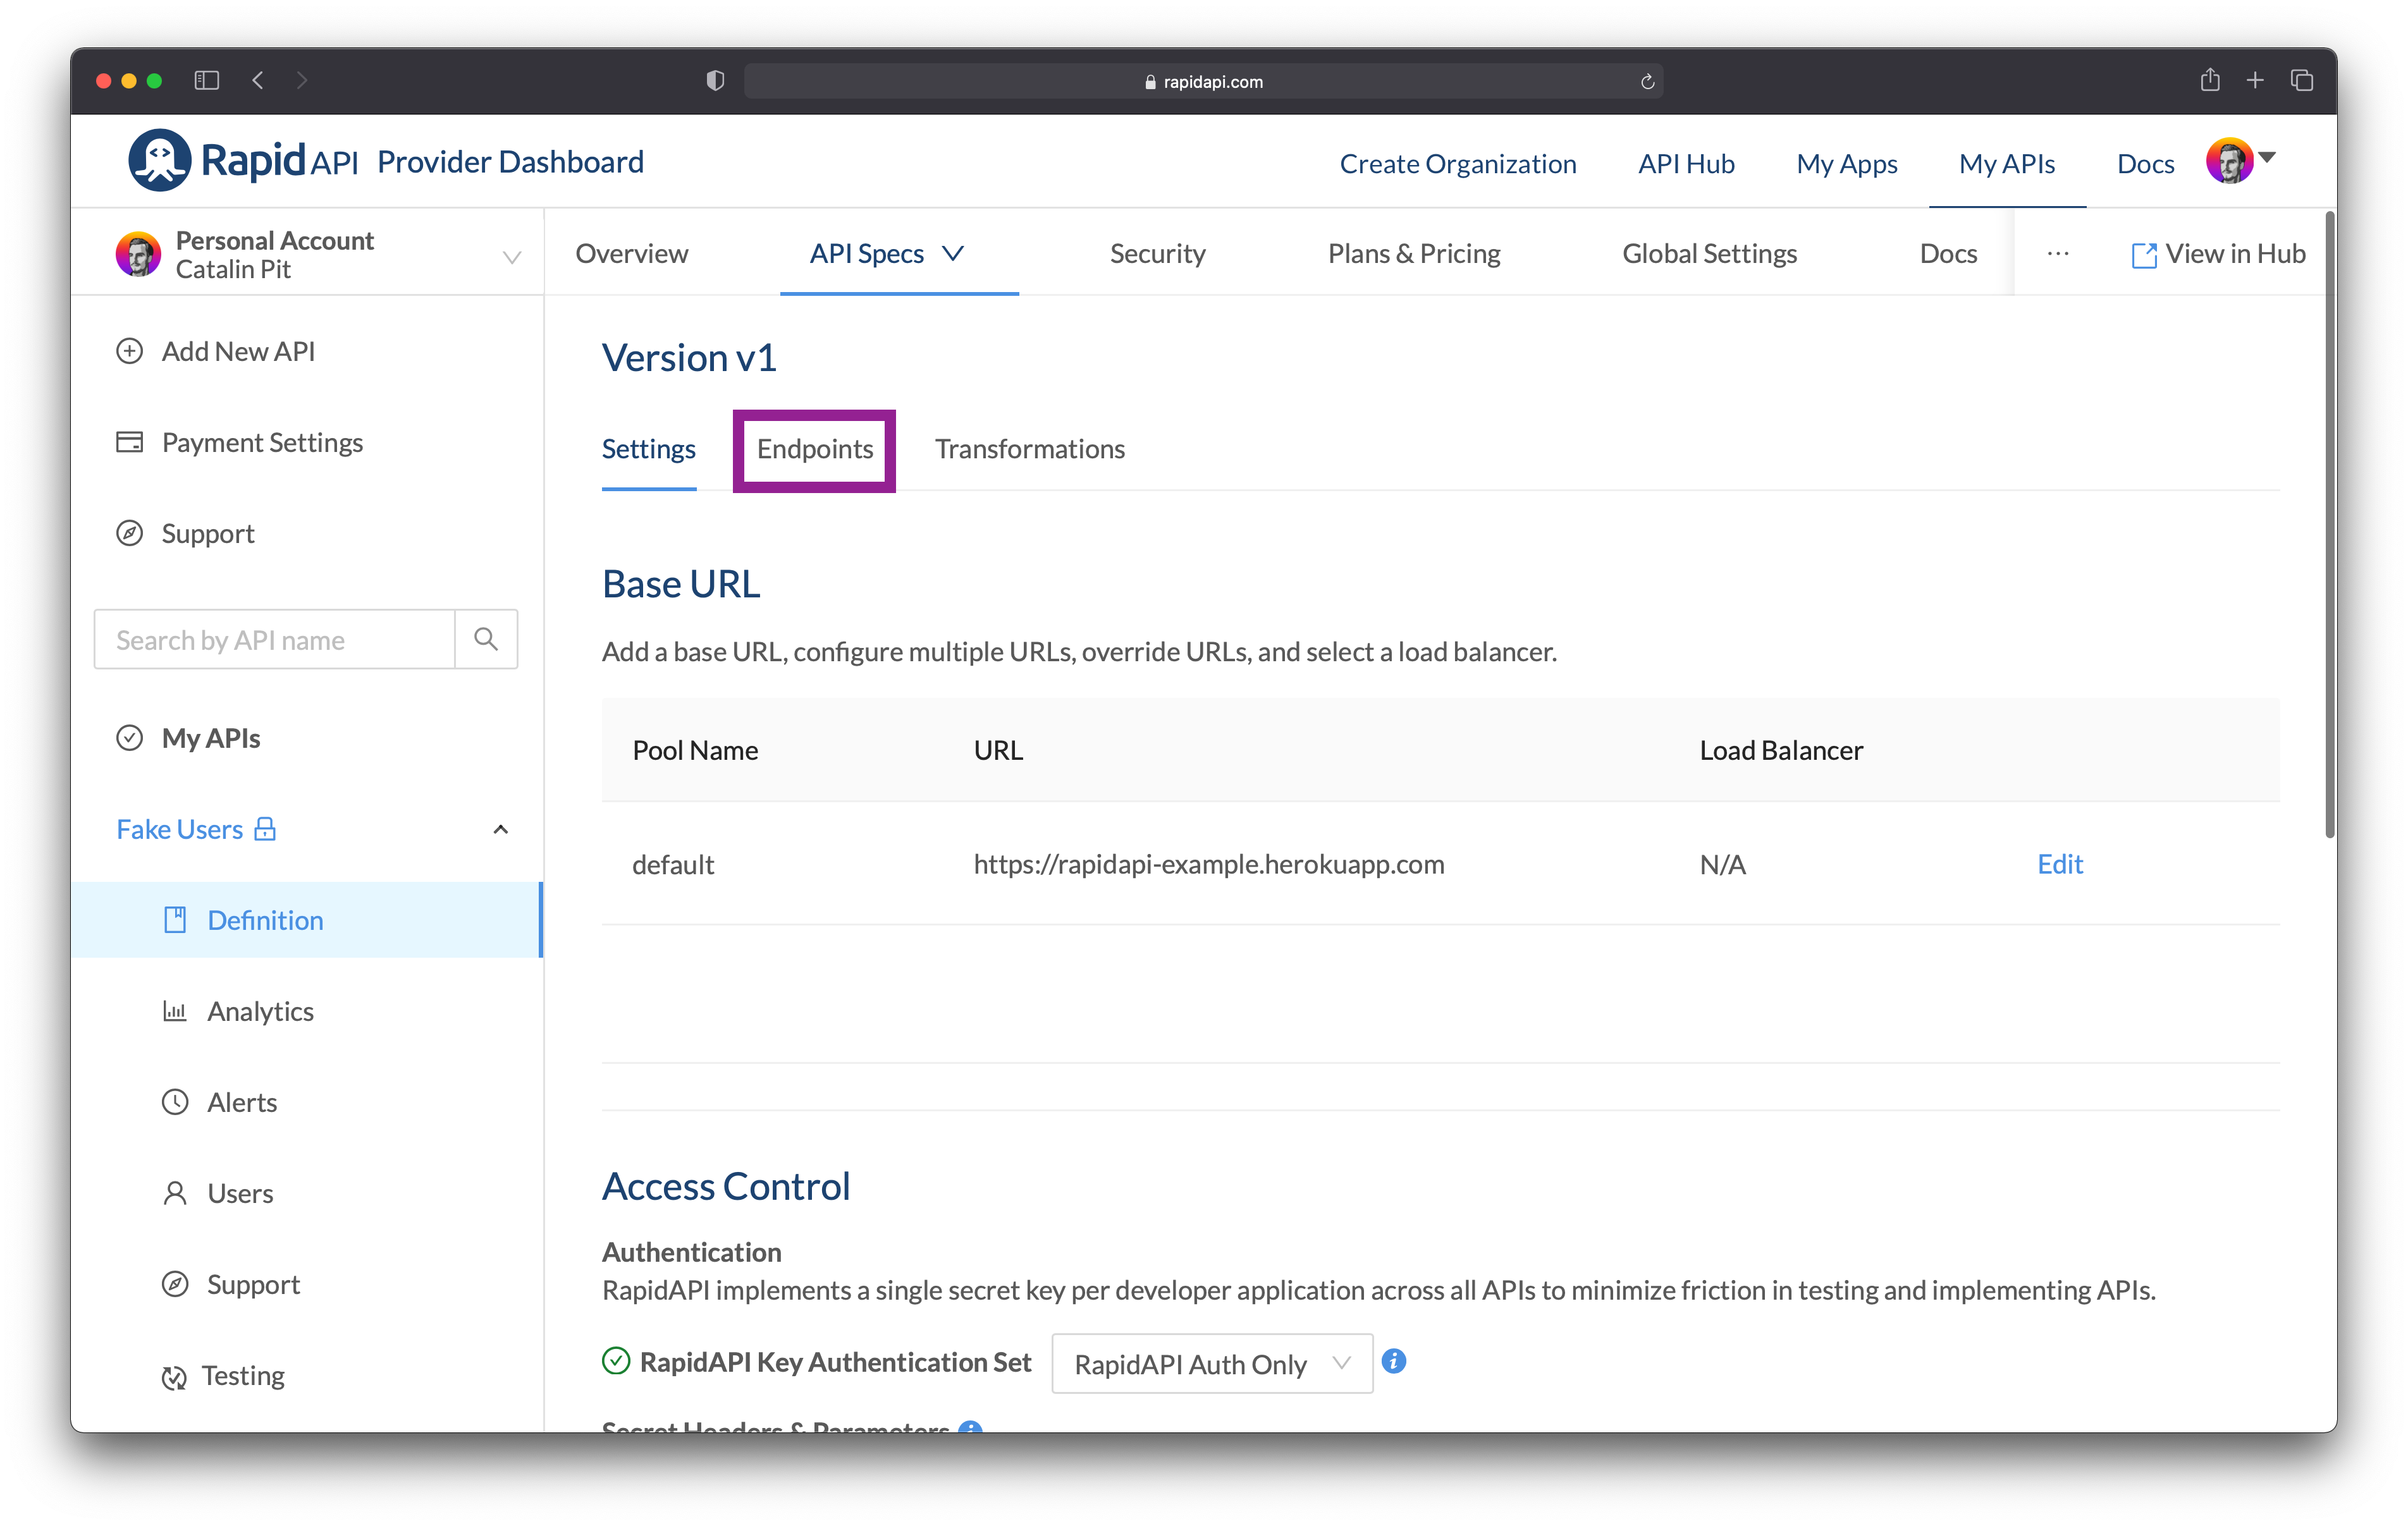 Figure 17
Configure the REST endpoint
On the new page, you can add either a REST endpoint or a GraphQL one. Since we have a REST API, click on the option Create REST Endpoint.
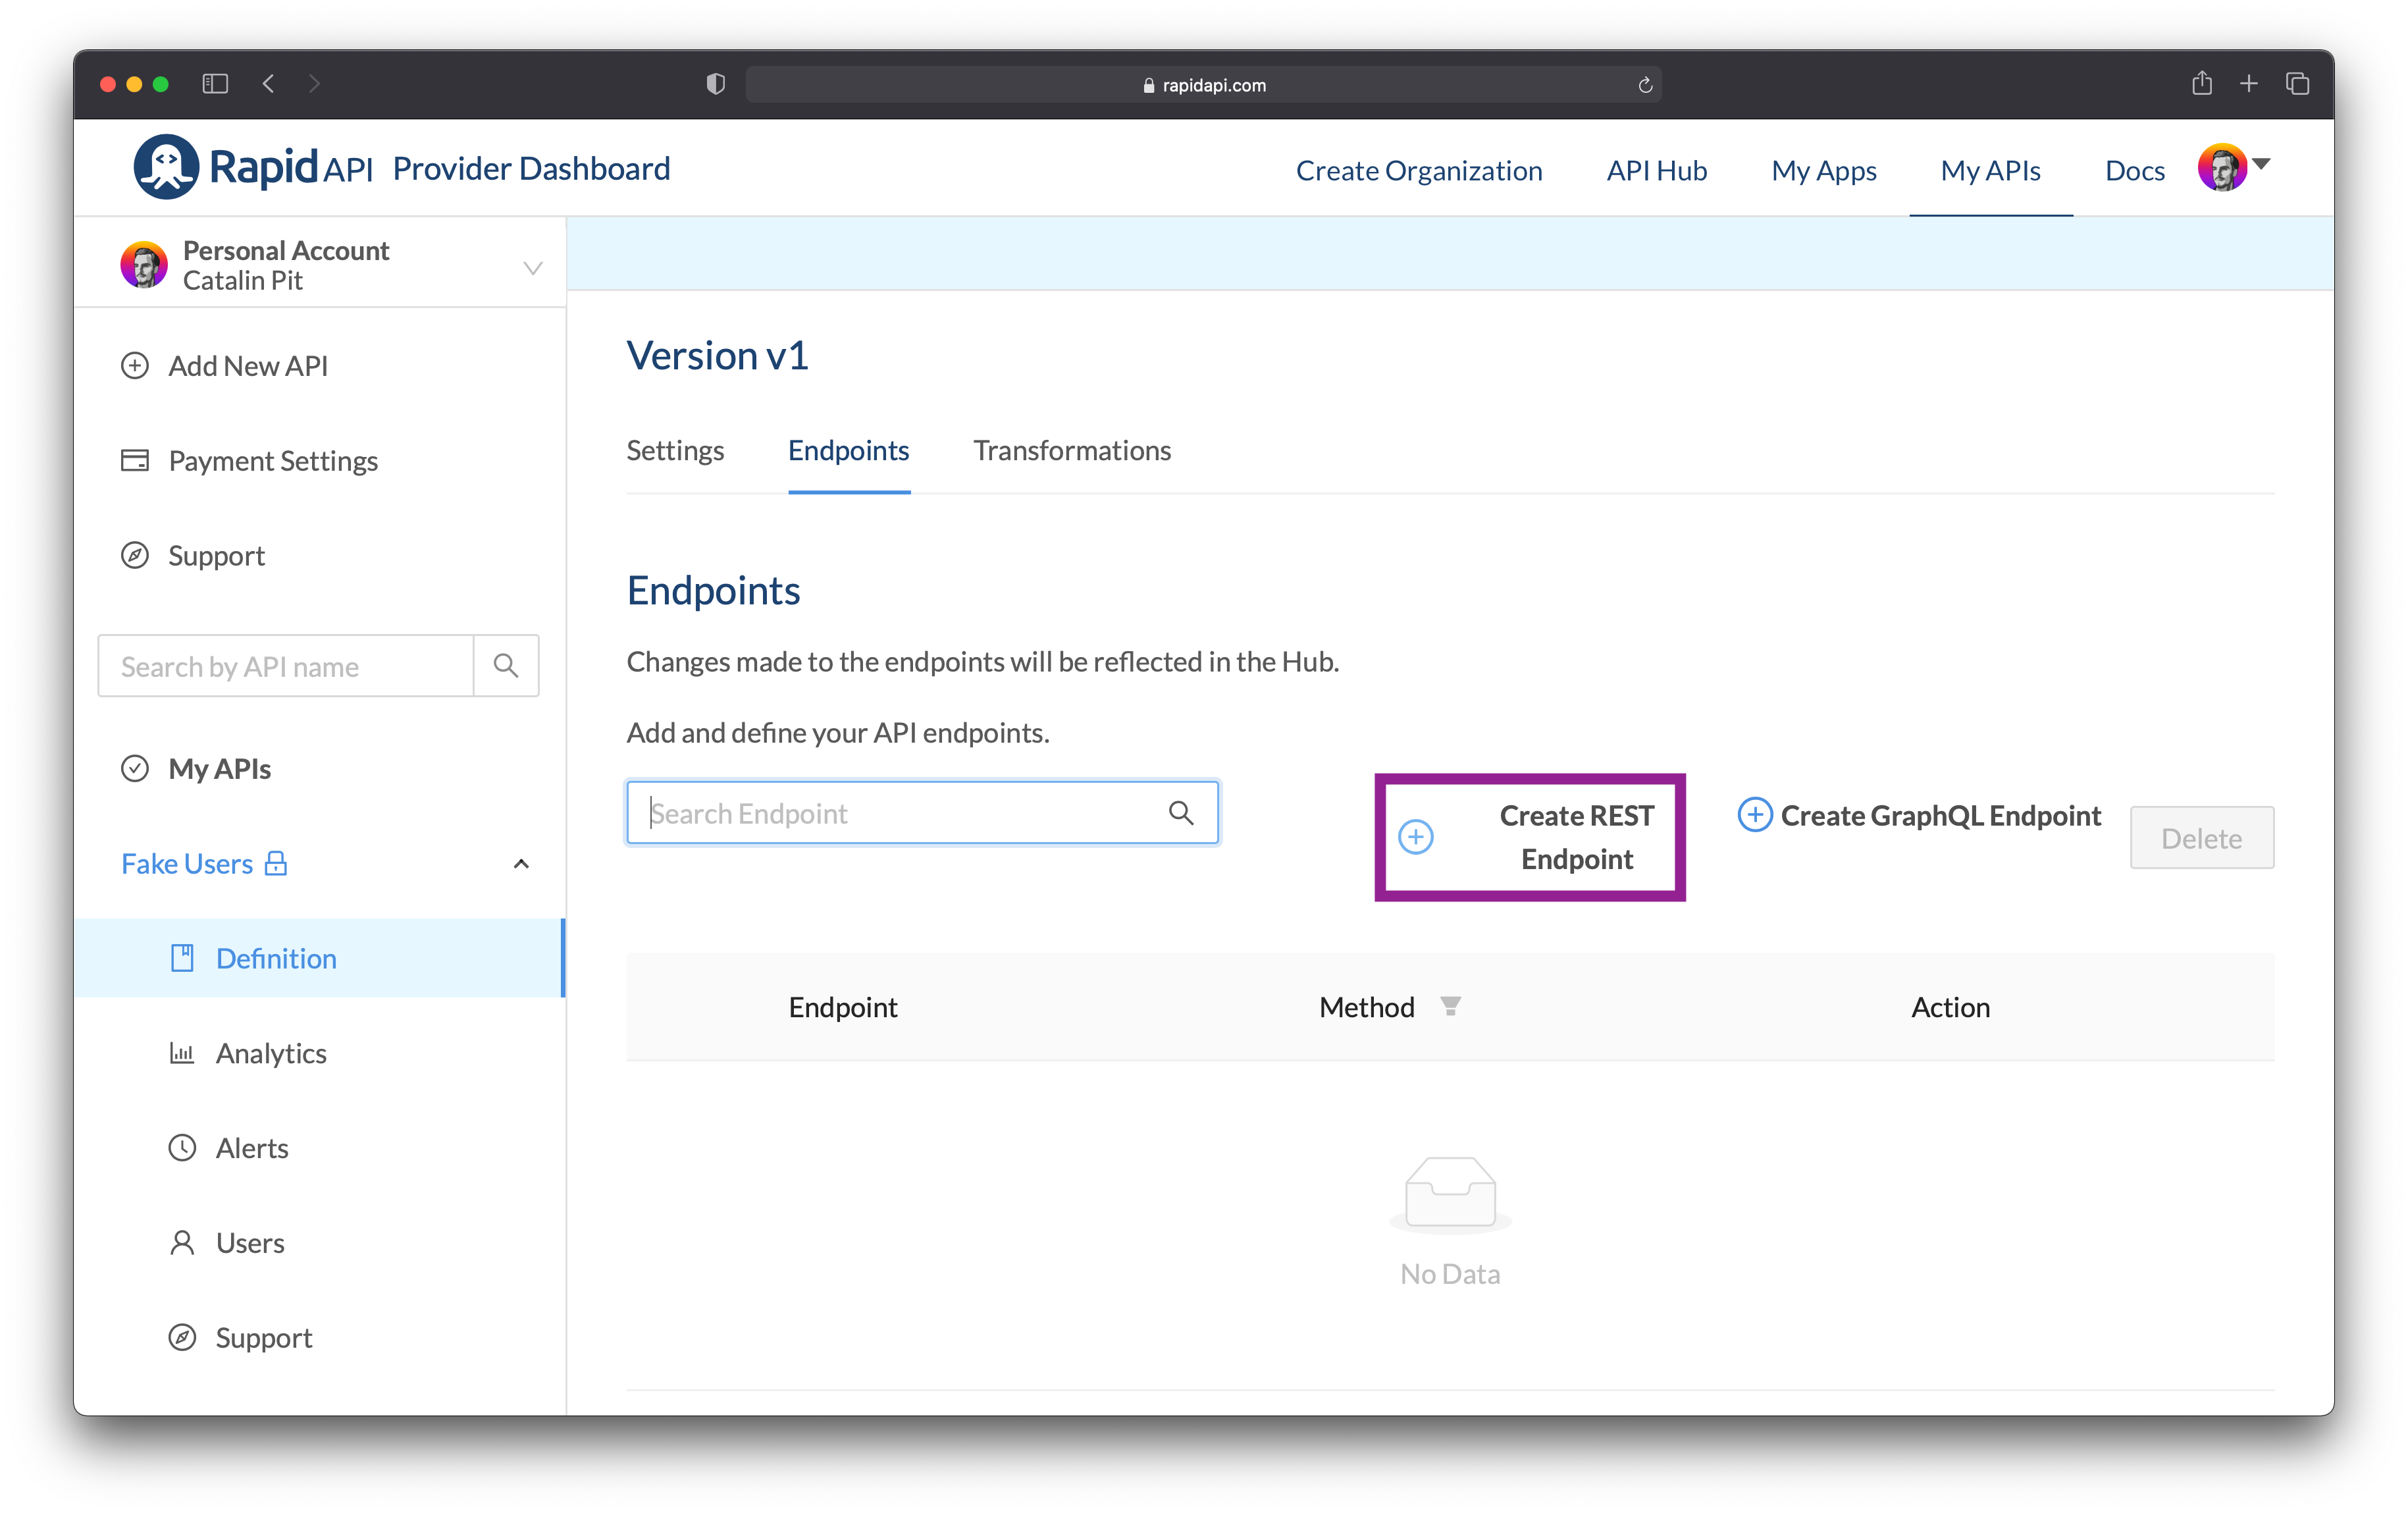 Figure 18
The next step is to configure the following for your endpoint:
- a name
- a description
- the HTTP method and the endpoint
Figure 19 illustrates the details for the /users endpoint. Observe how you only need to specify the endpoint /users rather than entering the whole URL. The reason why this works is because you set the base URL previously.
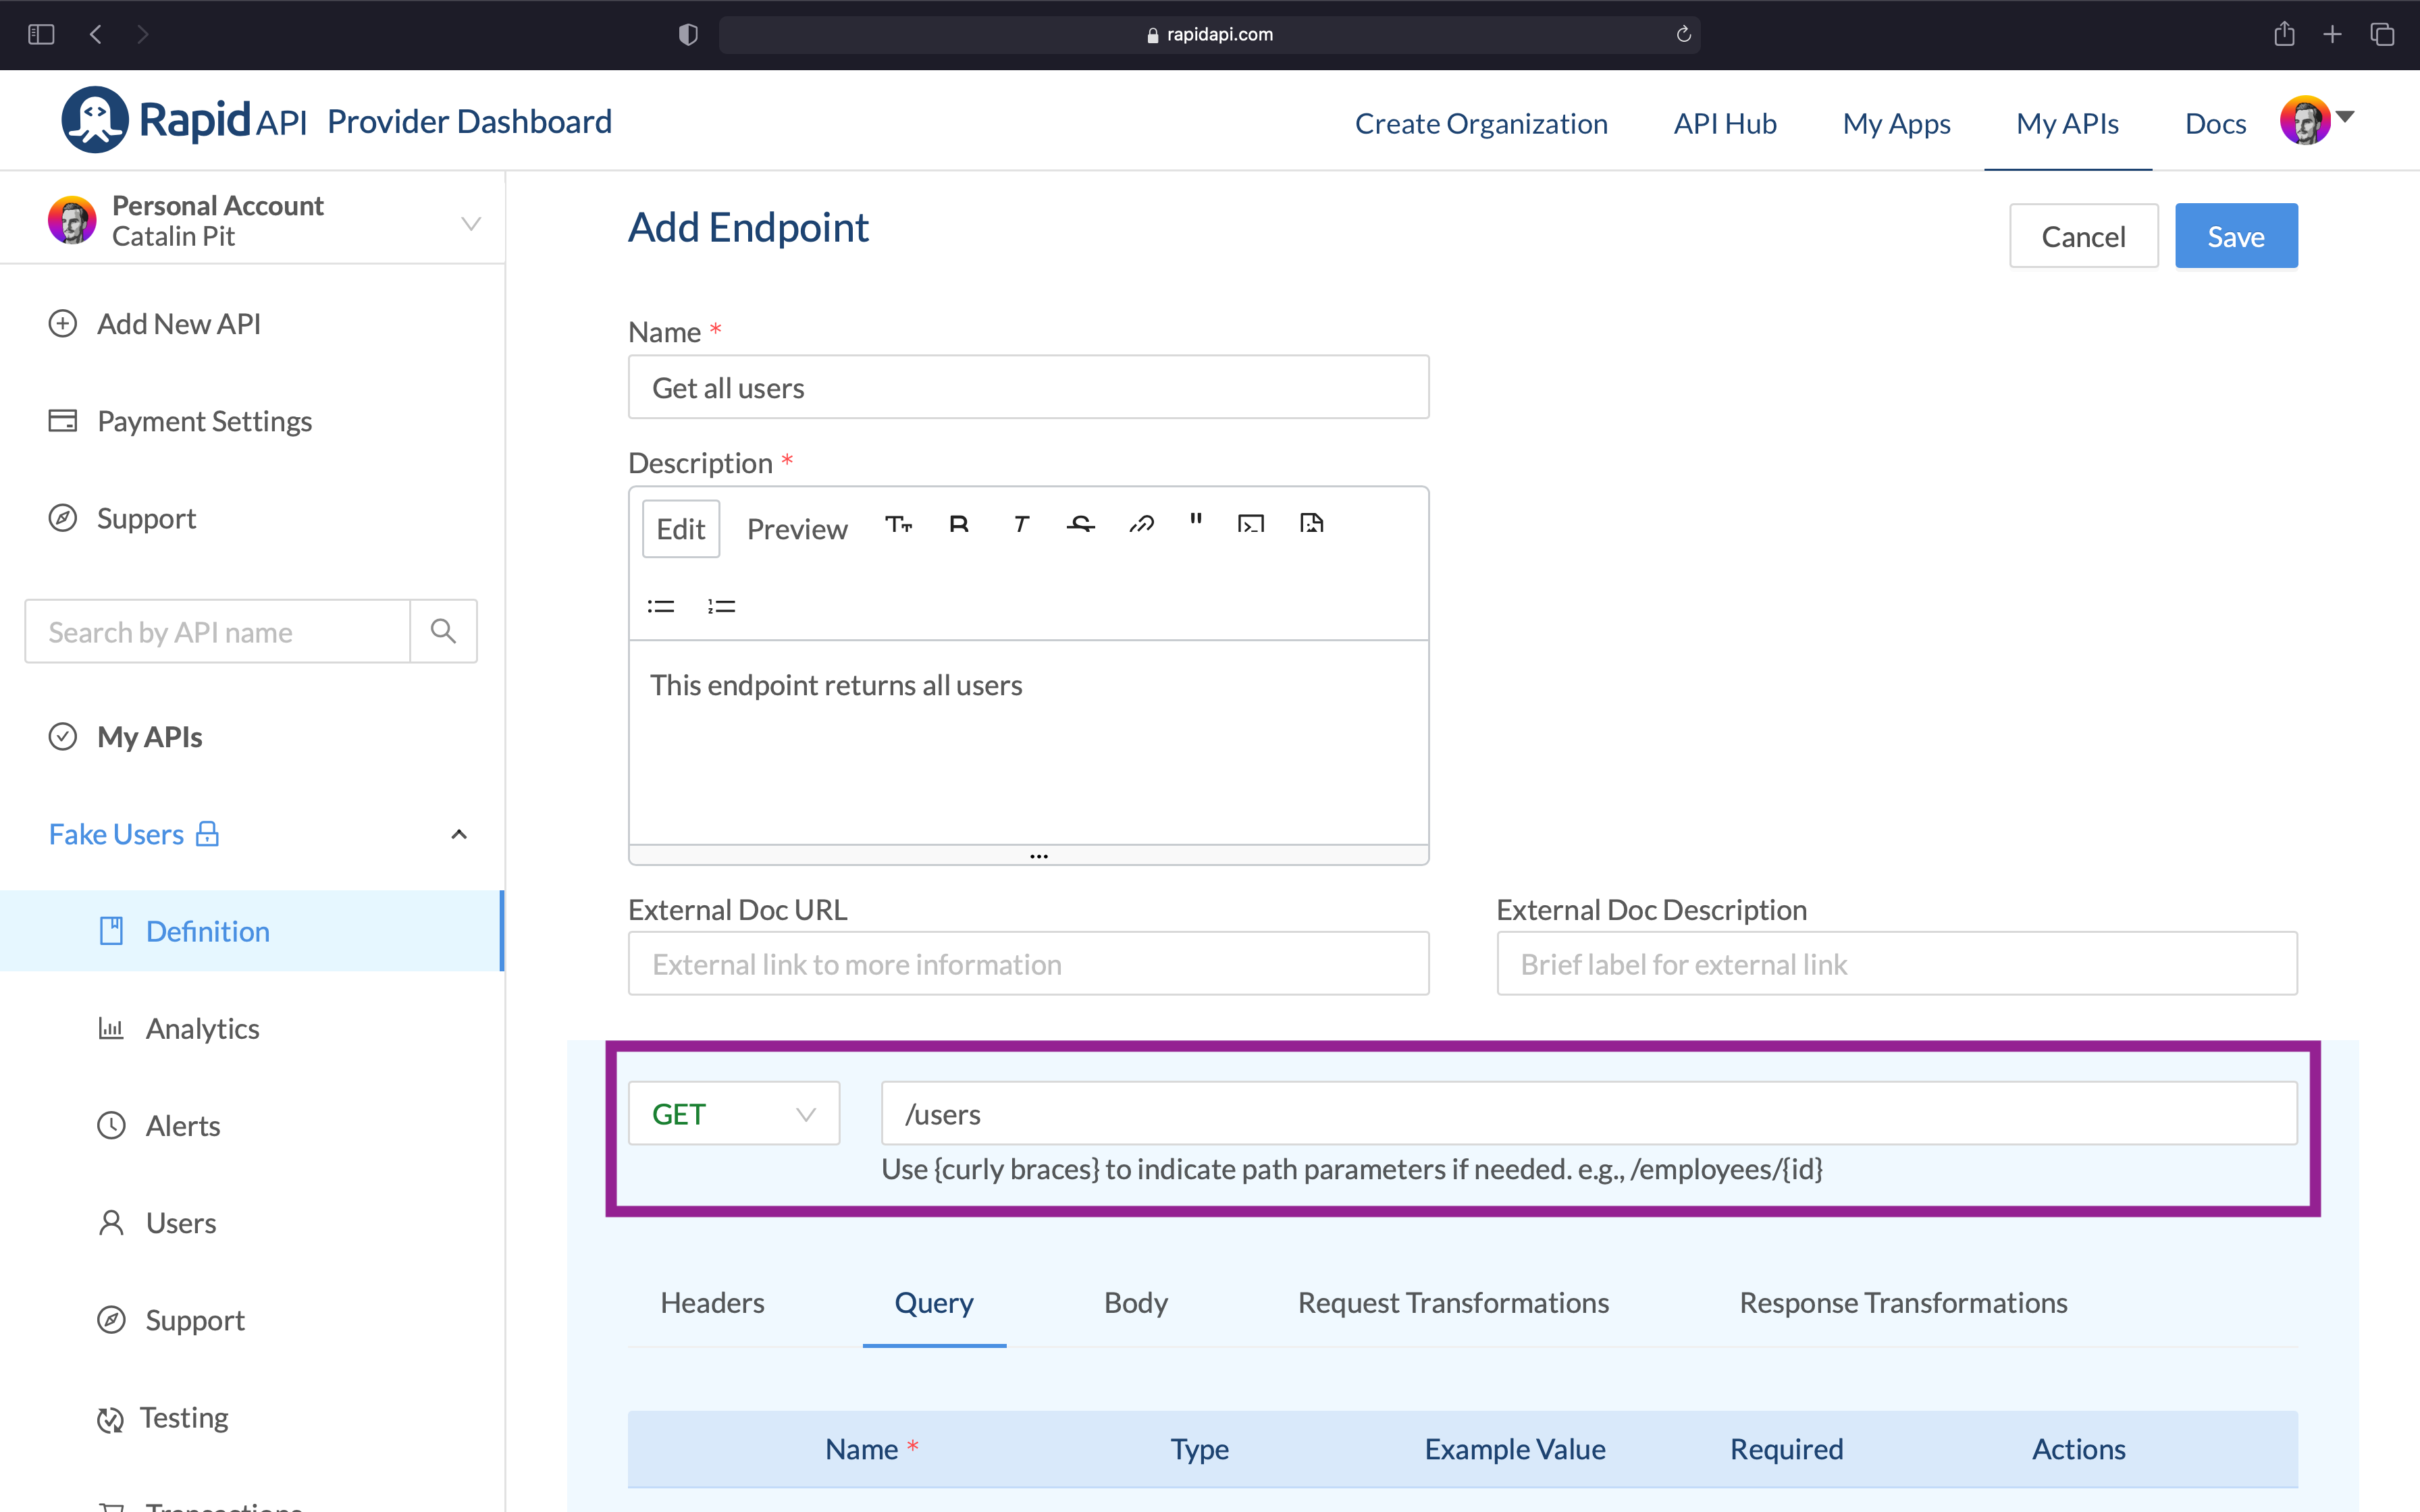 Figure 19
Now, you can test your endpoint. Save the endpoint by clicking on any of the buttons highlighted in figure 20.
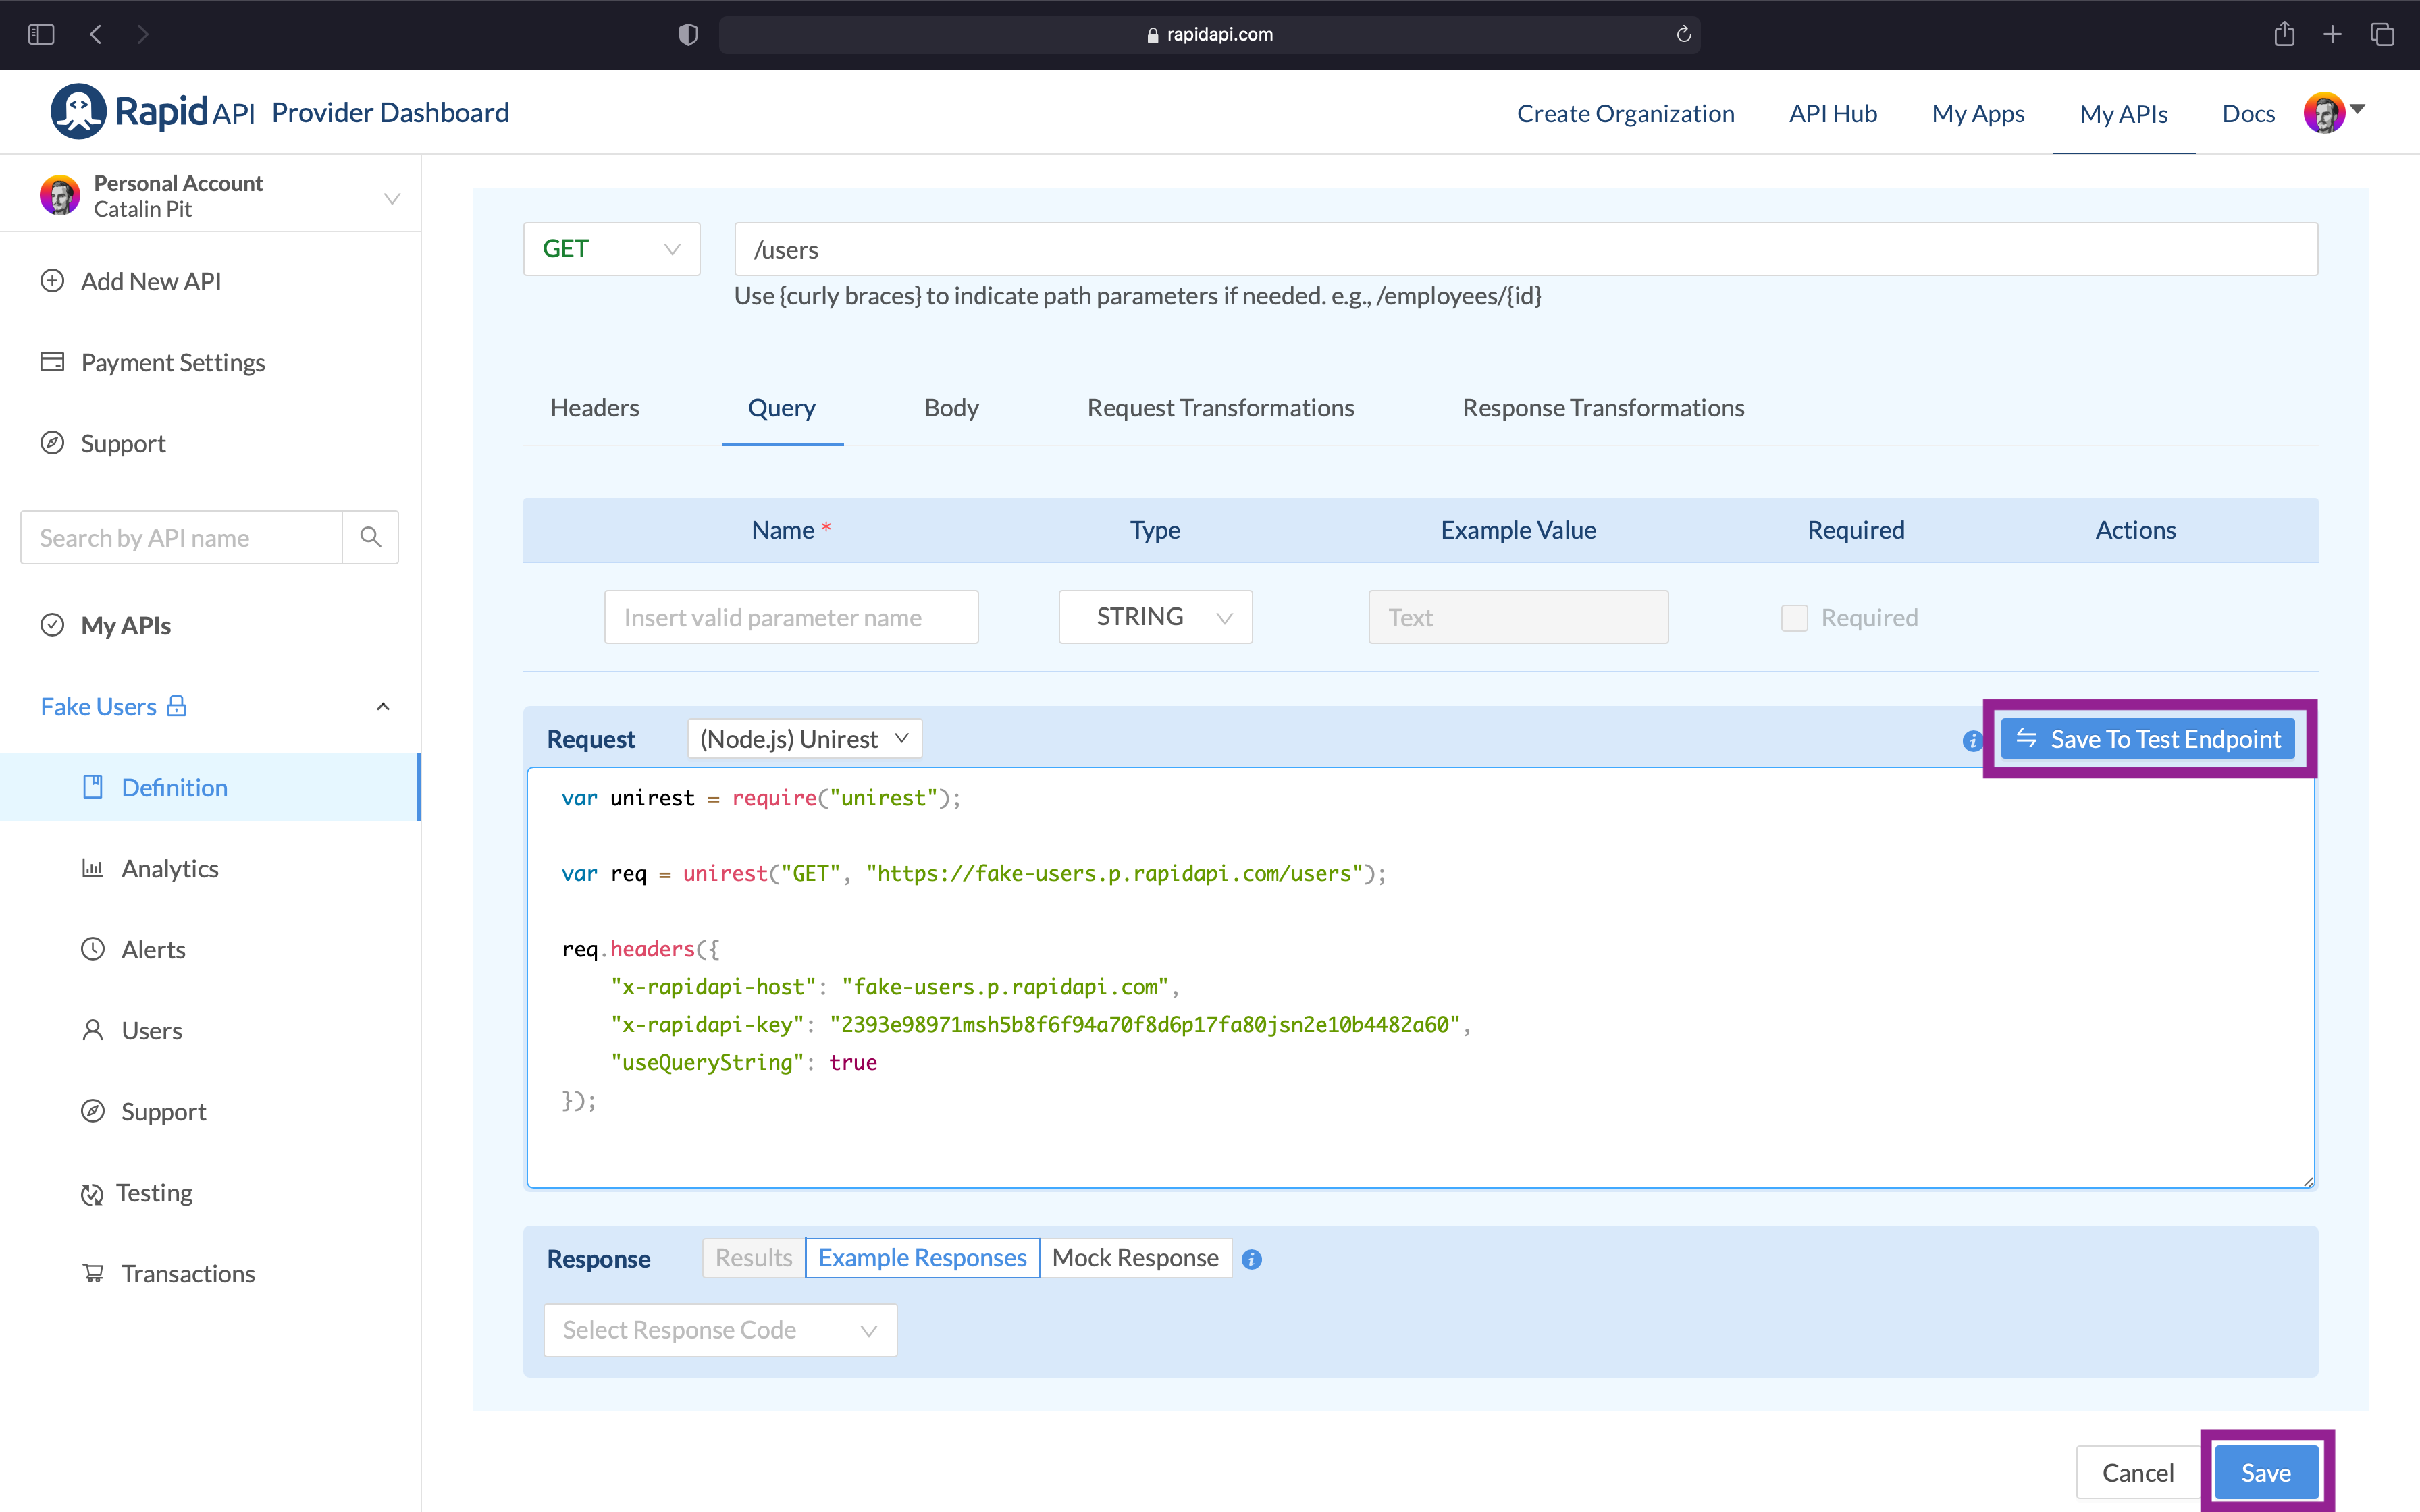 Figure 20
After saving the endpoint, the button Save To Test Endpoint transforms to Test Endpoint. Click on it to test and see if the endpoint returns the correct data.
In figure 21, you can see a successful endpoint test - it returned the array of users.
From here, you can set an example response to display on the API's page. The purpose of this example response is to help developers understand what kind of response they should get for an endpoint.
To create an example response, click on the button saying Create example from response. That's all you have to do!
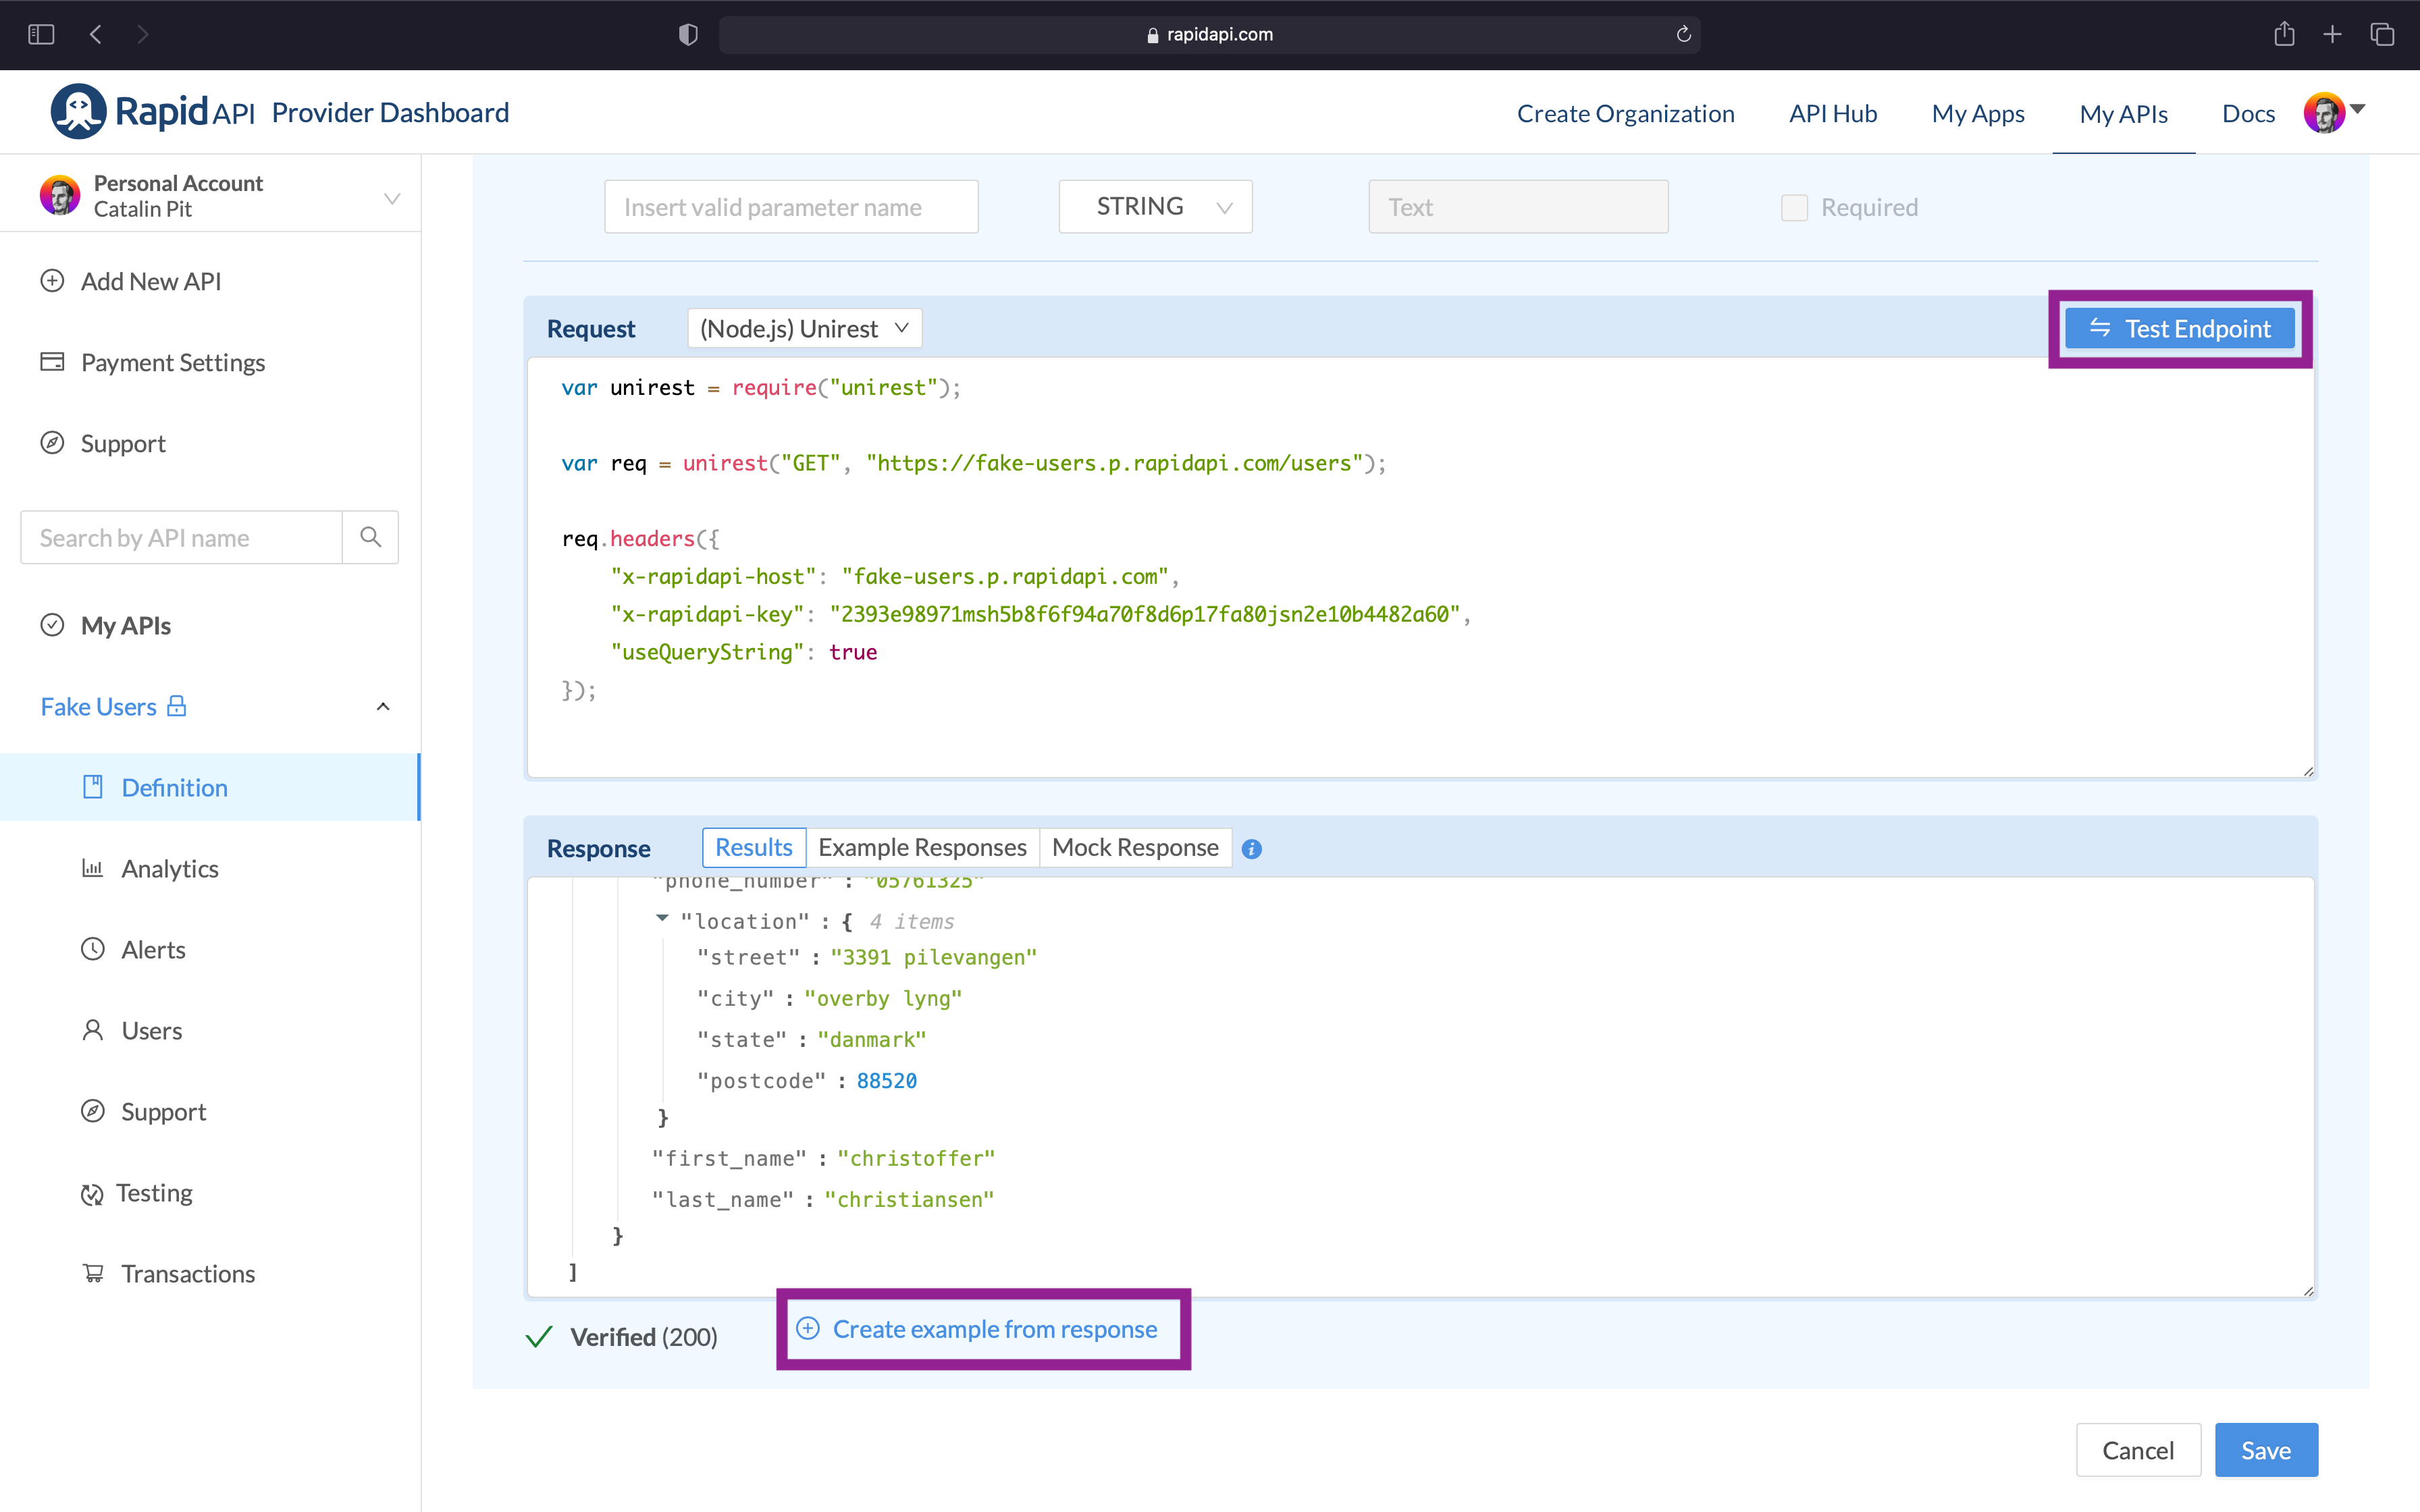 Figure 21
Now you can save the endpoint and move onto the next step, which is about setting the pricing tiers. Yes, you are going to see the monetization part in this next step!
To do that, click on the Plans & Pricing option, as shown in figure 22.
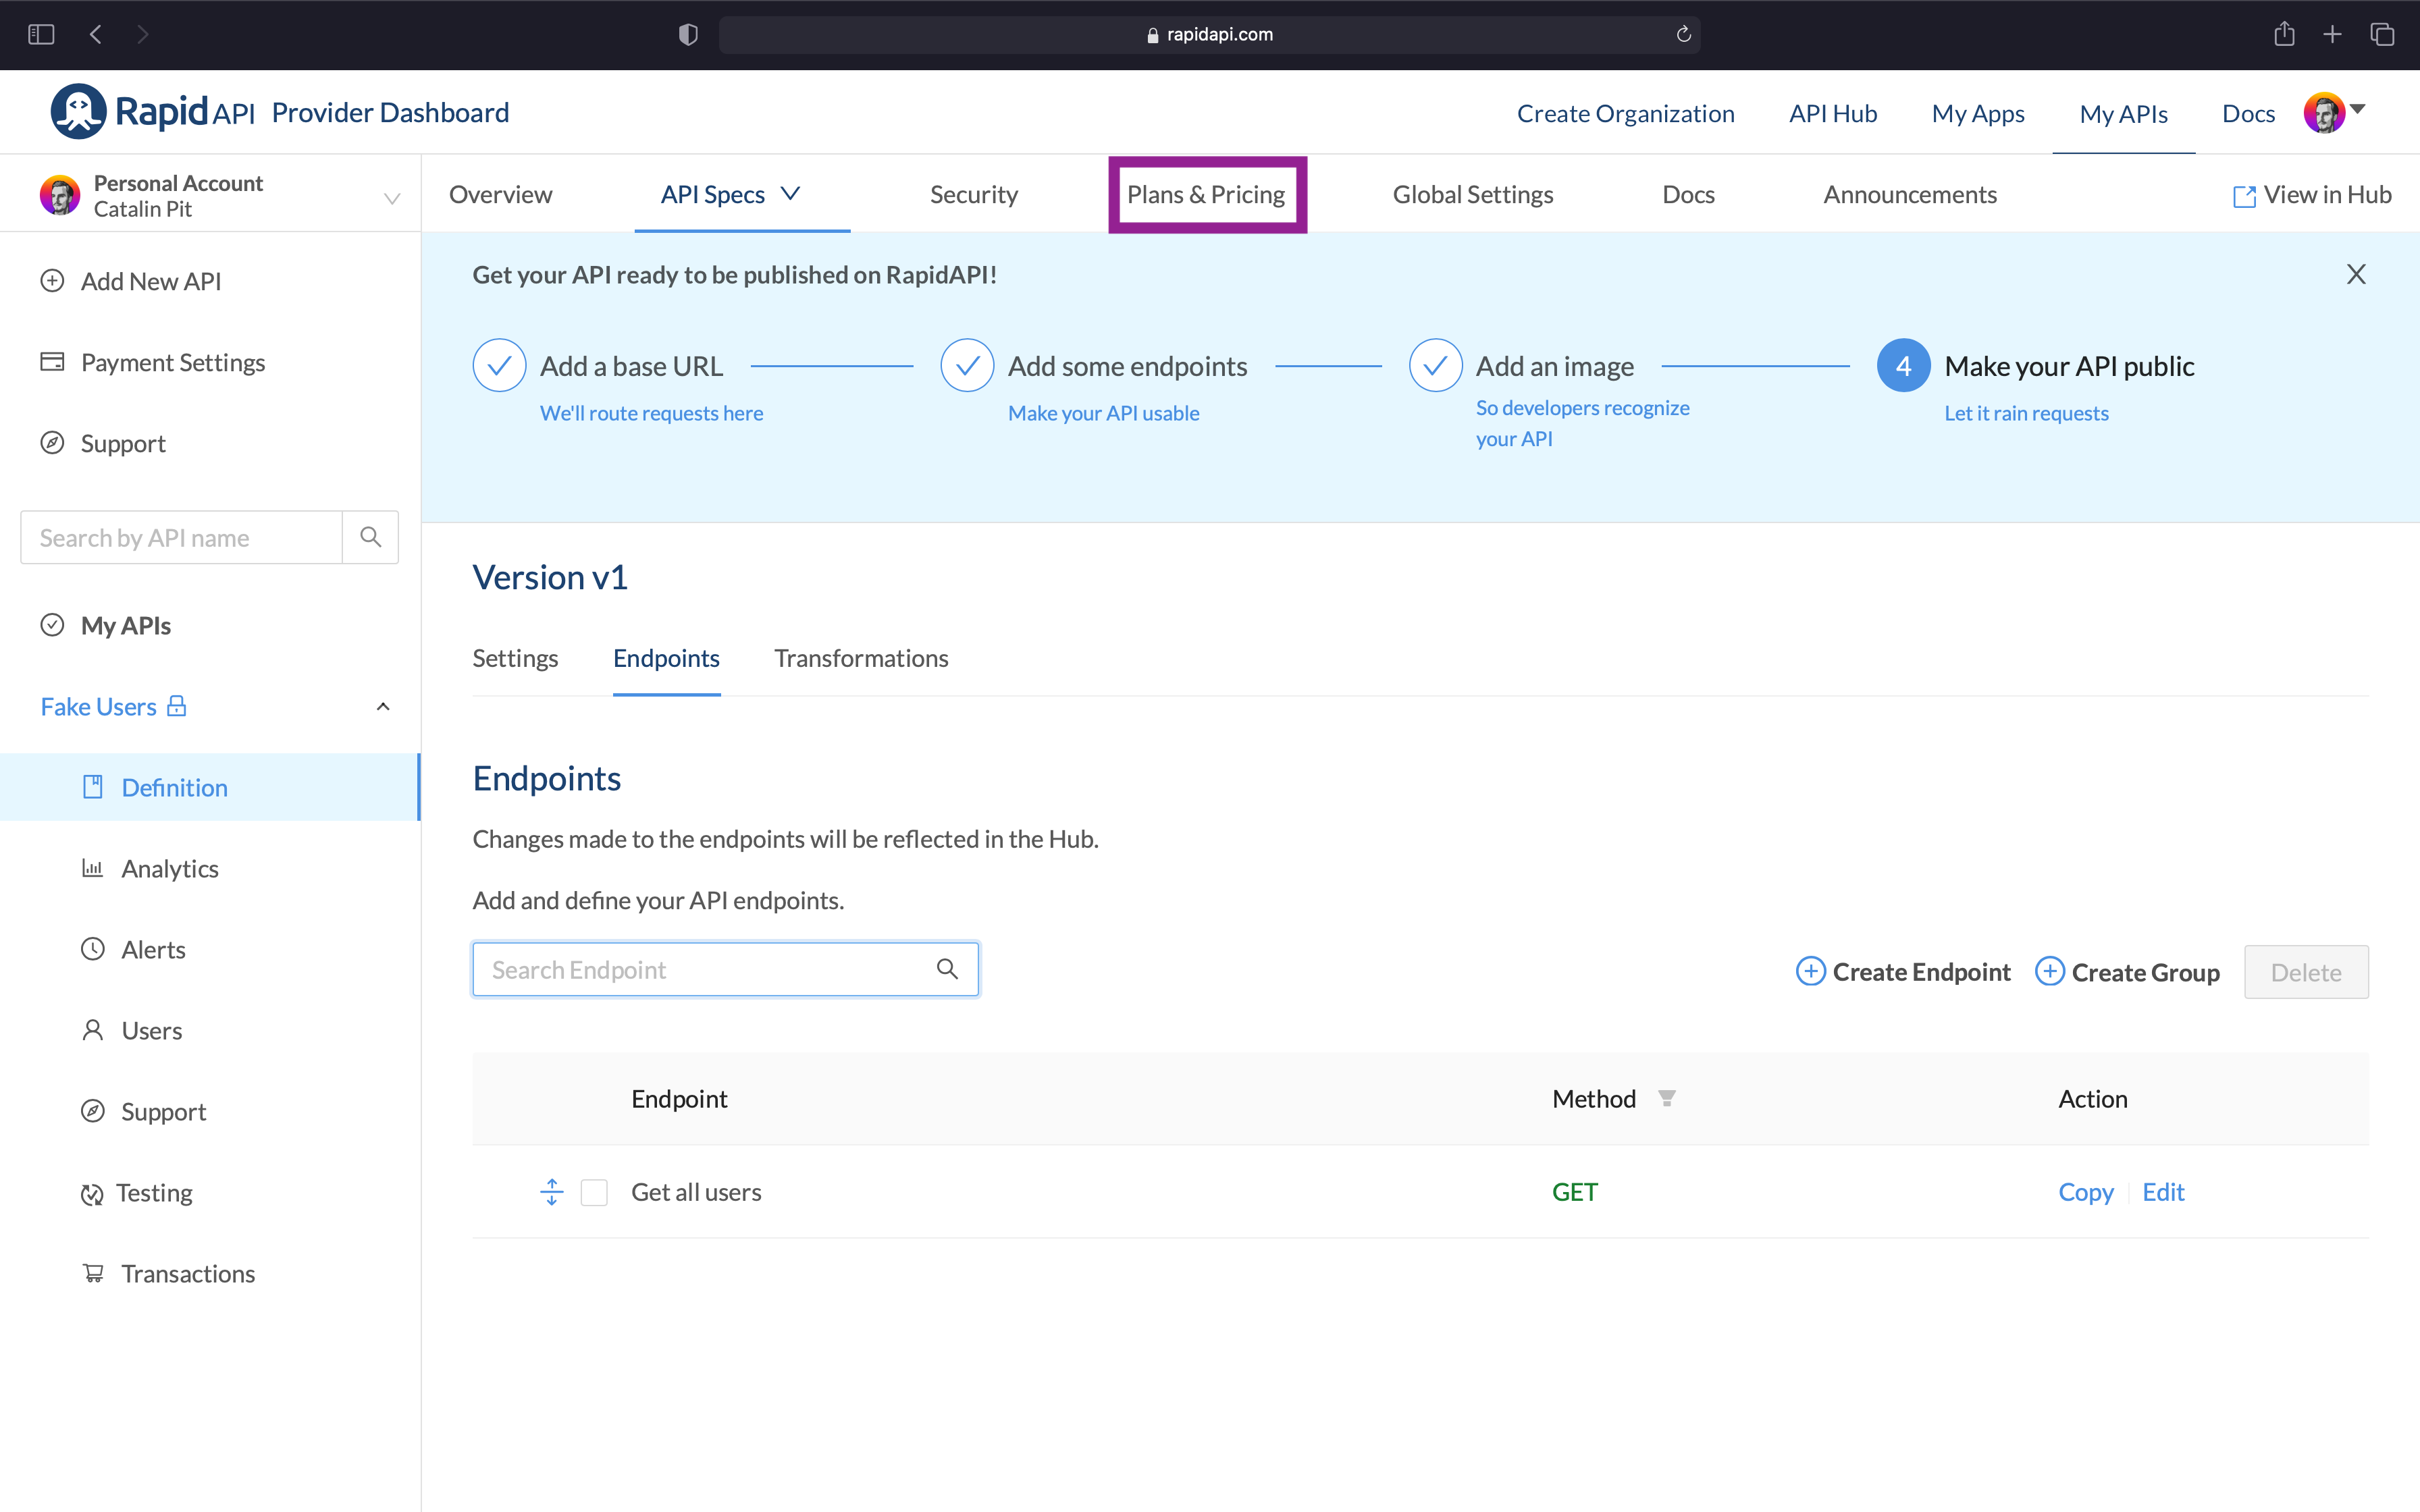 Figure 22
Pricing the API
For in-depth information about pricing plans, check the official guide from RapidAPI. It teaches you about advanced options such as custom quotas, rate limiting, and private subscription plans.
In this article, you price the API based on the number of requests made by users. In figure 23, you can see the pricing page on RapidAPI. From here, you can monetize your API.
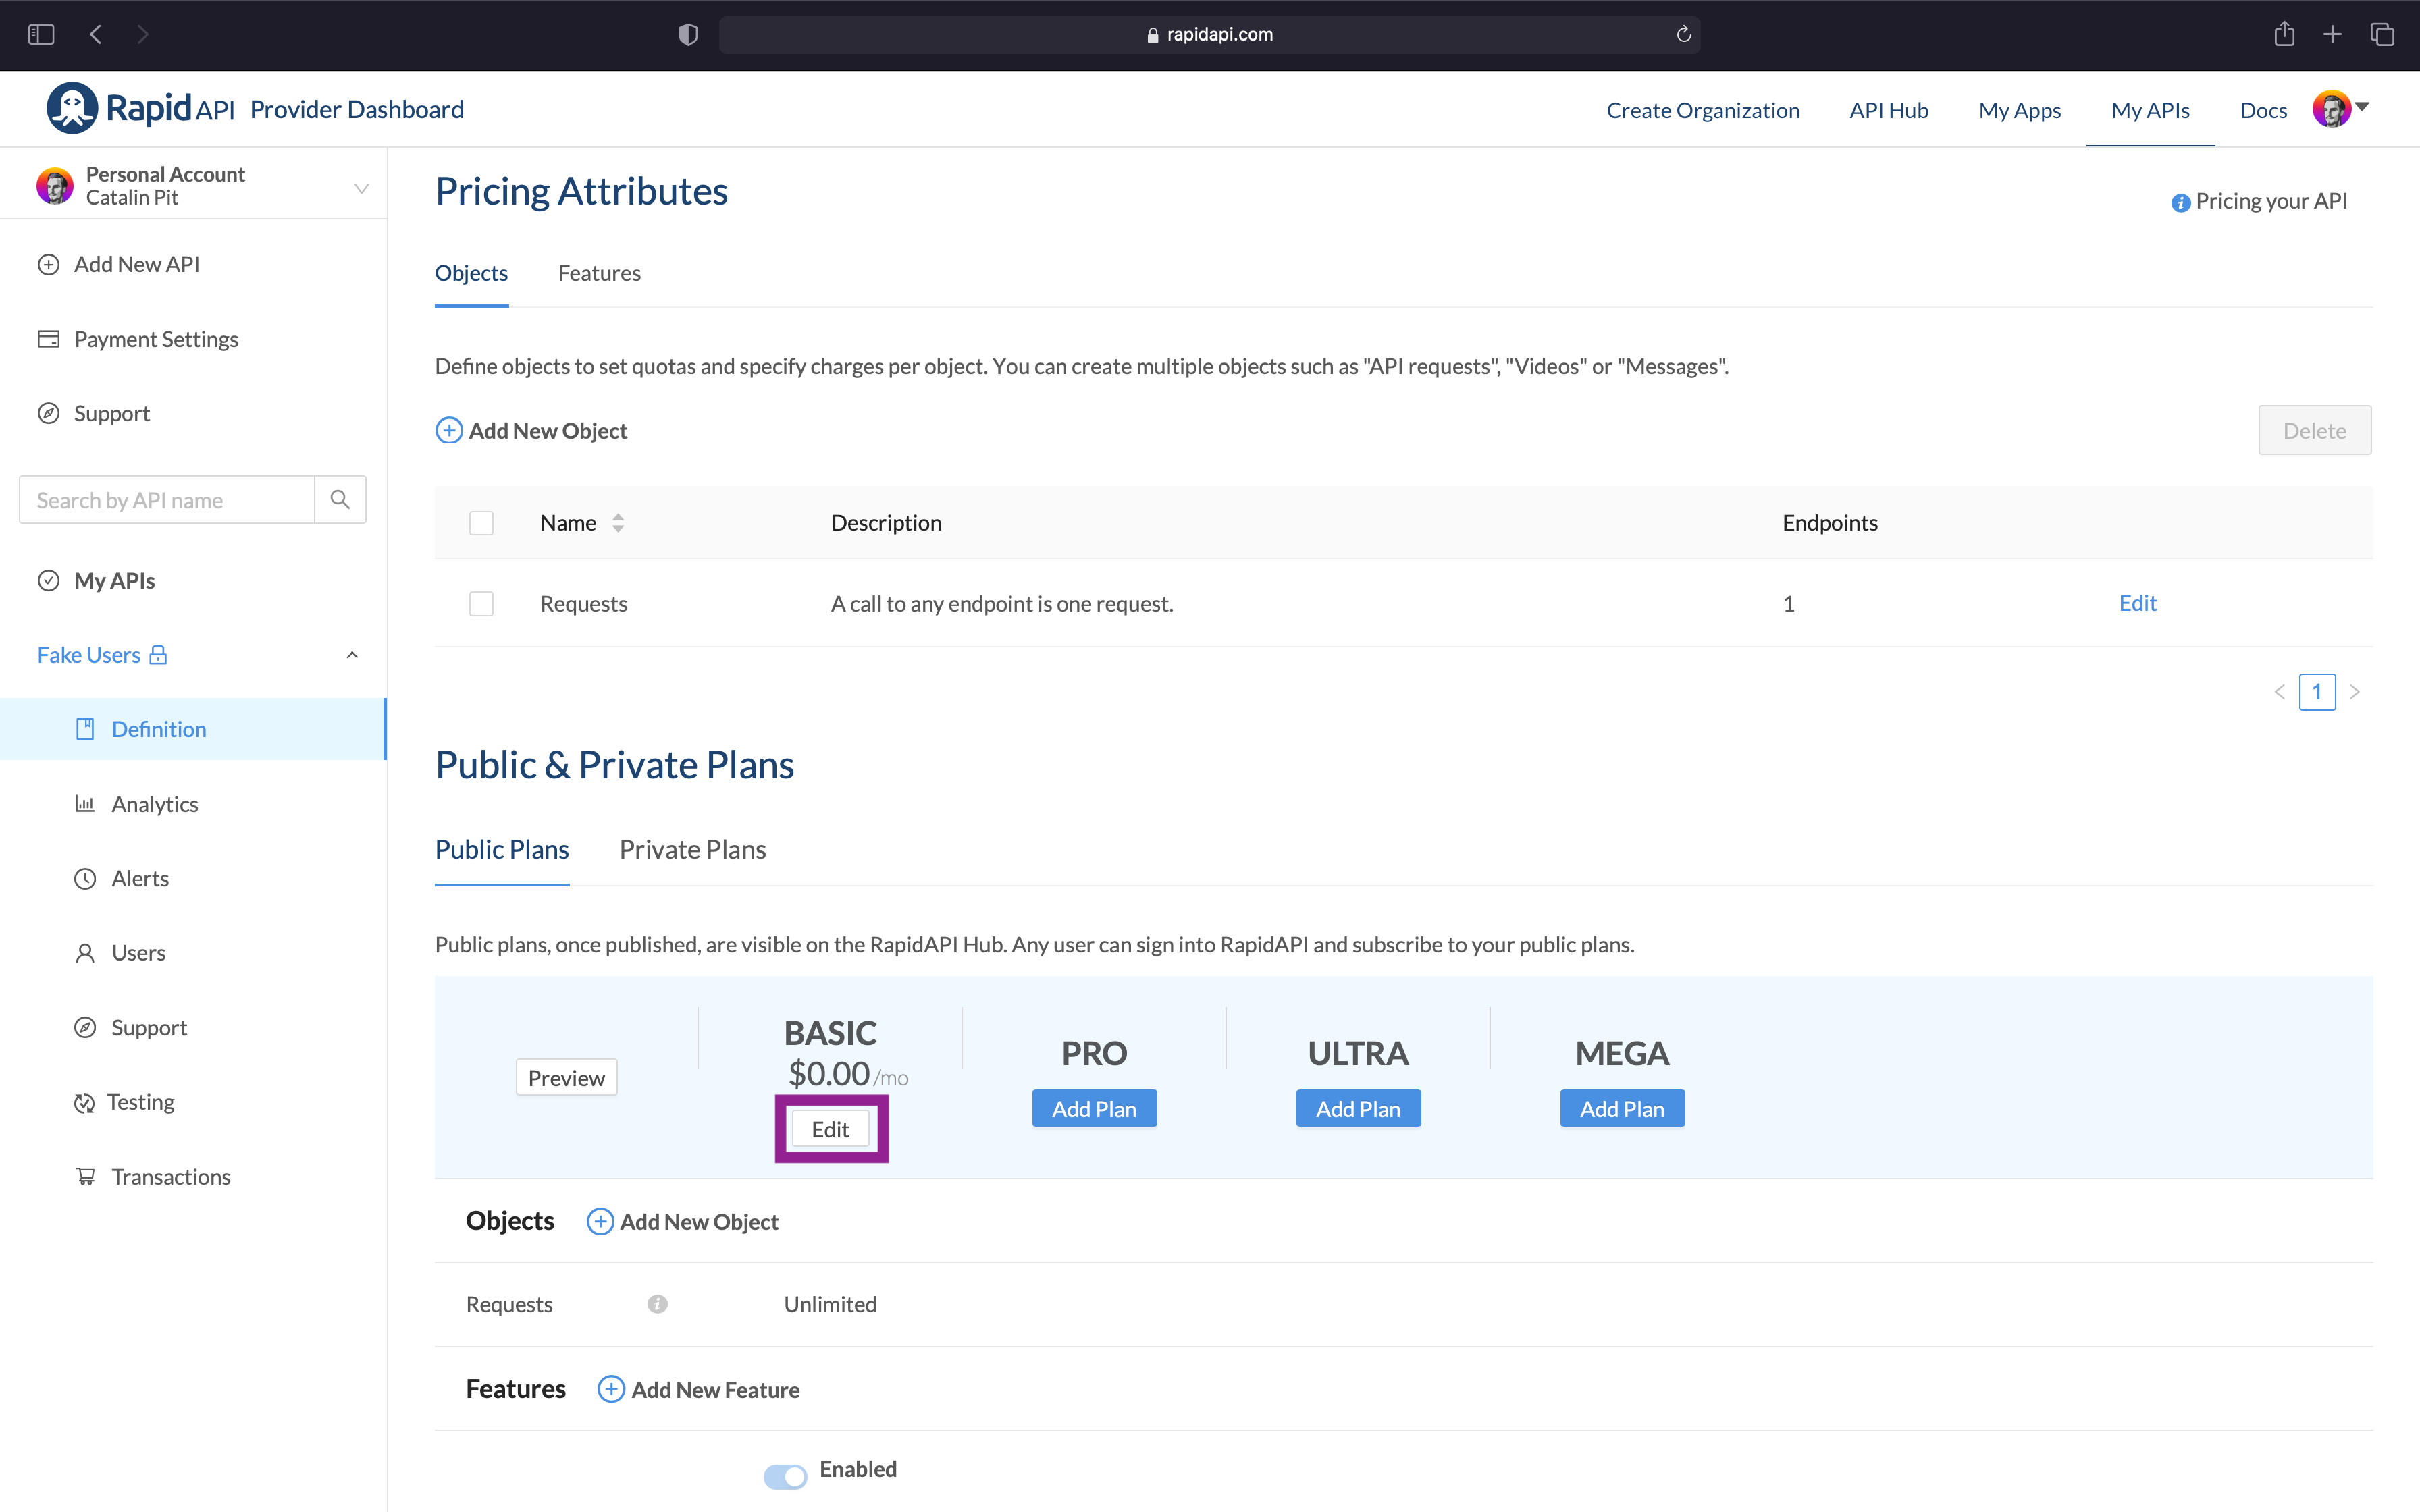 Figure 23
Let's start with the "BASIC" plan, which is the free plan. To configure the tier, click on the "Edit" button. Once you click on the edit button, a new page opens. On this page, you can configure your pricing tier as follows:
- Object Name - here, you select based on what you want to charge the users. For instance, with this API, you charge people based on the number of requests they make.
- Quota Type - quota type specifies the type of quota for users - that is, how many requests are free each day/month.
- Quota Limit - with quota limit, you specify how many requests are free. In this example, people can make 500 free requests each day.
- Limit Type - here, you have a hard and soft limit. A hard limit means the users cannot make any additional requests after exceeding their quota limit. On the other hand, a soft limit means users will pay a specific fee after exceeding their quota limit.
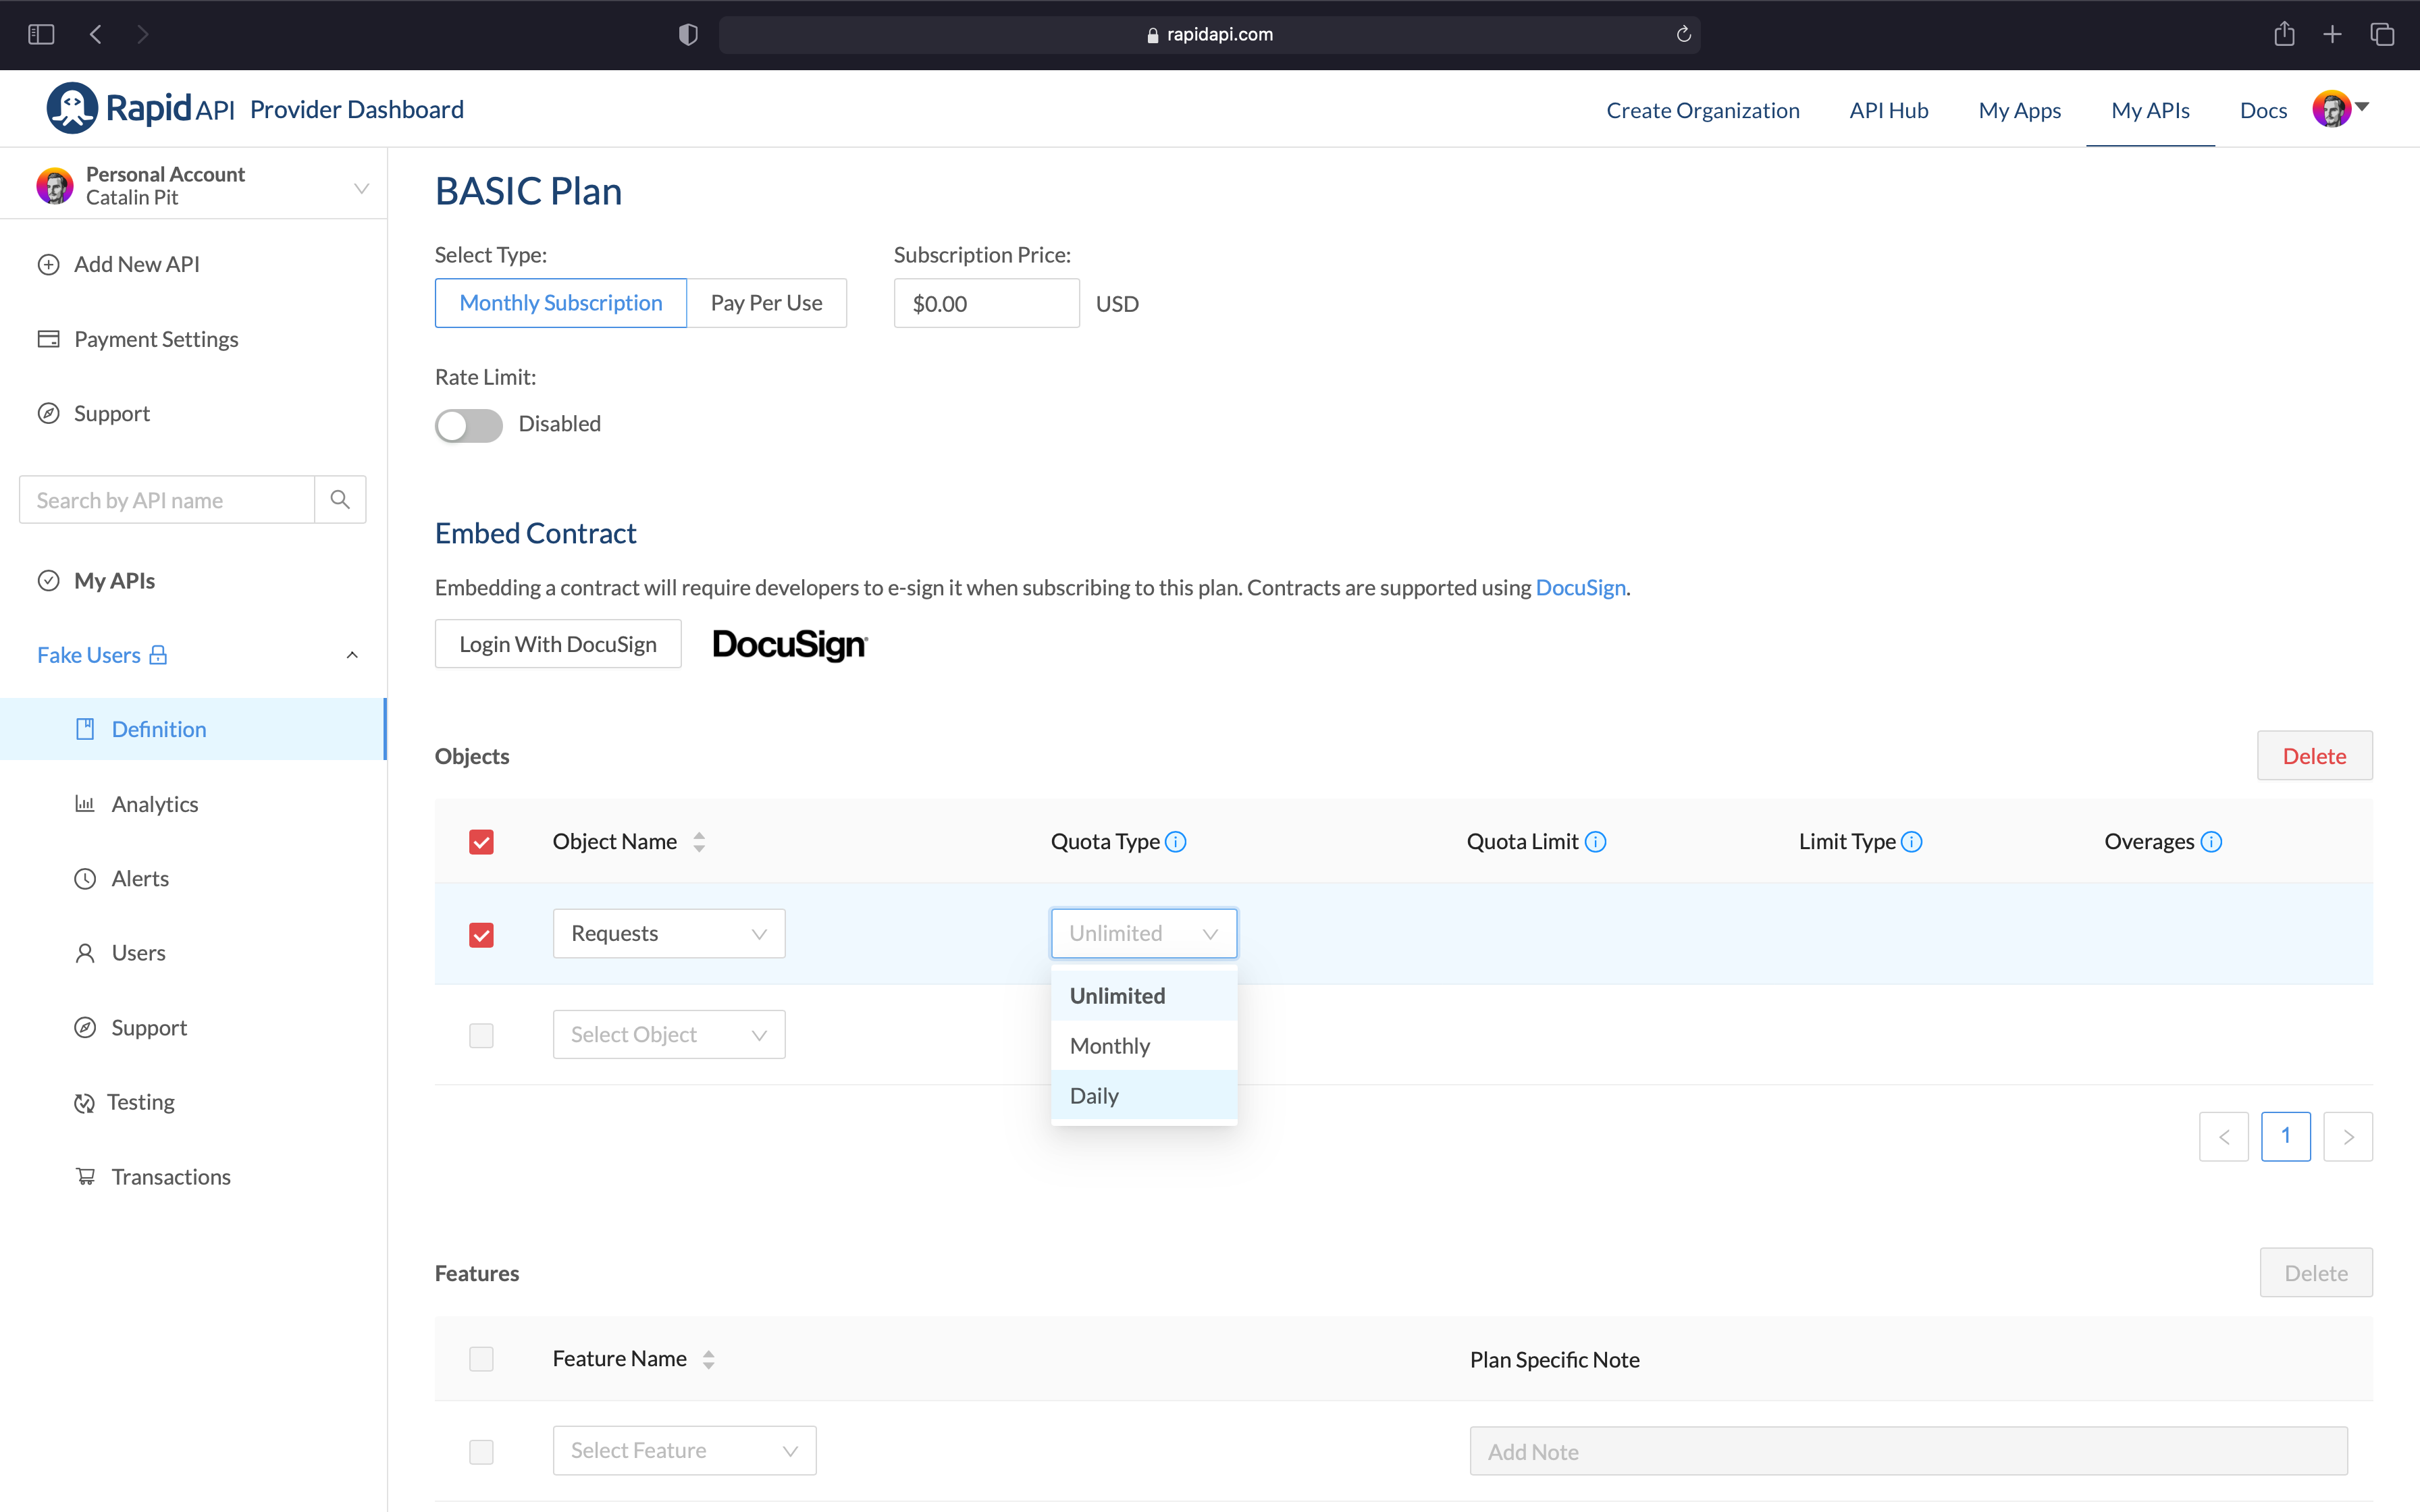 Figure 24
For this example, the free tier for the API will have 500 free requests each day. If the users exceed the quota limit, they will not be able to make any more requests.
Figure 25 illustrates the configuration for this pricing tier.
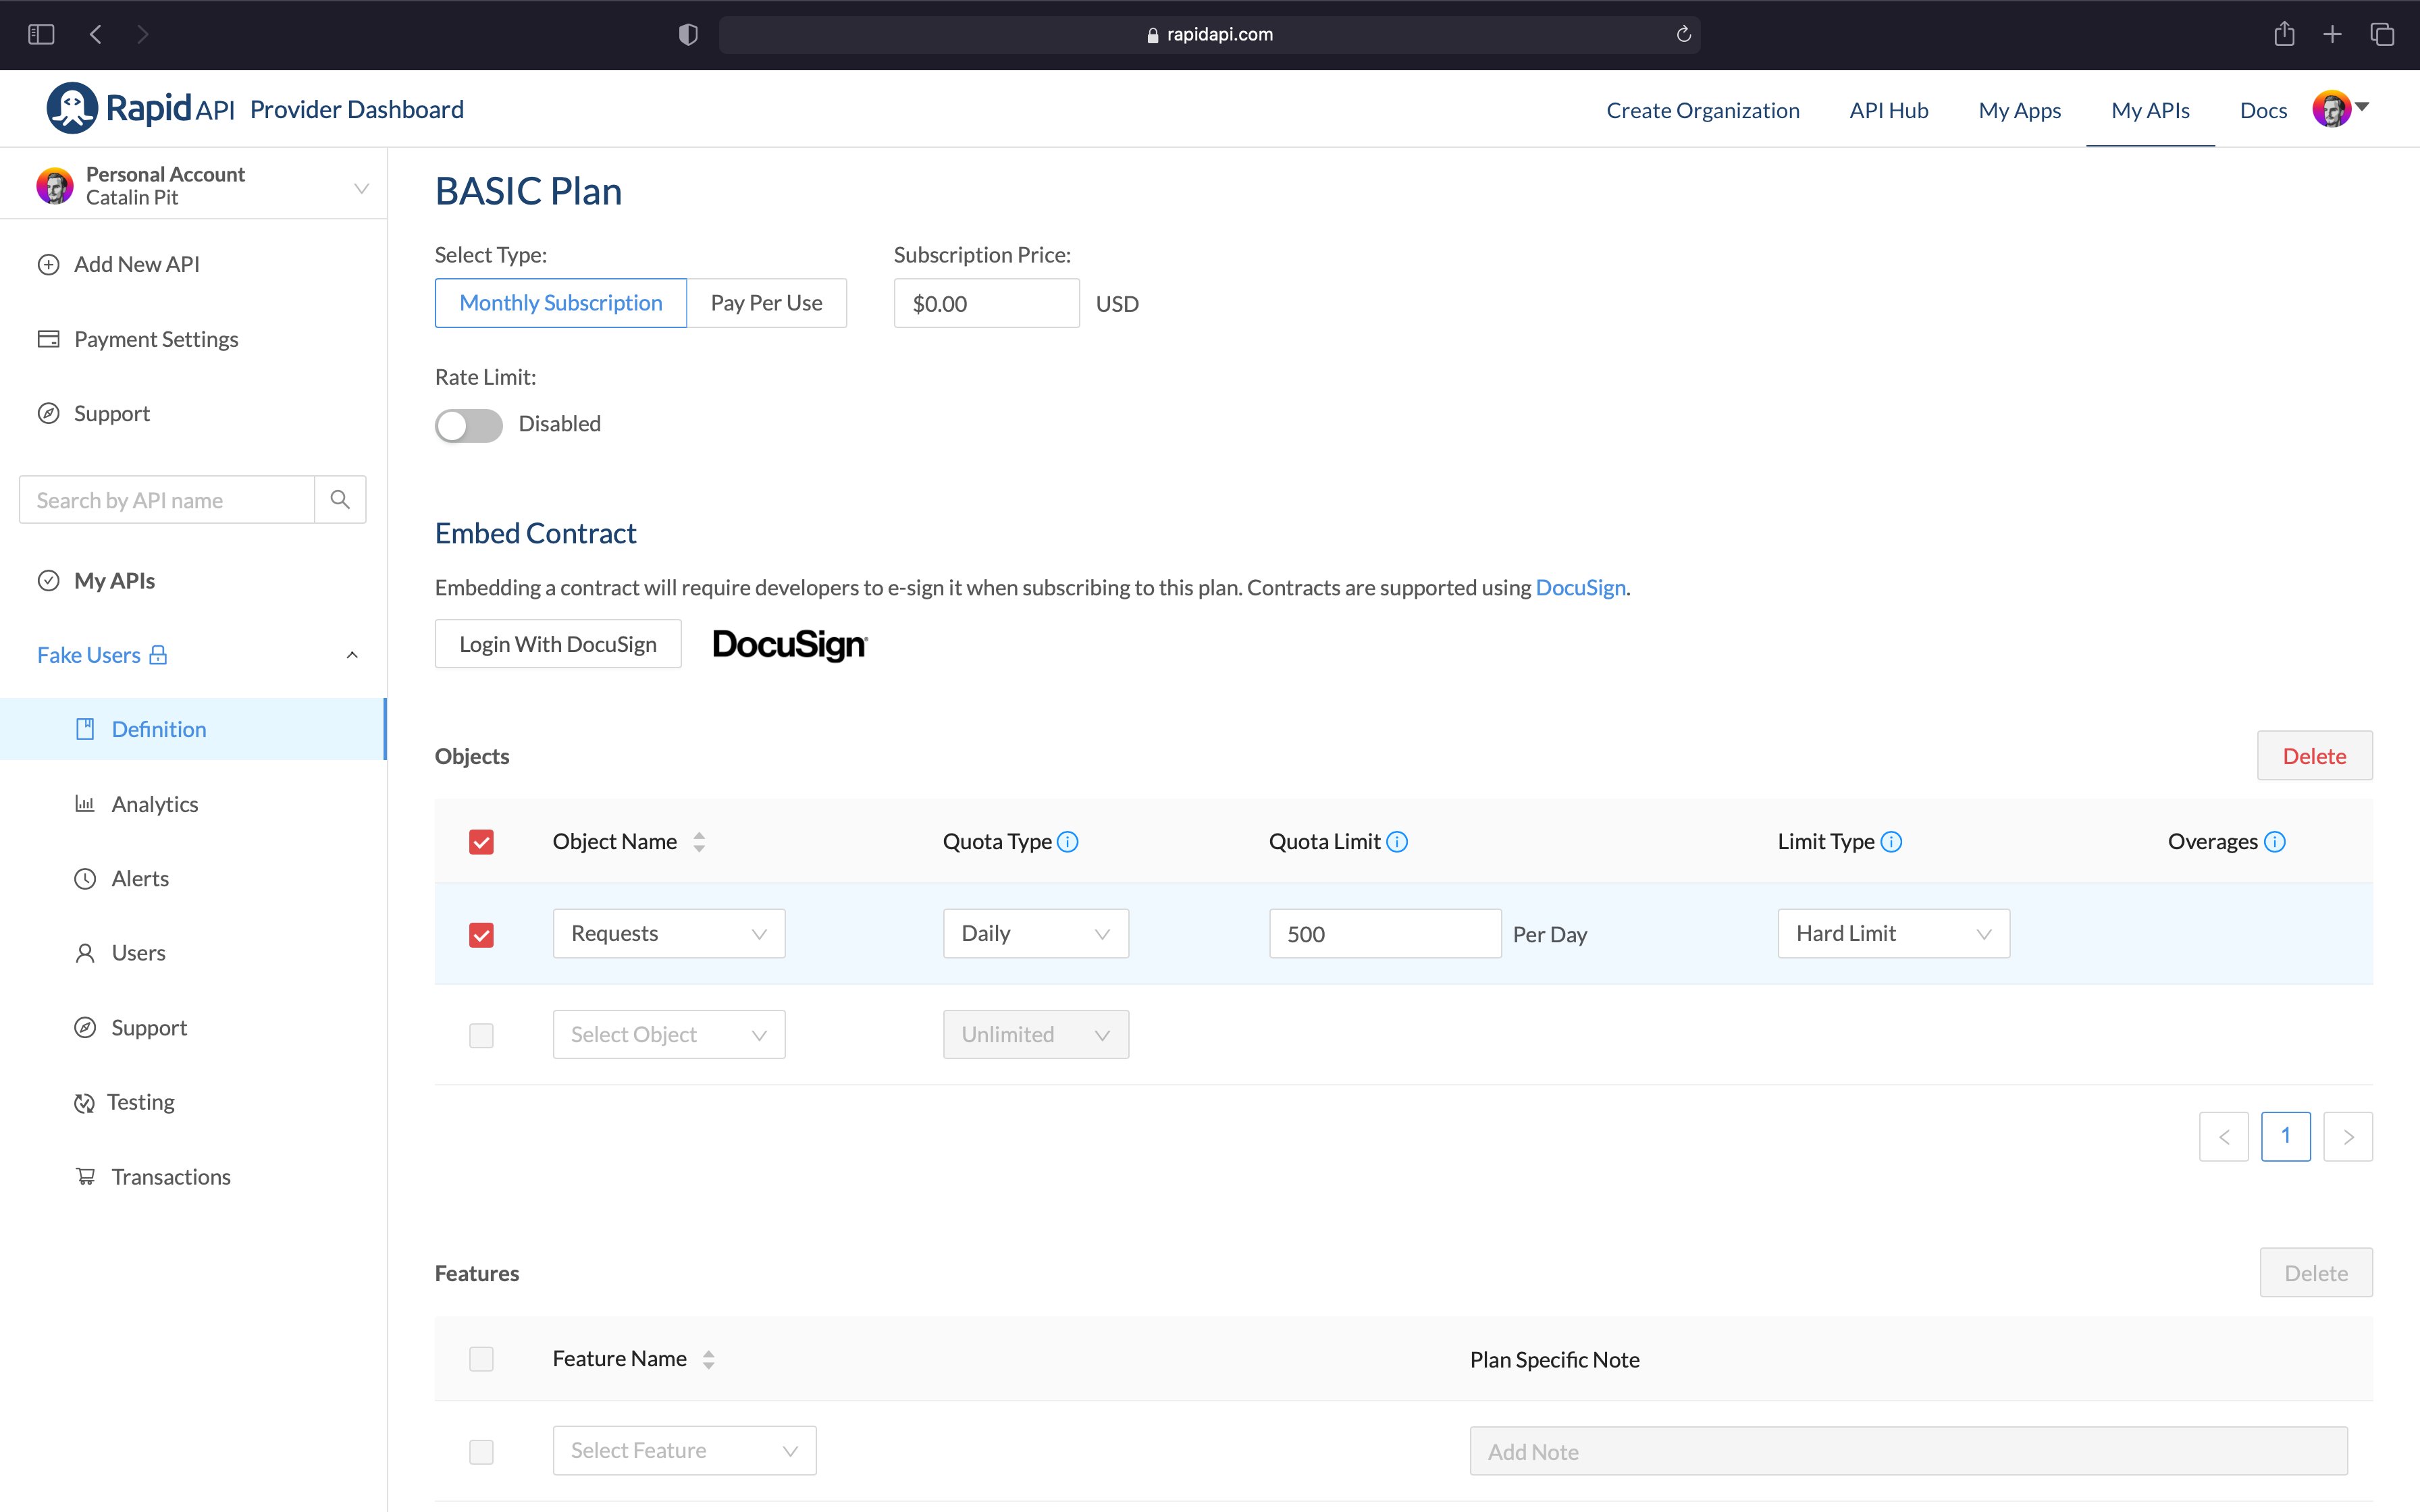 Figure 25
Similarly, let's add some paid plans as well. After all, we are here to make money, right? Click on the "Add Plan" button under the "pro" section, as shown in figure 26.
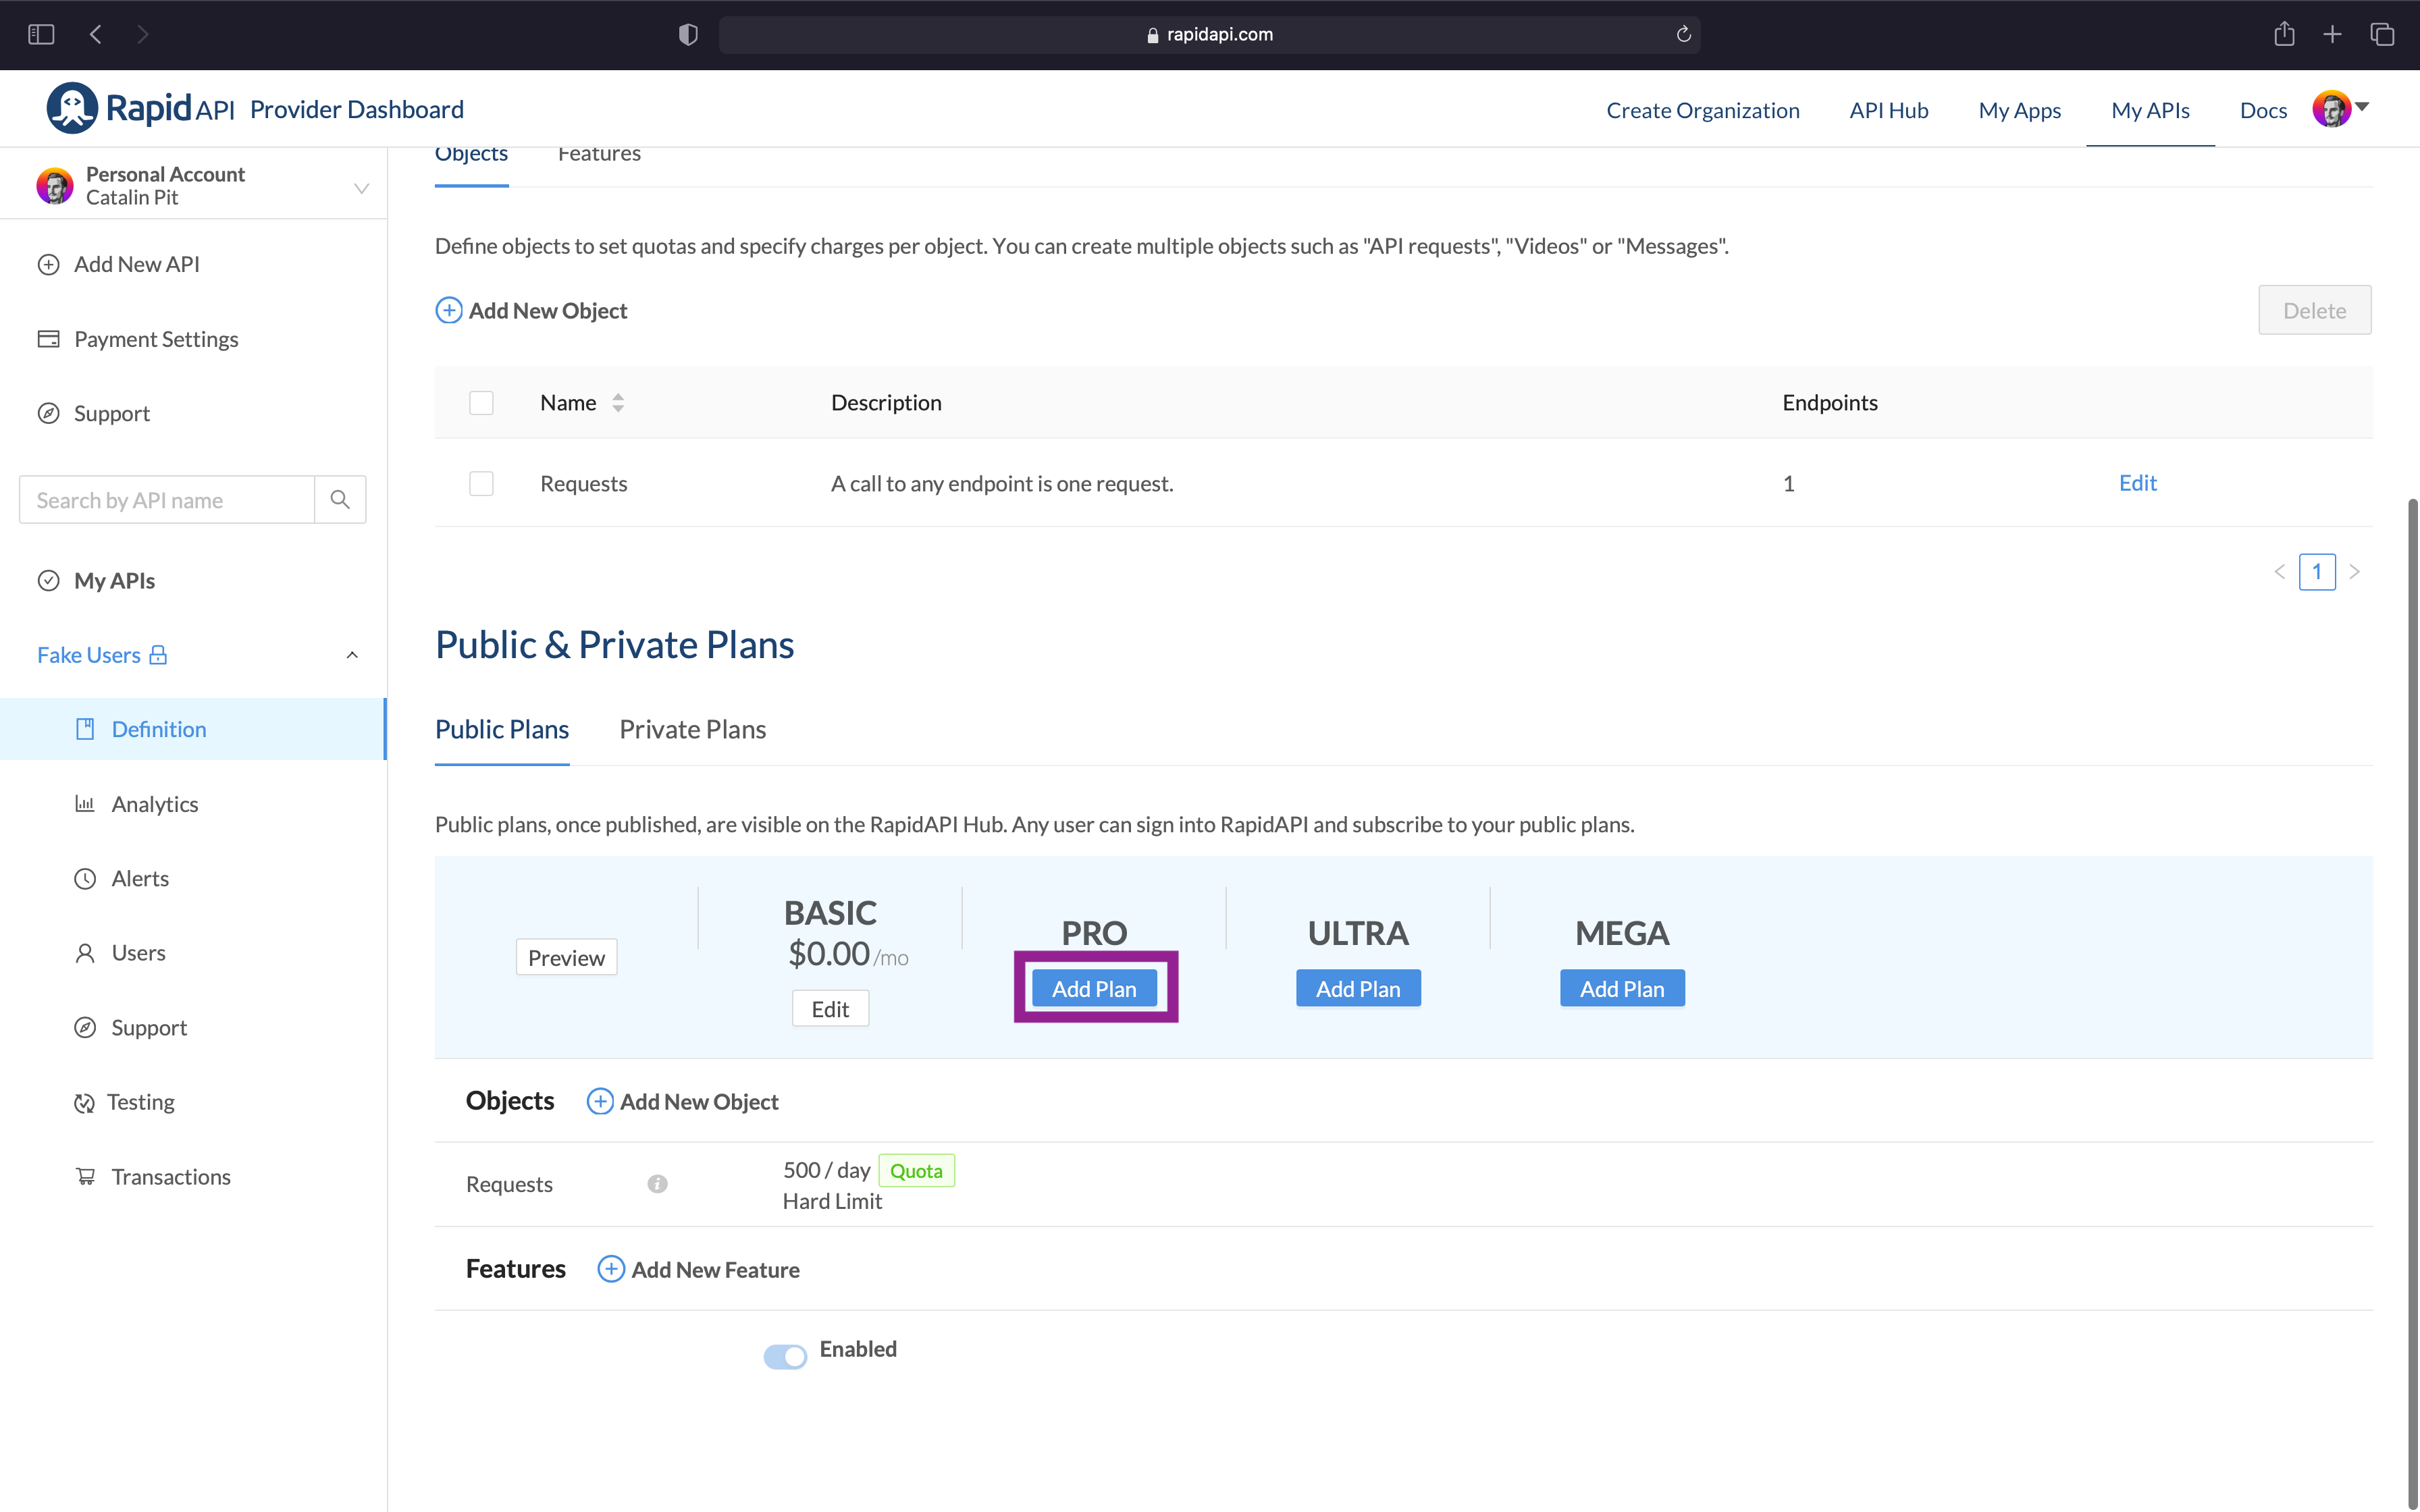 Figure 26
A new page opens, where you can add the usual details about the tier. For the object name, select "Requests" again because you want to charge based on the number of requests made by users.
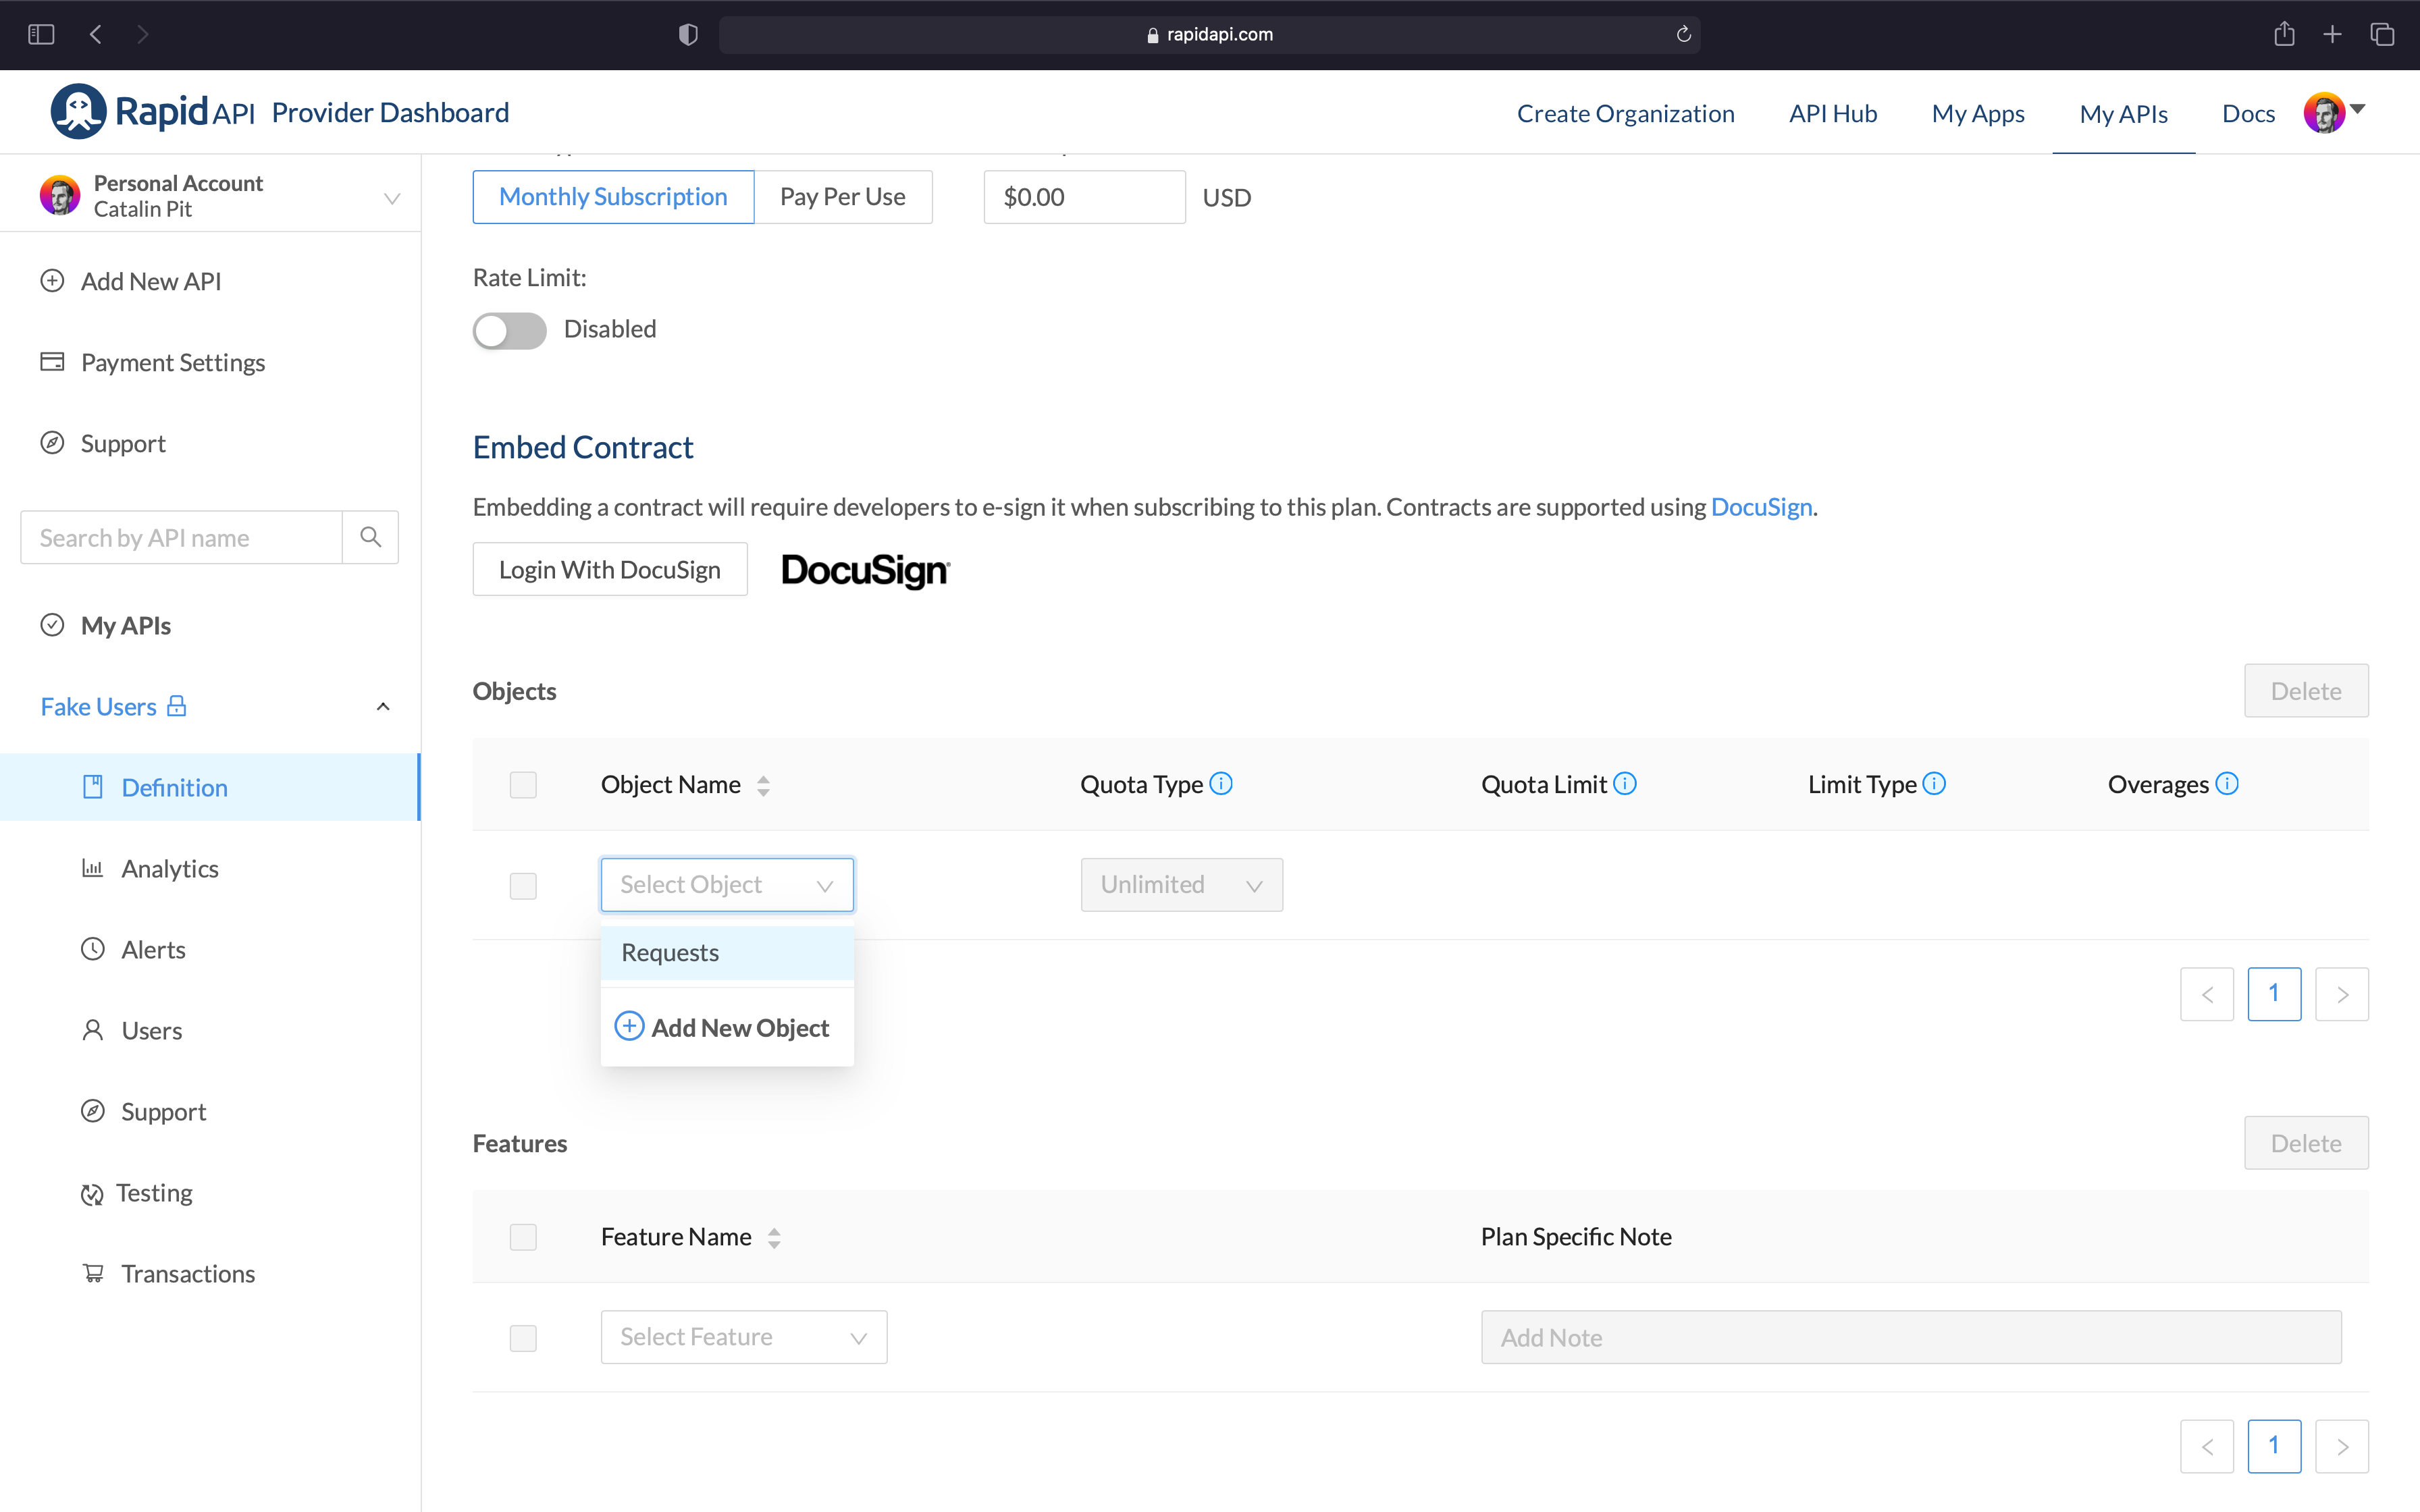 Figure 27
After that, enter the following information:
- Quota Type - choose the monthly quota type.
- Quota Limit - enter 10000, so you allow people to make 10000 free requests each month.
- Limit Type - choose a soft limit for this endpoint and then charge $0.01 for any additional request.
See figure 28 for reference. Now you are done with the pro plan as well. Before it takes effect, you need to scroll down at the bottom of the page and save it.
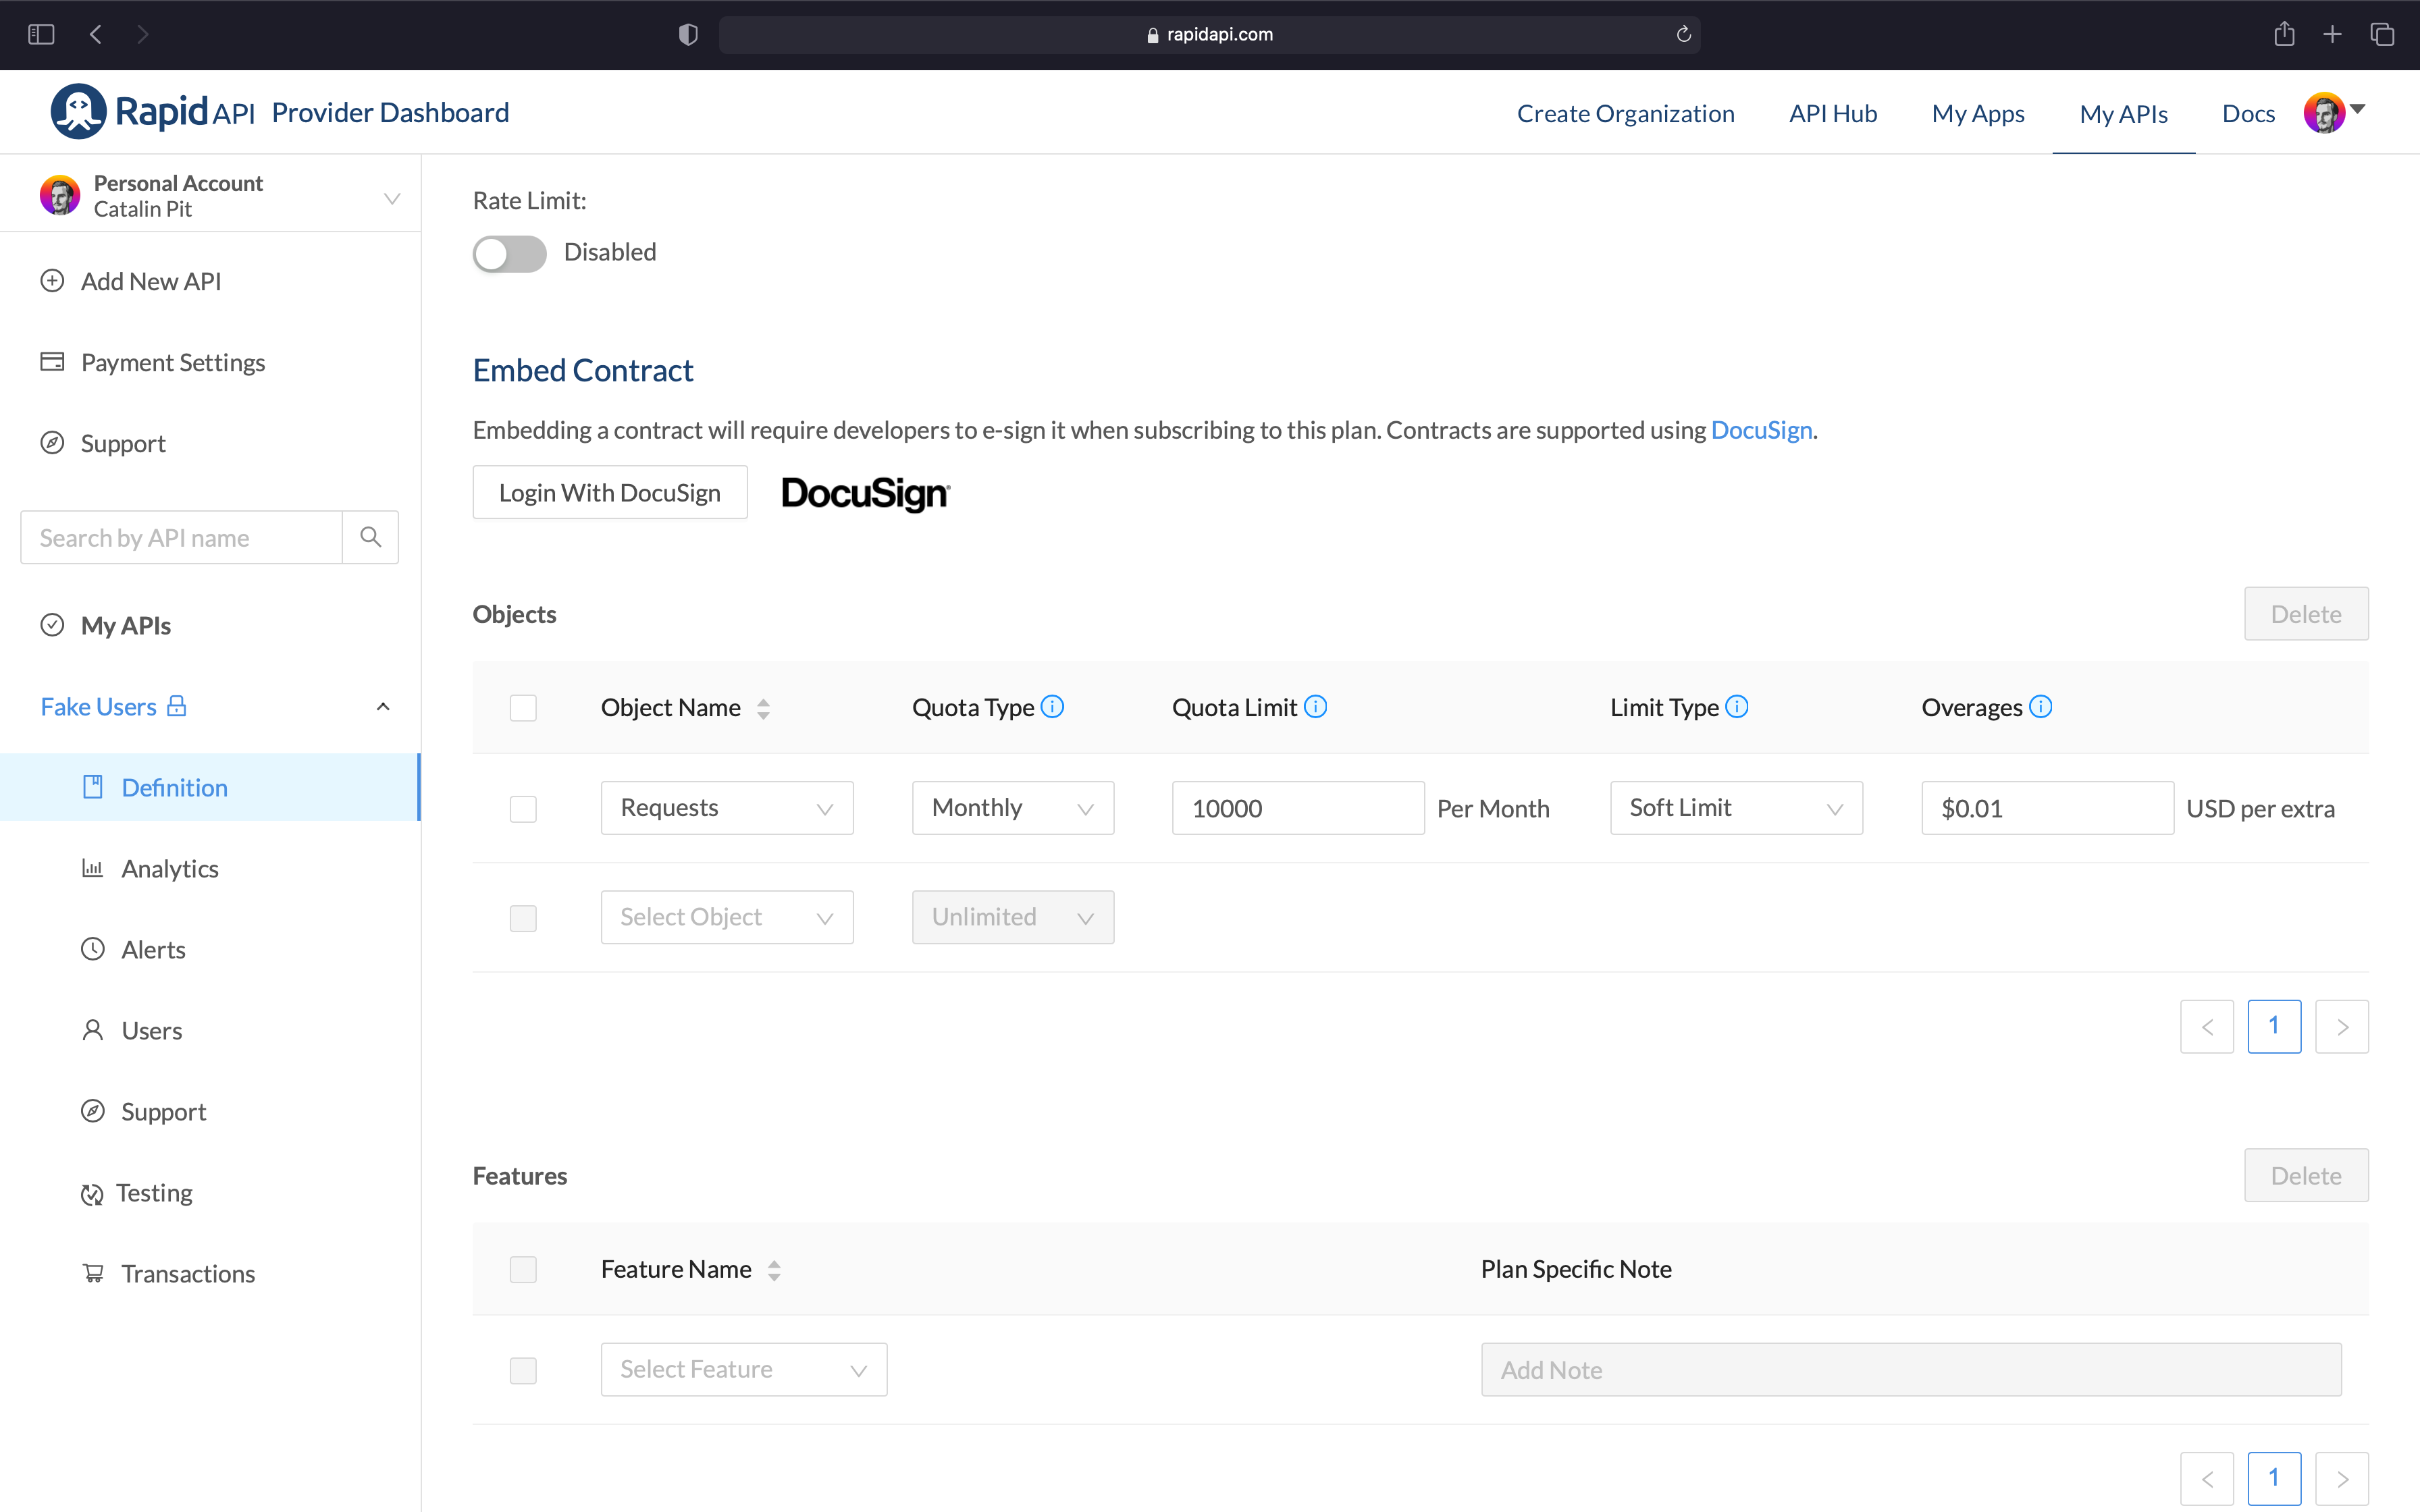 Figure 28
Once you save the plan, you can go back to the pricing dashboard and see the configured tiers.
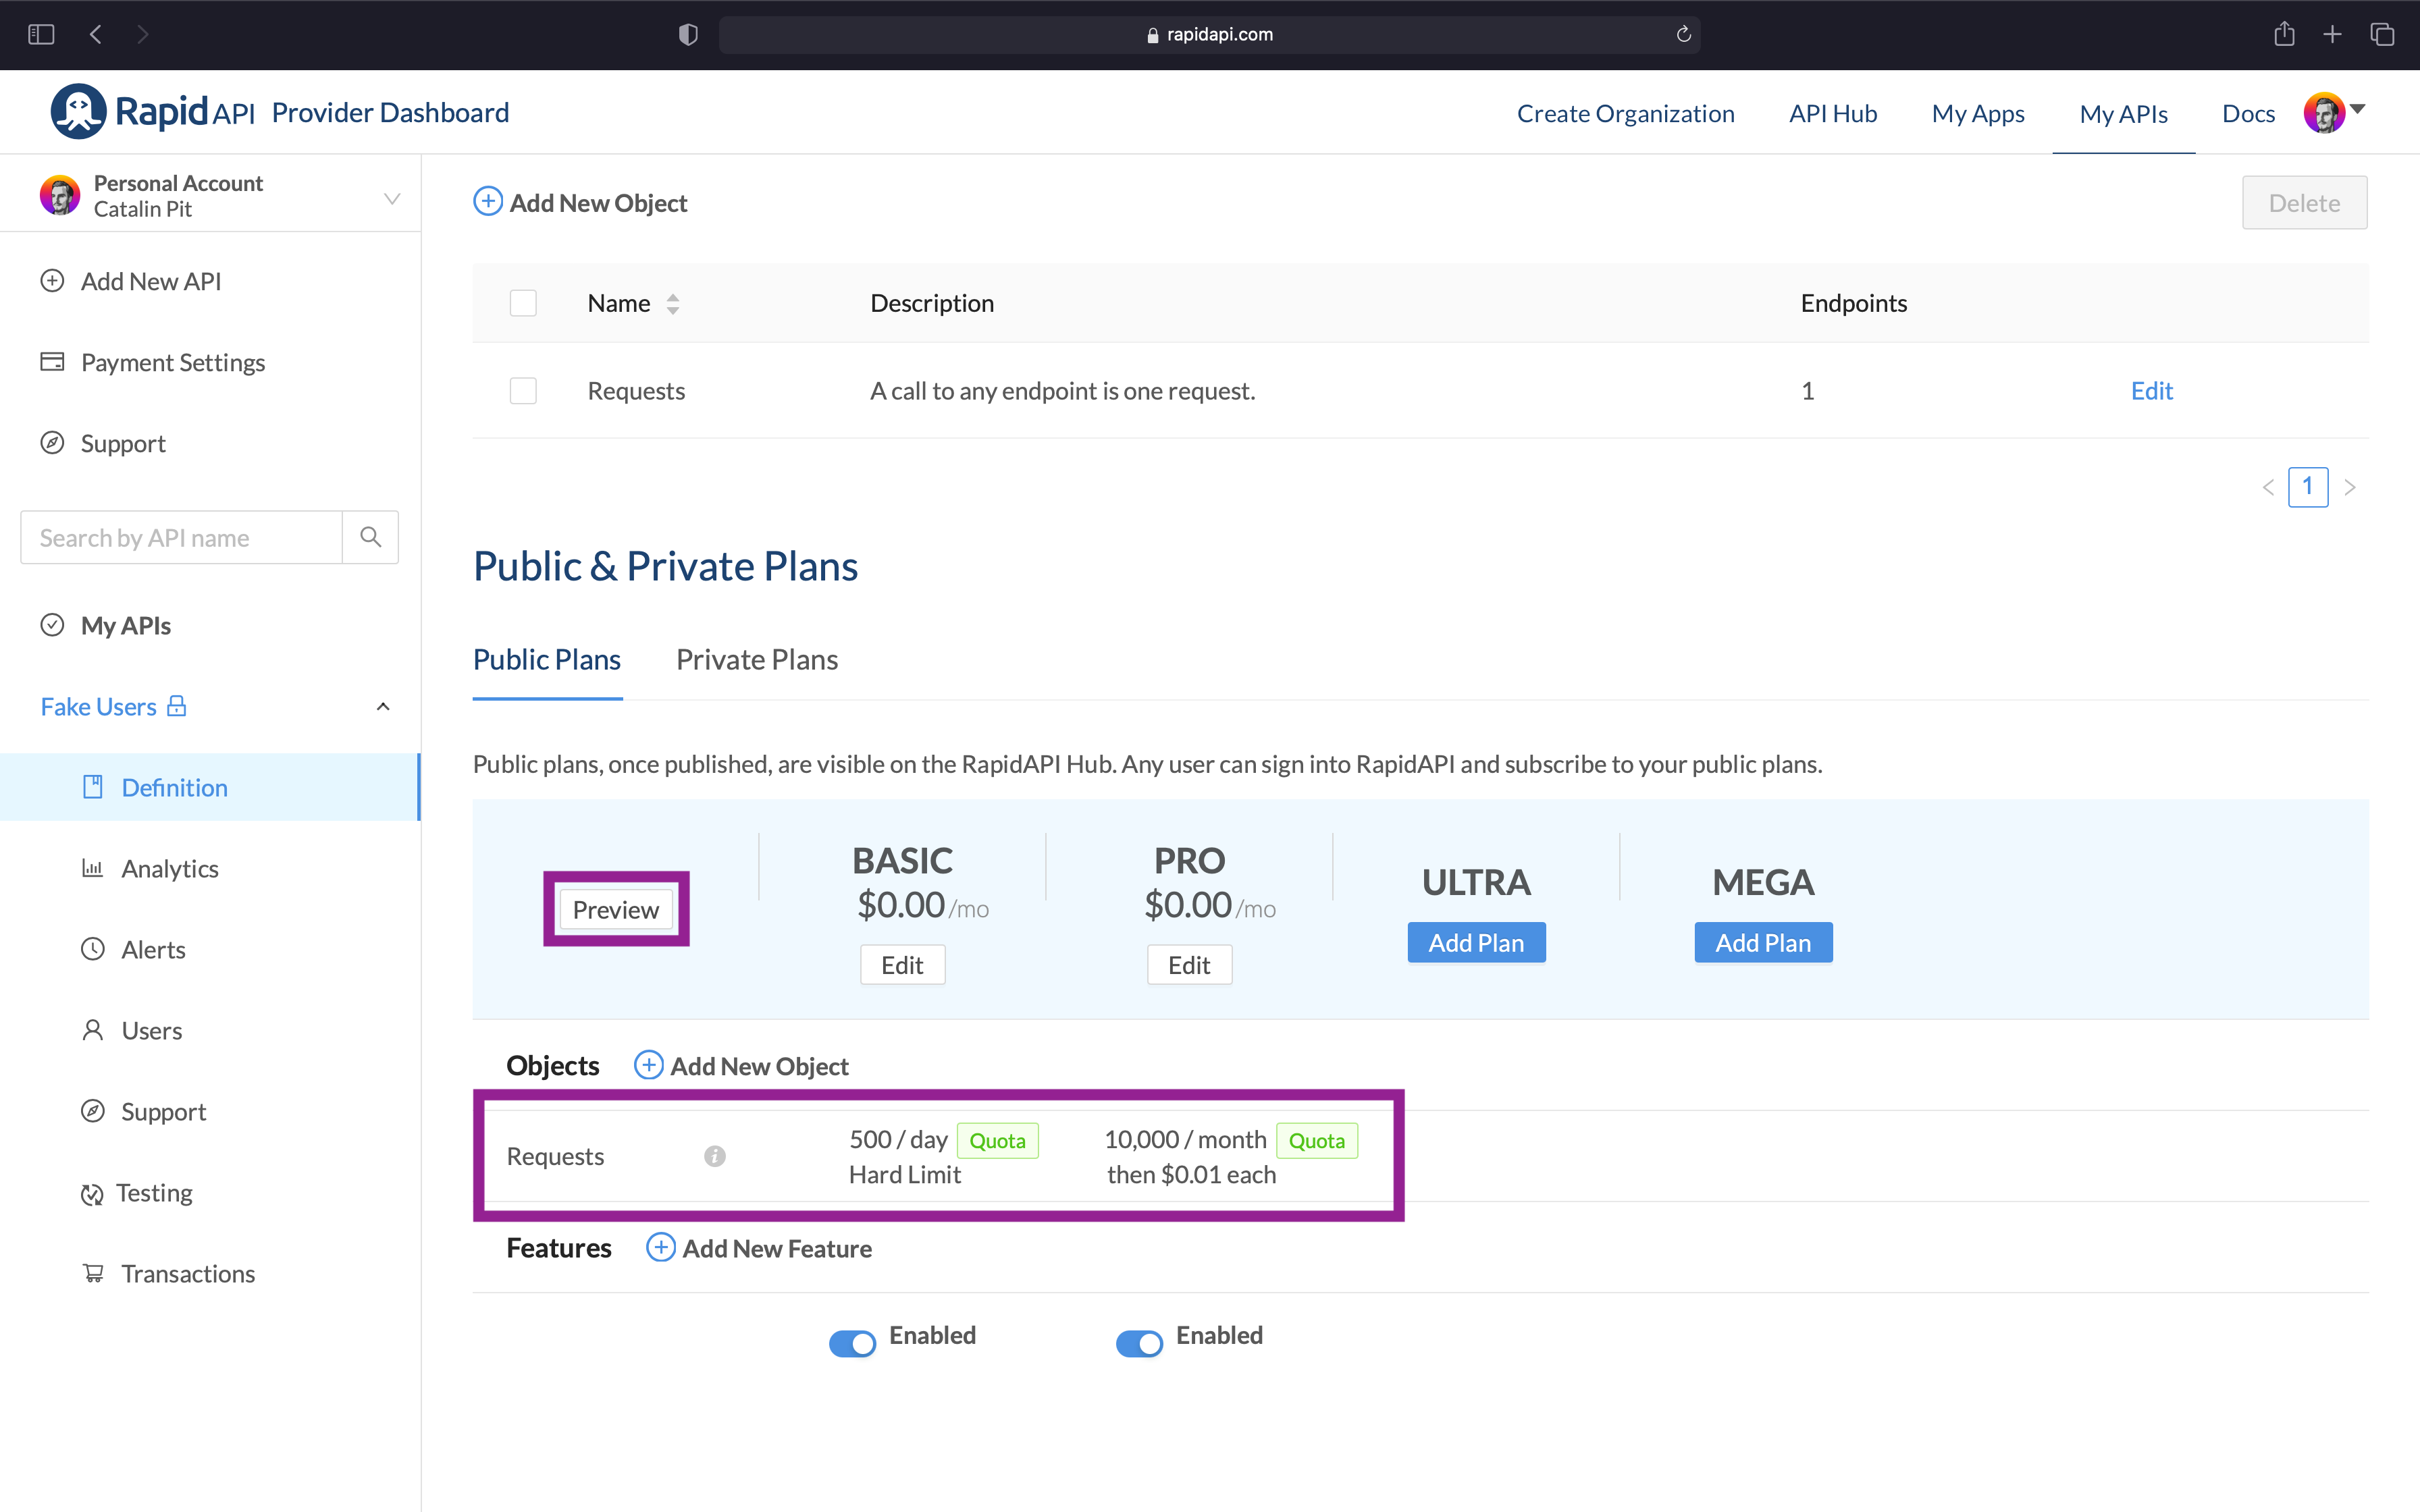 Figure 29
Additionally, you can click on the "Preview" button, highlighted in figure 29, to see the plans in more detail. See figure 30 for reference.
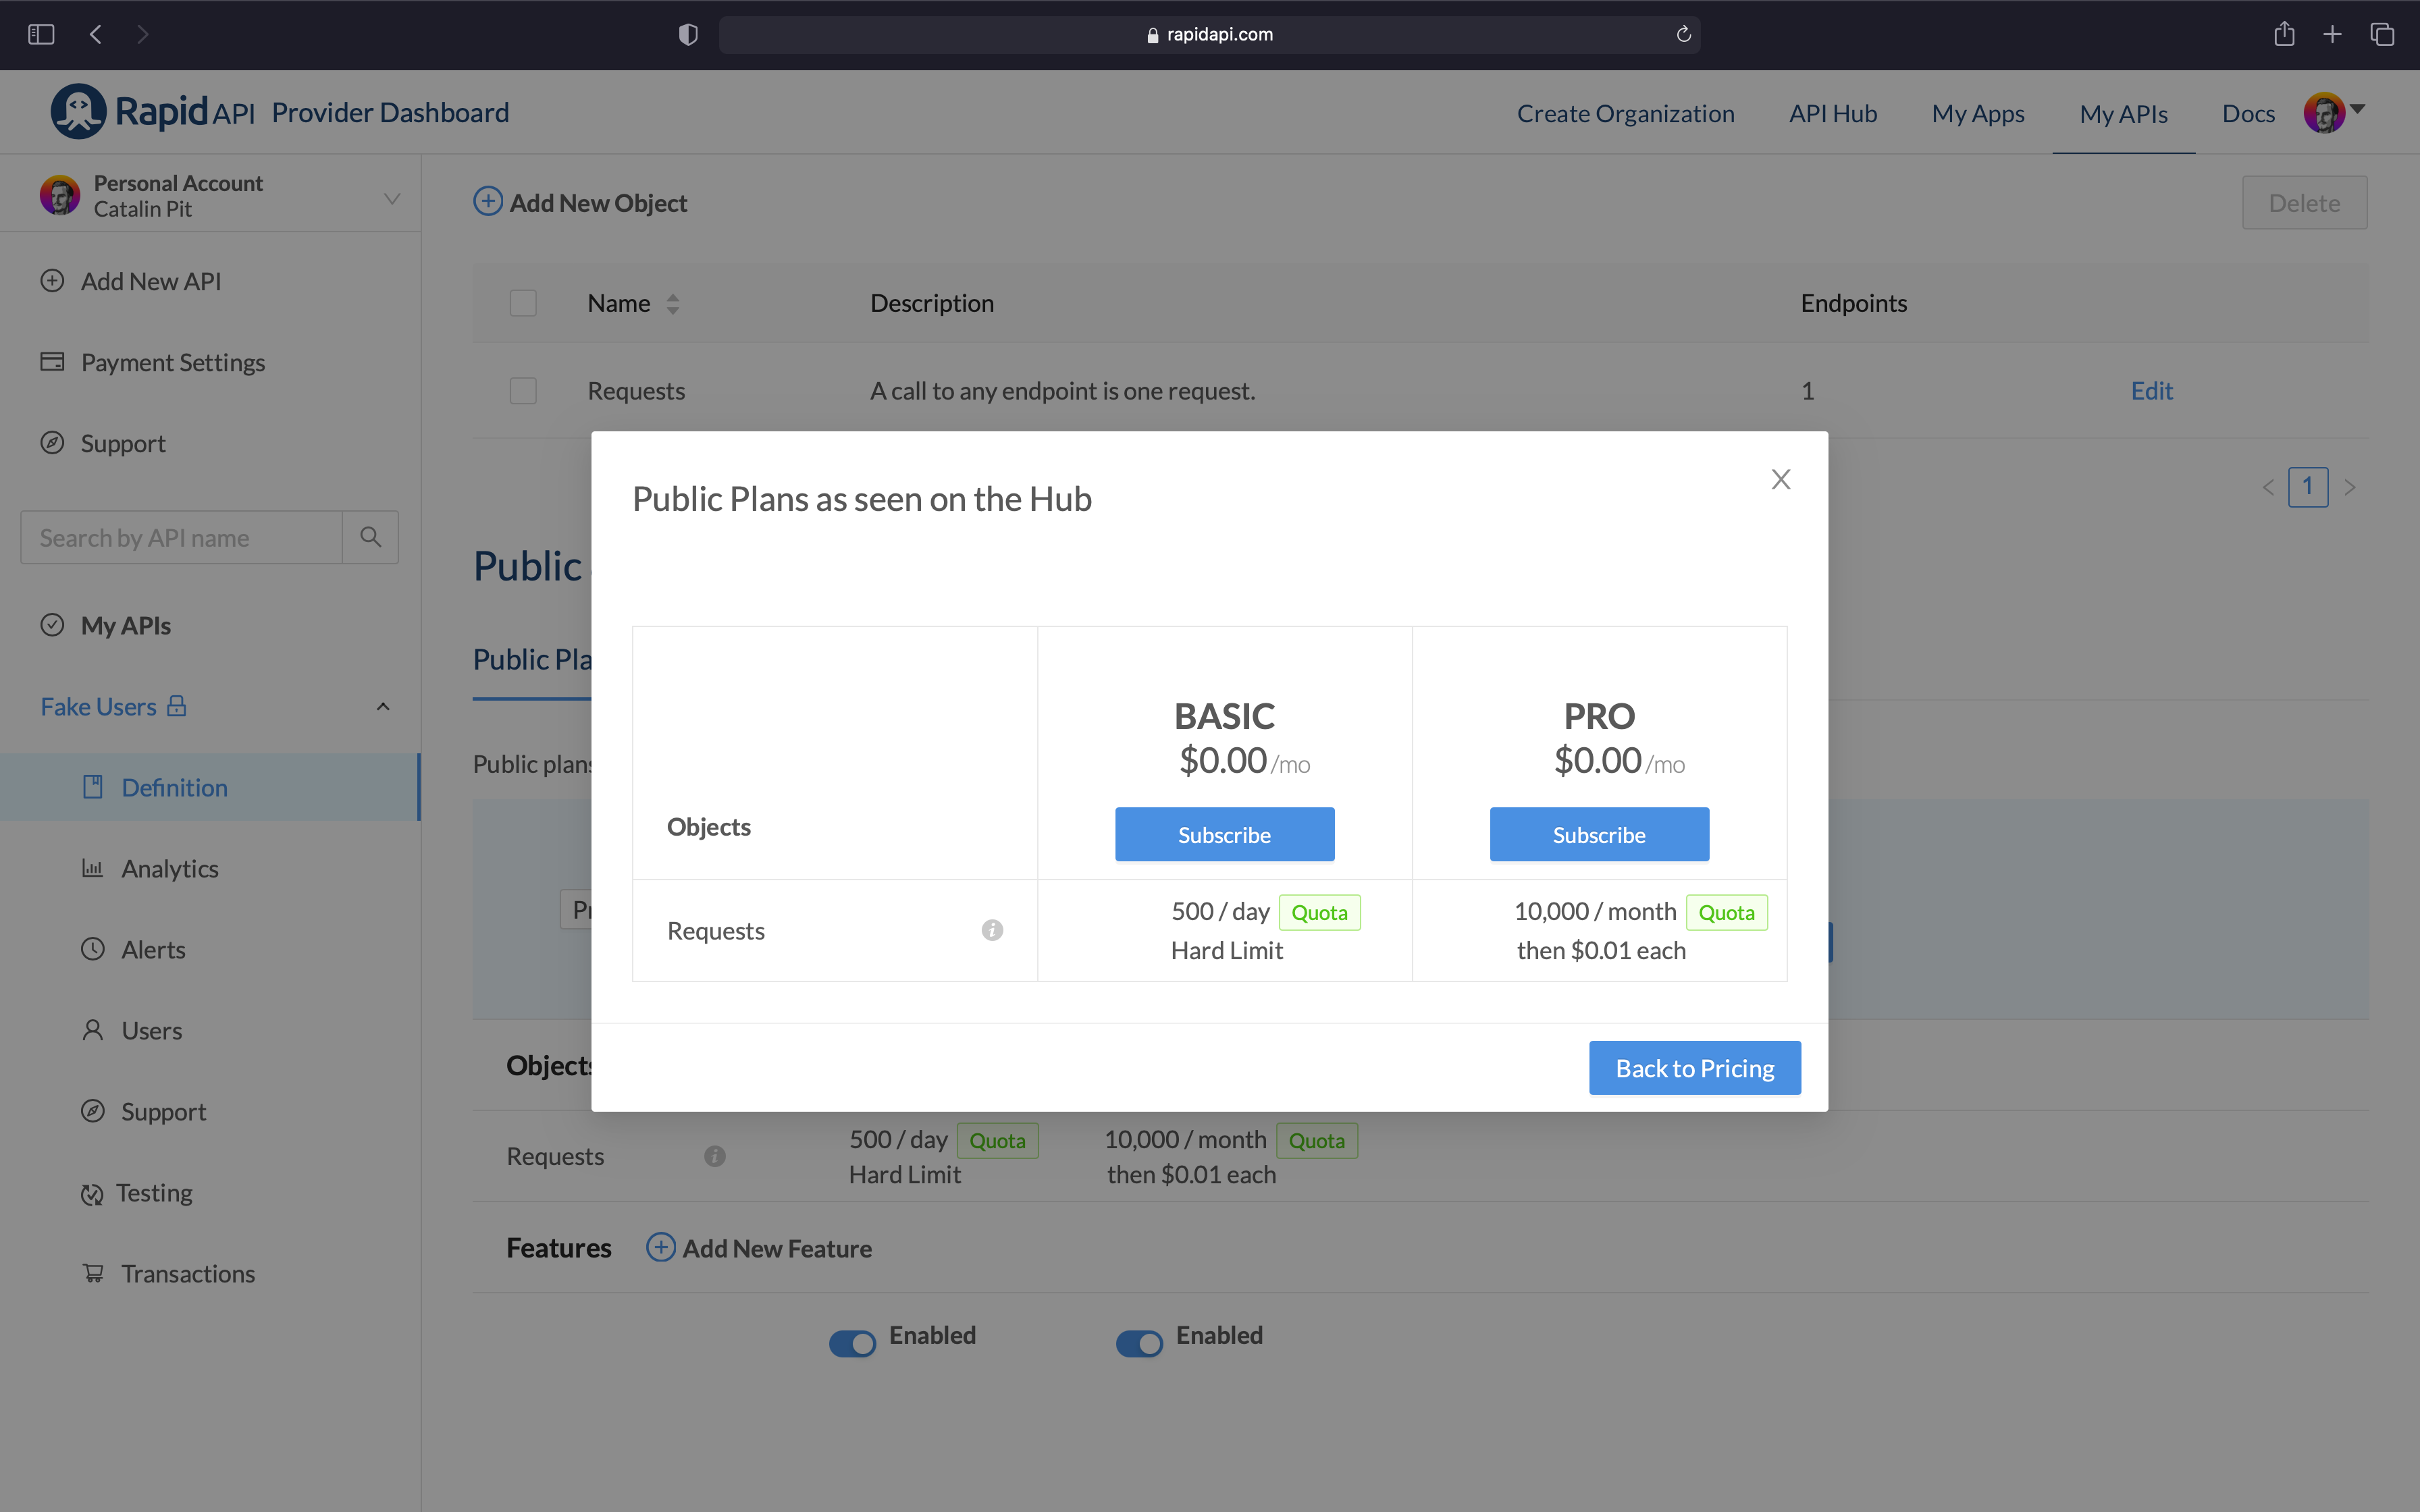 Figure 30
Configuring the other two tiers - Ultra and Mega - is similar to the two plans you already set up. Thus, as an exercise, create those two tiers yourself!
The next and last step is to make the API public, so other developers can use it!
Publish the API
Before anyone can use your API and pay for it, you need to make it available to the public. Thus, go to the Global Settings, as shown in figure 31.
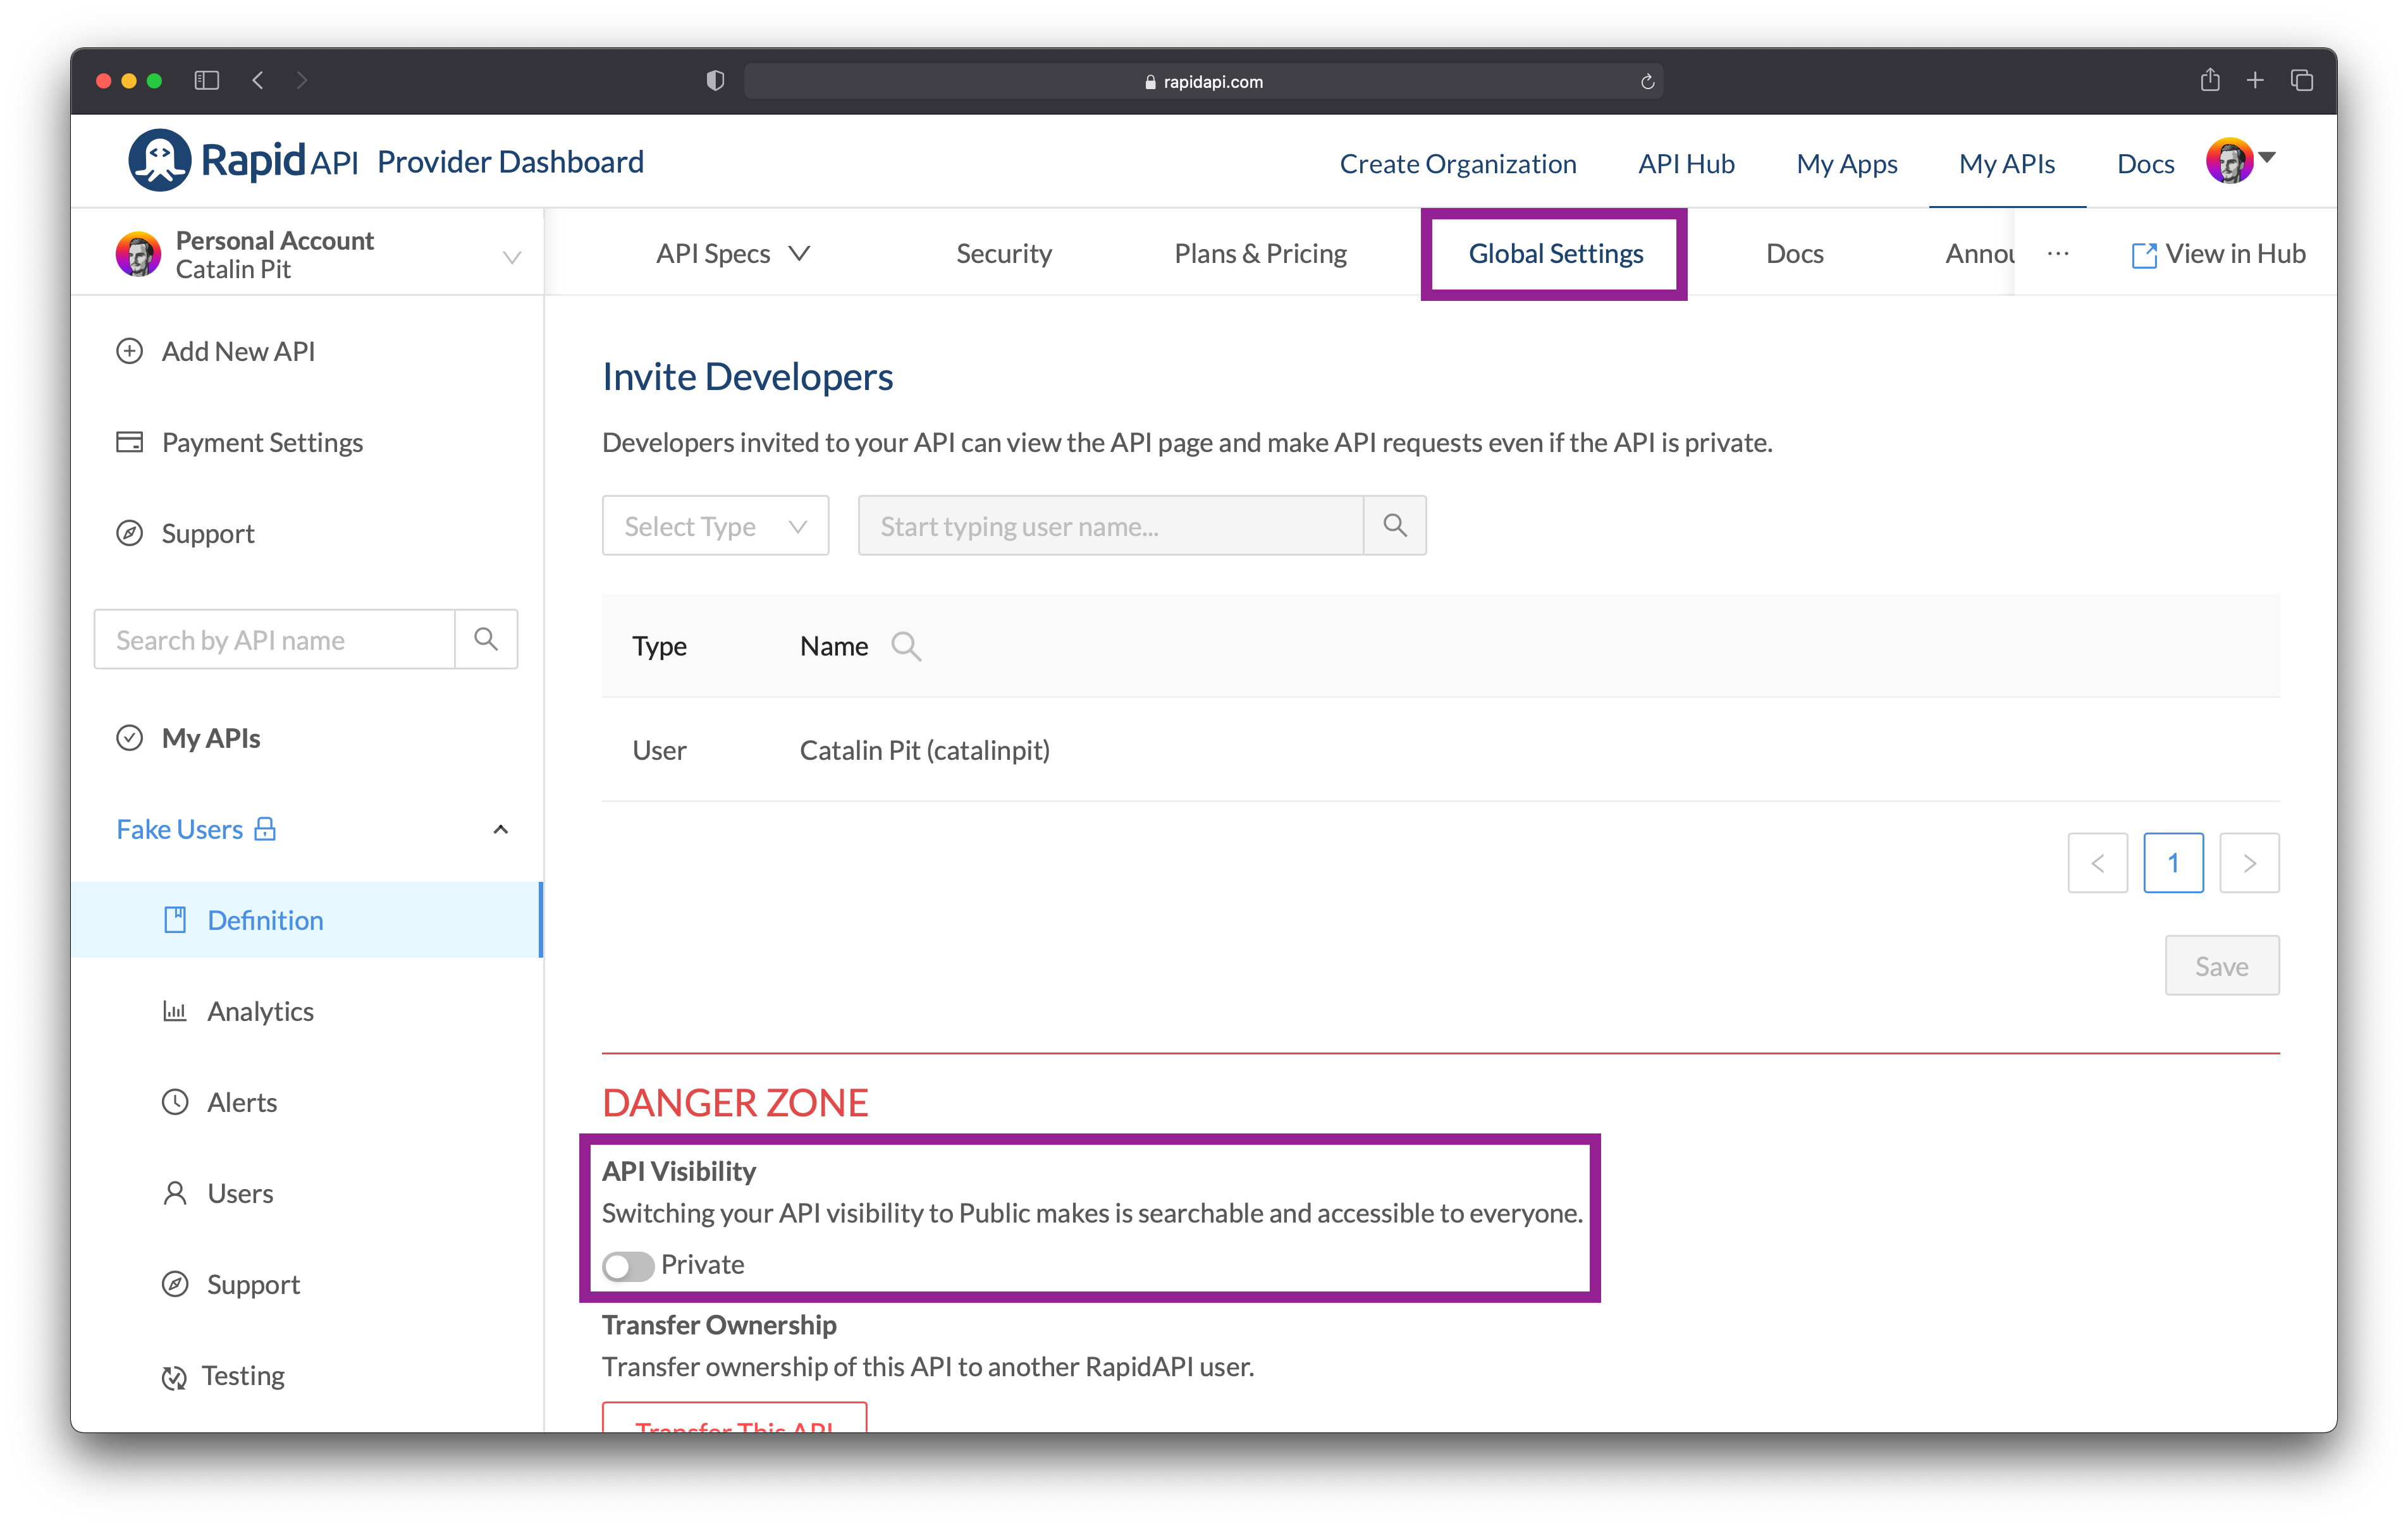 Figure 31
Once you are there, switch the API visibility to "public". To do that, click on the switch highlighted in figure 31.
After clicking on the switch, a new pop-up appears, which tells you that you are about to make your API public. Lastly, click on the blue button saying "Make API public", and you are done!
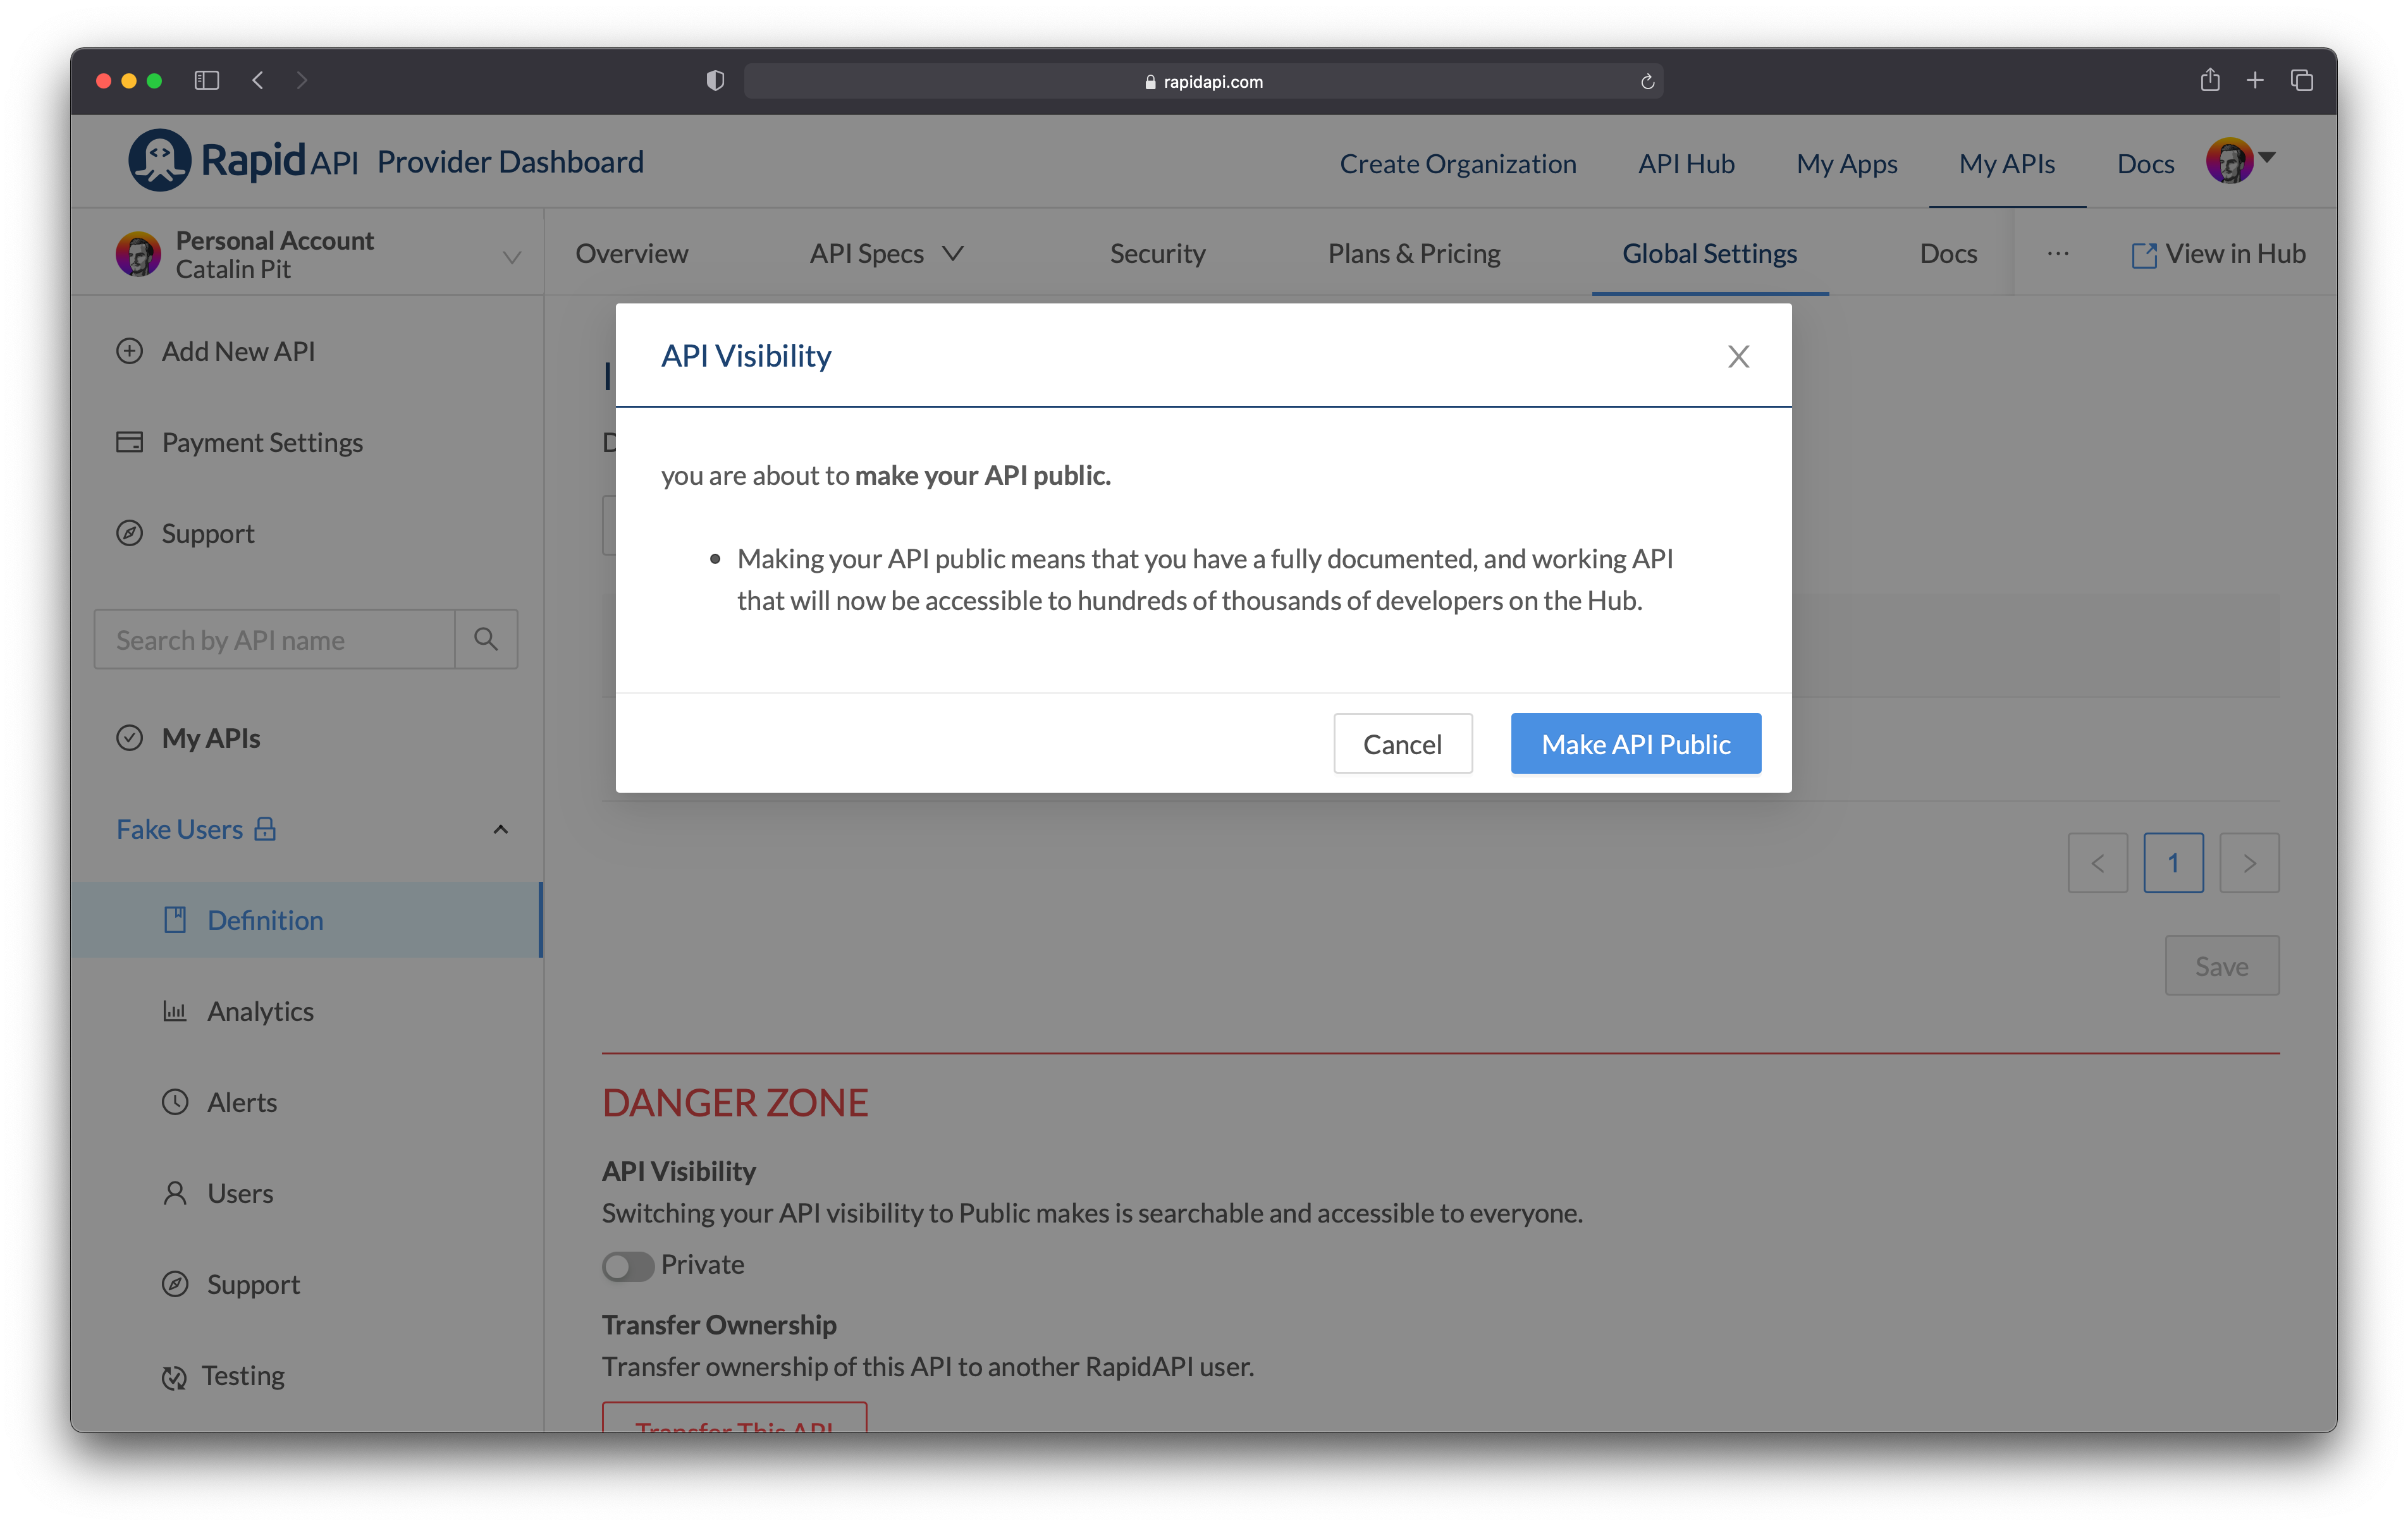 Figure 32
Now, you should see your API in the RapidAPI Hub. That means the API is public, and other developers can use it in their applications.
Figure 33 illustrates the example API from this tutorial on the RapidAPI hub.
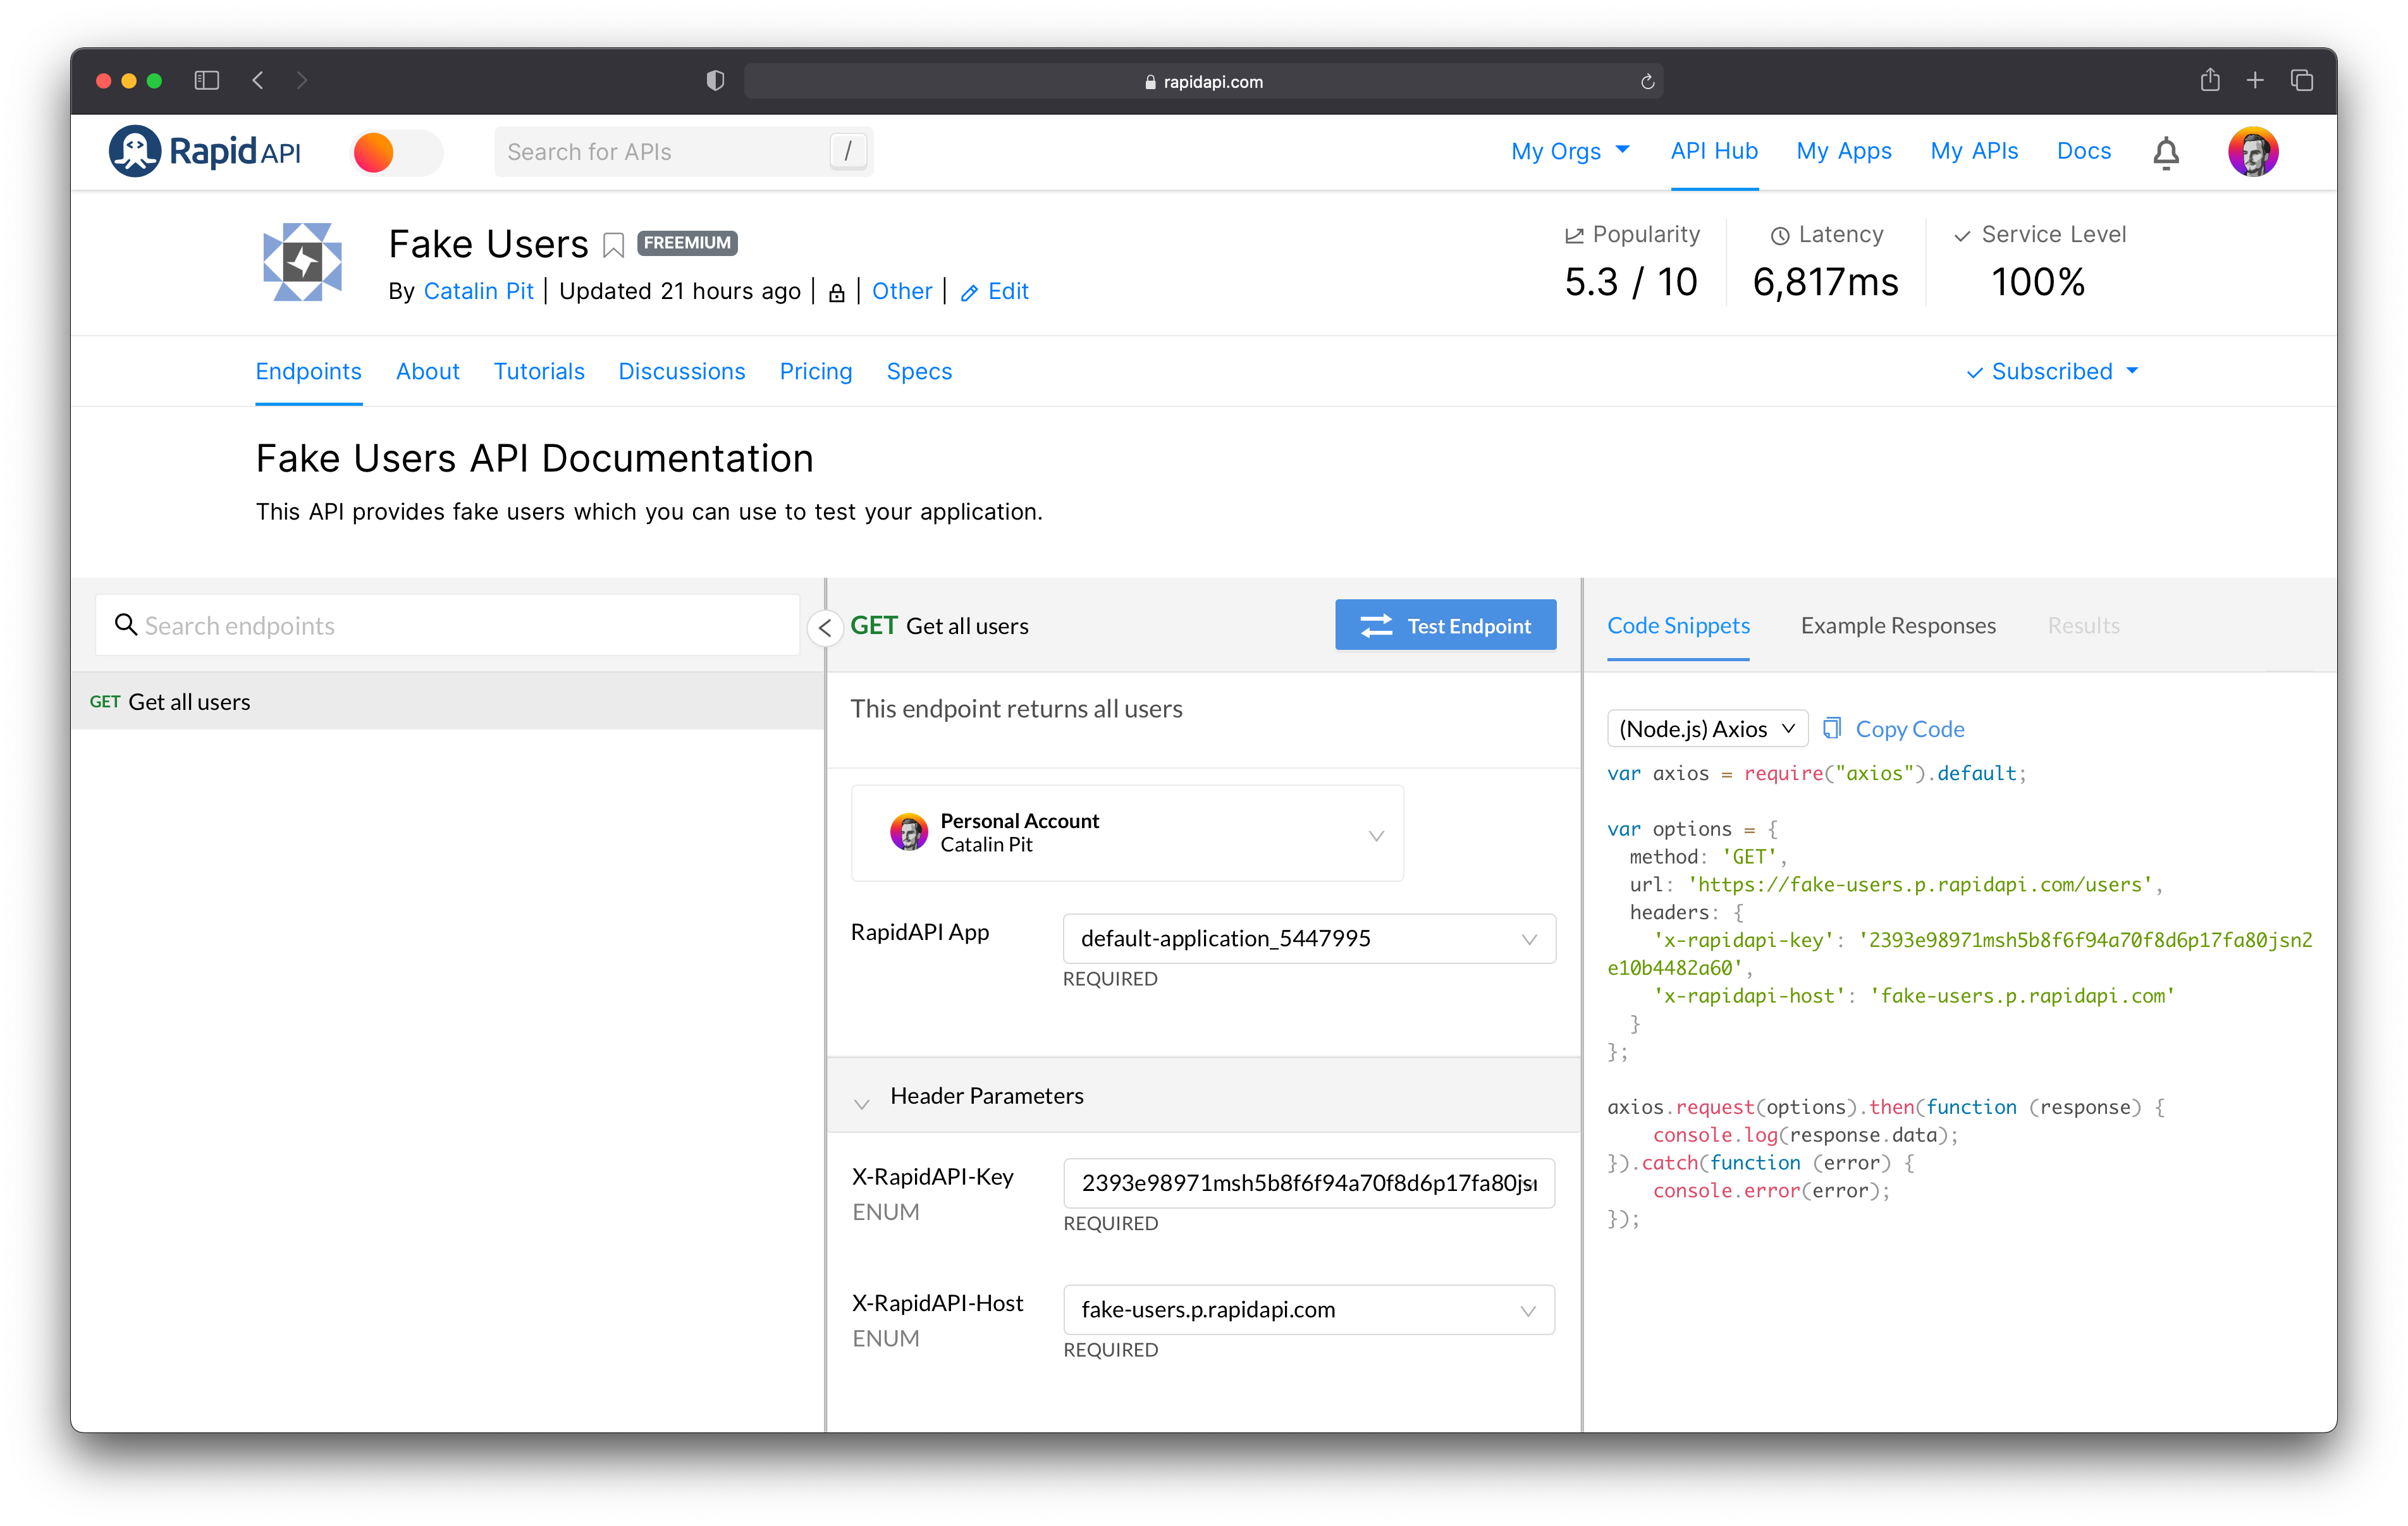 Figure 33
Conclusion
Well done for selling your first API! In this article, you learnt:
- what an API is
- how to build and deploy a simple API
- how to sell access to it on RapidAPI hub
As you can see, there is a lot of potential in selling your APIs. You can turn your API into a new stream of income, and it can even be passive. You build the API once and sell it and then sell it multiple times.