

In the traditional approach to building Full Stack applications, you need to manually build the backend and frontend.
Building your backend manually means that you need to decide whether to use REST or GraphQL. Based on what you choose to use, you need to define GraphQL schemas, resolvers, write database queries, create views, controllers, and more.
While the approach is neither wrong nor bad, you could speed up your development by automating some of that stuff. That's where Hasura comes in.
Throughout this article, you will build the backend of an e-commerce application using Hasura. By the end, you will have a functional, basic e-commerce application.
What is Hasura?
Hasura is a GraphQL Engine that turns your Postgres database into an instant, real-time GraphQL API.
In simpler terms, you connect your PostgreSQL database to Hasura and it automatically generates the GraphQL schema and resolvers based on the database tables/views. After that, you can start querying and mutating your data.
But, what if the application needs to support REST endpoints? If the application needs to support REST endpoints, you can create them from named queries and mutations. With Hasura, you can support both GraphQL and REST.
Moreover, Hasura lets you plug your custom GraphQL/REST API into Hasura with the Remote Schemas and Actions, respectively.
To recap:
- Hasura turns your Postgres database into a GraphQL API.
- Your application can support REST endpoints too.
- Hasura enables you to plug in your custom APIs.
E-commerce Data Modeling
Let's see what Hasura is capable of by building a simple e-commerce application. The first step of the process is to determine the structure of the database.
Figure 1 illustrates the database schema for the application.
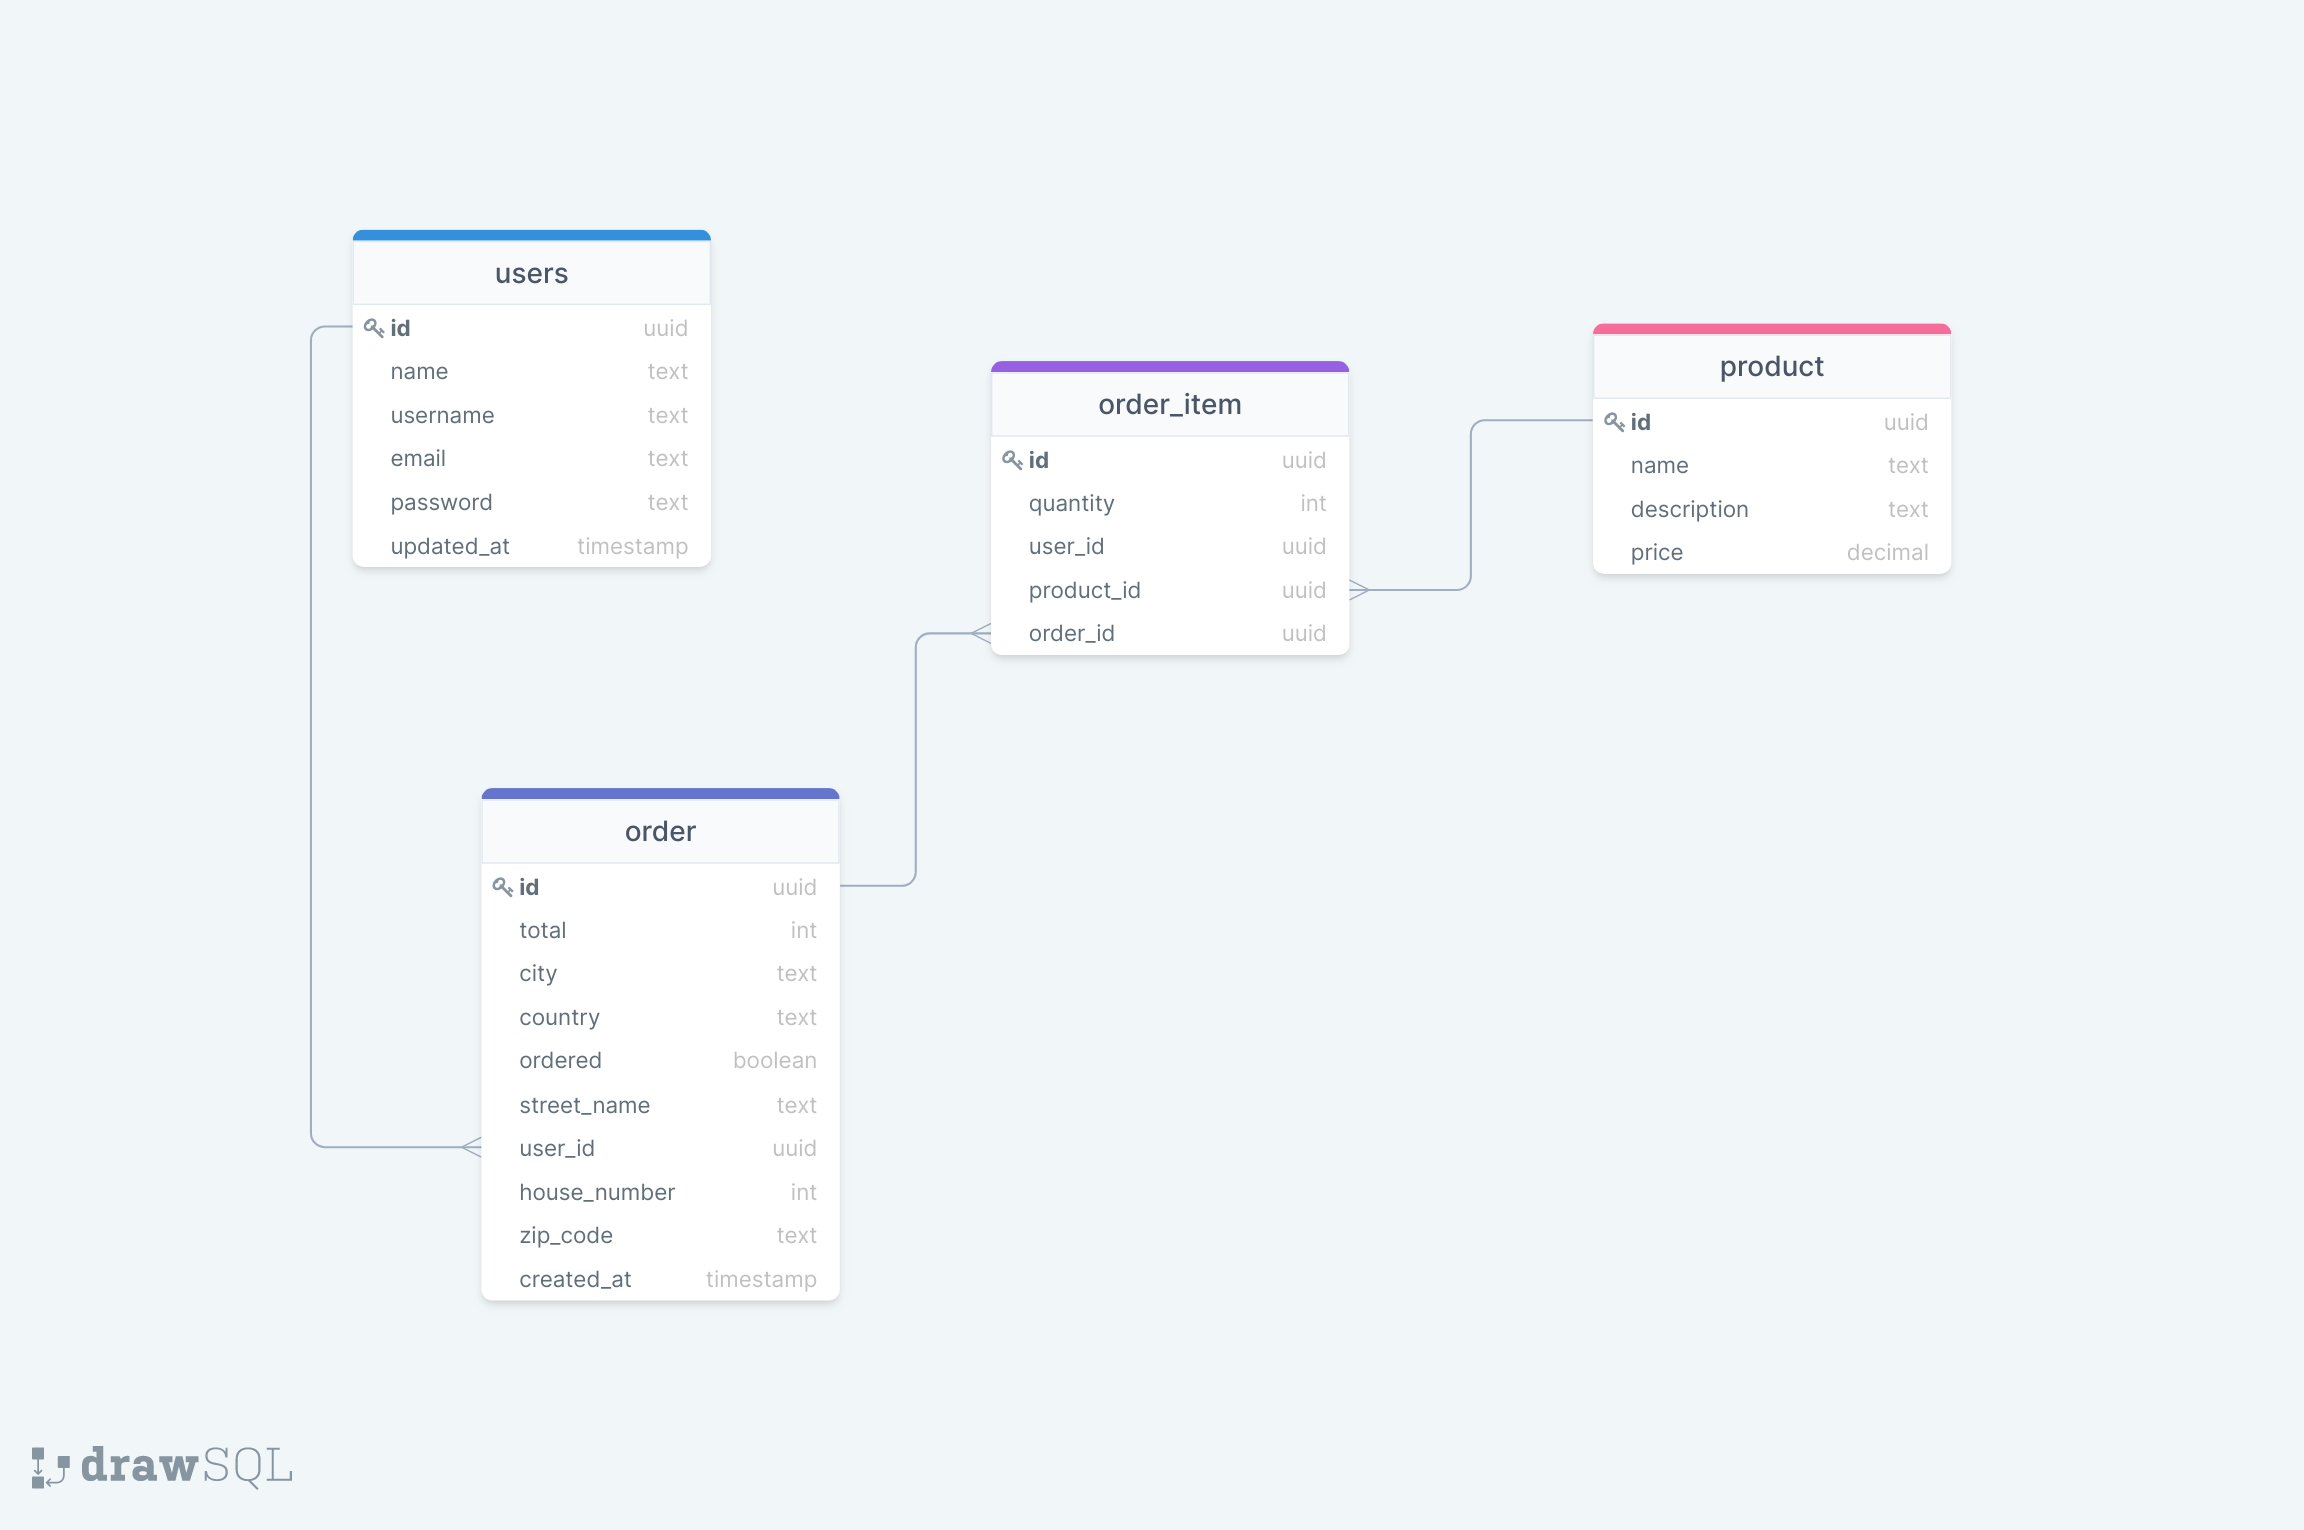
Figure 1 - E-commerce Data Modeling
The database consists of four tables:
- users
- products
- order items
- orders
There is a one-to-many relationship between the "users" and "order", which means that a user can have multiple orders, but an order can only belong to a user. Two users cannot have the same order.
The relationship between "order" and "order_item" is also a one-to-many relationship. An order can contain multiple items, but the same order item cannot belong to multiple orders.
The "order_item" and "product" has a one-to-many relationship, which means that an order item is associated with exactly one product. Essentially, as soon as the user adds a product to the cart, it becomes an order item. The "order_item" creates a link between the "product" and "order".
Now that we are done with the data modeling, the next step is implementing it in Hasura.
Hasura Implementation
There are two ways to use Hasura. You can use it on your local machine with Docker, or you can use Hasura Cloud. The tutorial uses Hasura Cloud to implement the e-commerce backend.
If it's your first time using Hasura, you need to set up an account and a project. Follow this guide, and you should be up and running within minutes.
After you set up your account and project, you should be in the project dashboard. Figure 2 illustrates the page you should see.
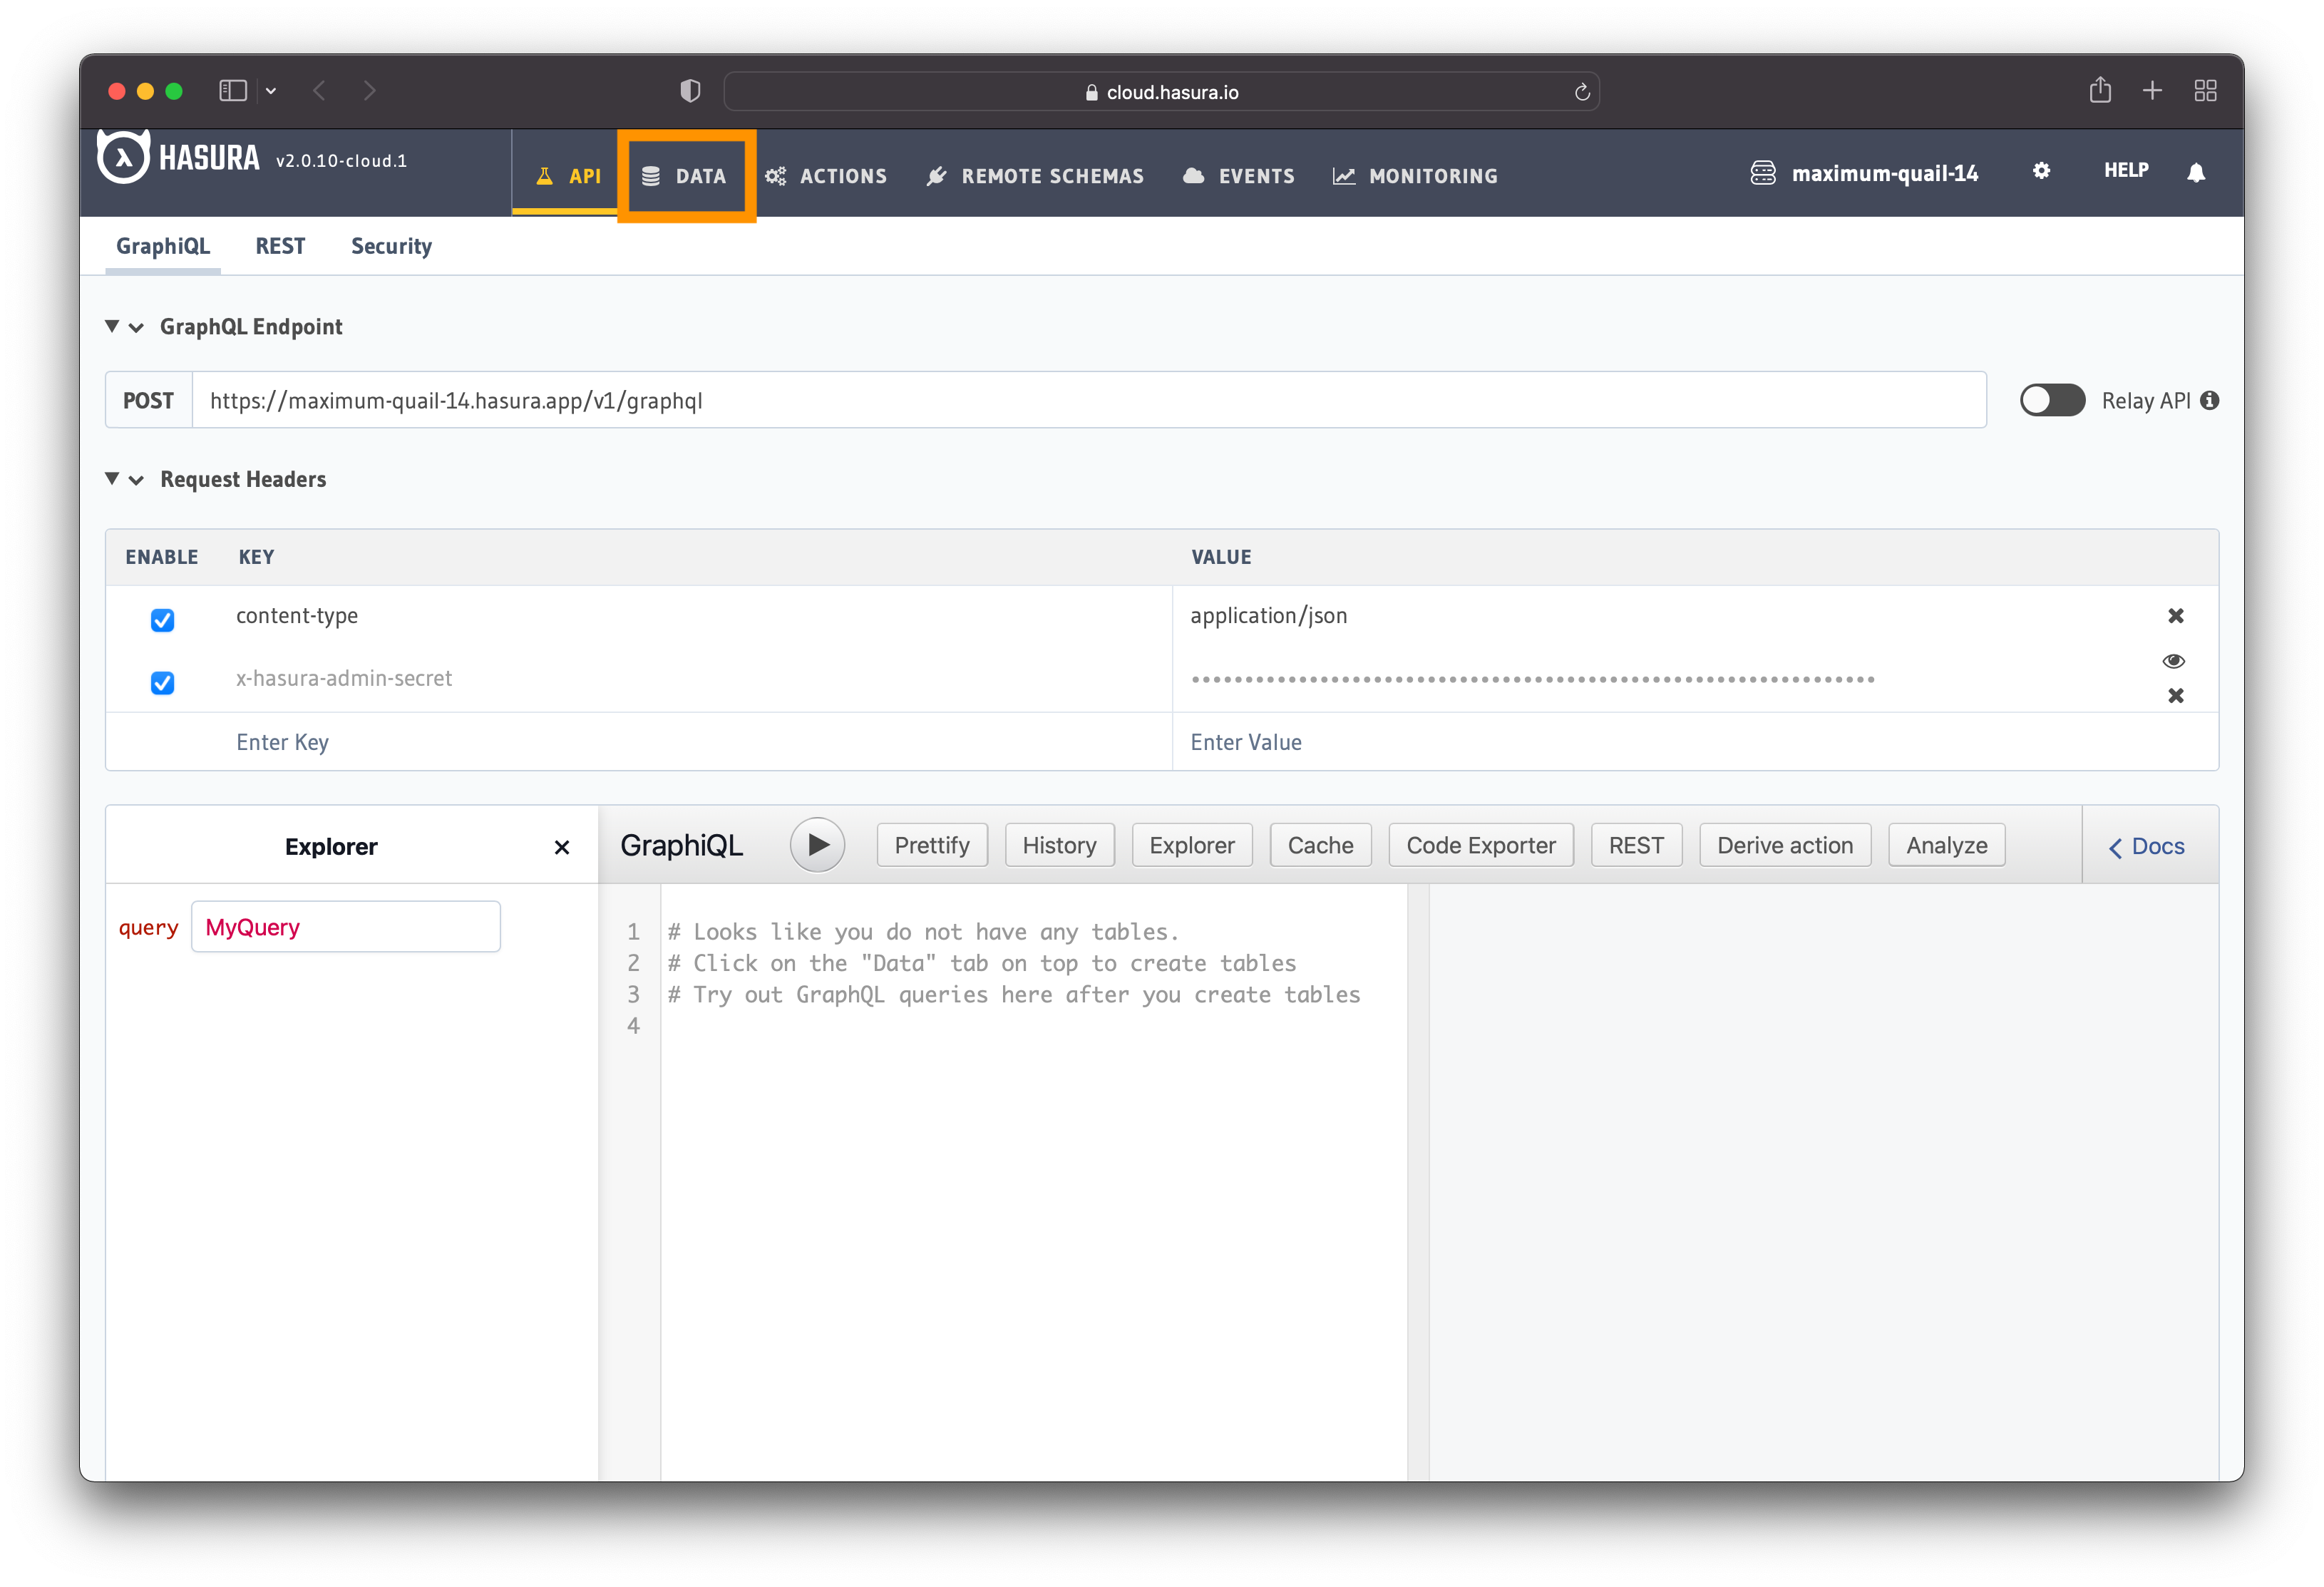
Figure 2 - Hasura Project Dashboard
The implementation consists of:
- creating the database tables
- establishing the relationships between the tables
- defining the permission rules
- adding custom business logic with Actions
Create the Database
The first step of the implementation is to create the database. Click on the "DATA" option, as shown in figure 2. That takes you to the database page where you can connect an existing database or create a new one.
For this tutorial, it is recommended to create a new database. It's important to note that you need a Heroku account to create a new database. If you do not have a Heroku account and do not want to make one, you can connect Hasura to an existing database.
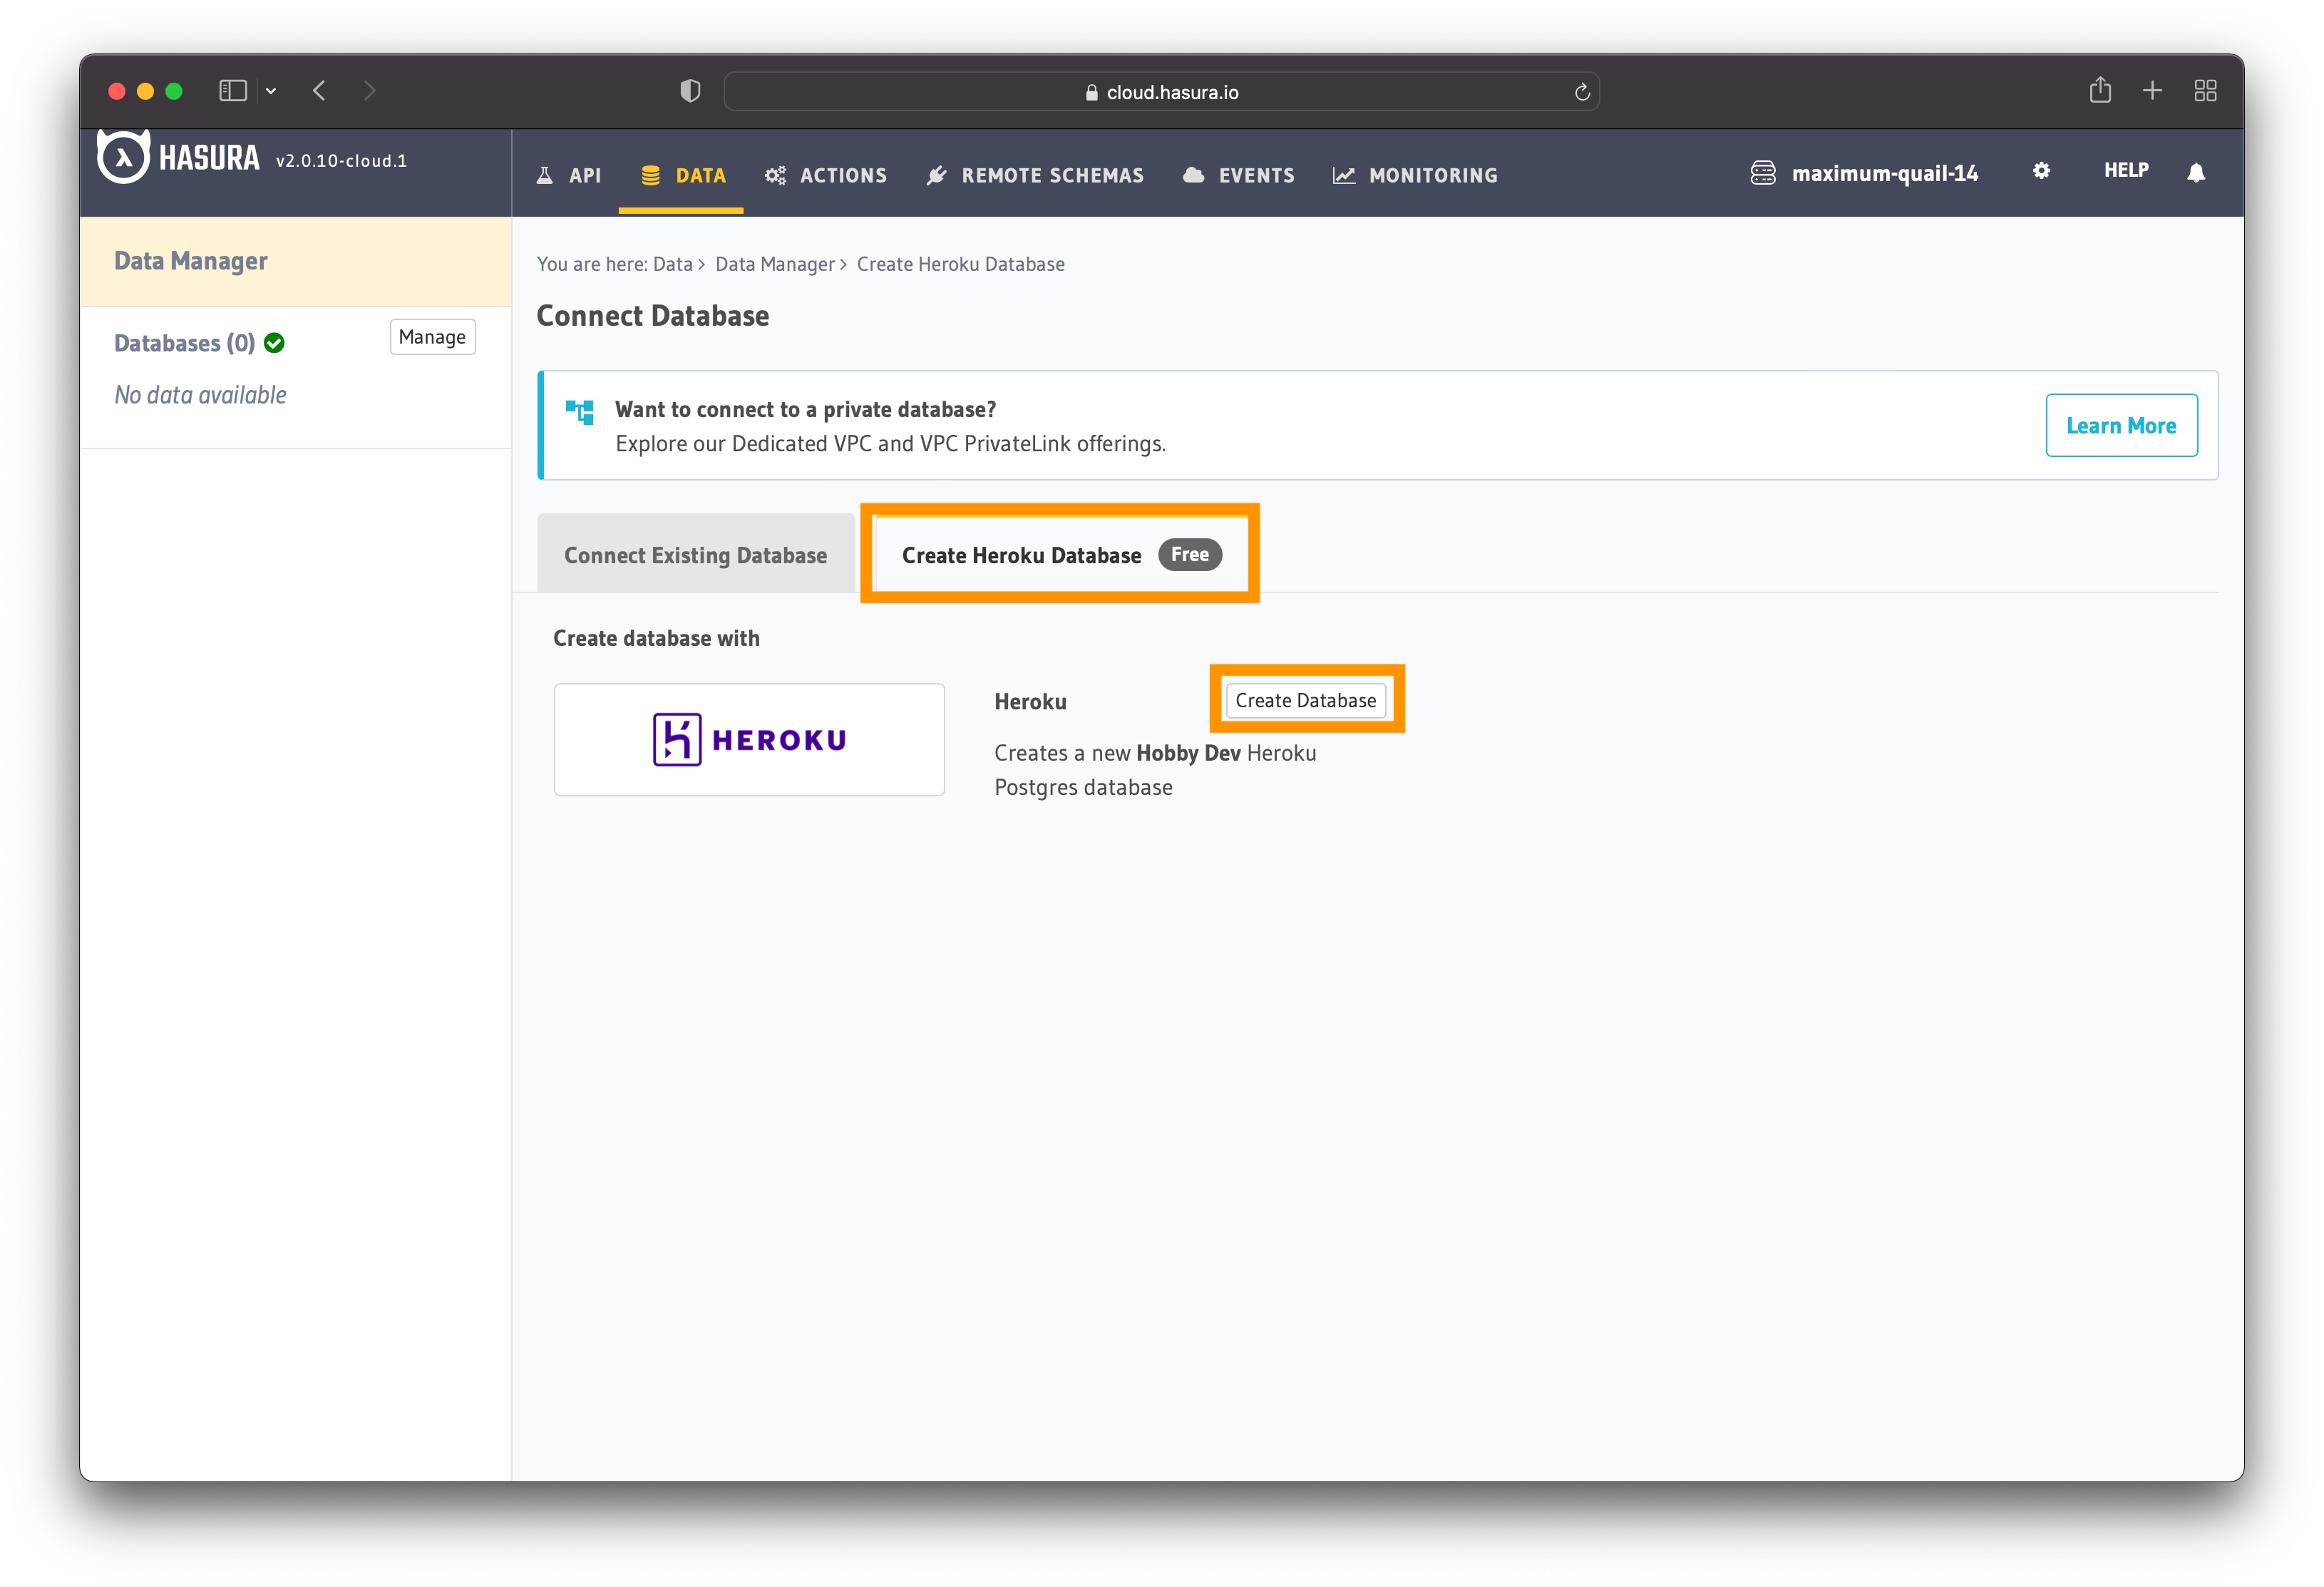
Figure 3 - Heroku Project Database Page
Figure 3 illustrates the process of creating a new database. The process is quick, so you should have a new database within seconds.
Once the database is ready, you can access it by clicking on "public", as shown in figure 4.
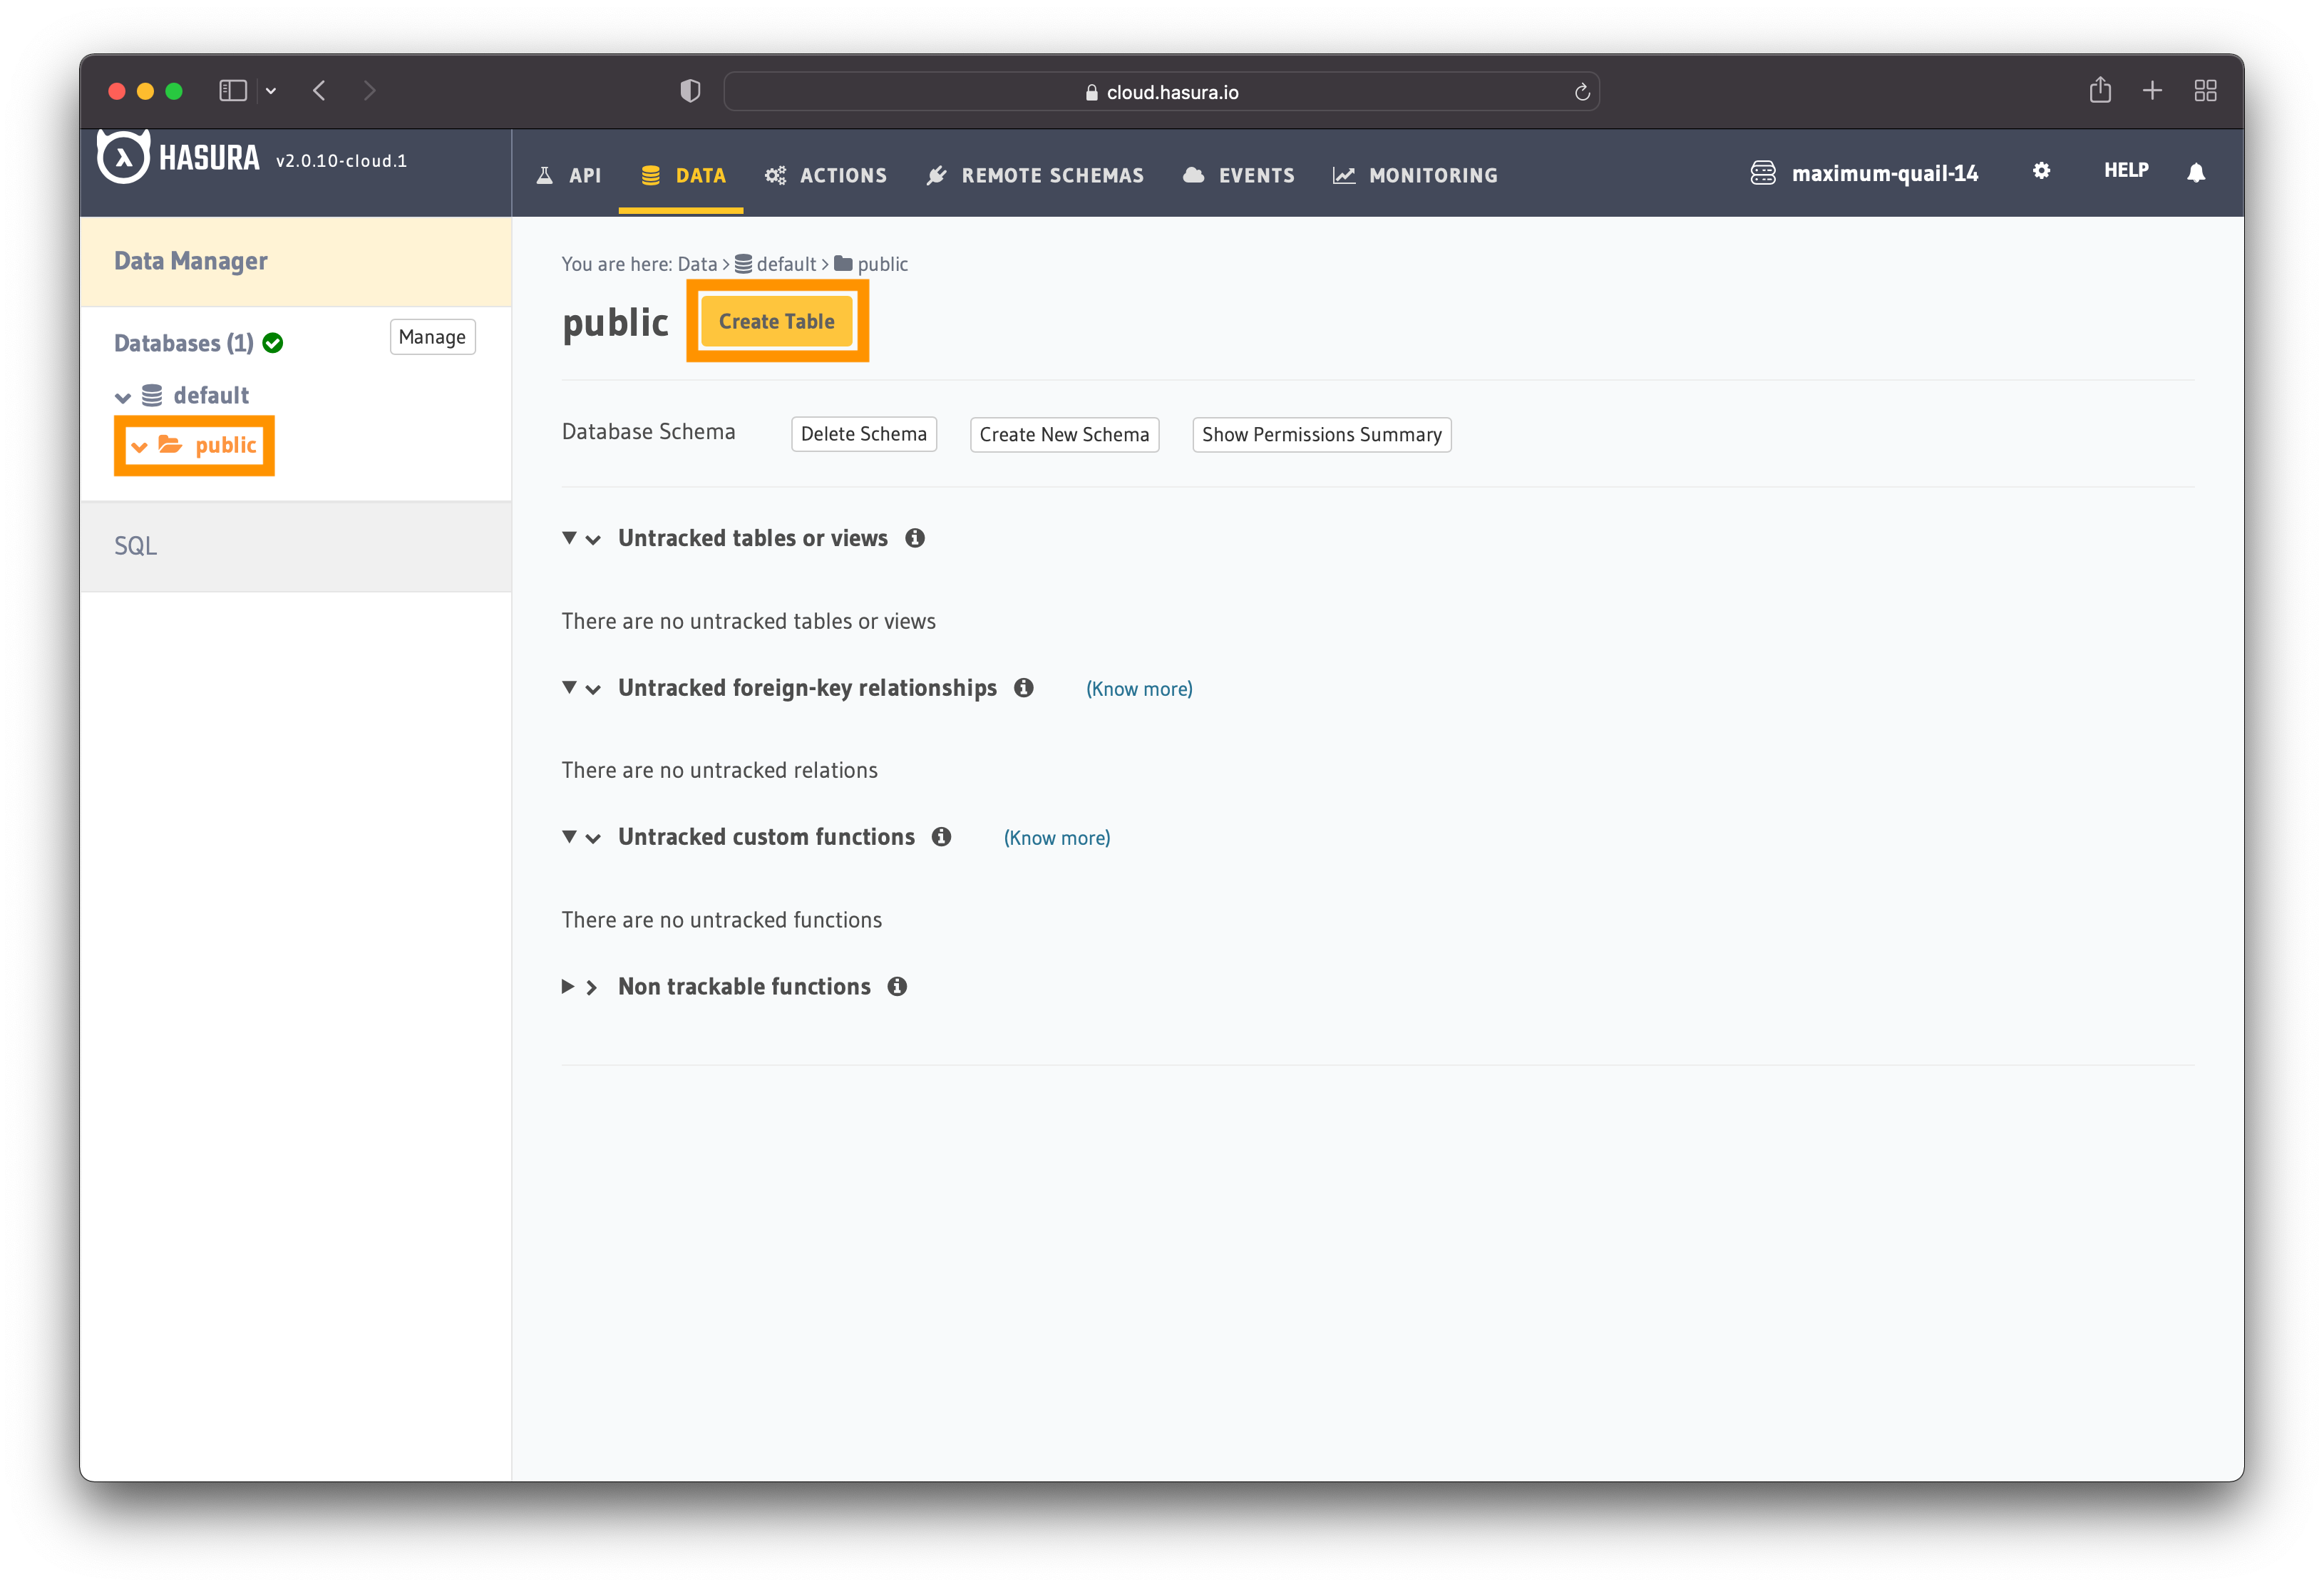
Figure 4 - Database Dashboard
The next stage involves building the tables and relationships.
Database Tables
Now that you have the database set up, it's time to create the tables. In this step, you will create the four tables: users, product, order, order item.
Users Table
Let's implement the "user" table first. Click on the "Create Table" to create a new table, as illustrated in figure 4.
The "users" table has the following fields and types:
- id (Primary Key) => UUID
- name => Text
- username => Text
- email => Text
- password => Text
- updated_at => Timestamp
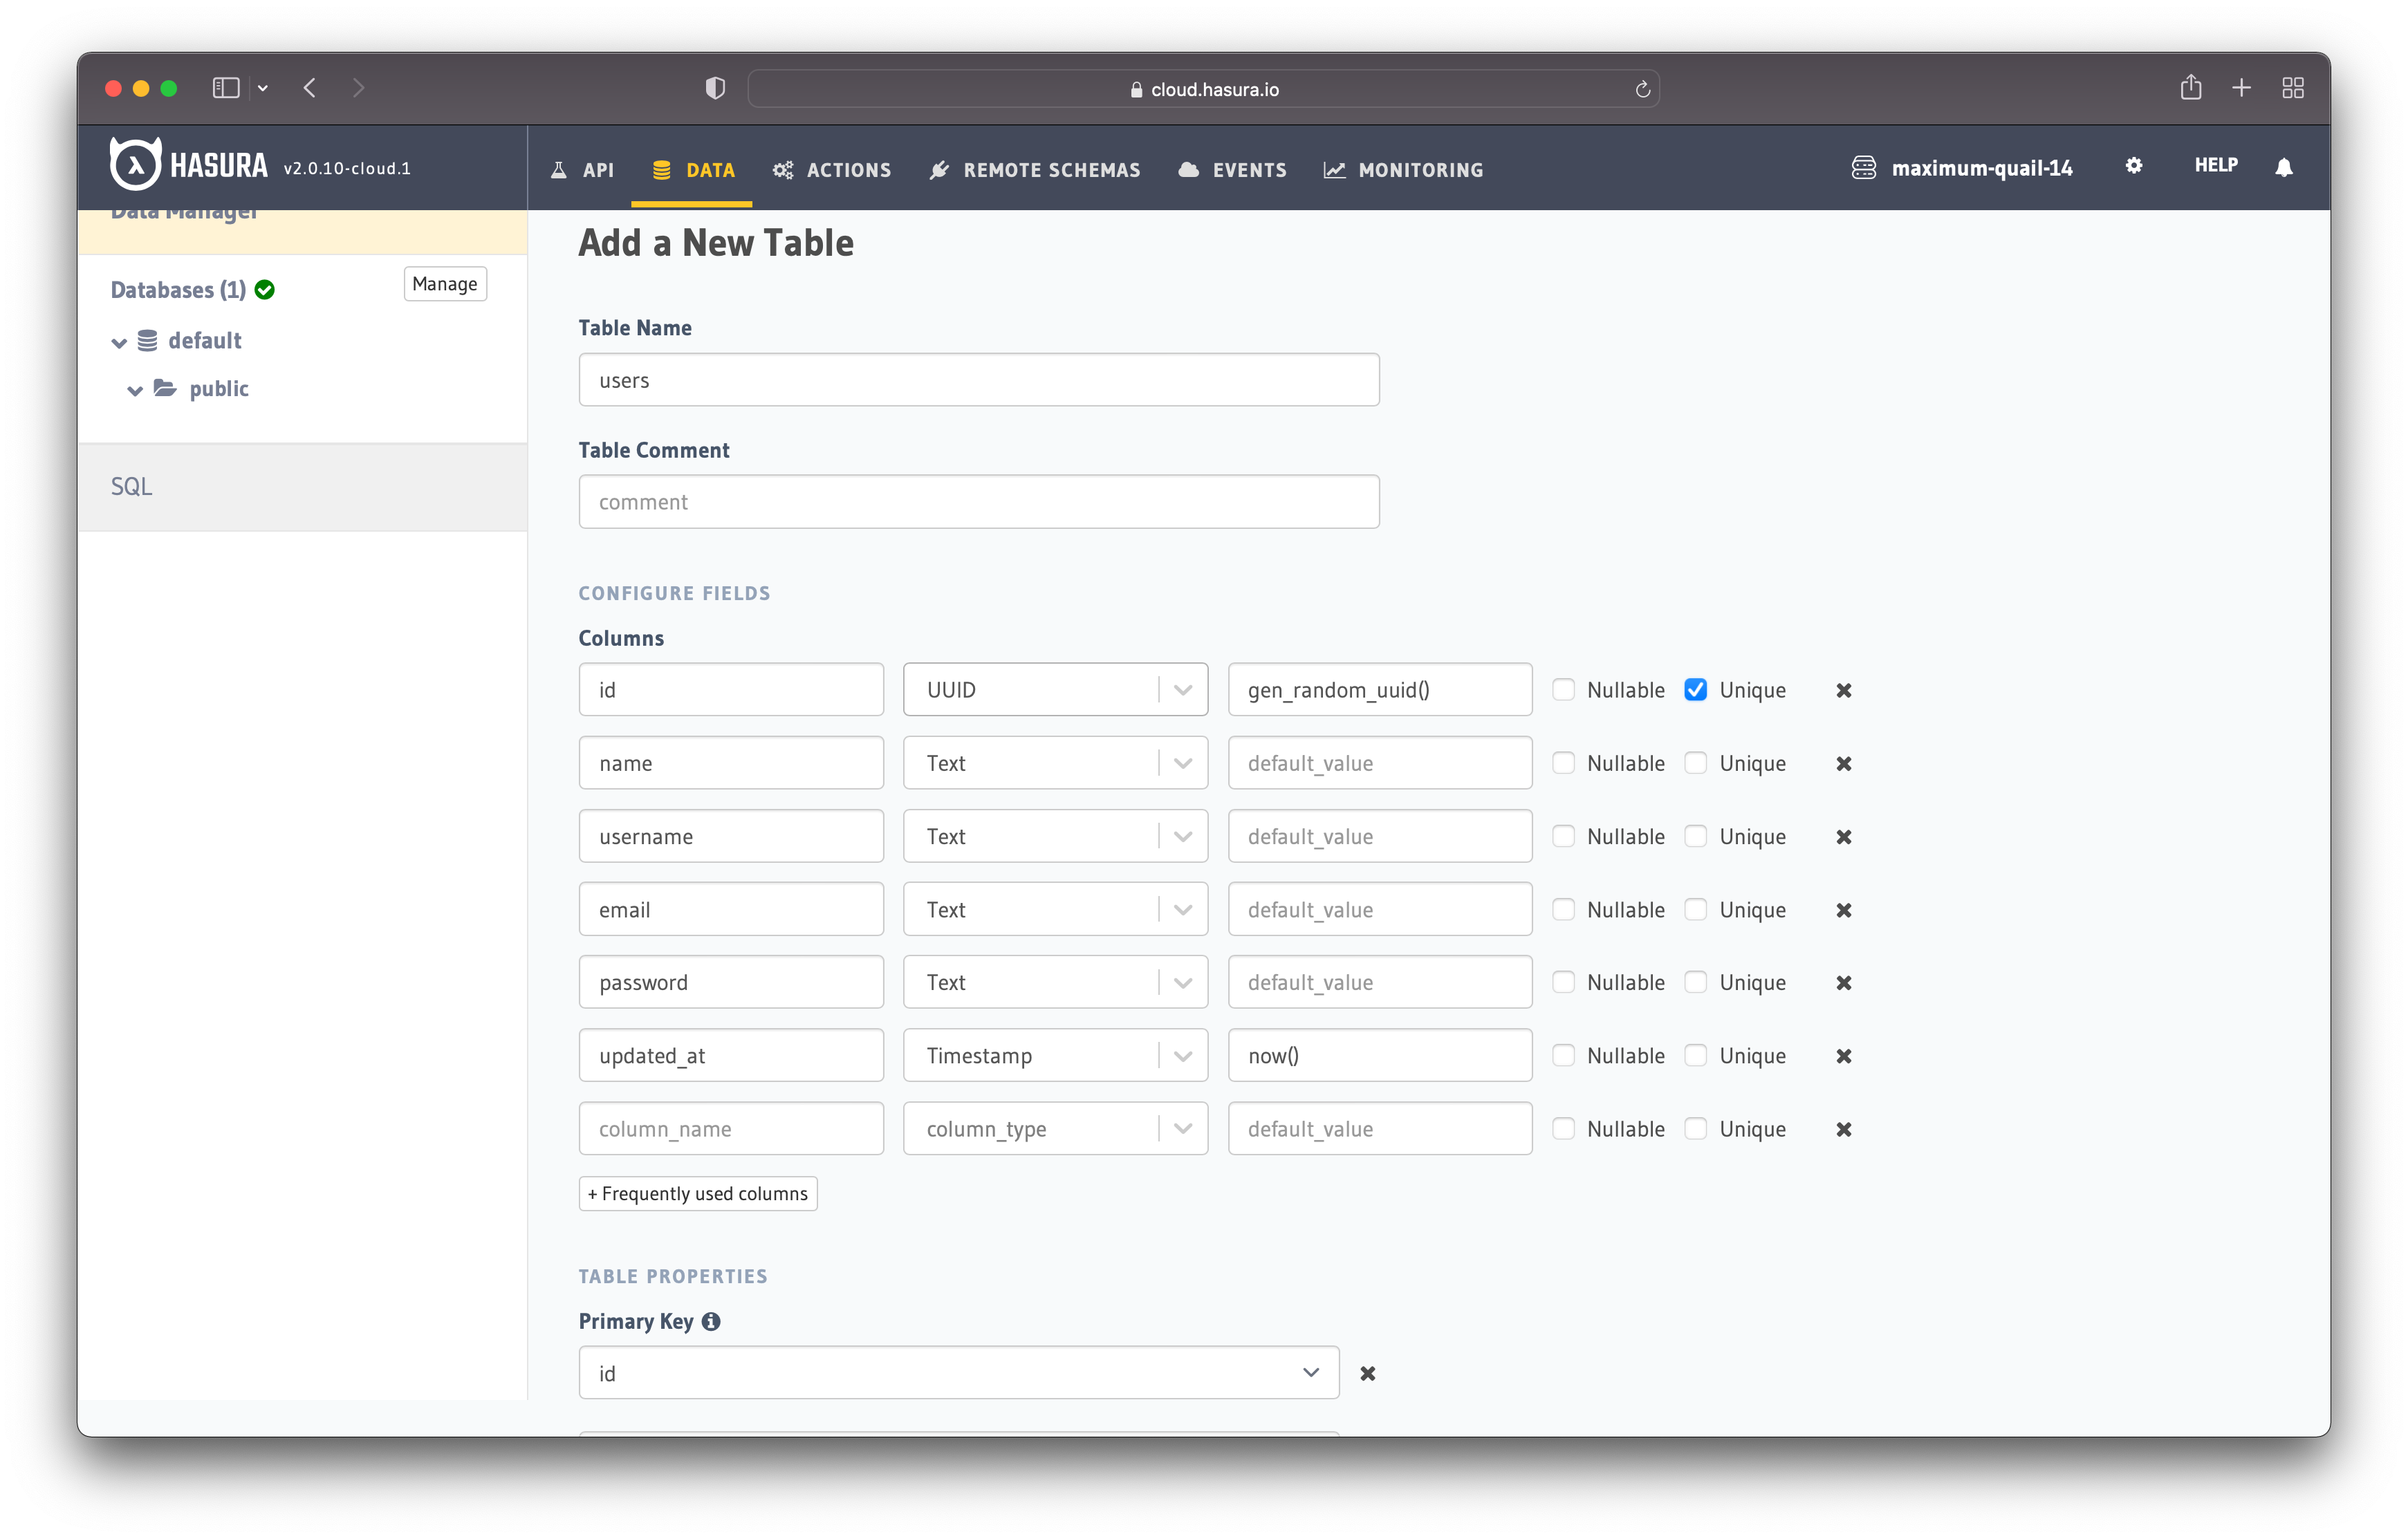
Figure 5 - Create "users" Table
In figure 5, you can see all the fields, their types and the field used for the primary key.
After adding all the fields and choosing the primary key, press "Add Table" to create the table.
Product Table
You also need to implement the product table, which has the following fields and types:
- id (Primary Key) => UUID
- name => Text
- description => Text
- price => Numeric
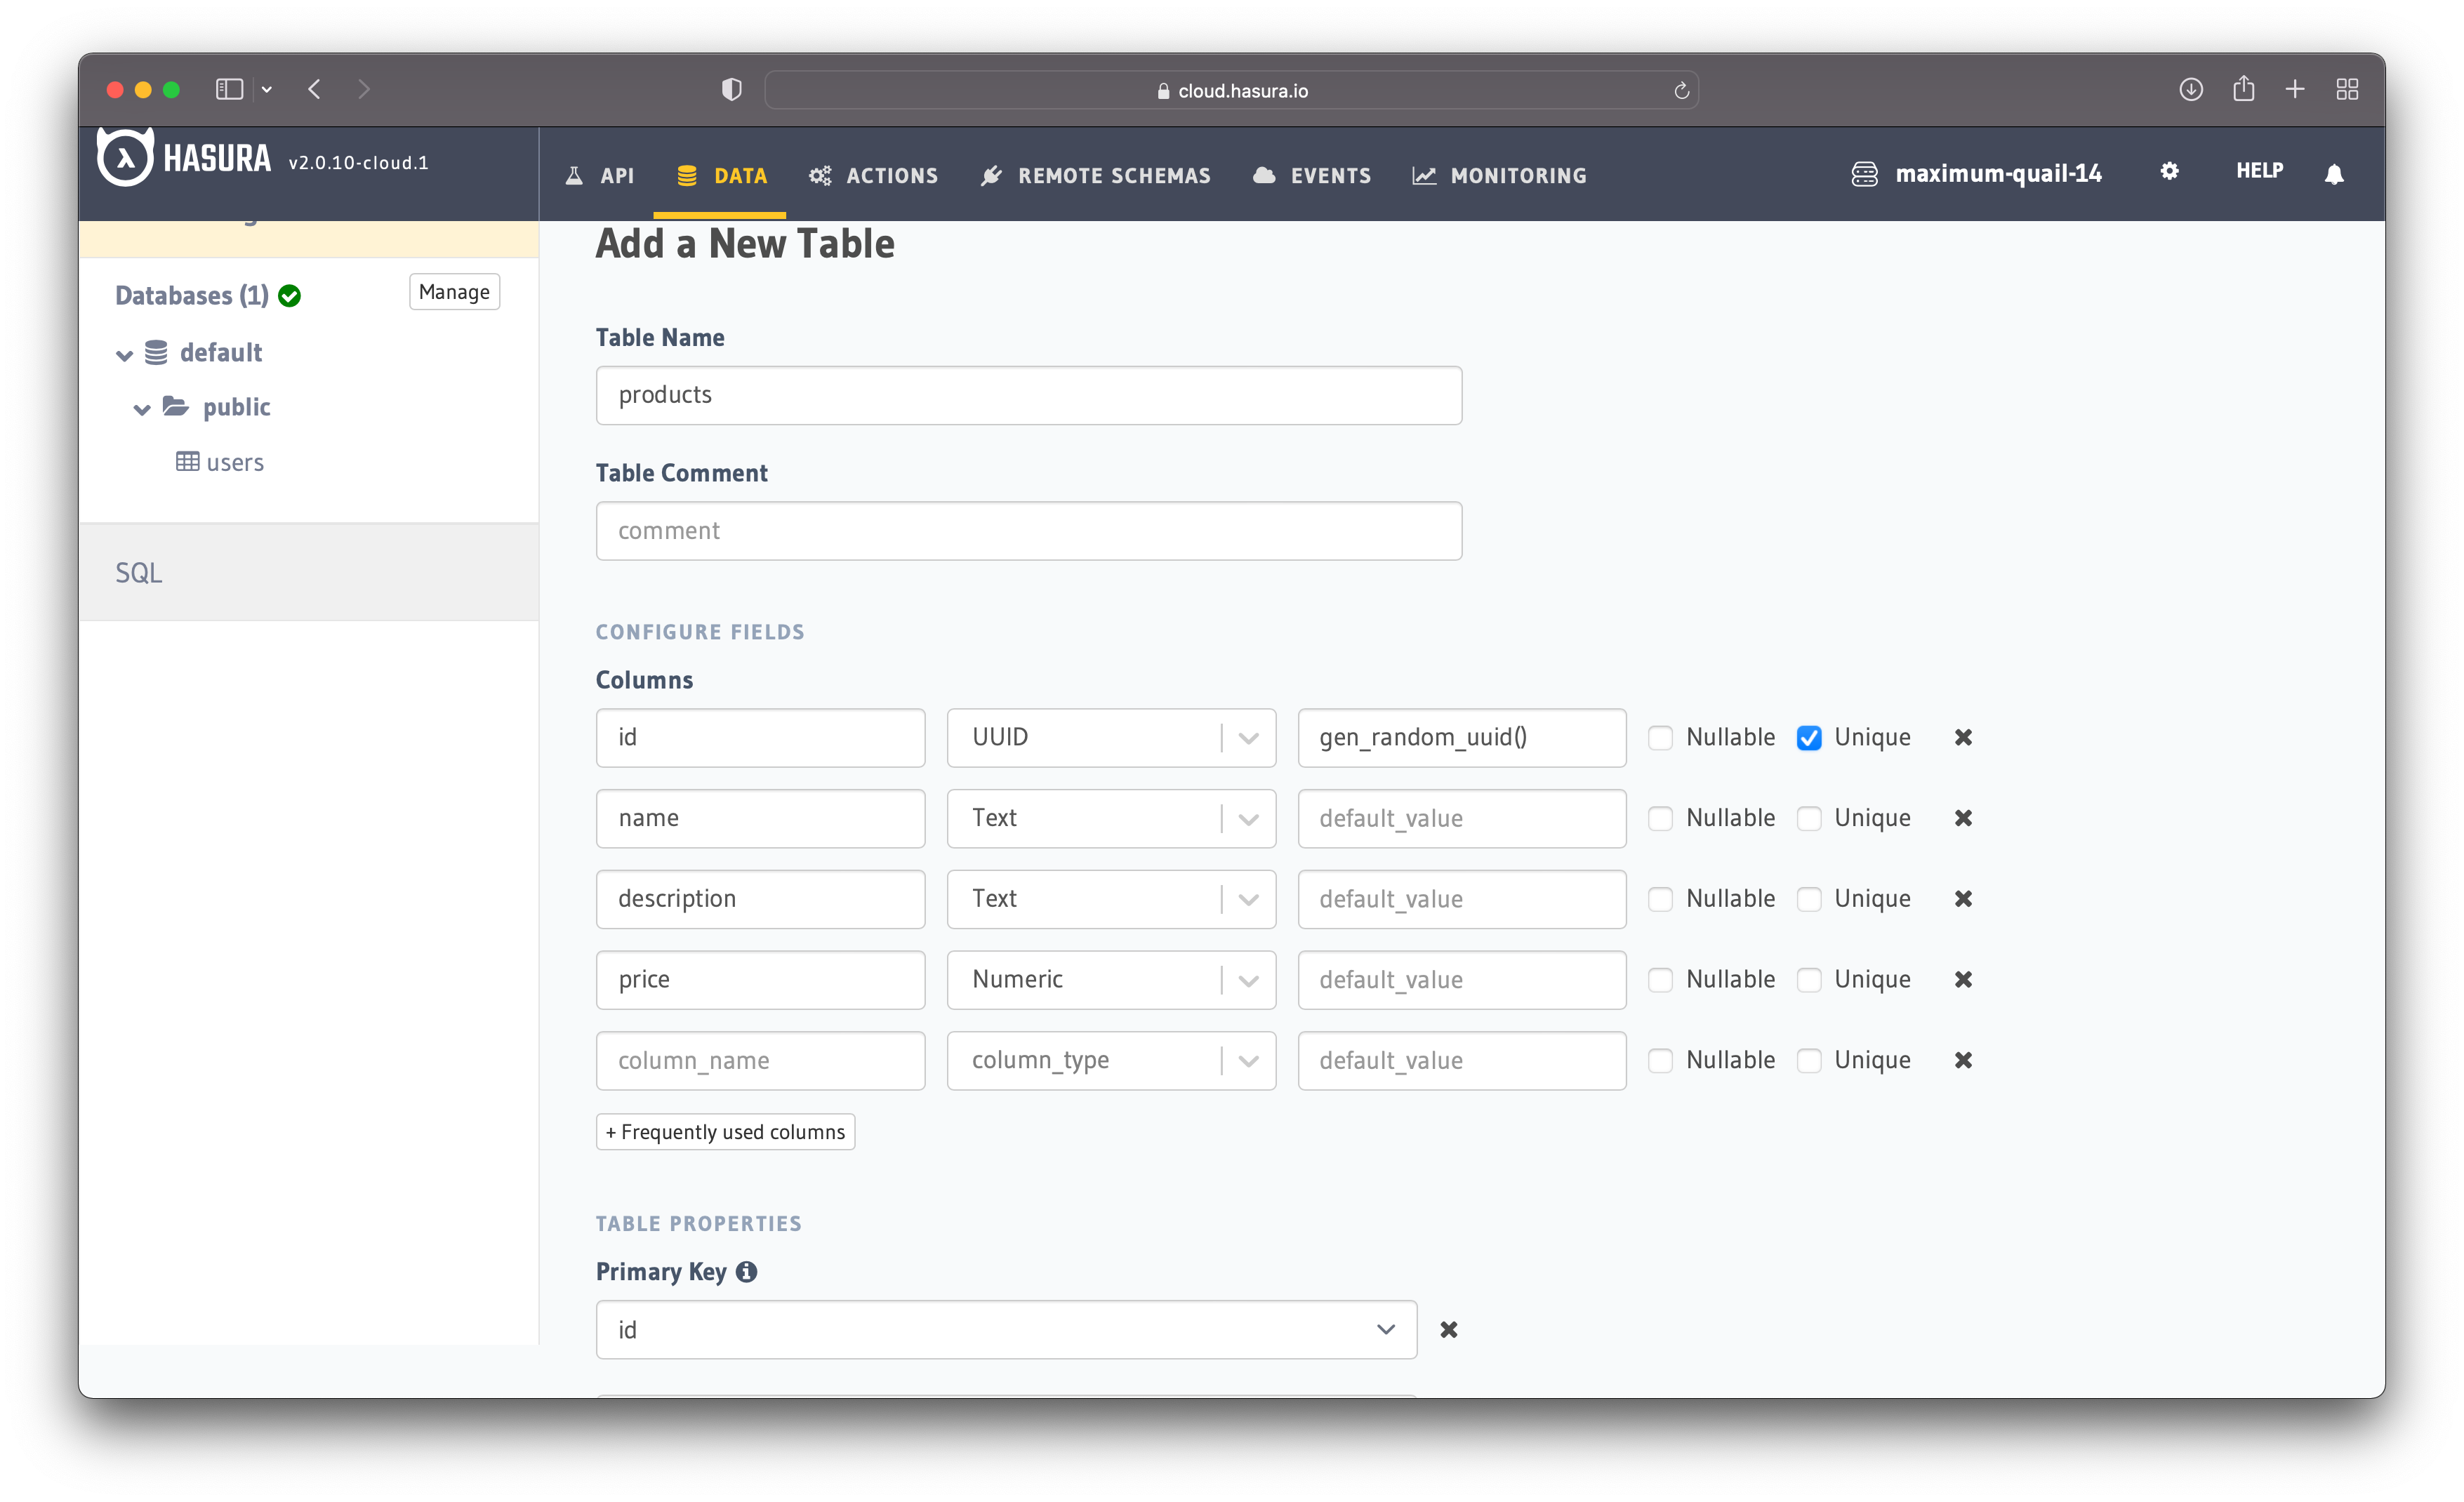
Figure 6 - Create "product" Table
After creating the fields and choosing the primary key, save the table to the database.
Order Table
The next table to create is the "Order" table, which has following fields:
- id (Primary Key) => UUID
- city => Text
- country => Text
- street_name => Text
- house_number => Int
- zip_code => Text
- ordered => Boolean
- total => Numeric
- created_at => Timestamp
- user_id (Foreign Key) => UUID
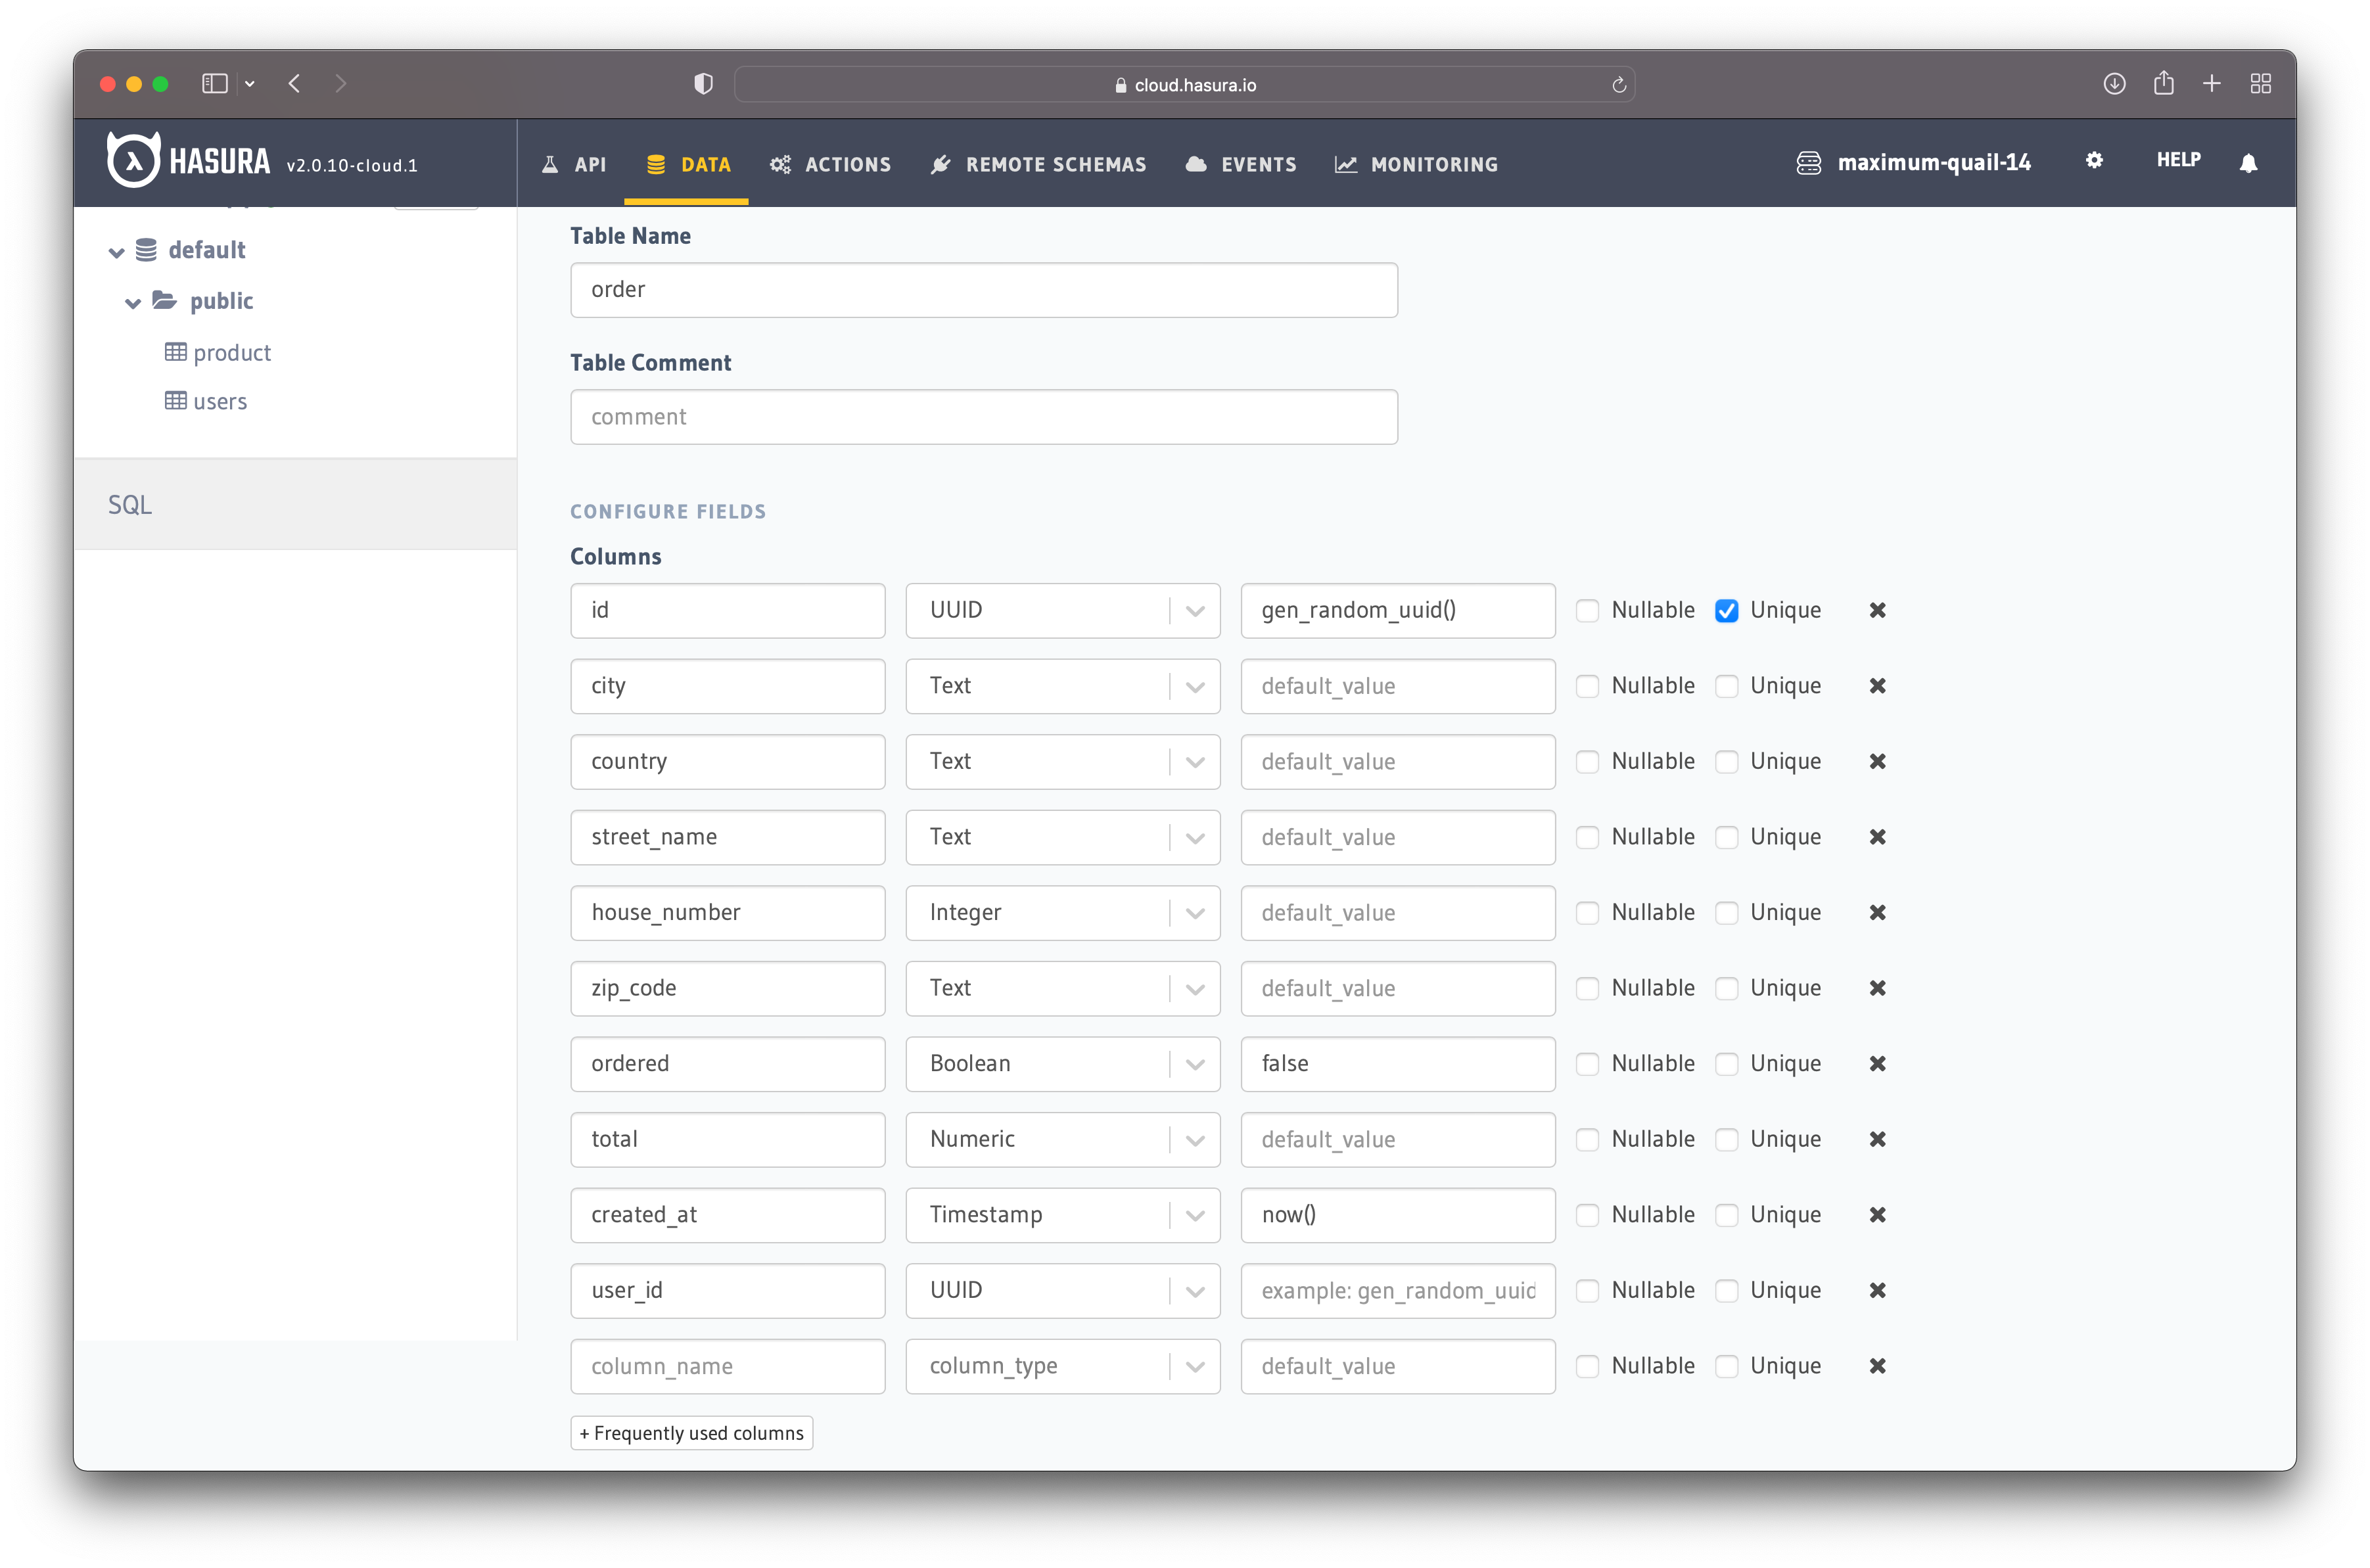
Figure 7 - Create "order" Table
Figure 7 illustrates how your table should look. Once you finish setting it up, add the table to the database.
Order Item Table
The last table to create is "order_item". This table comes with the following fields and types:
- id (Primary Key) => UUID
- quantity => Int
- product_id (Foreign Key) => UUID
- order_id (Foreign Key) => UUID
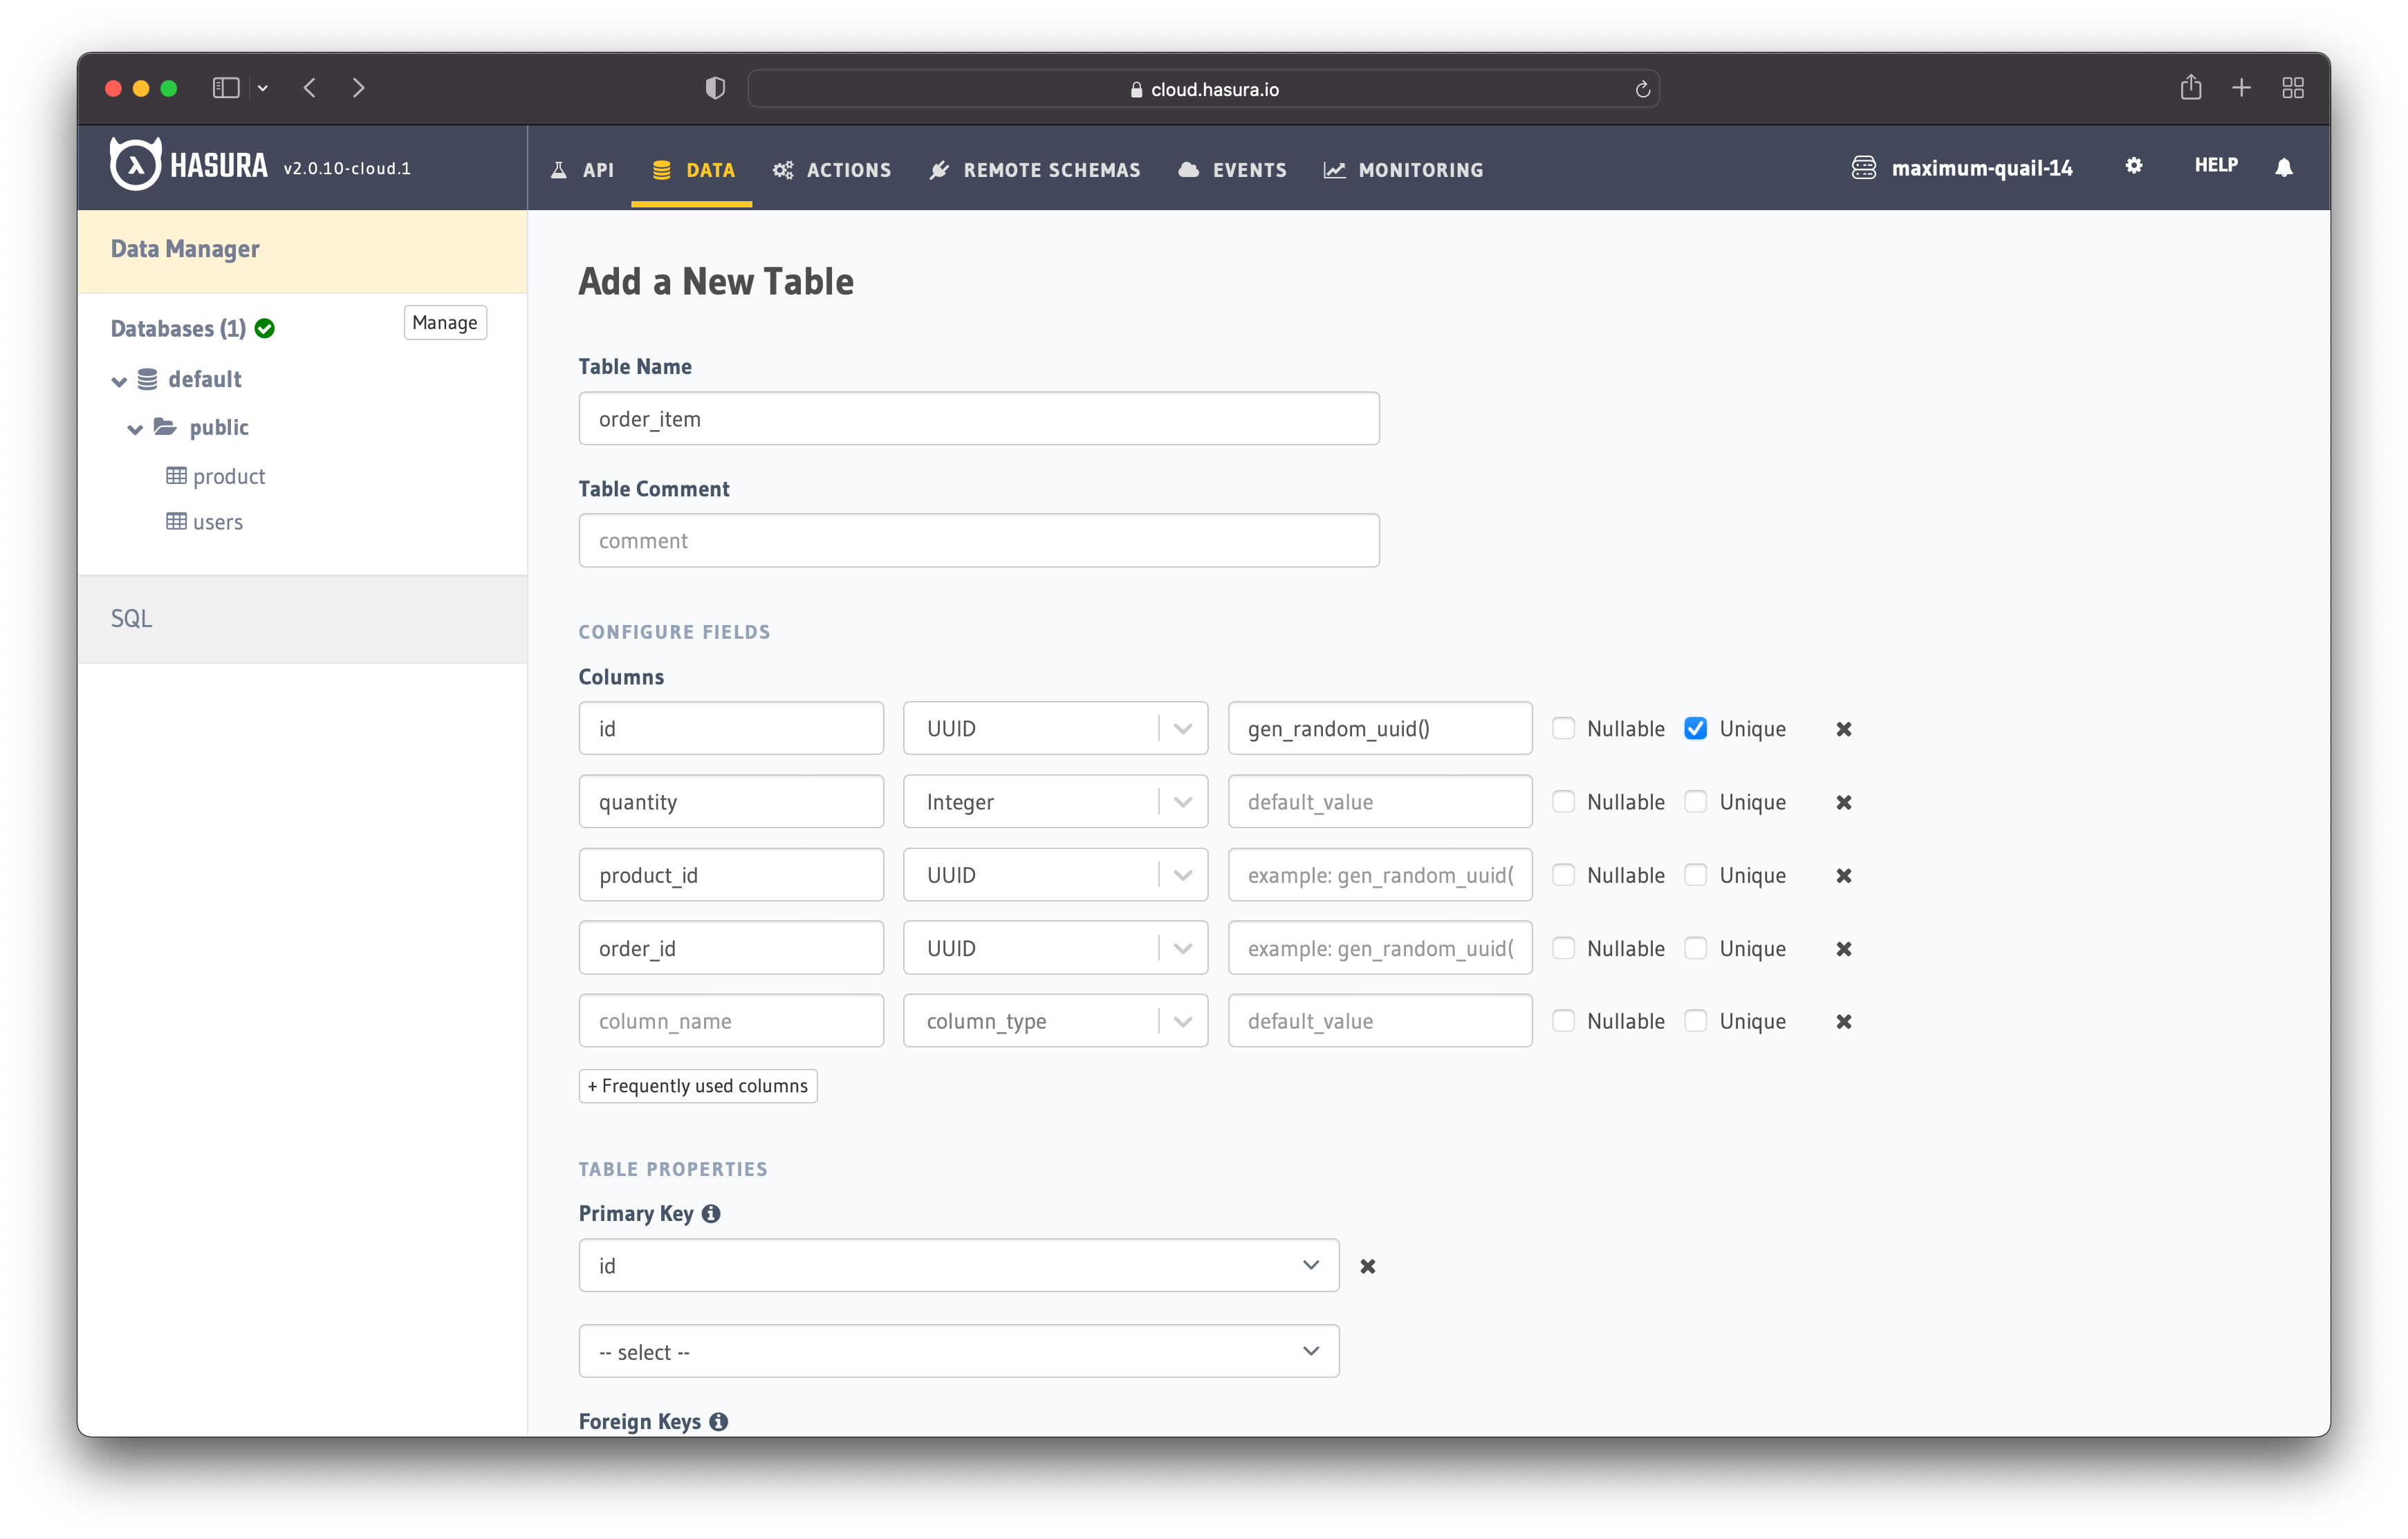
Figure 8 - Create "order_item" Table
Save the table and you are done with tables creation.
Relationships
Although the tables are created, there is no connection between them. The following step is to create the relationships between the tables. In Hasura, there are two ways to create relationships:
- Relationships defined from foreign key constraints
- Relationships created manually (when it's not possible to use foreign key constraints)
In this e-commerce application, we will create relationships from foreign key constraints.
Users - Order Relationship
The first step is to navigate to the "Modify" tab in the "order" table and click on the button saying "Add a foreign key".
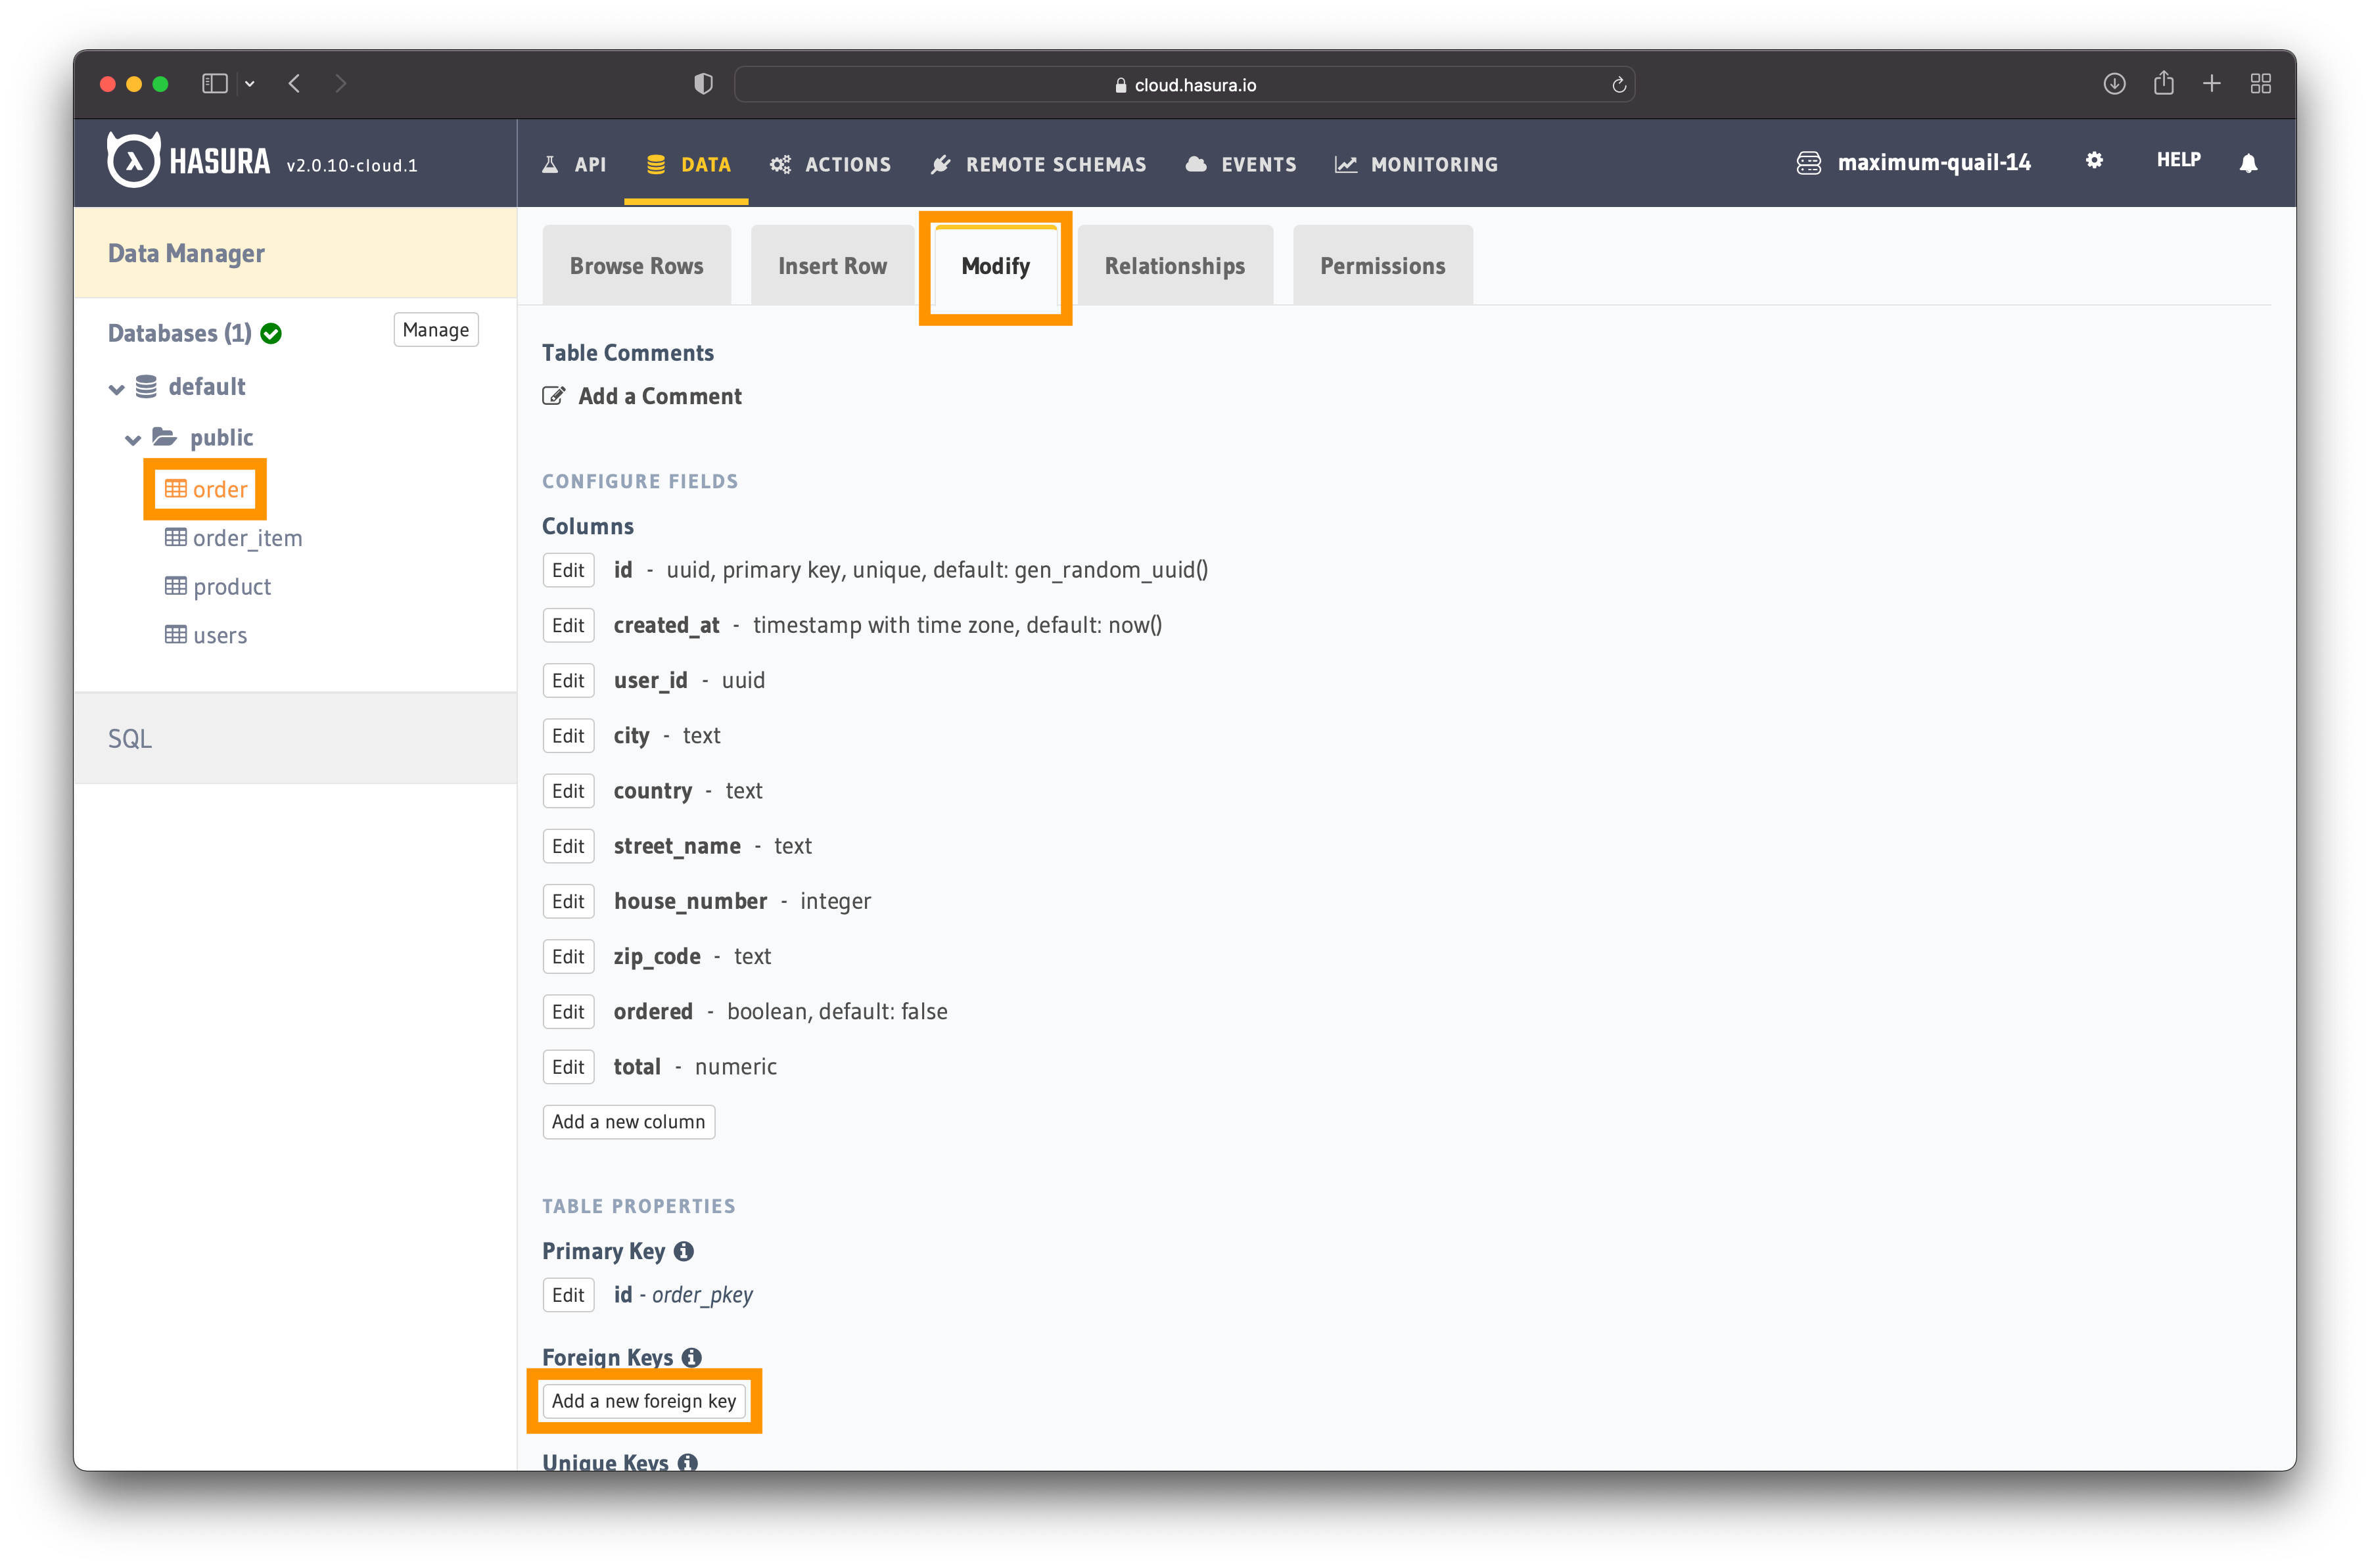
Figure 9 - Modify Table
Once you click on the button, you can set up the foreign key. Add the "user_id" as a foreign key for the "id" column in the "users" table.
Figure 10 illustrates the process of adding the foreign key.
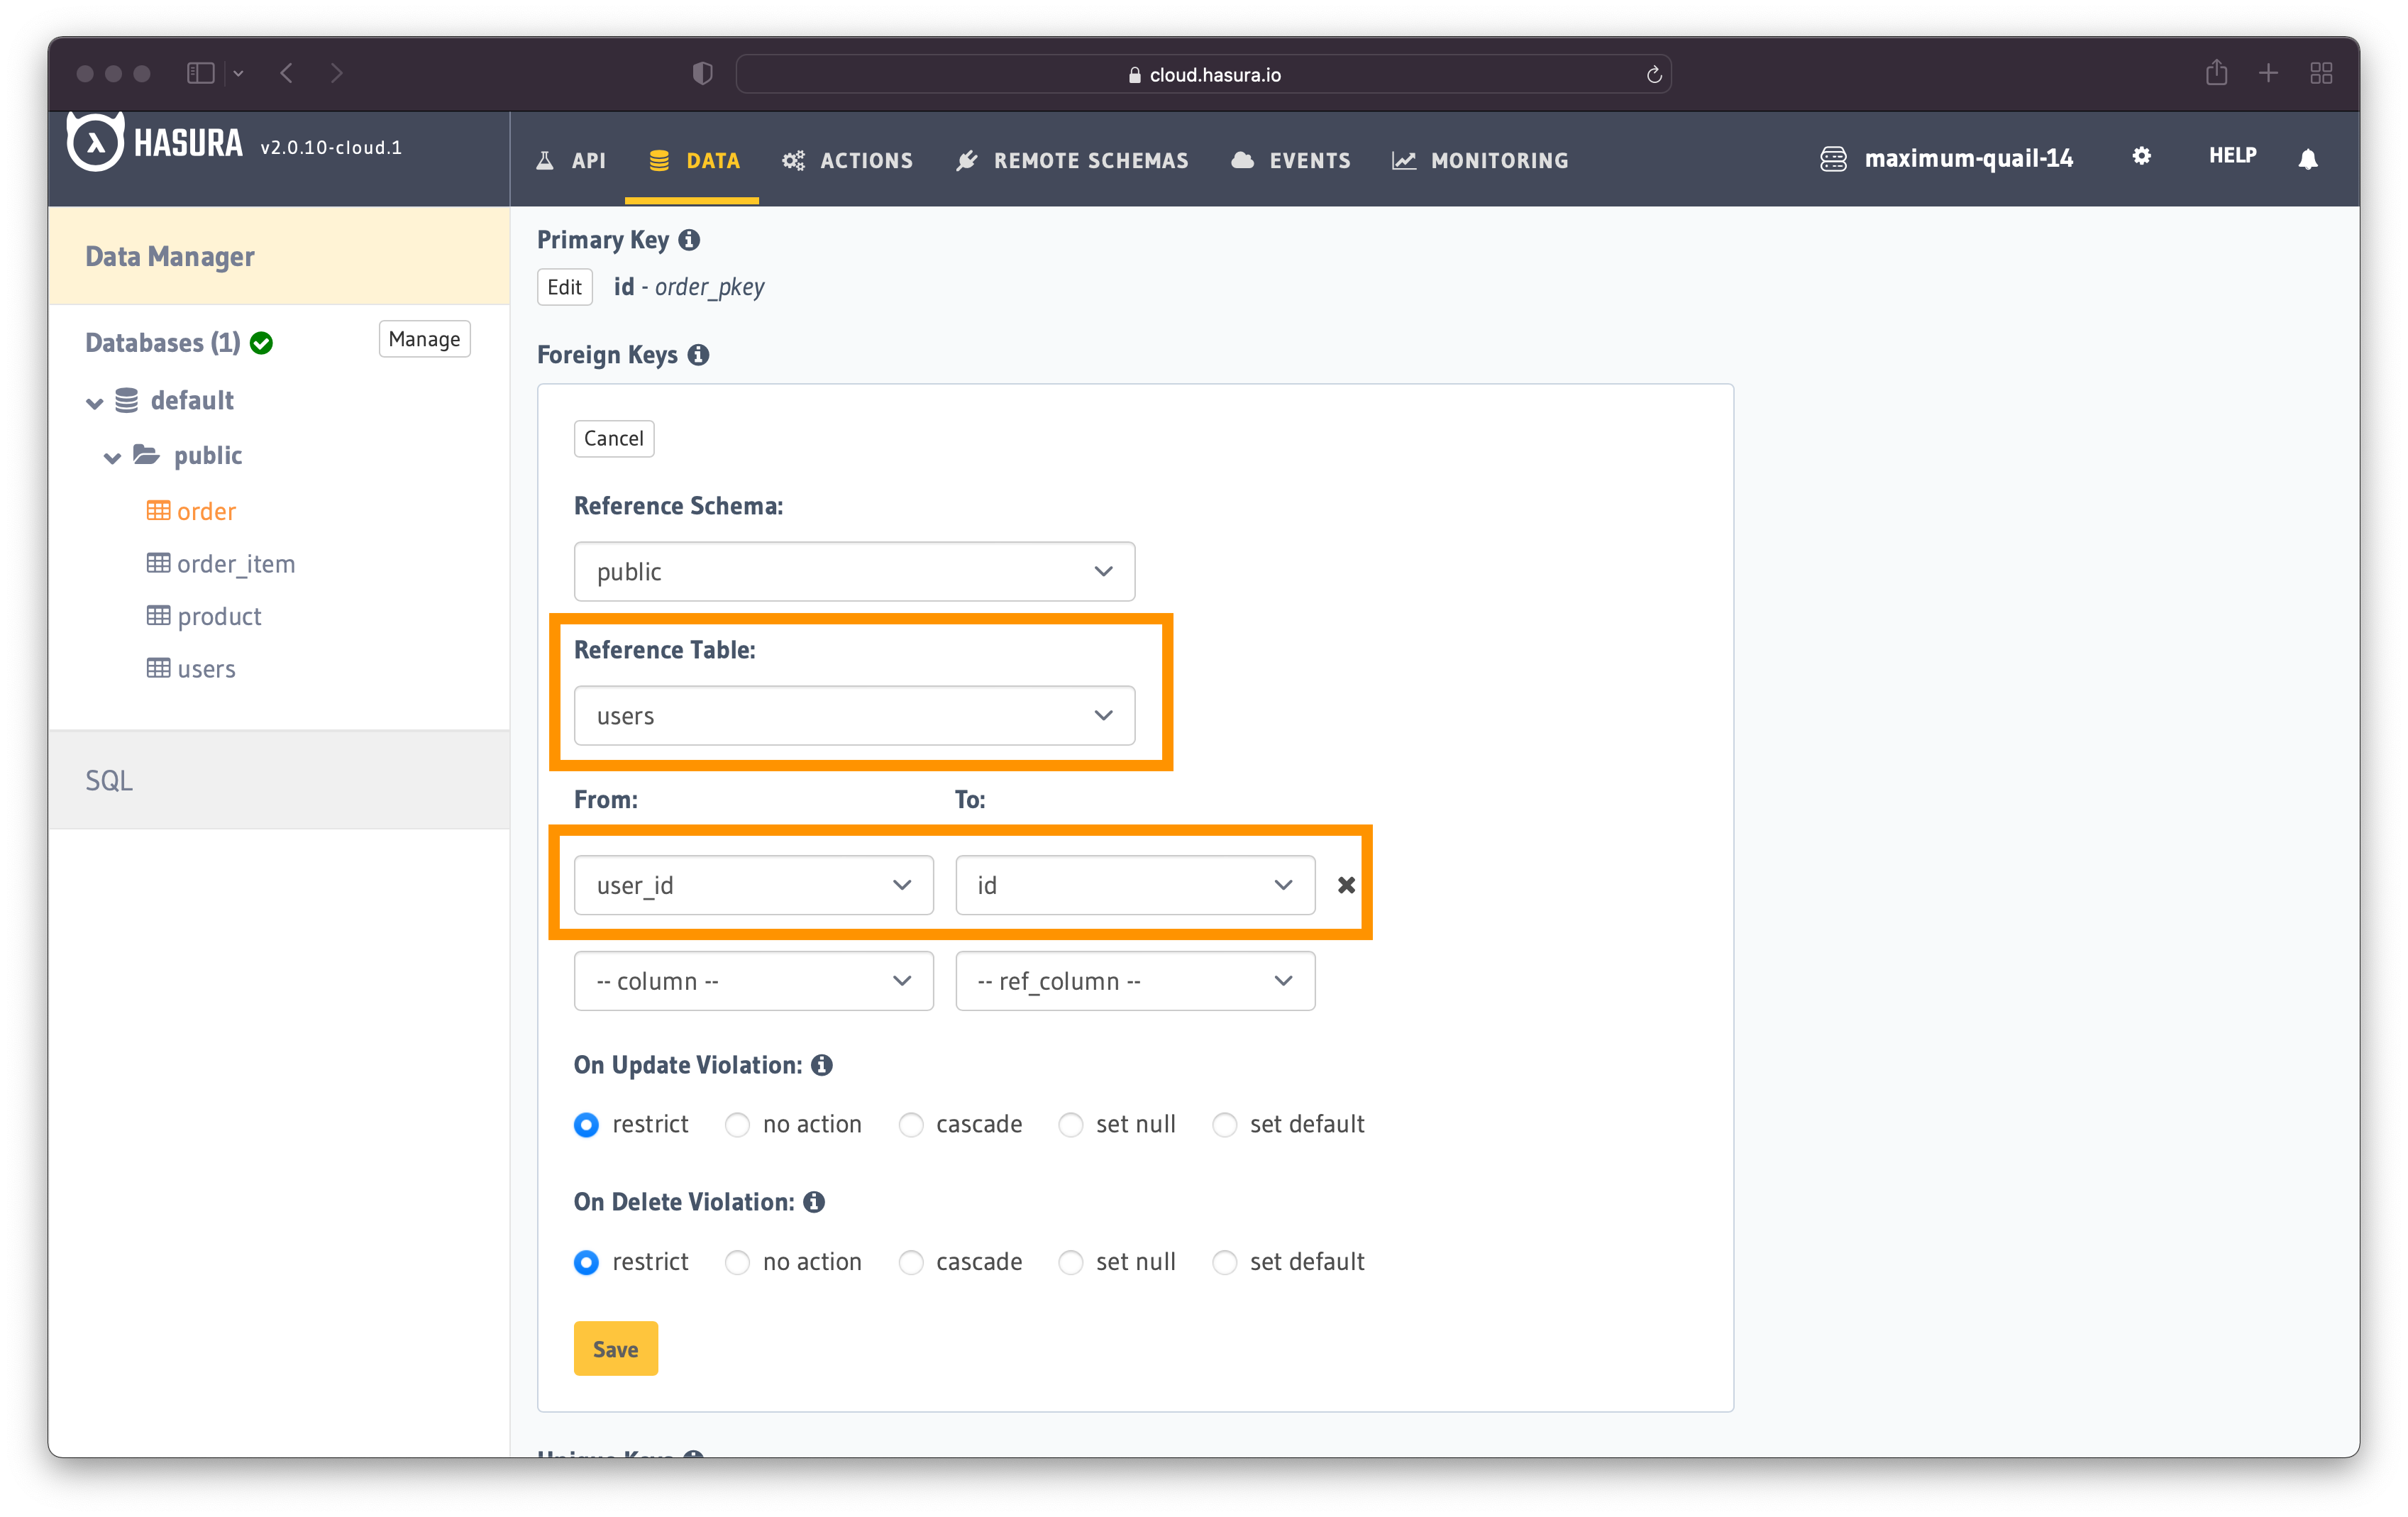
Figure 10 - Add Foreign Key
Once you are done, click on the "Save" button.
Hasura is smart and can suggest potential relationships based on the foreign keys added. Since you added the foreign key, Hasura knows that:
- one order belongs to only one user
- a user can have multiple orders
If you go to the "Relationship" tab (next to the "Modify" tab in figure 9), you should see the suggested relationship.
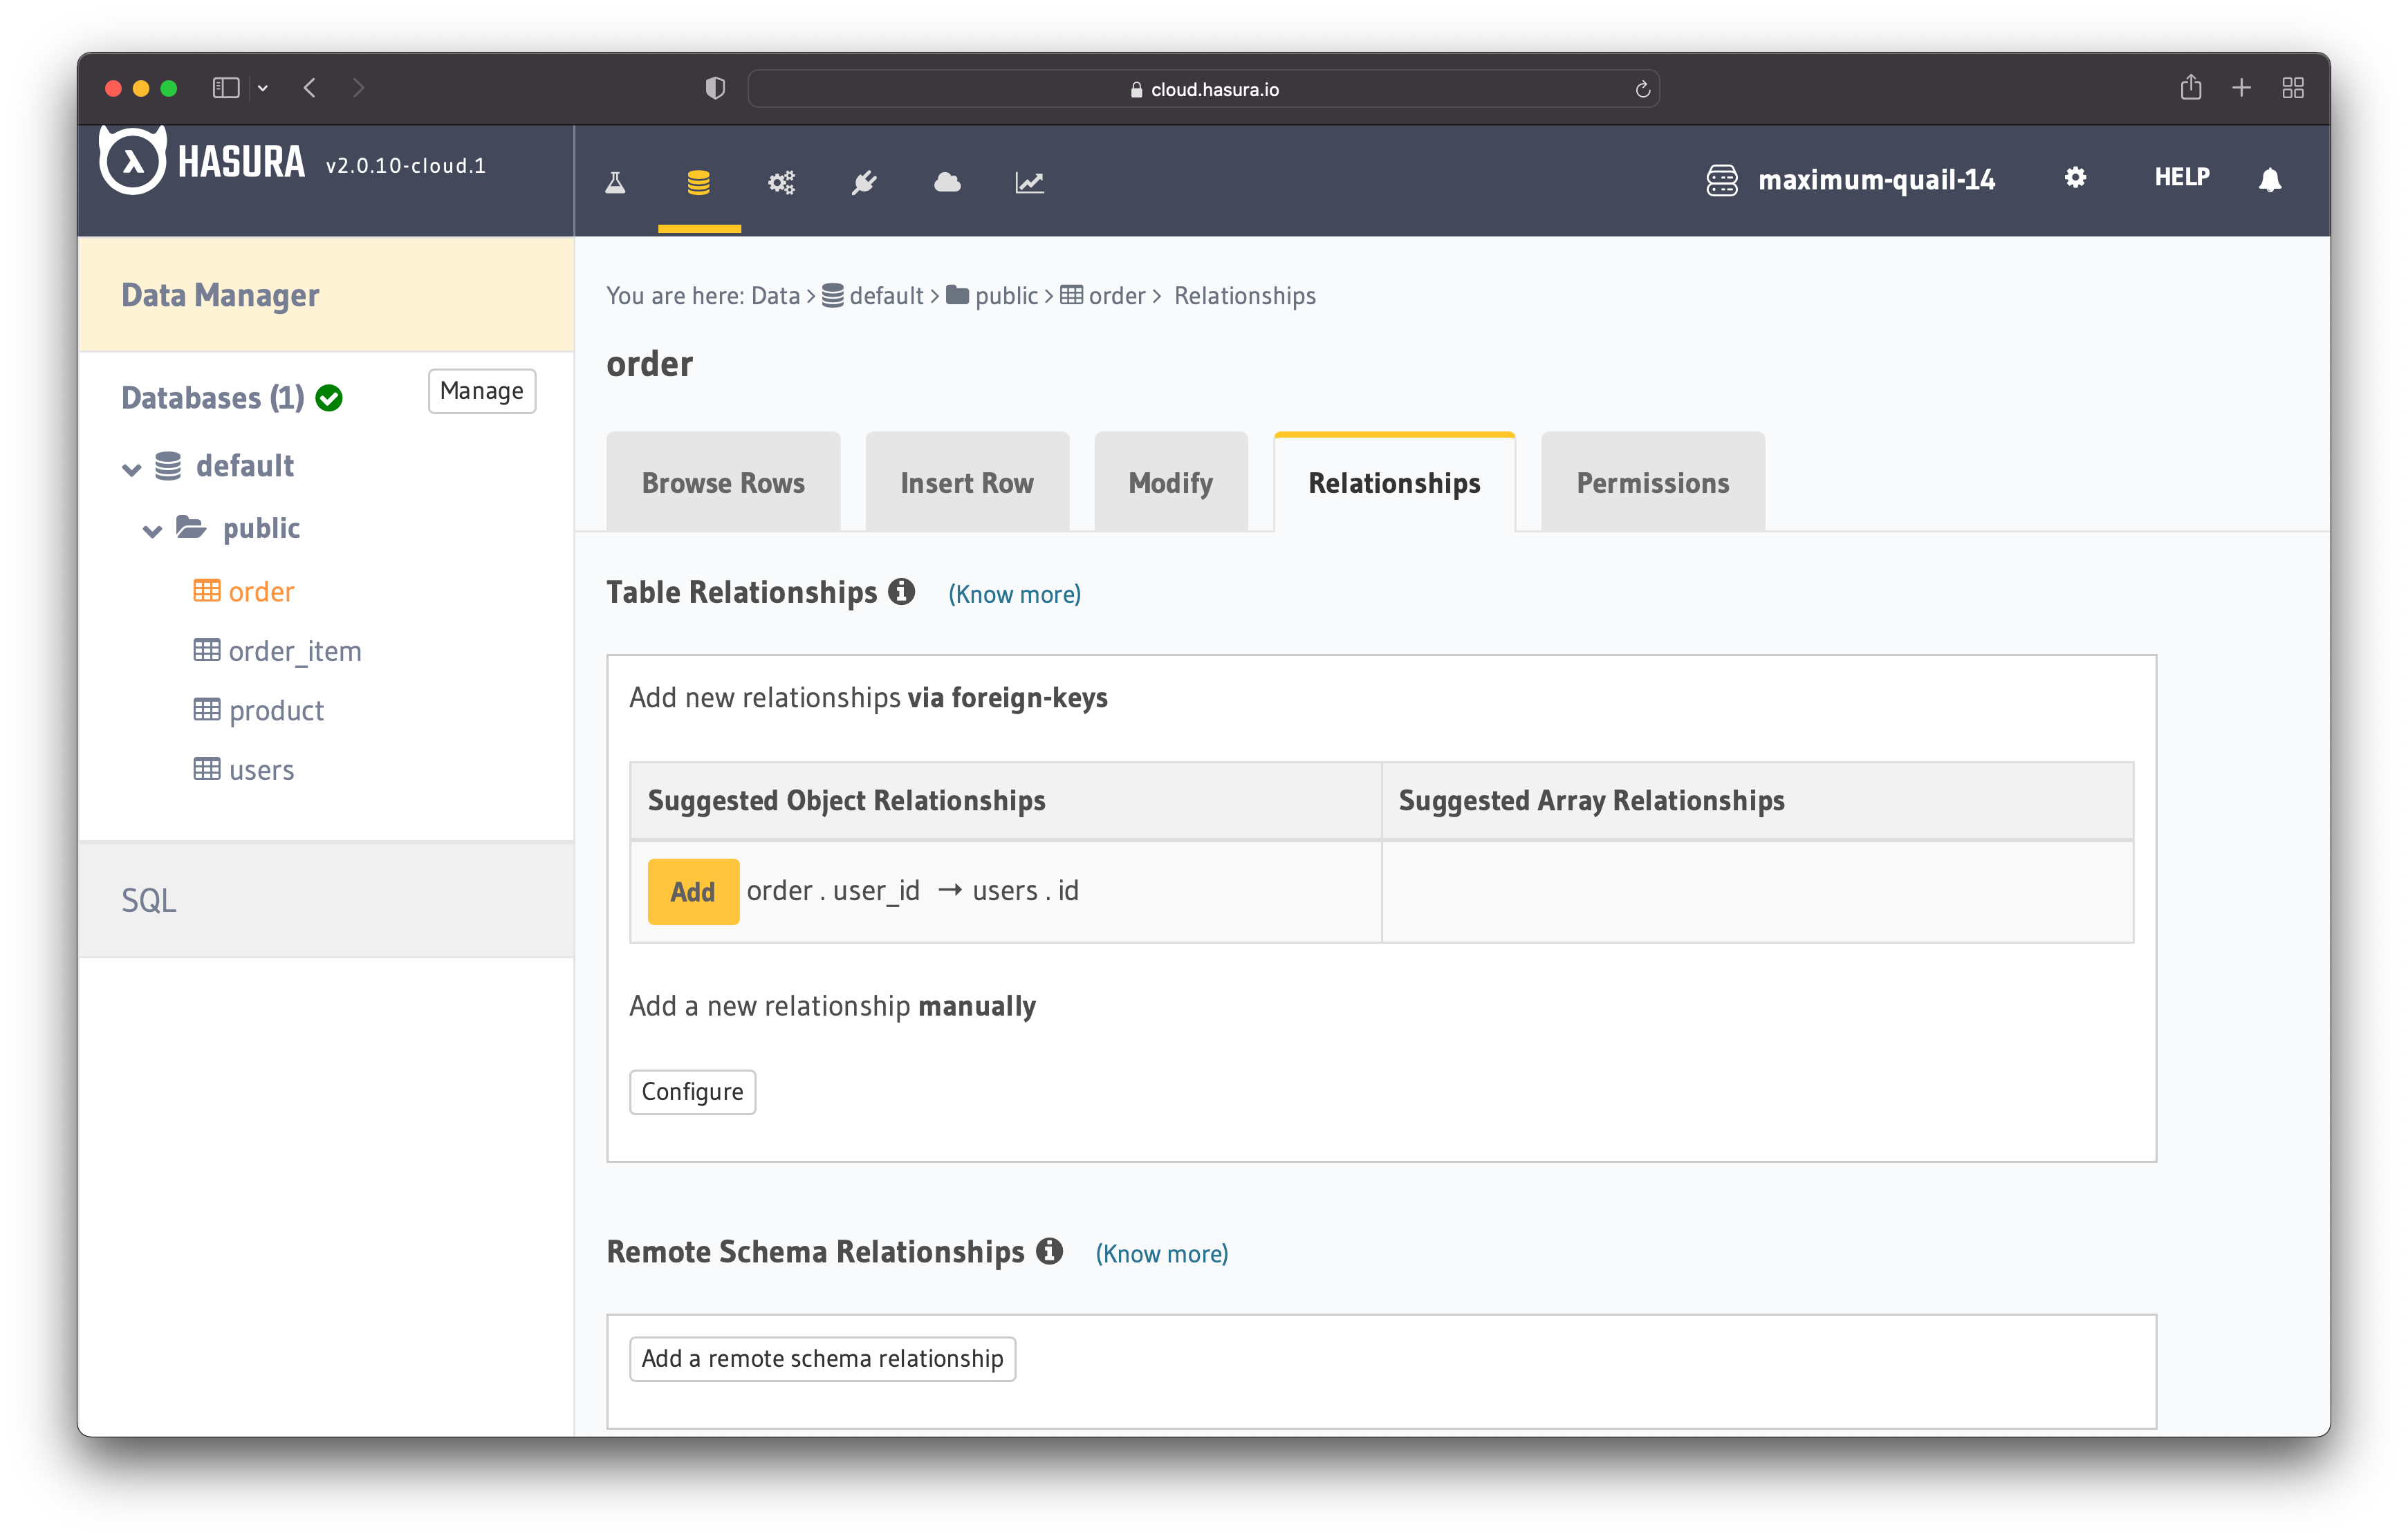
Figure 11 - Suggested Relationship
Click on the "Add" button, name your relationship (or leave the default name), press "Save" and you are halfway done.
Now go to the "Relationships" tab in the referenced table - "users".
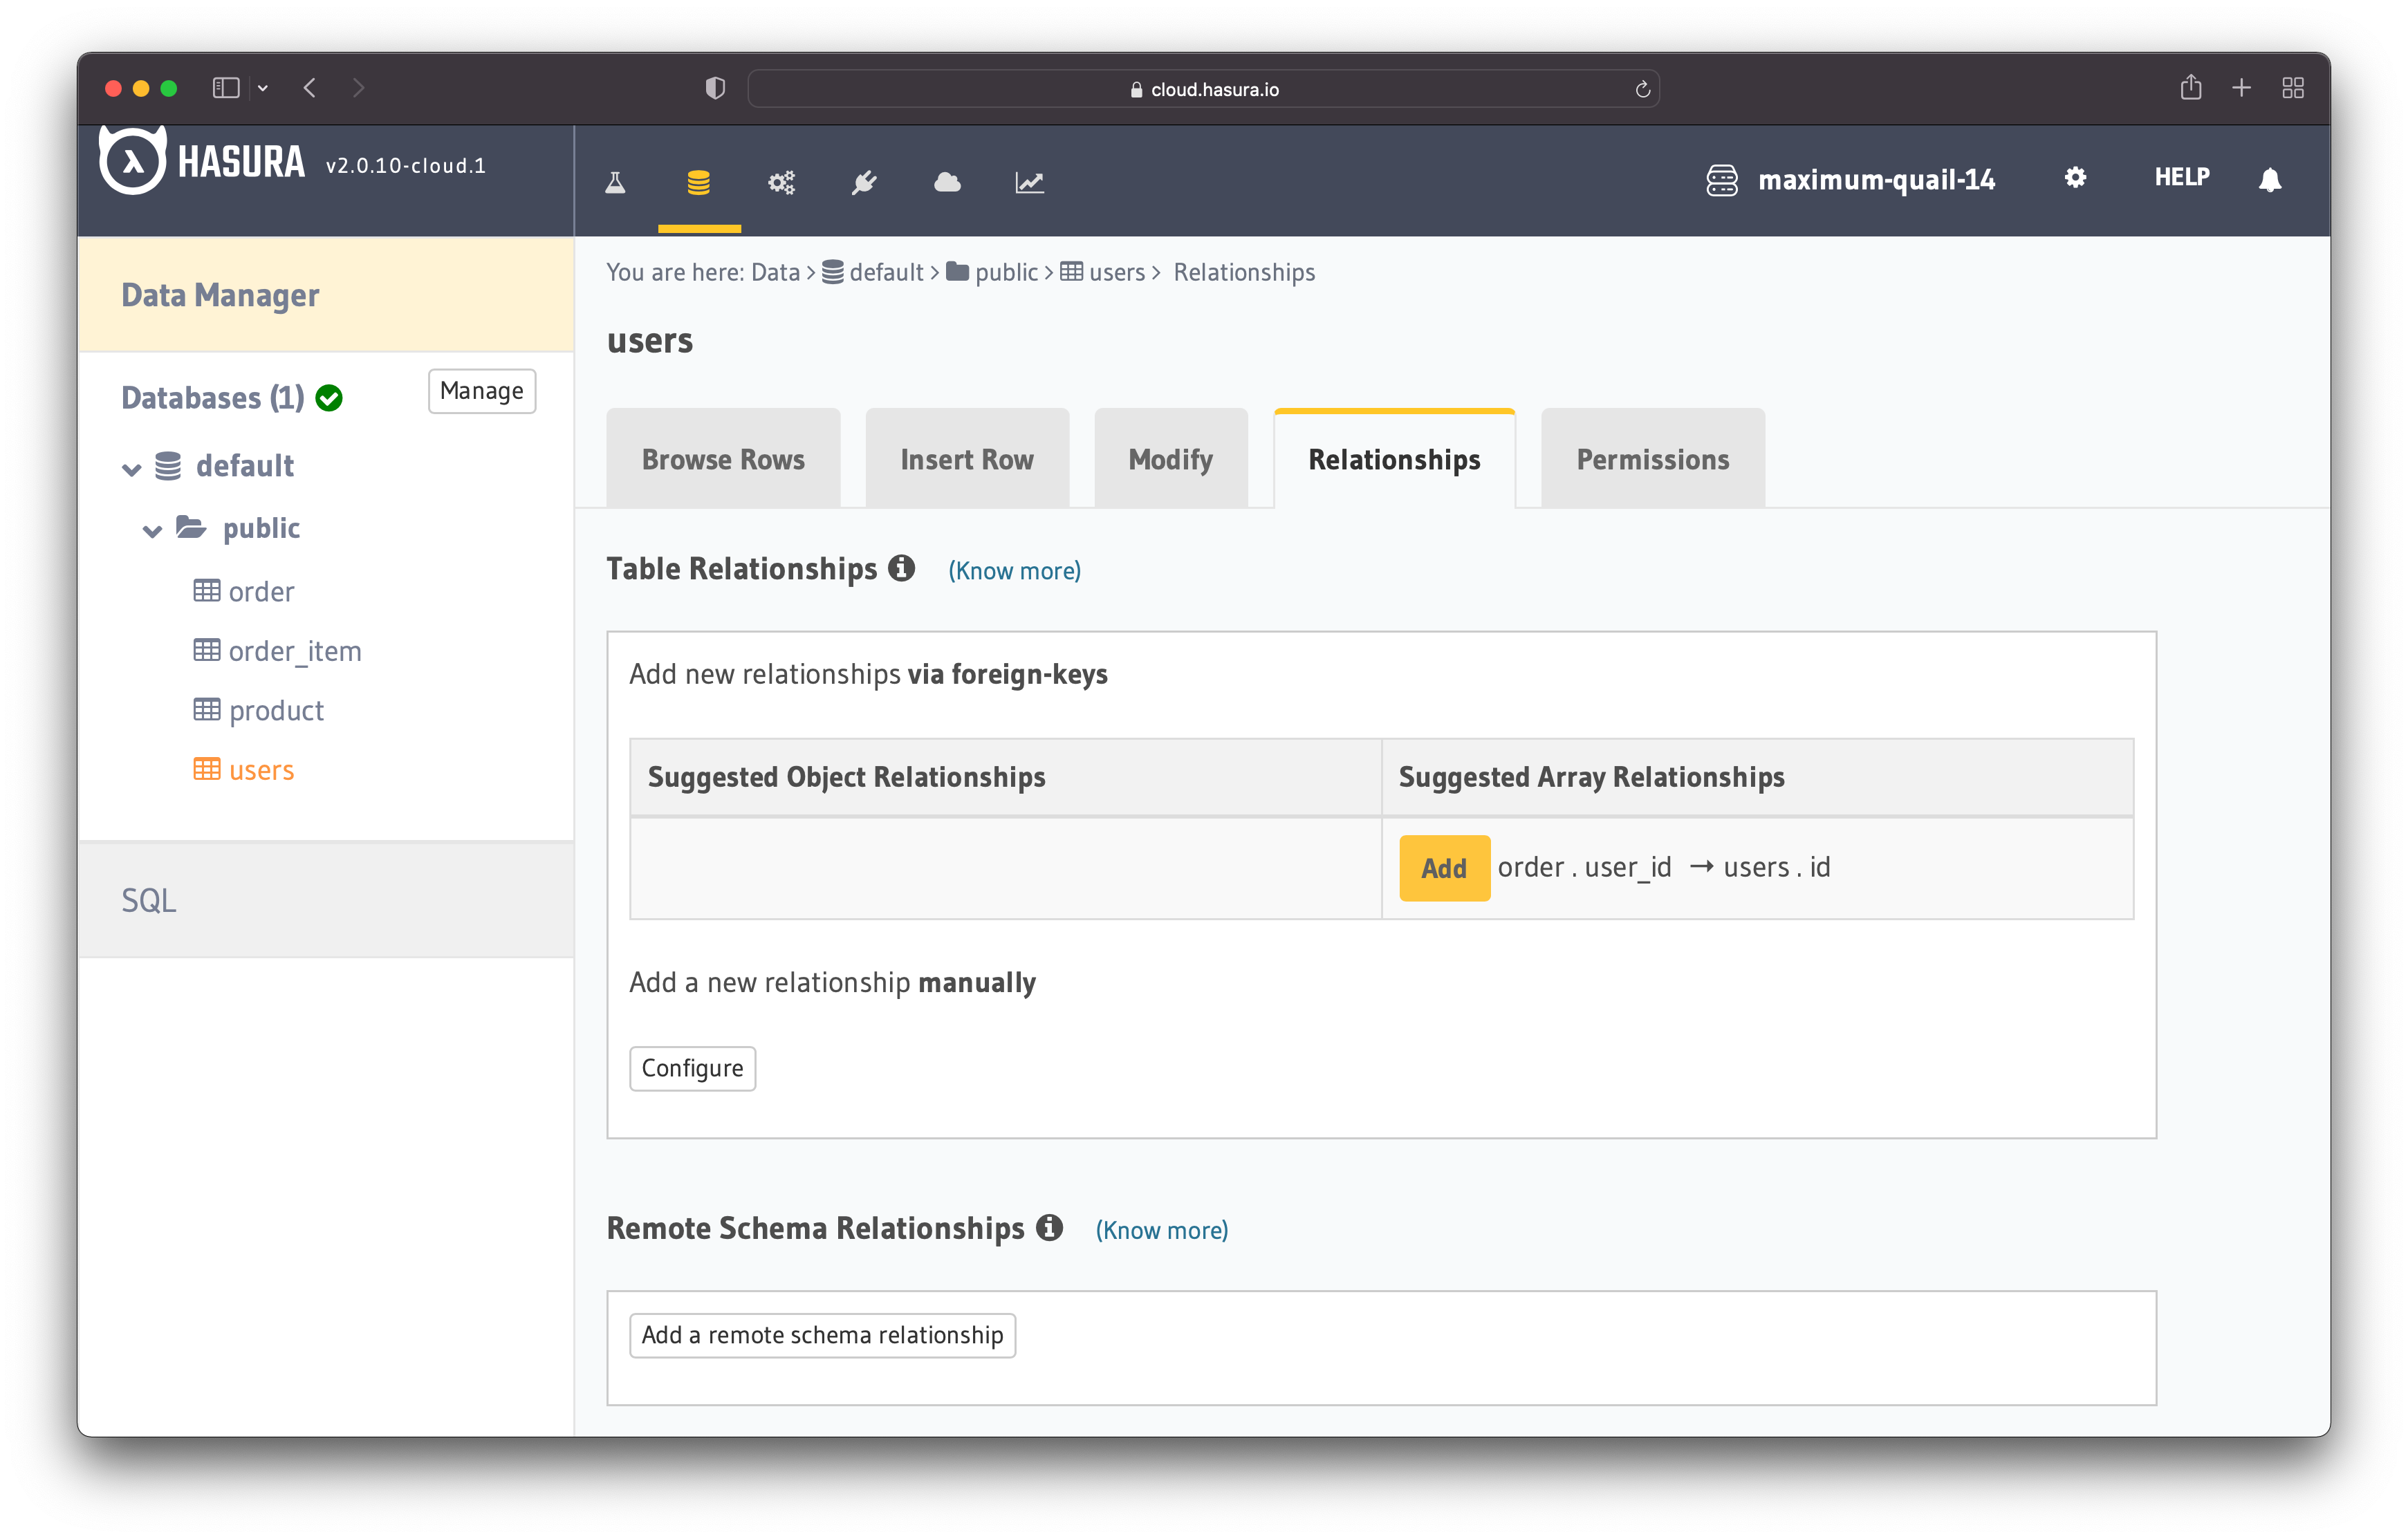
Figure 12 - Suggested Relationship
You can see that it suggests a new relationship once again. This time, the implied relationship is an "Array Relationship", meaning that a user can have an array of nested objects called orders. In simpler terms, the user can have multiple orders.
Order - Order Item Relationship
Building the relationship between the tables "order" and "order_item" is done similarly.
Go to the "order_item" table and add "order_id" as the foreign key for the "id" column in the "order" table.
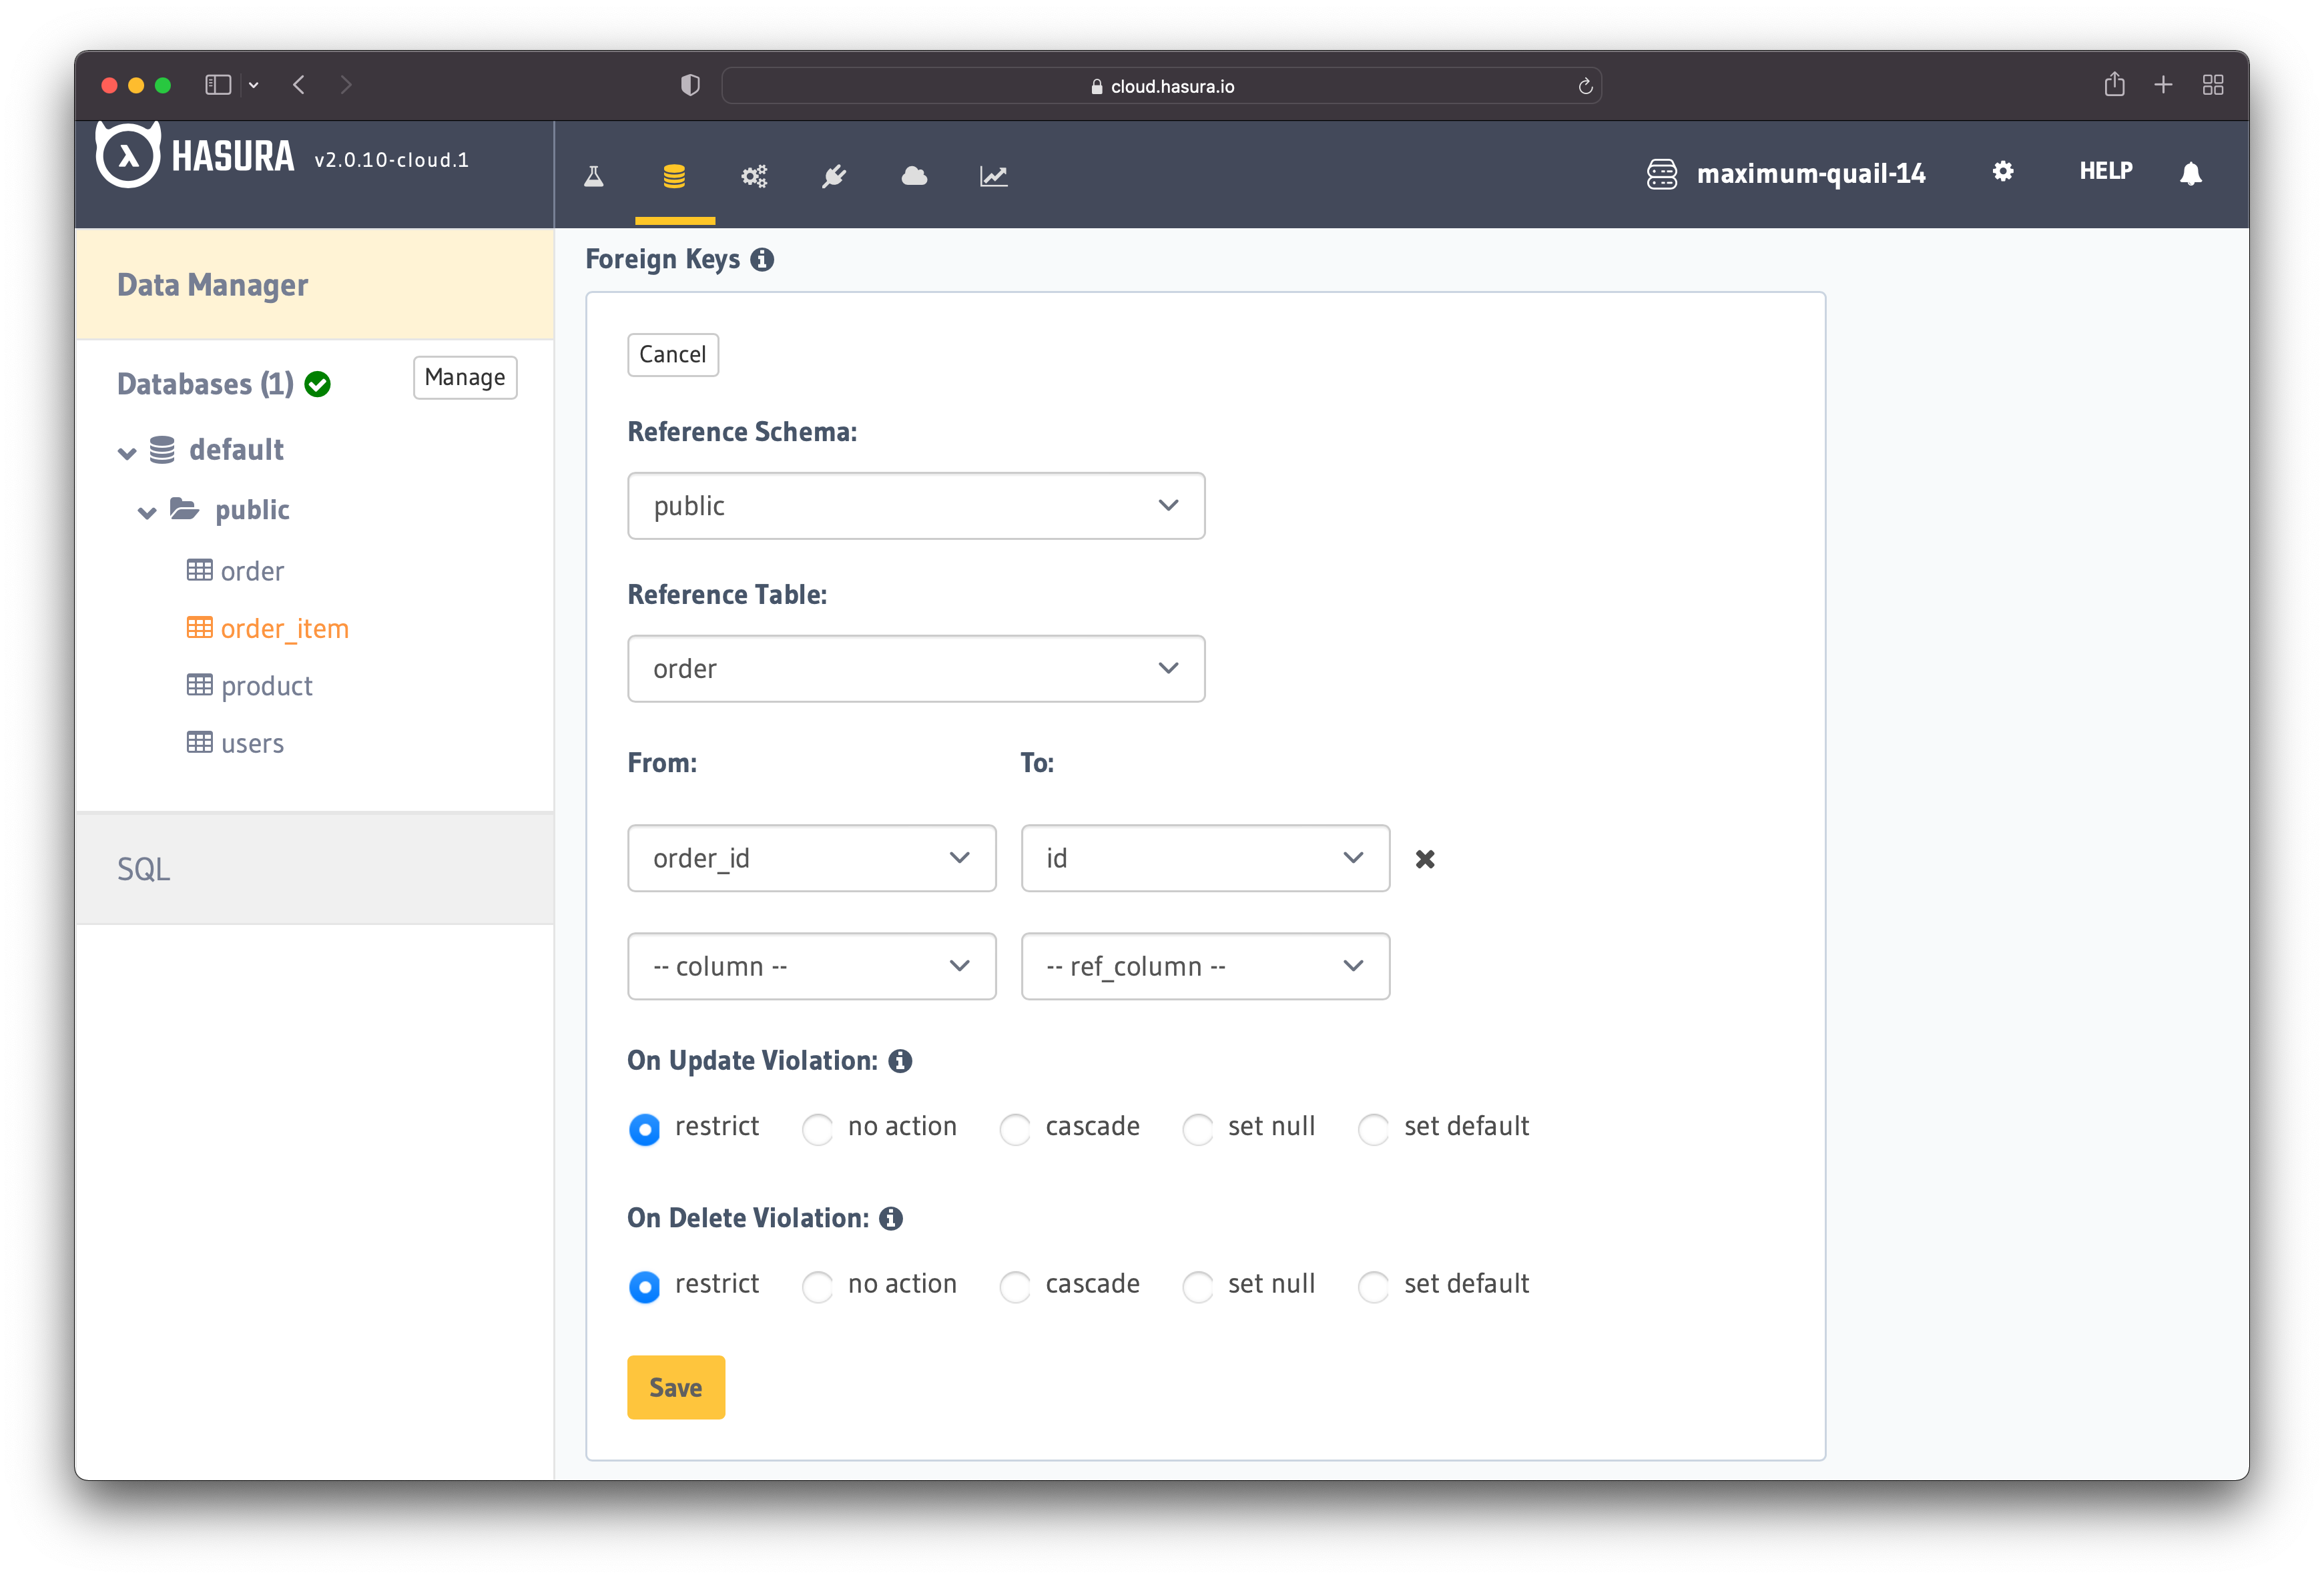
Figure 13 - Add Foreign Key
As an exercise, go to the "Relationships" tab from both tables and accept the suggested relationships. Remember that an order item can only belong to an order, while an order can have multiple items.
The relationship in the "order_item" table should be an Object Relationship, whereas the relationship in the "order" table should be an Array Relationship.
Order Item - Product Relationship
The last relationship is between the tables "order_item" and "product".
In the usual way, go to the "Modify" tab in the "order_item" table. Then add "product_id" as the foreign key for the "id" column in the "product" table.
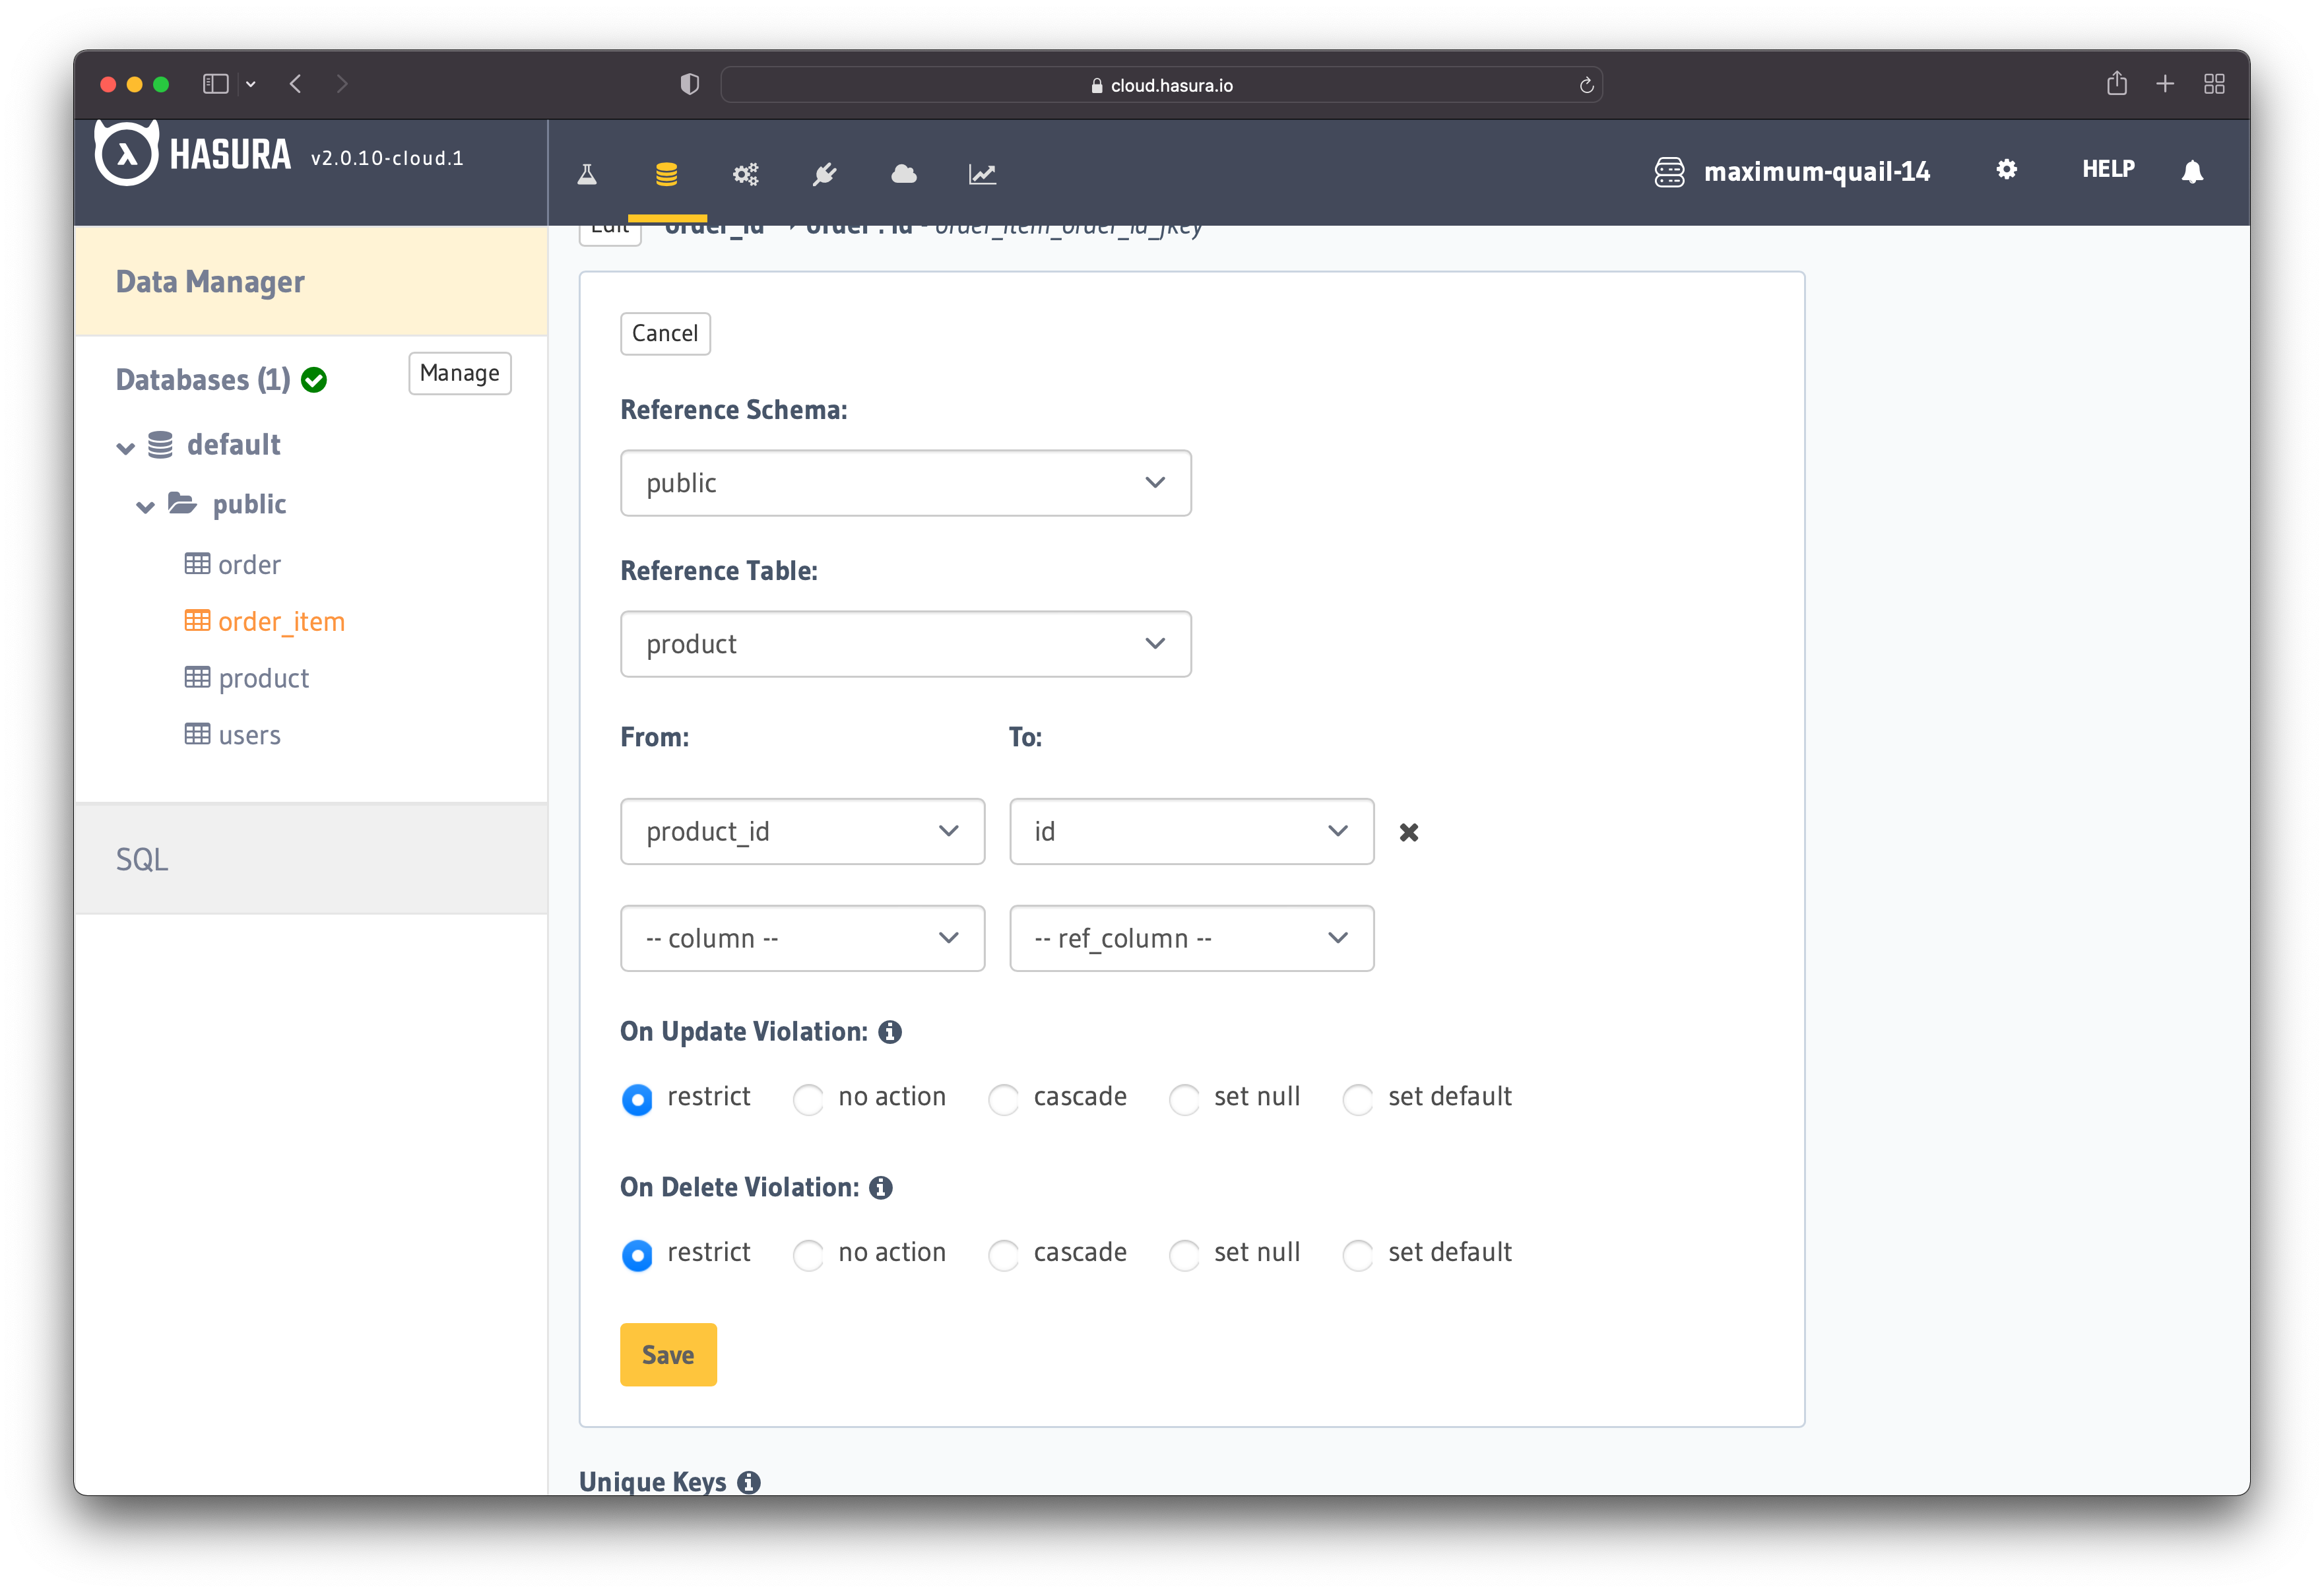
Figure 14 - Add Foreign Key
The next stage is to go to both tables' "Relationships" tab and accept the suggested relationships. The relationship in the "order_item" table should be an Object Relationship, whereas the relationship in the "product" table should be an Array Relationship.
The tables and relationships are in place. That means the only thing left is to set up the permissions!
For more in-depth information about creating relationships, I recommend checking the documentation on relationships.
Permission Rules
With Hasura, you can define access control rules at three levels:
- Role level
- Table level
- Action (Insert, Select, Update, Delete) level
In this article, you will use all of them.
Users Table Permissions
Let's define the permissions rules for the "users" table. Firstly, select the "users" table and then click on the "Permissions" tab.
Once you are on the permissions page, add a new role called user. The arrow in figure 15 illustrates where you should add the new role.
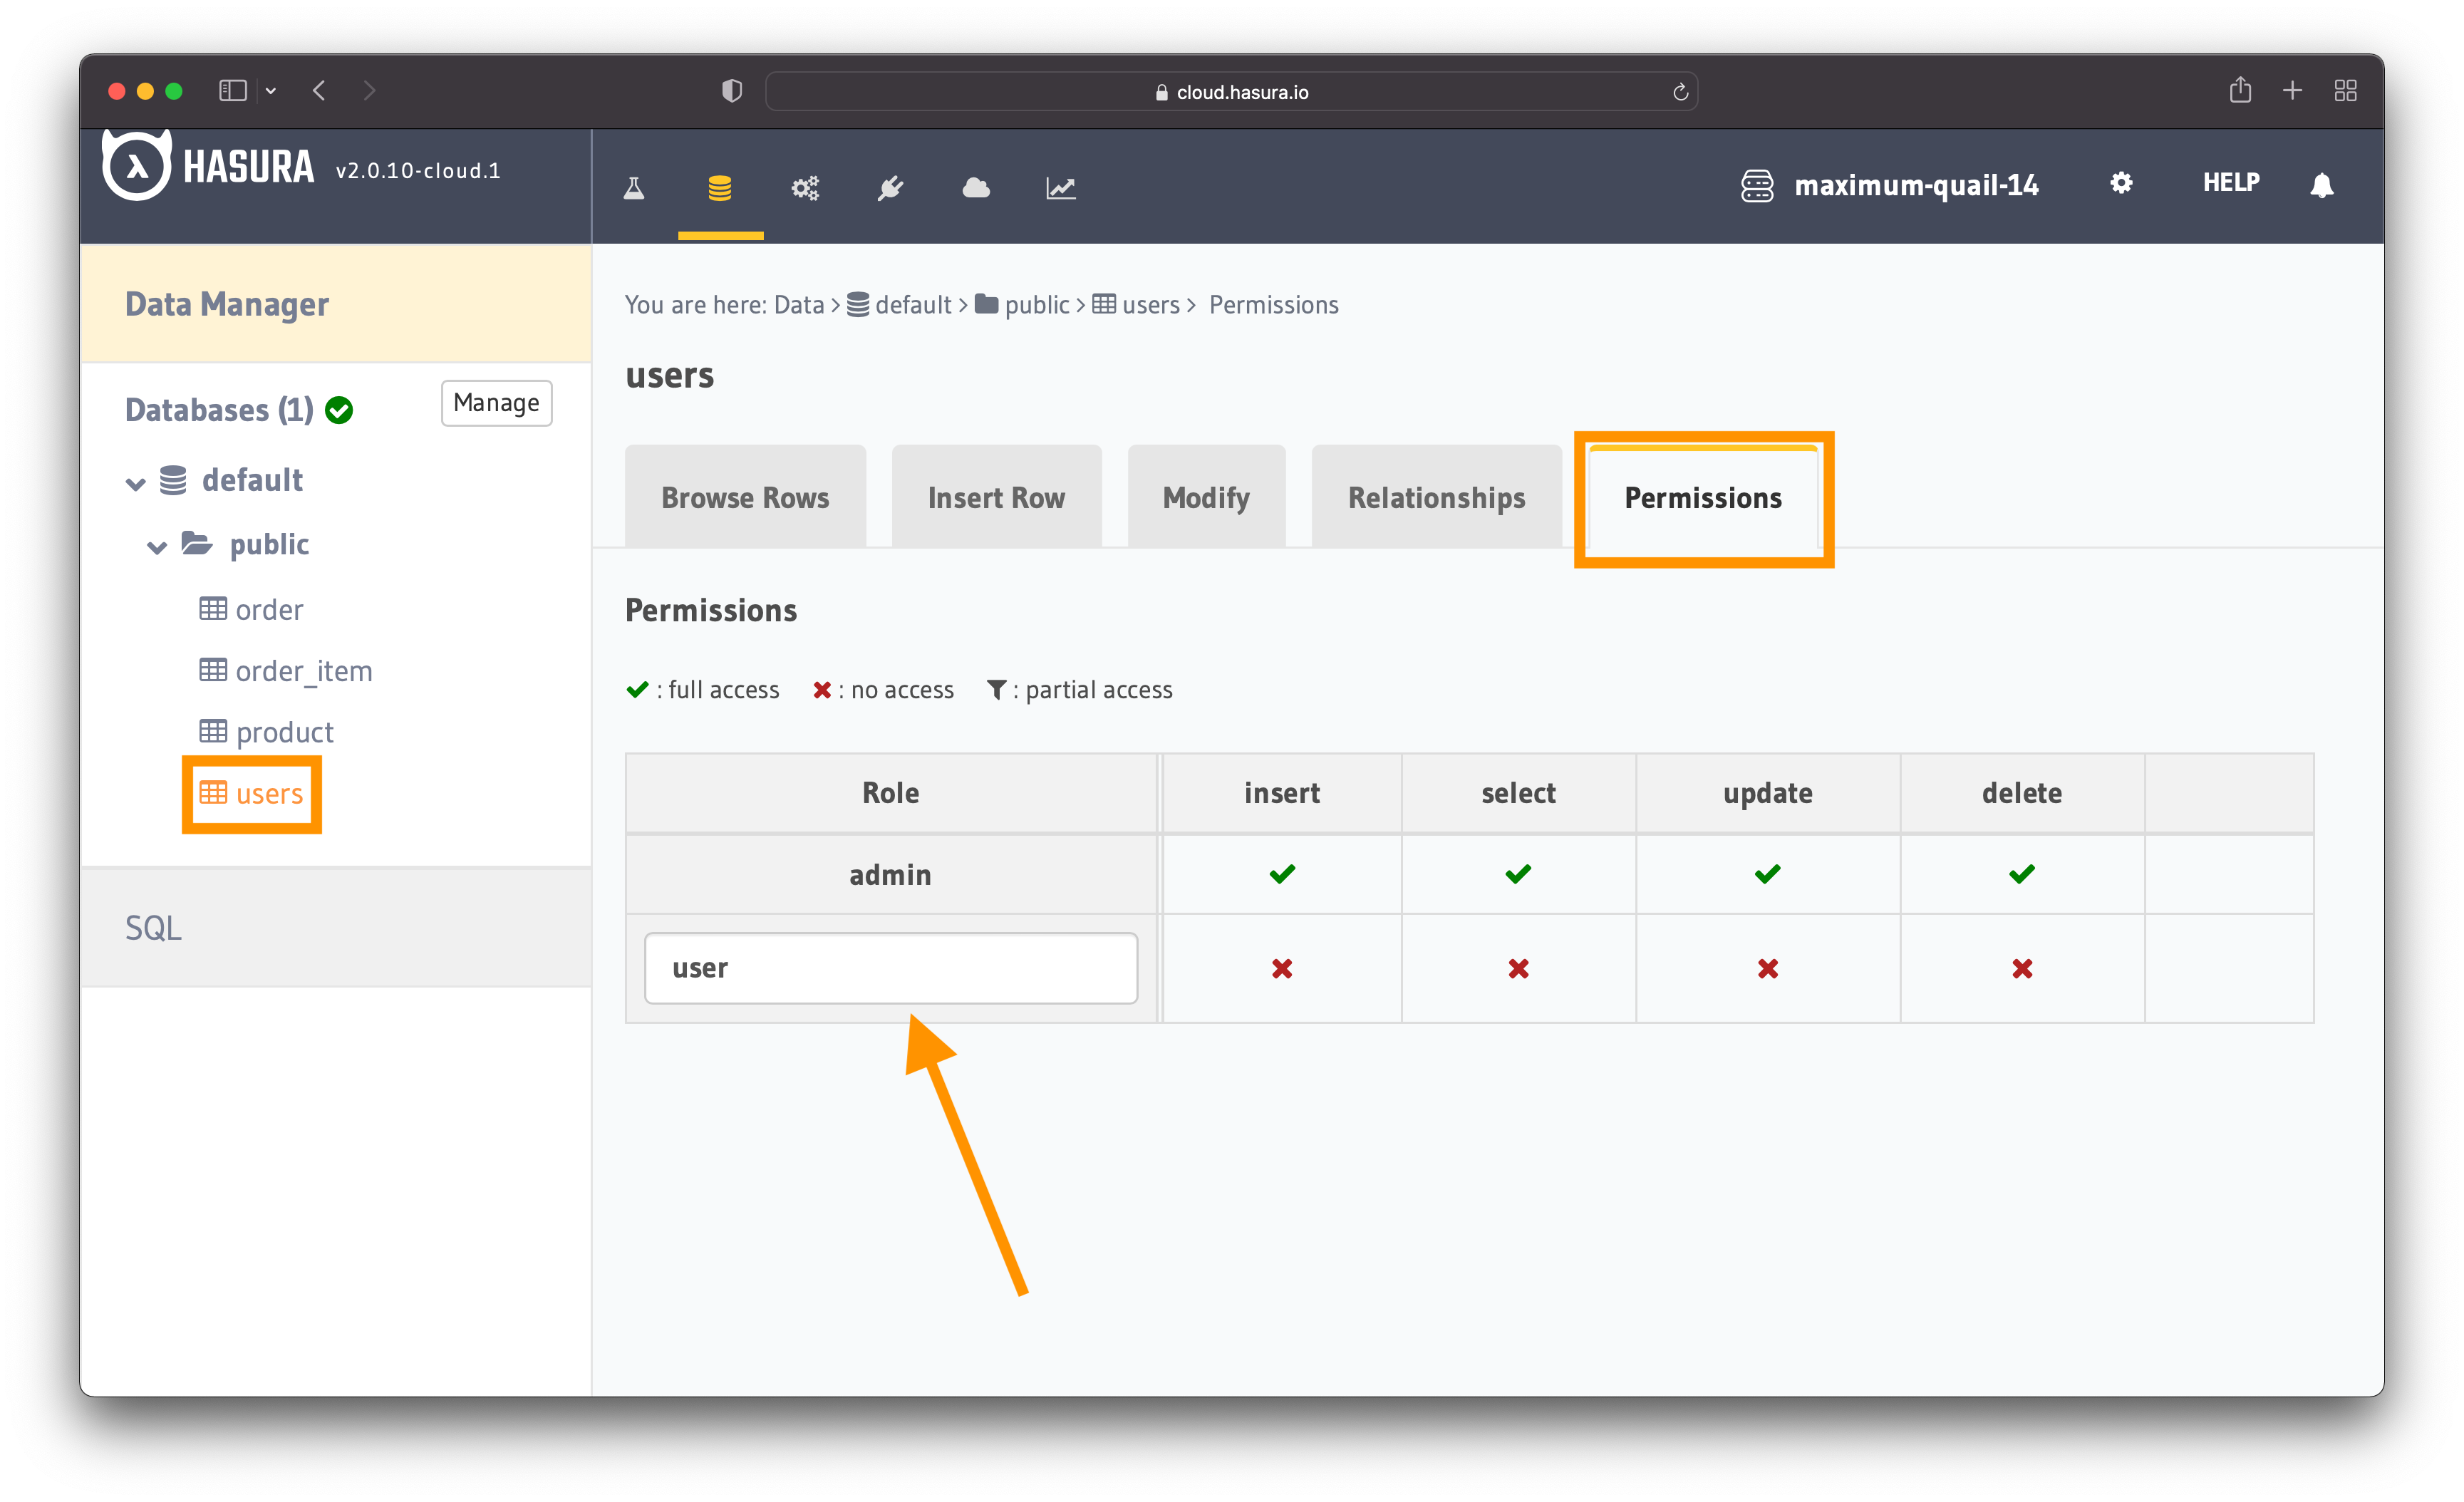
Figure 15 - Users Table Permissions
Before moving further, let's define what users should be able to do:
- Users should be able to see only their details and not those of other users.
- Users should be able to update their records.
Based on these rules, you need to update only the actions "select" and "update".
Select (Read)
Click on "select" and you will be able to add the rules.
As shown in figure 16, you need to add the following custom check:
{
    "id": {
         "_eq": "X-Hasura-User-Id"
     }
}
You can add the check by using the dropdowns - you do not need to write it manually. The above check ensures that users can only access their records.
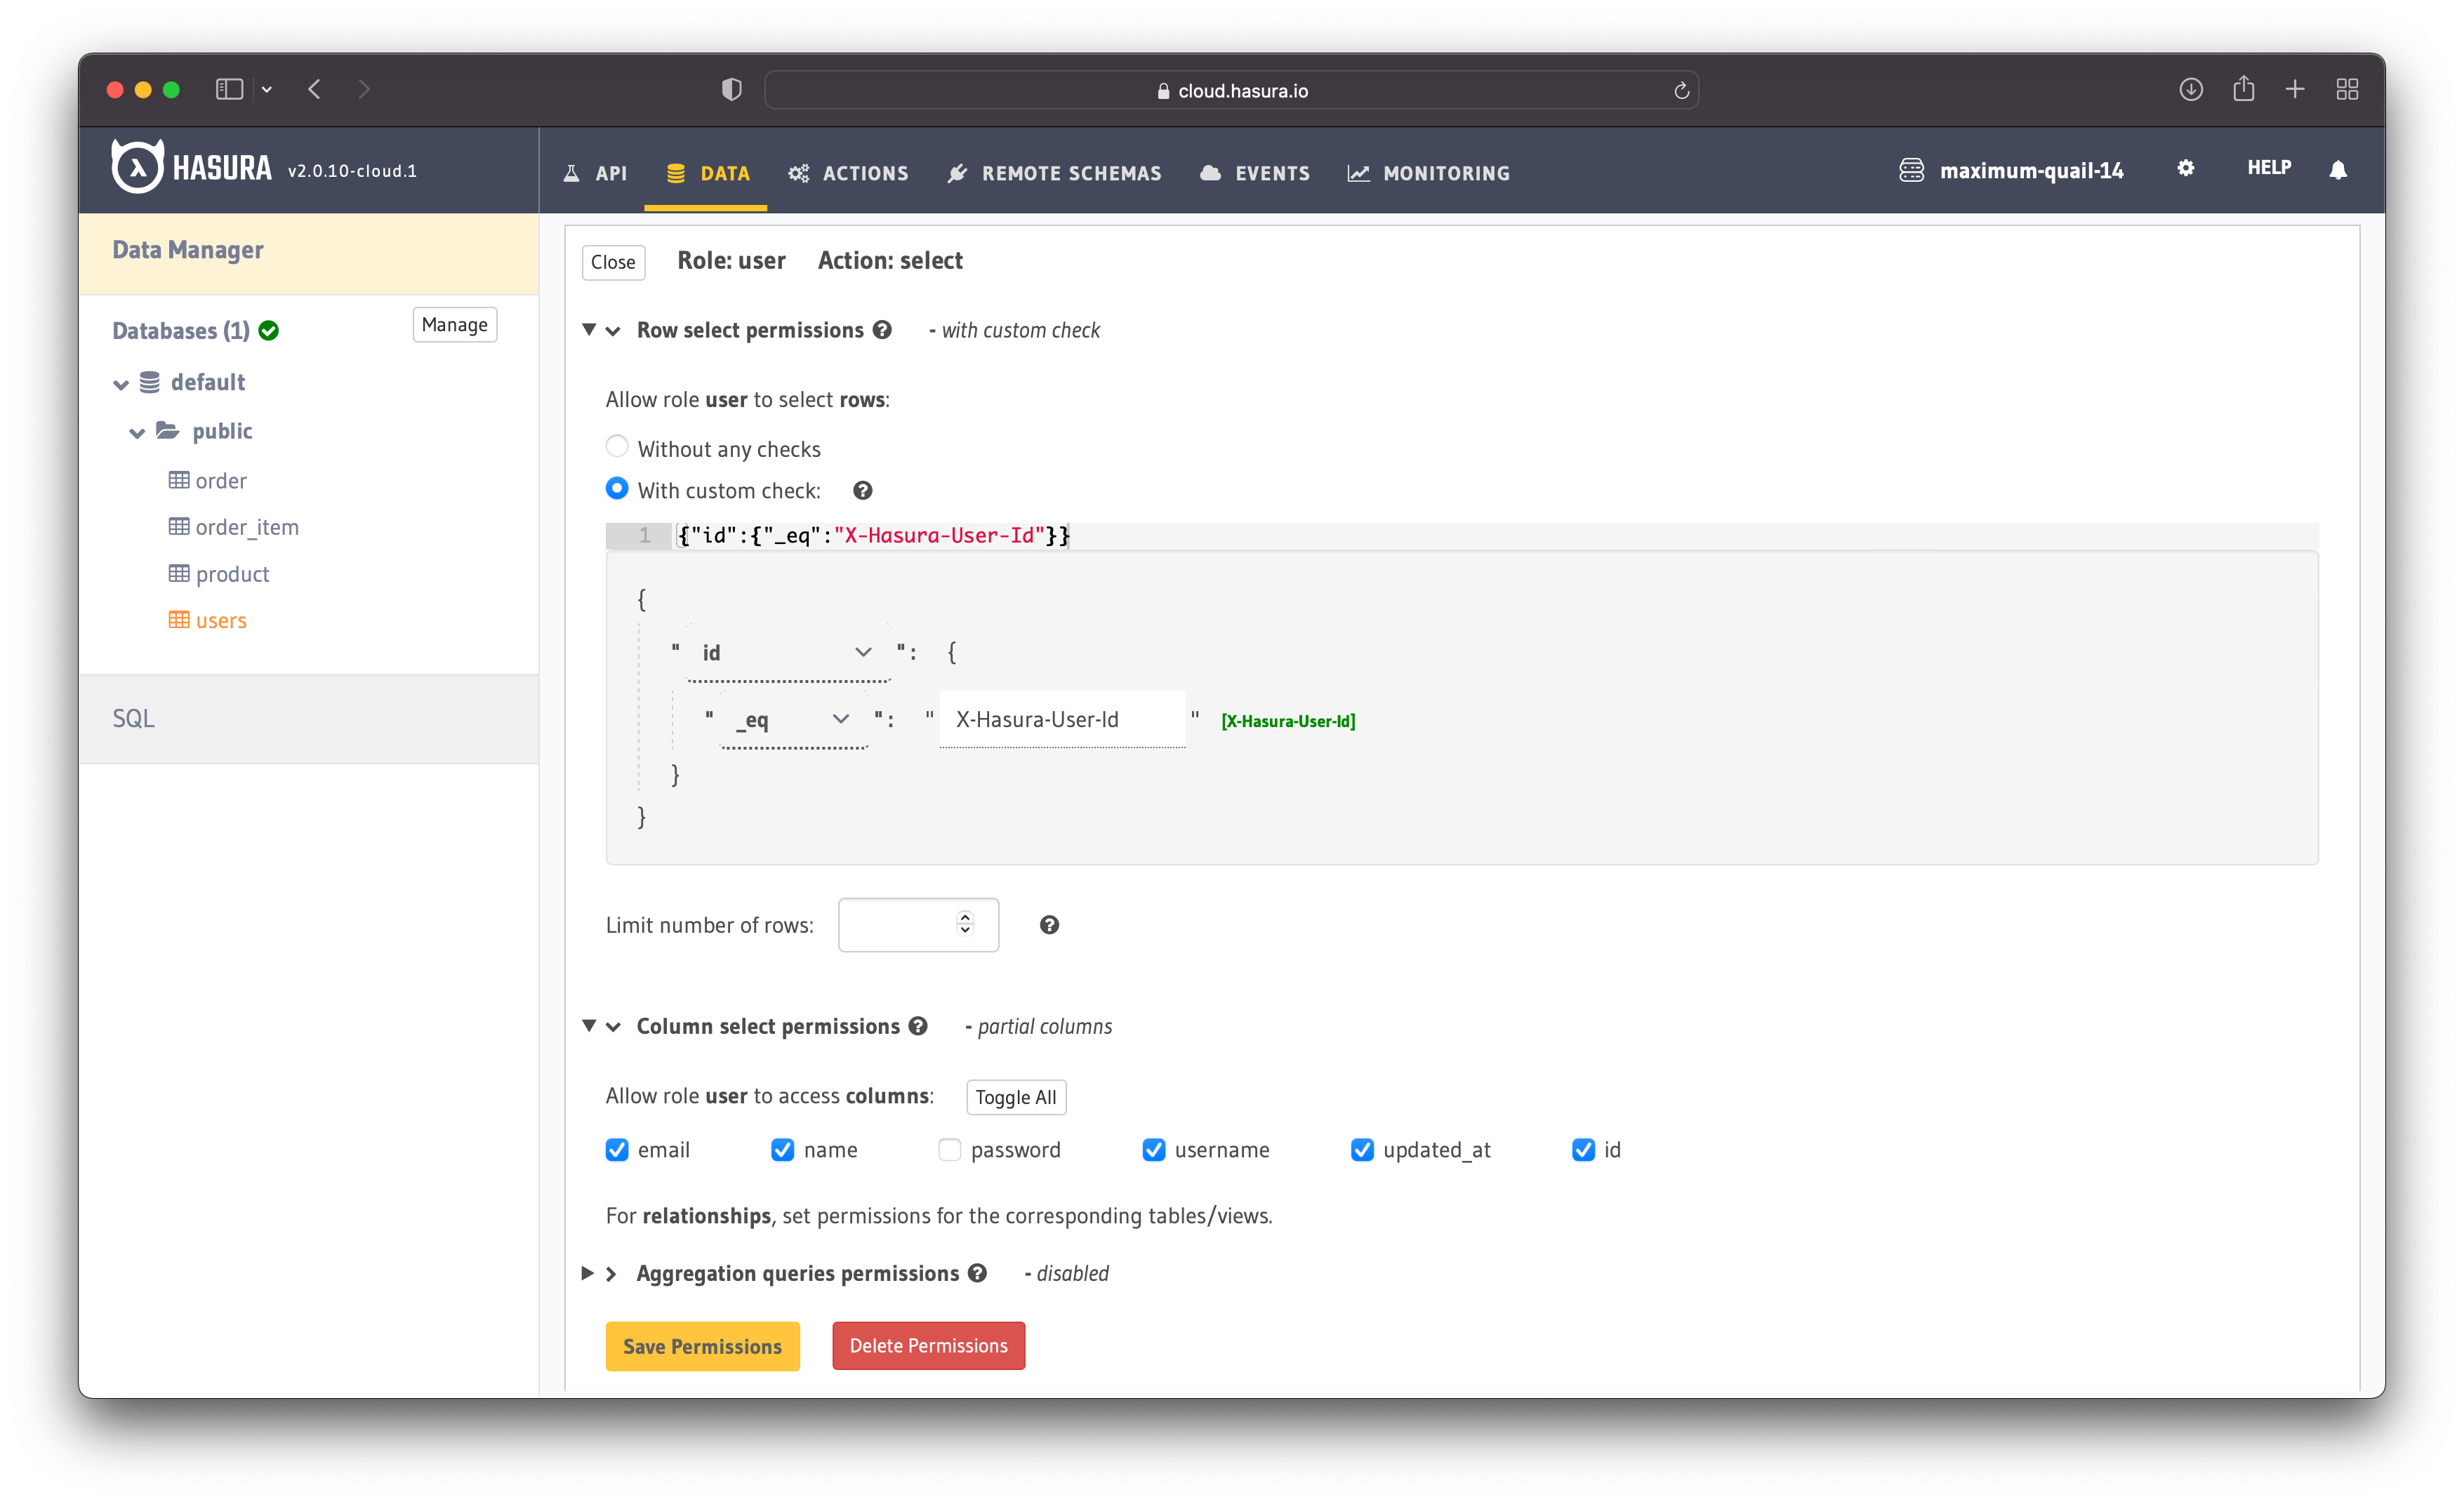
Figure 16 - Defined Permission Rules
Make sure you also check the fields you want to make available to the users. In this case, the users can see their:
- id
- name
- username
- when it was last updated
Save the permissions once you are done.
Update
One helpful thing from Hasura is that you can reuse custom checks. Choose the option With same custom check as select for the "update" action, as shown in figure 17.
Also, users should be able to update everything except the ID. Check all the boxes except the ID and save the permissions.
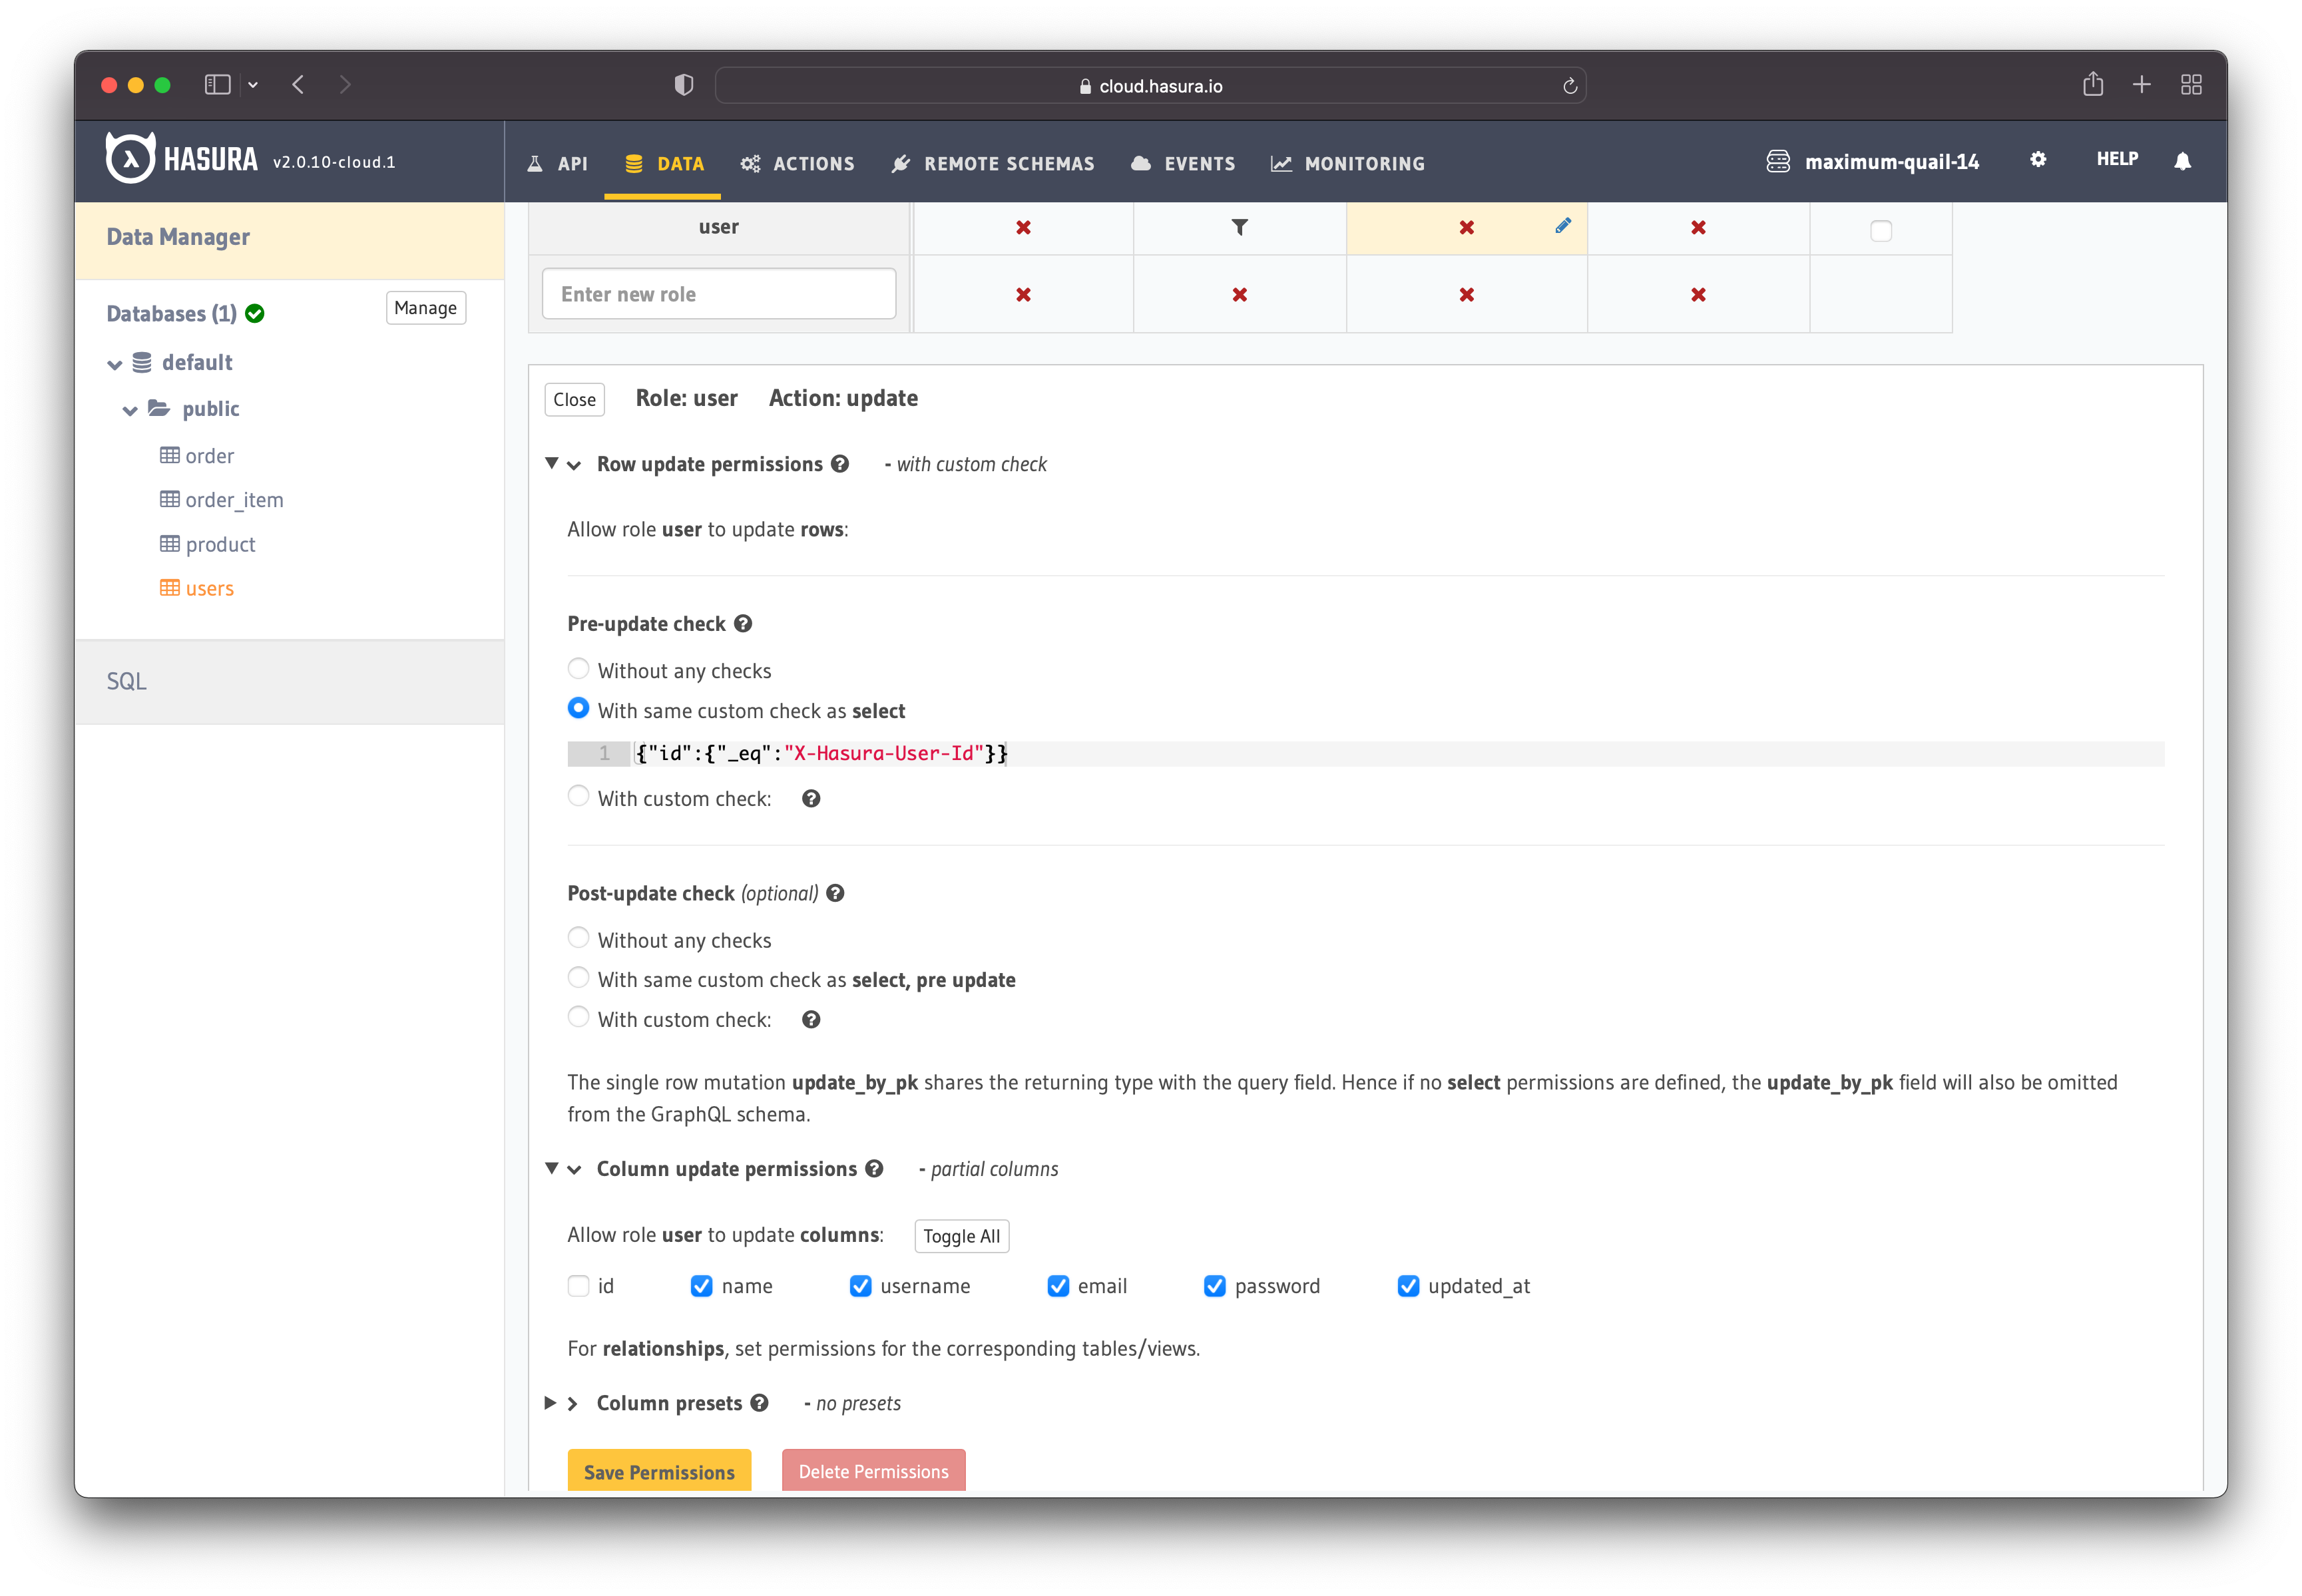
Figure 17 - Define Permission Rules
The rules for the users are set and by this point, you have already defined access control rules at all three levels.
Insert - Public Role
Later, you will add additional functionality that allows people to register. The registration process will hash people's passwords and add their details to the database.
Since the "users" role refers to registered people, you need another role for unauthenticated people. You can call it "public".
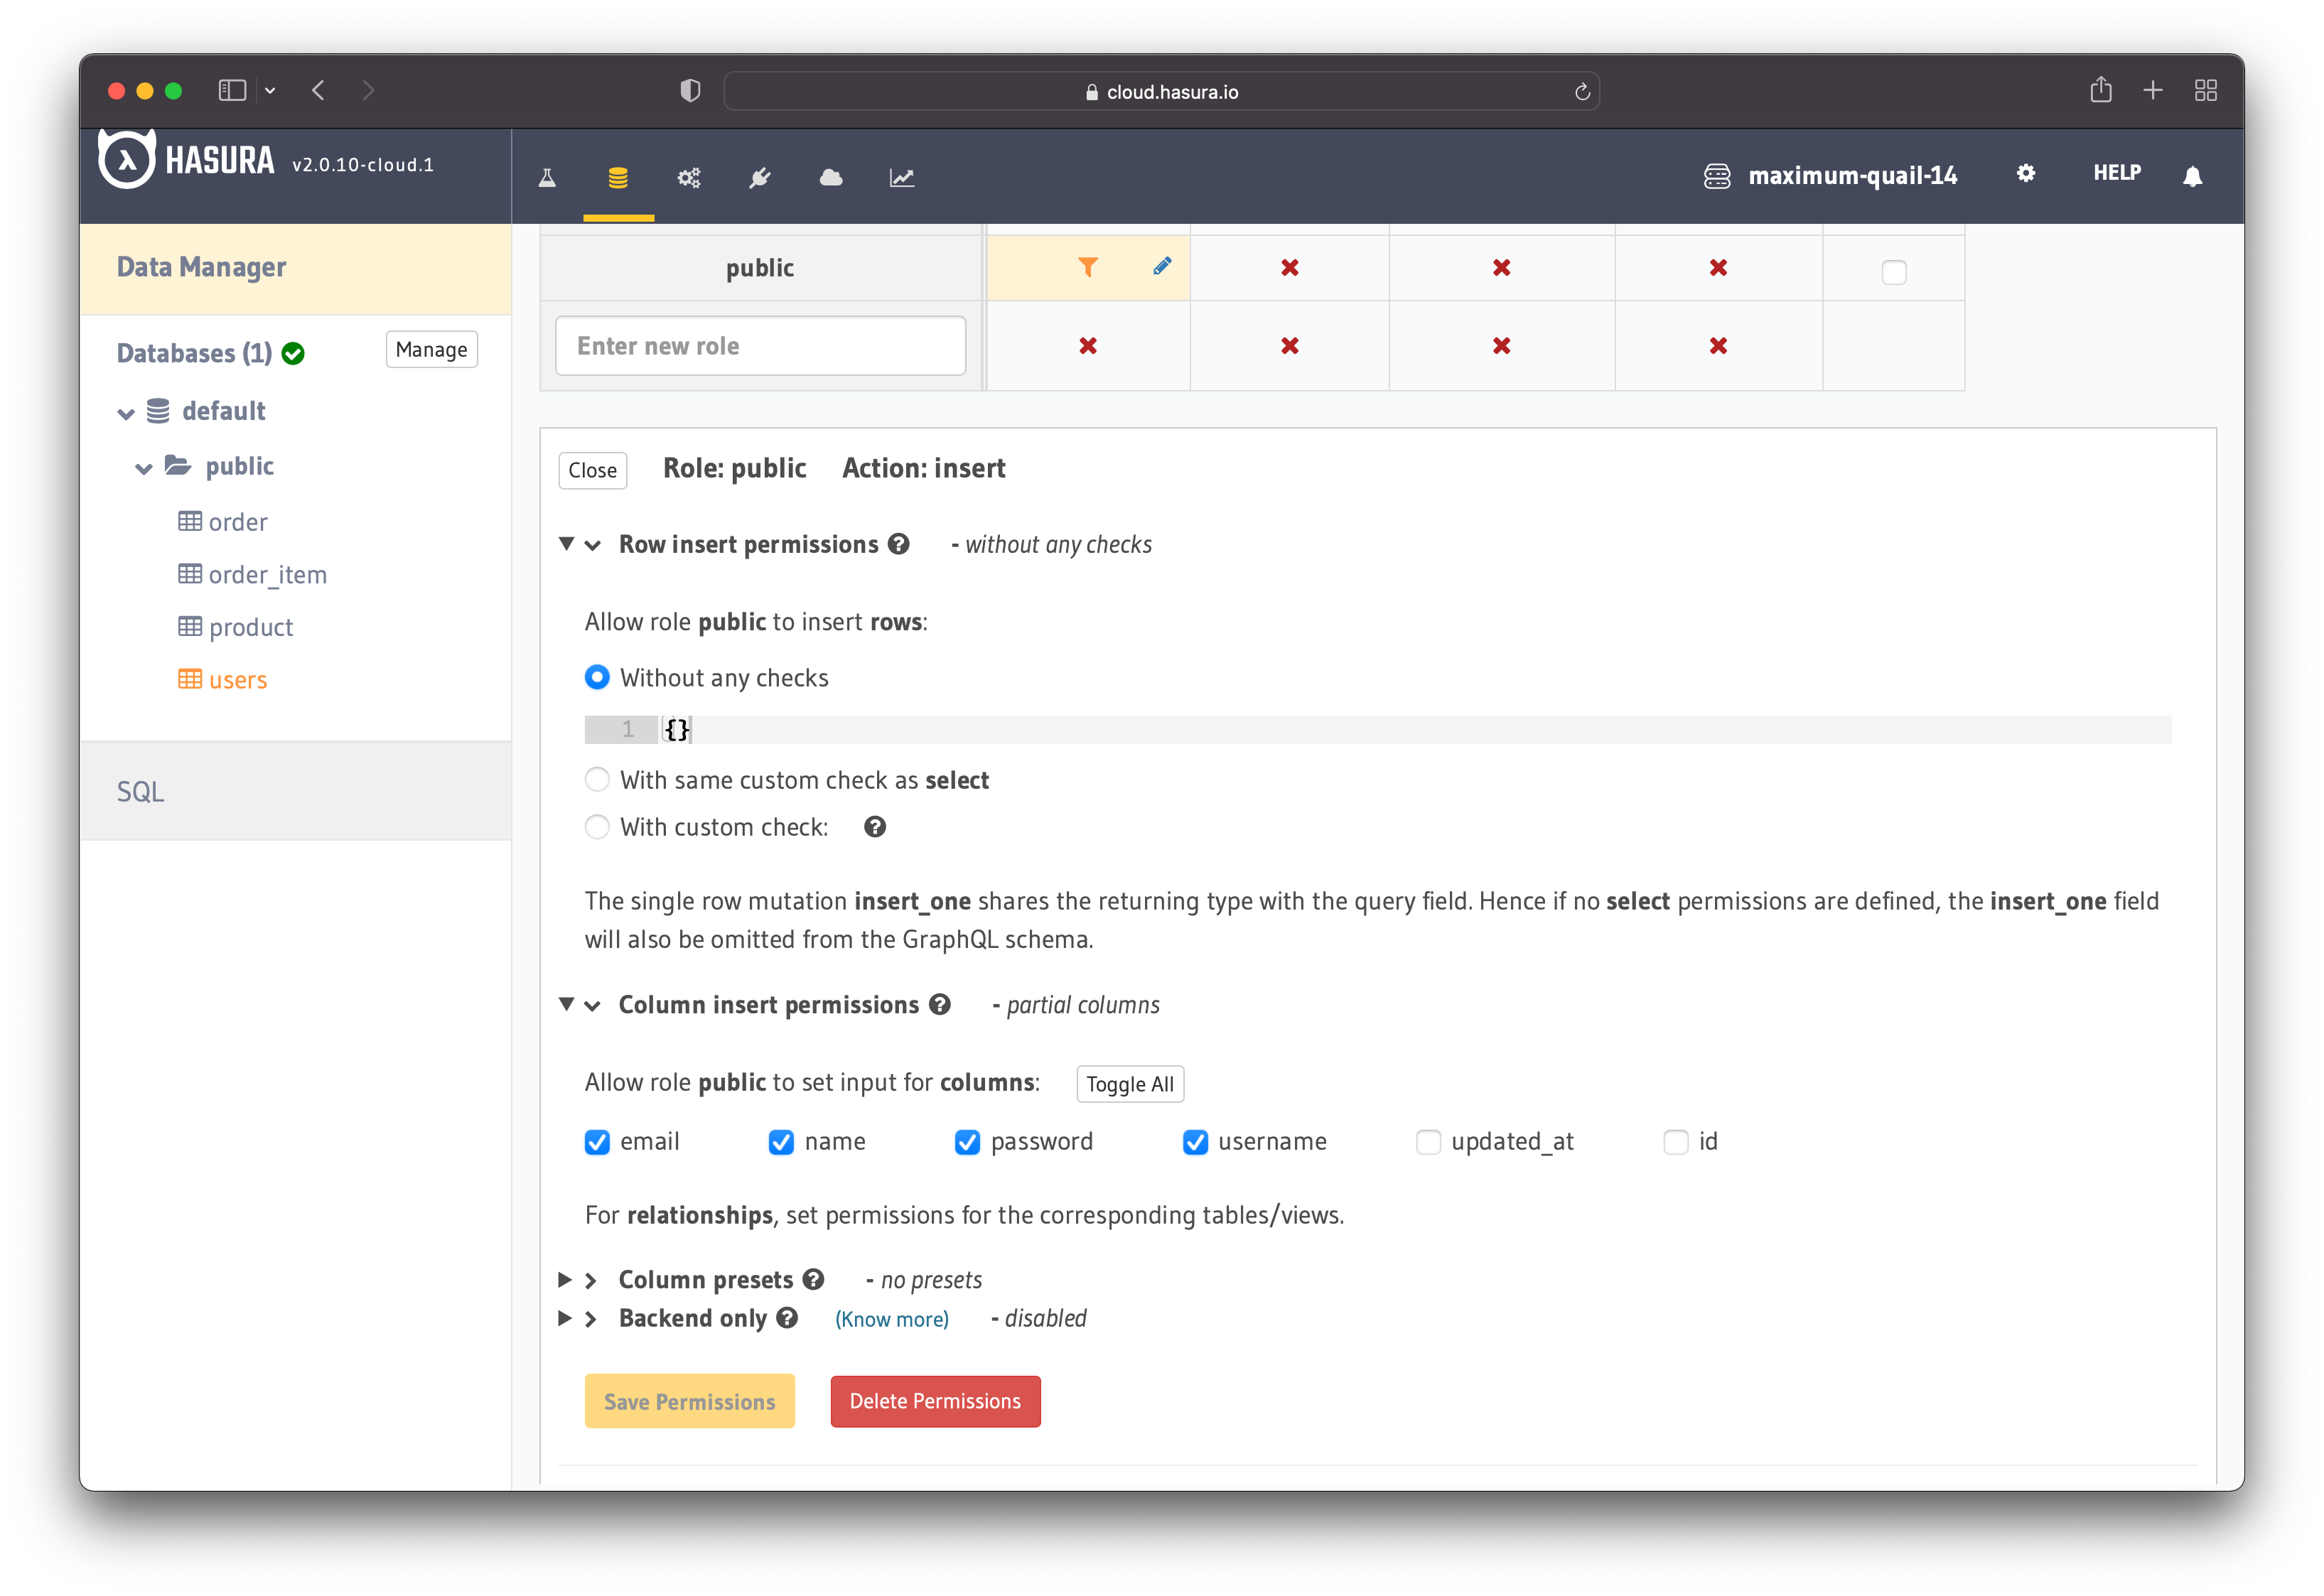
Figure 18 - Define Public Permission Rules
Being a public role, there is no need for any checks. Configure the permission rules as shown in figure 18.
Select - Public Role
When an unauthenticated person registers, the server returns the ID of the newly created user. For that, you need to define the permission rules for the "select" action.
It's essential to add the custom check from figure 19. If the check is not present, unauthenticated users can see the personal details of all other users.
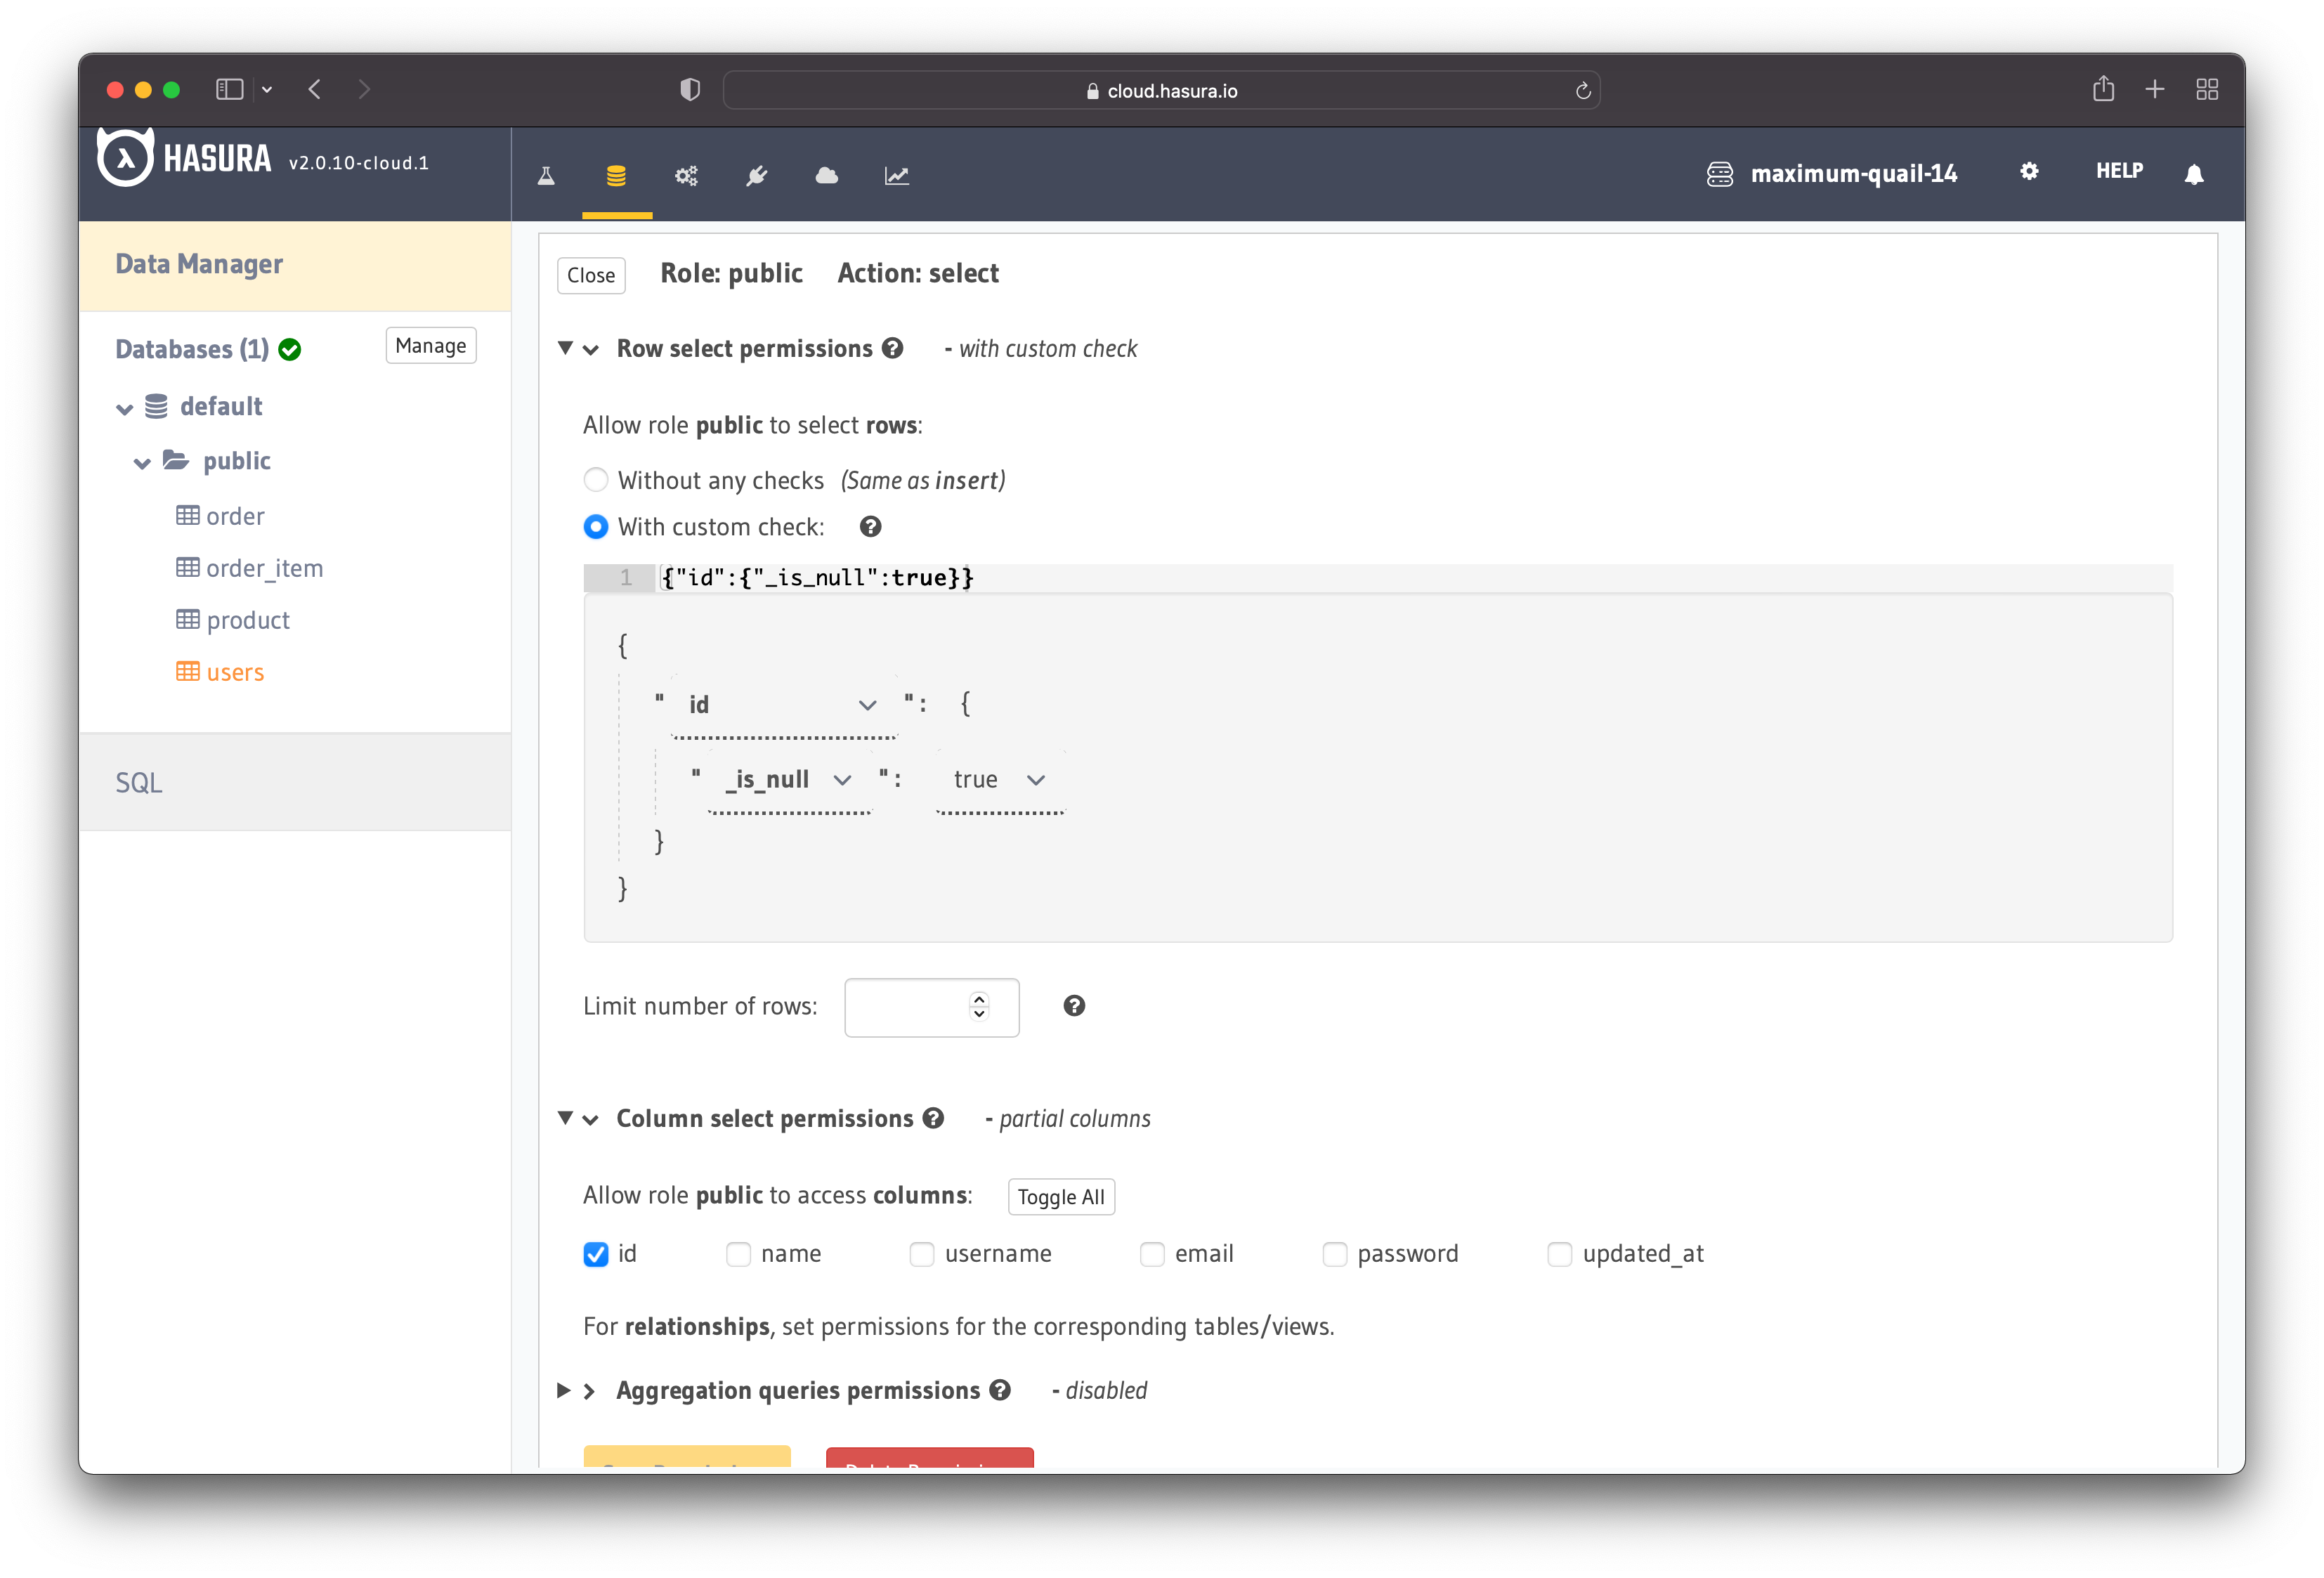
Figure 19 - Define Public Permission Rules
Since the registration only returns the id of the newly created user, check only the "id" field.
Product Table Permissions
The products should be available for all users to see, whether they are logged in or not. That means you can reuse the "public" role.
Select (Read)
Go to the "Permissions" tab and add the new permissions. Enable the option Without any checks and select the product fields that should be displayed.
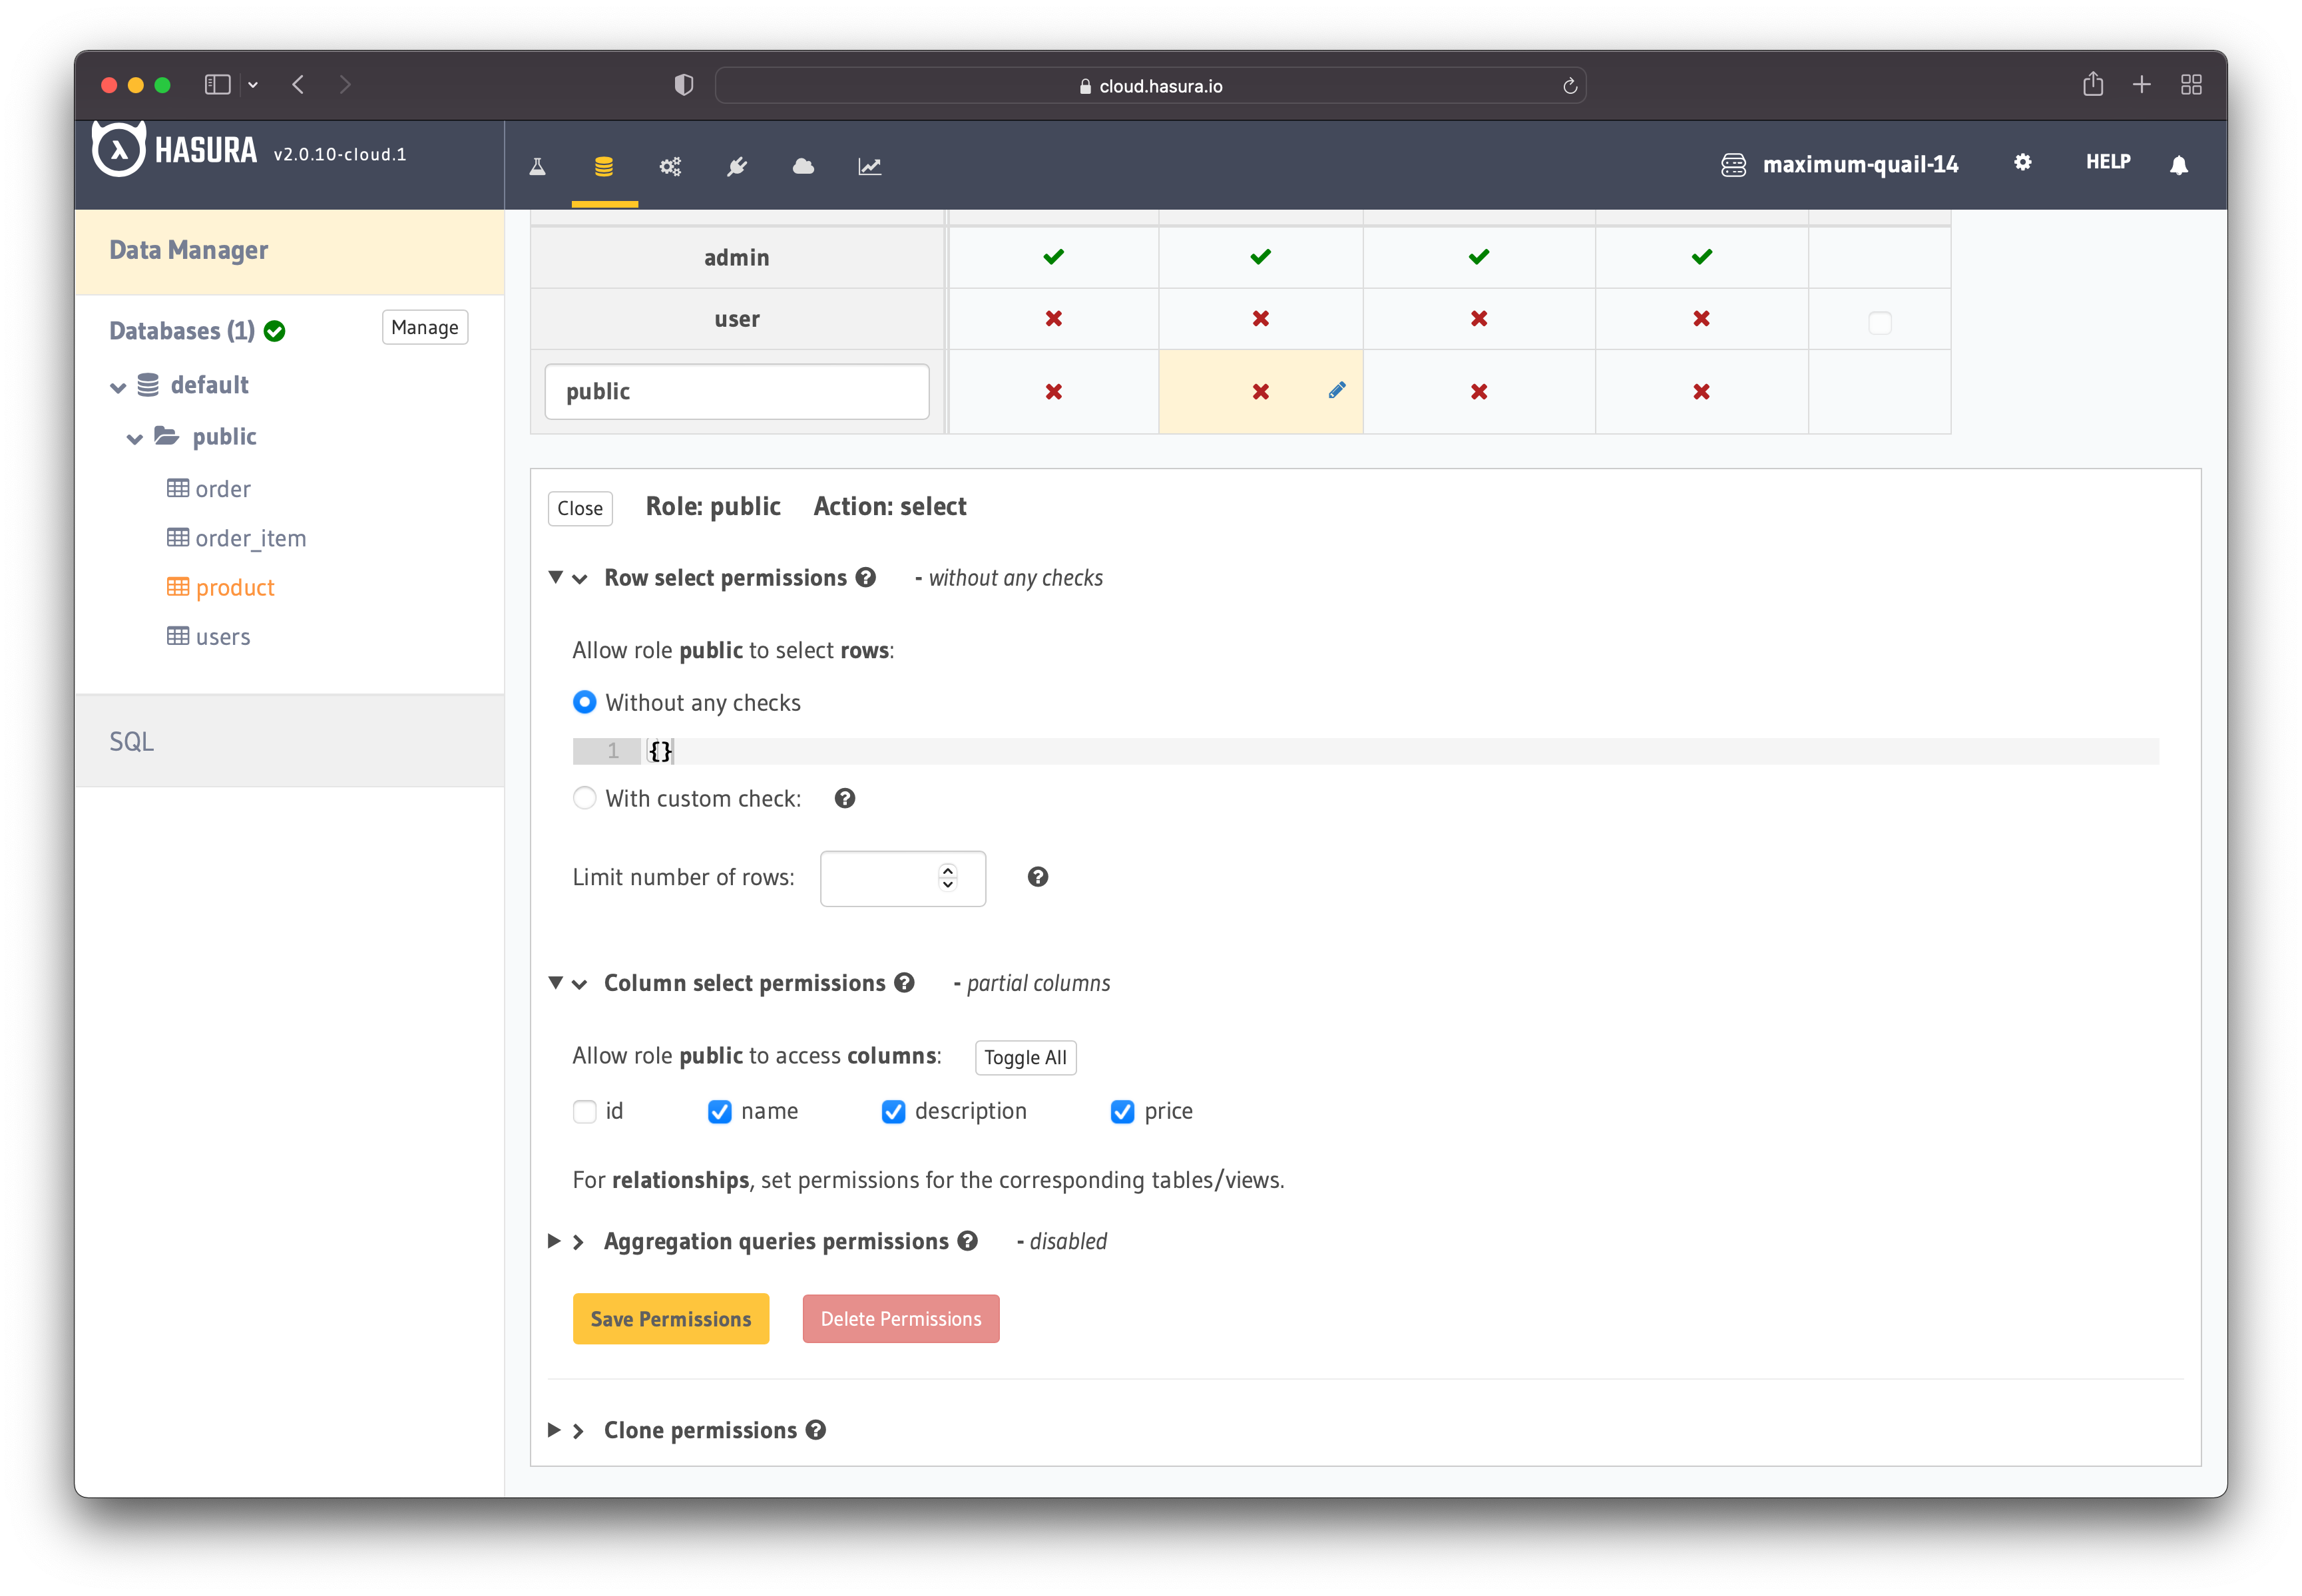
Figure 20 - Define Public Permissions
Before going further, you need to allow logged-in users to fetch the products as well. Apply the same permissions to the "user" role as for the "public" role. Additionally, check the "id" field as well. The logged users should be able to see all product fields.
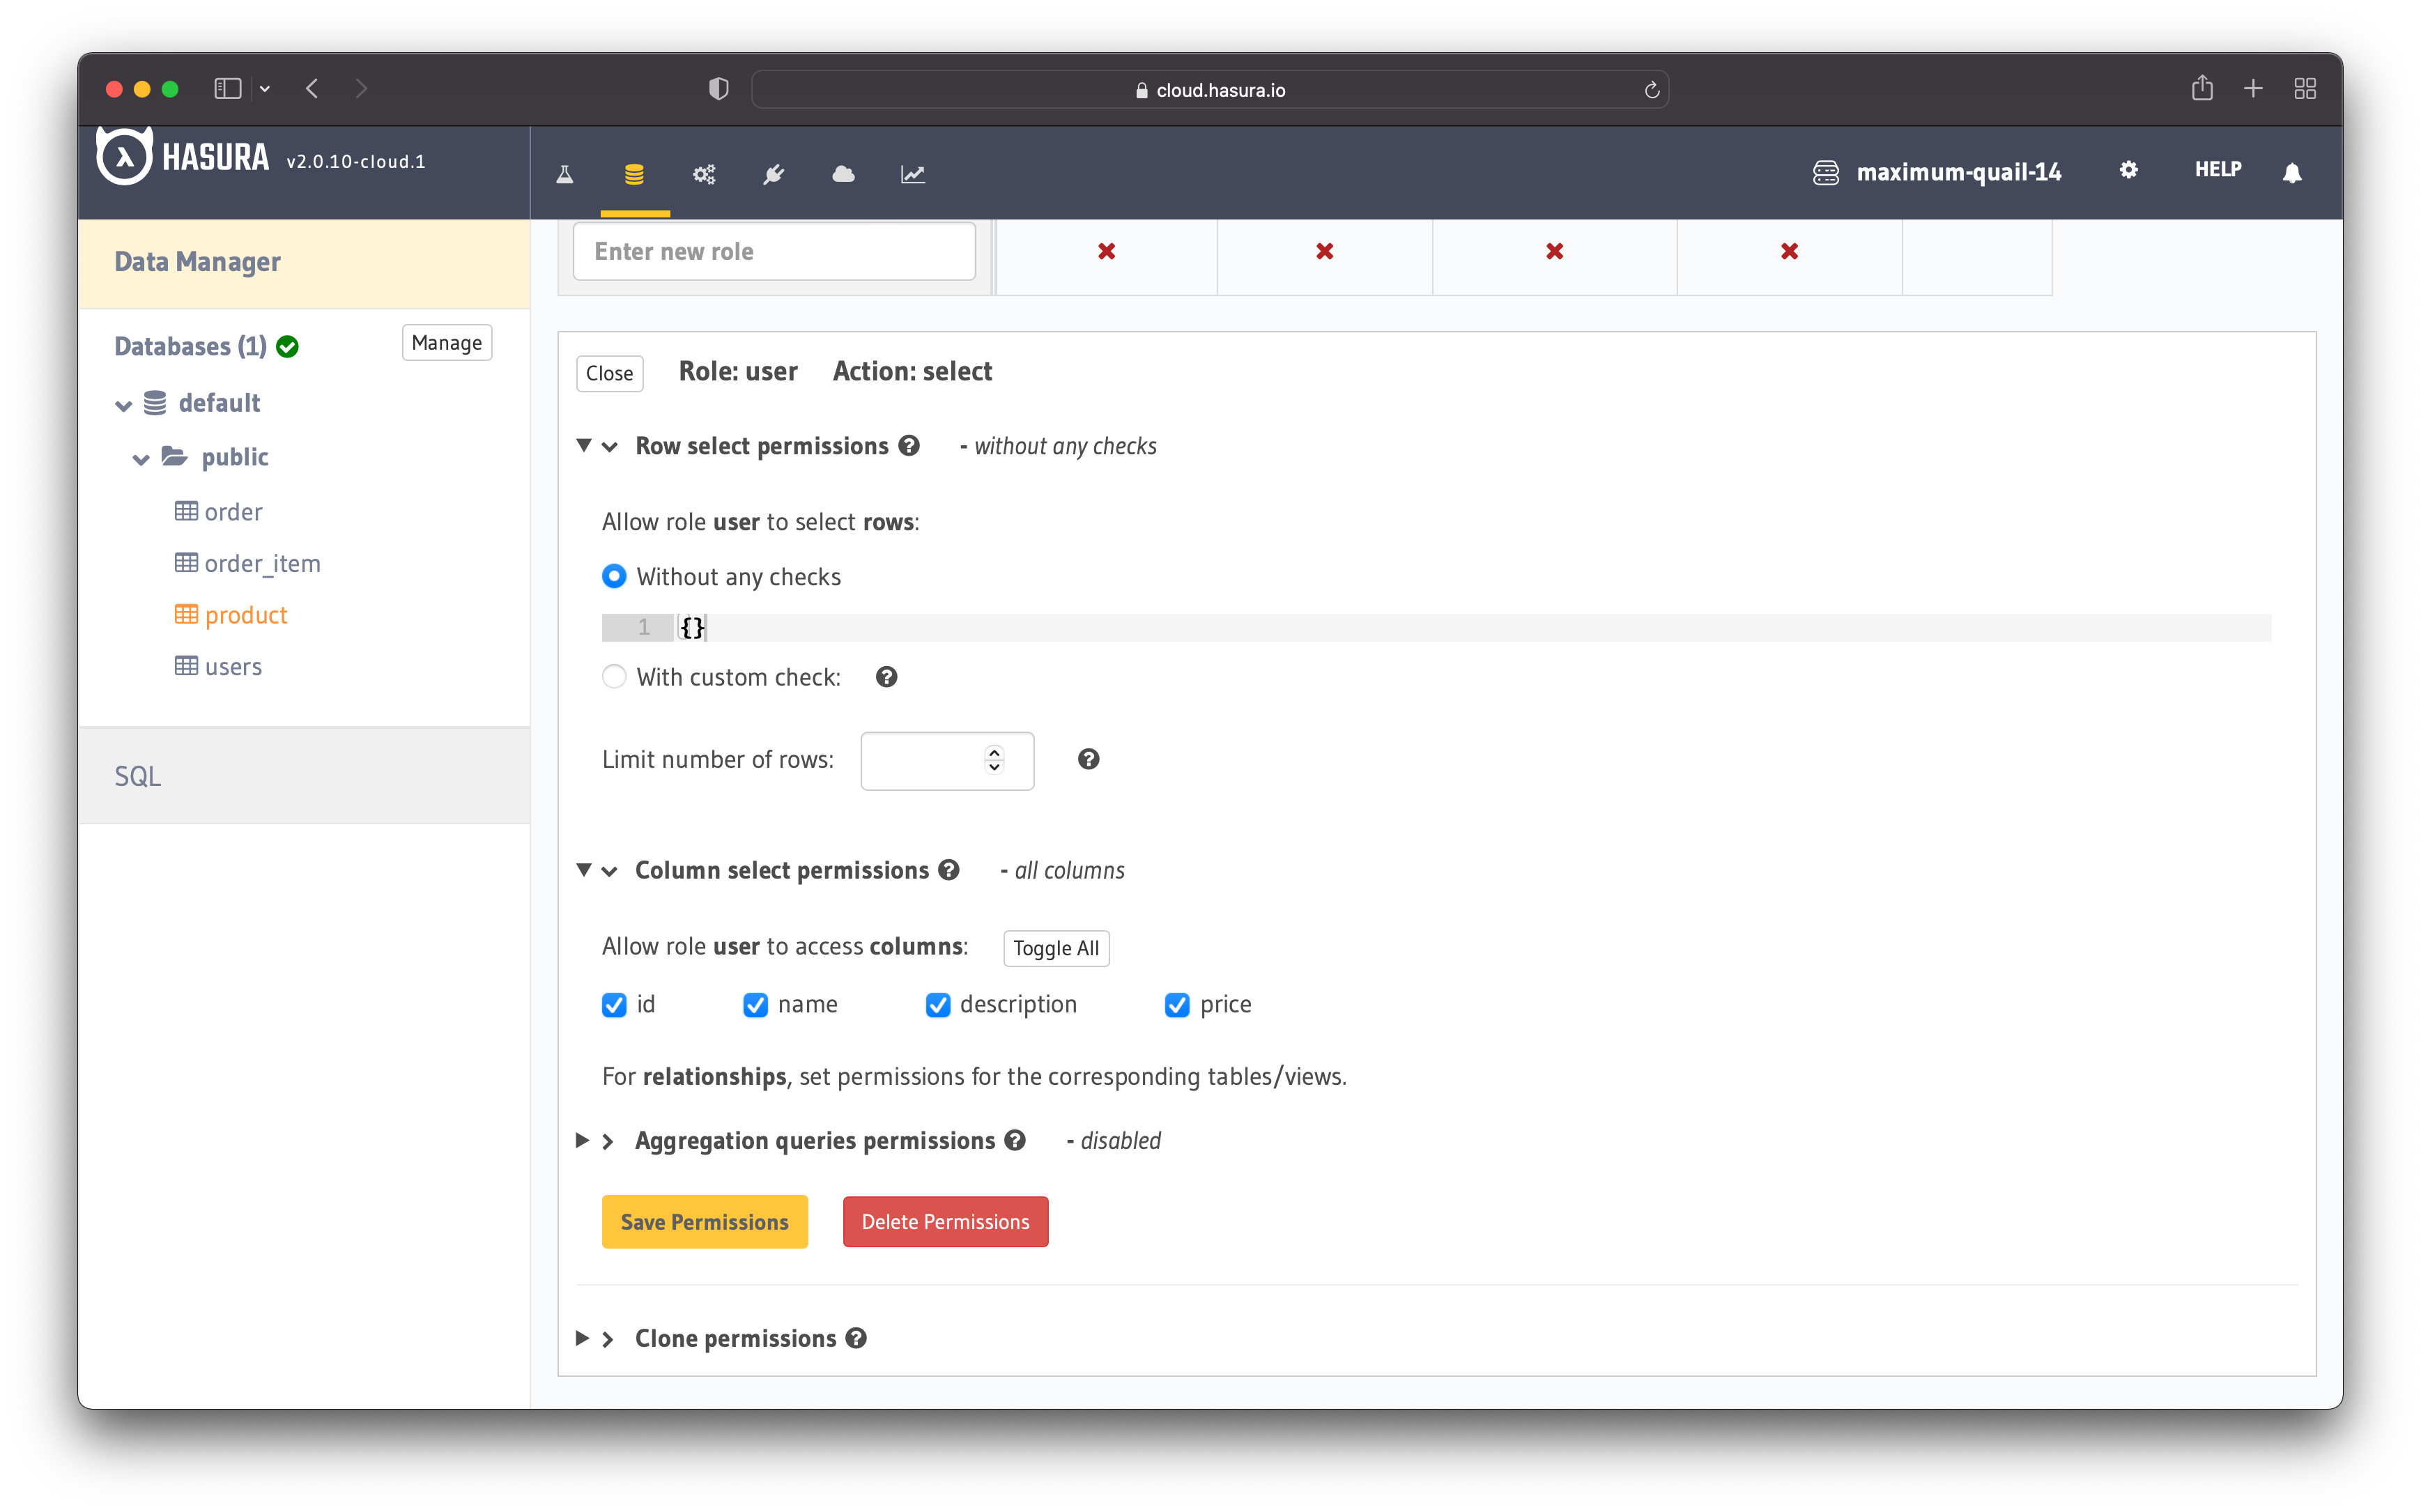
Figure 21 - Define Users Permissions
Both authenticated and unauthenticated users should only be able to see the products and not mutate them. That means they do not have access to create, update or delete products.
Order Table Permissions
When it comes to orders, the users should only be able to see their orders. They should not have access to the orders of other people.
** Select (Read)**
Go to the "order" table and then to the "Permissions" tab. Click on the "select" Action for the "user" role and add the following custom check:
{
    "user_id": {
        "_eq":" X-Hasura-User-Id"
     }
}
The above custom check ensures that only the user who placed the order can access it. Also, check the fields you want the query to return. In this case, it should return all the fields because the users should have access to all the information about orders.
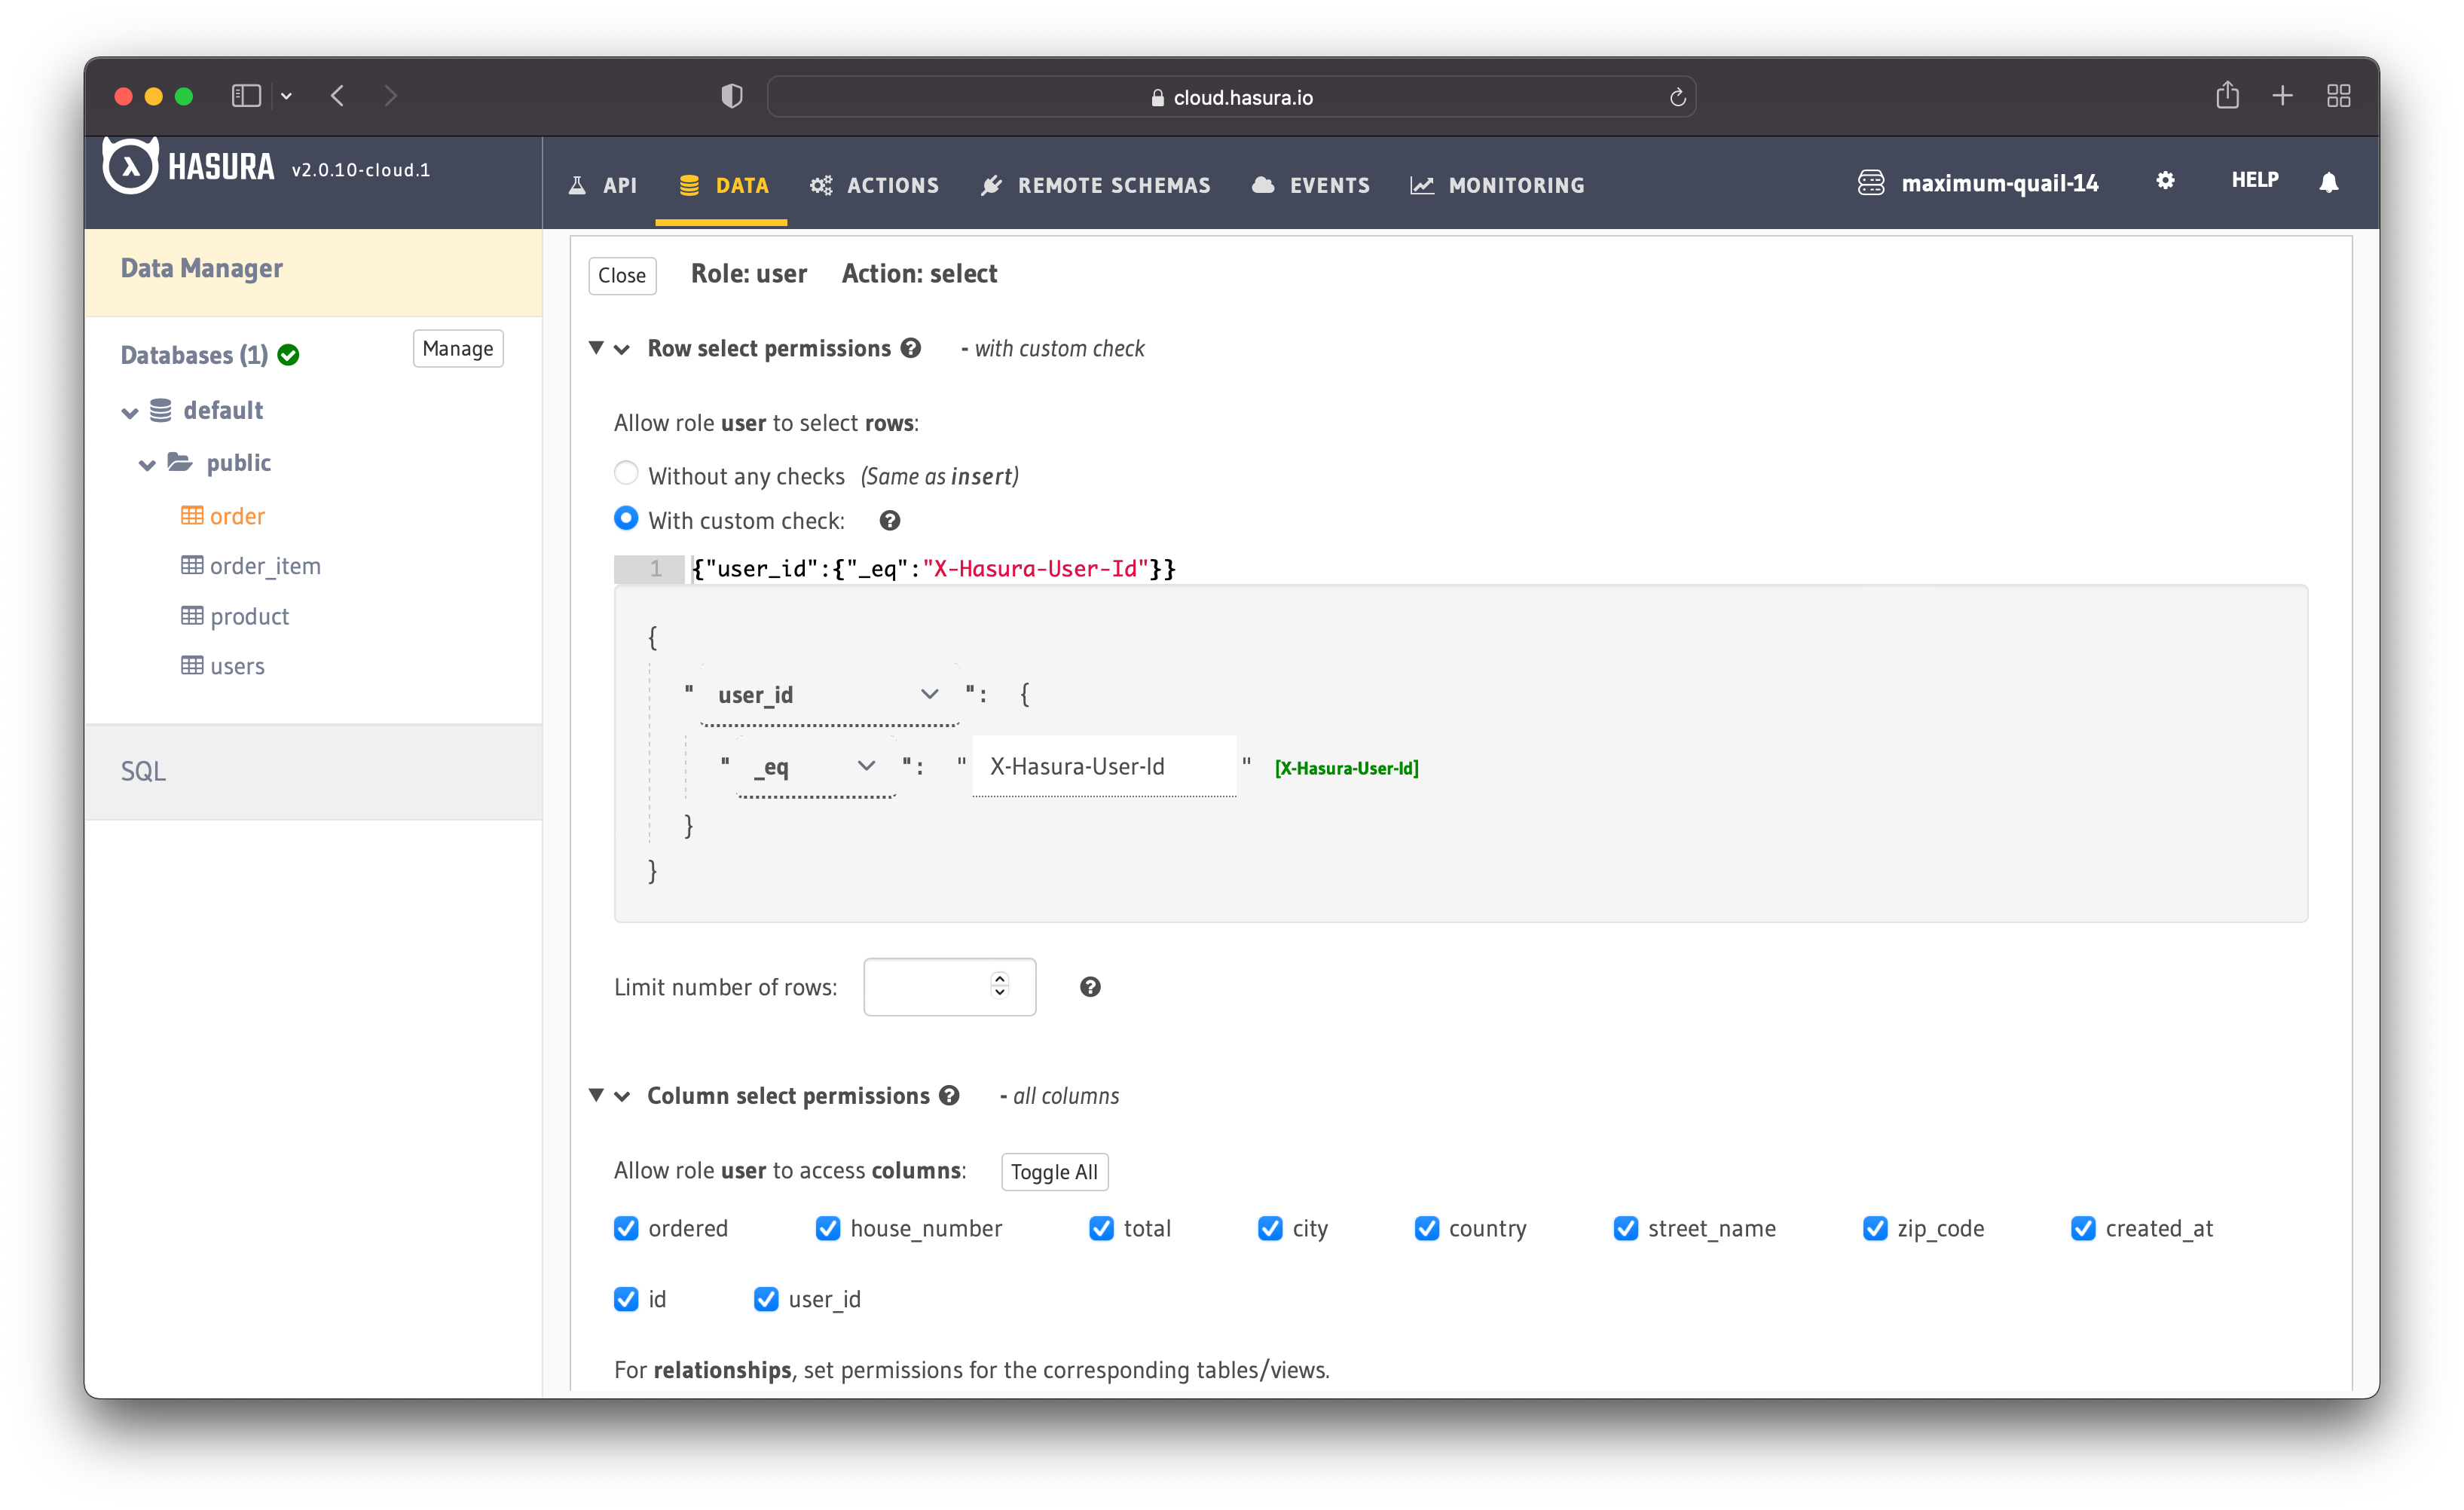
Figure 22 - User Permissions For Orders
Insert
Besides seeing their orders, the users should also be able to create new orders. Click on the "insert" action to add permission rules.
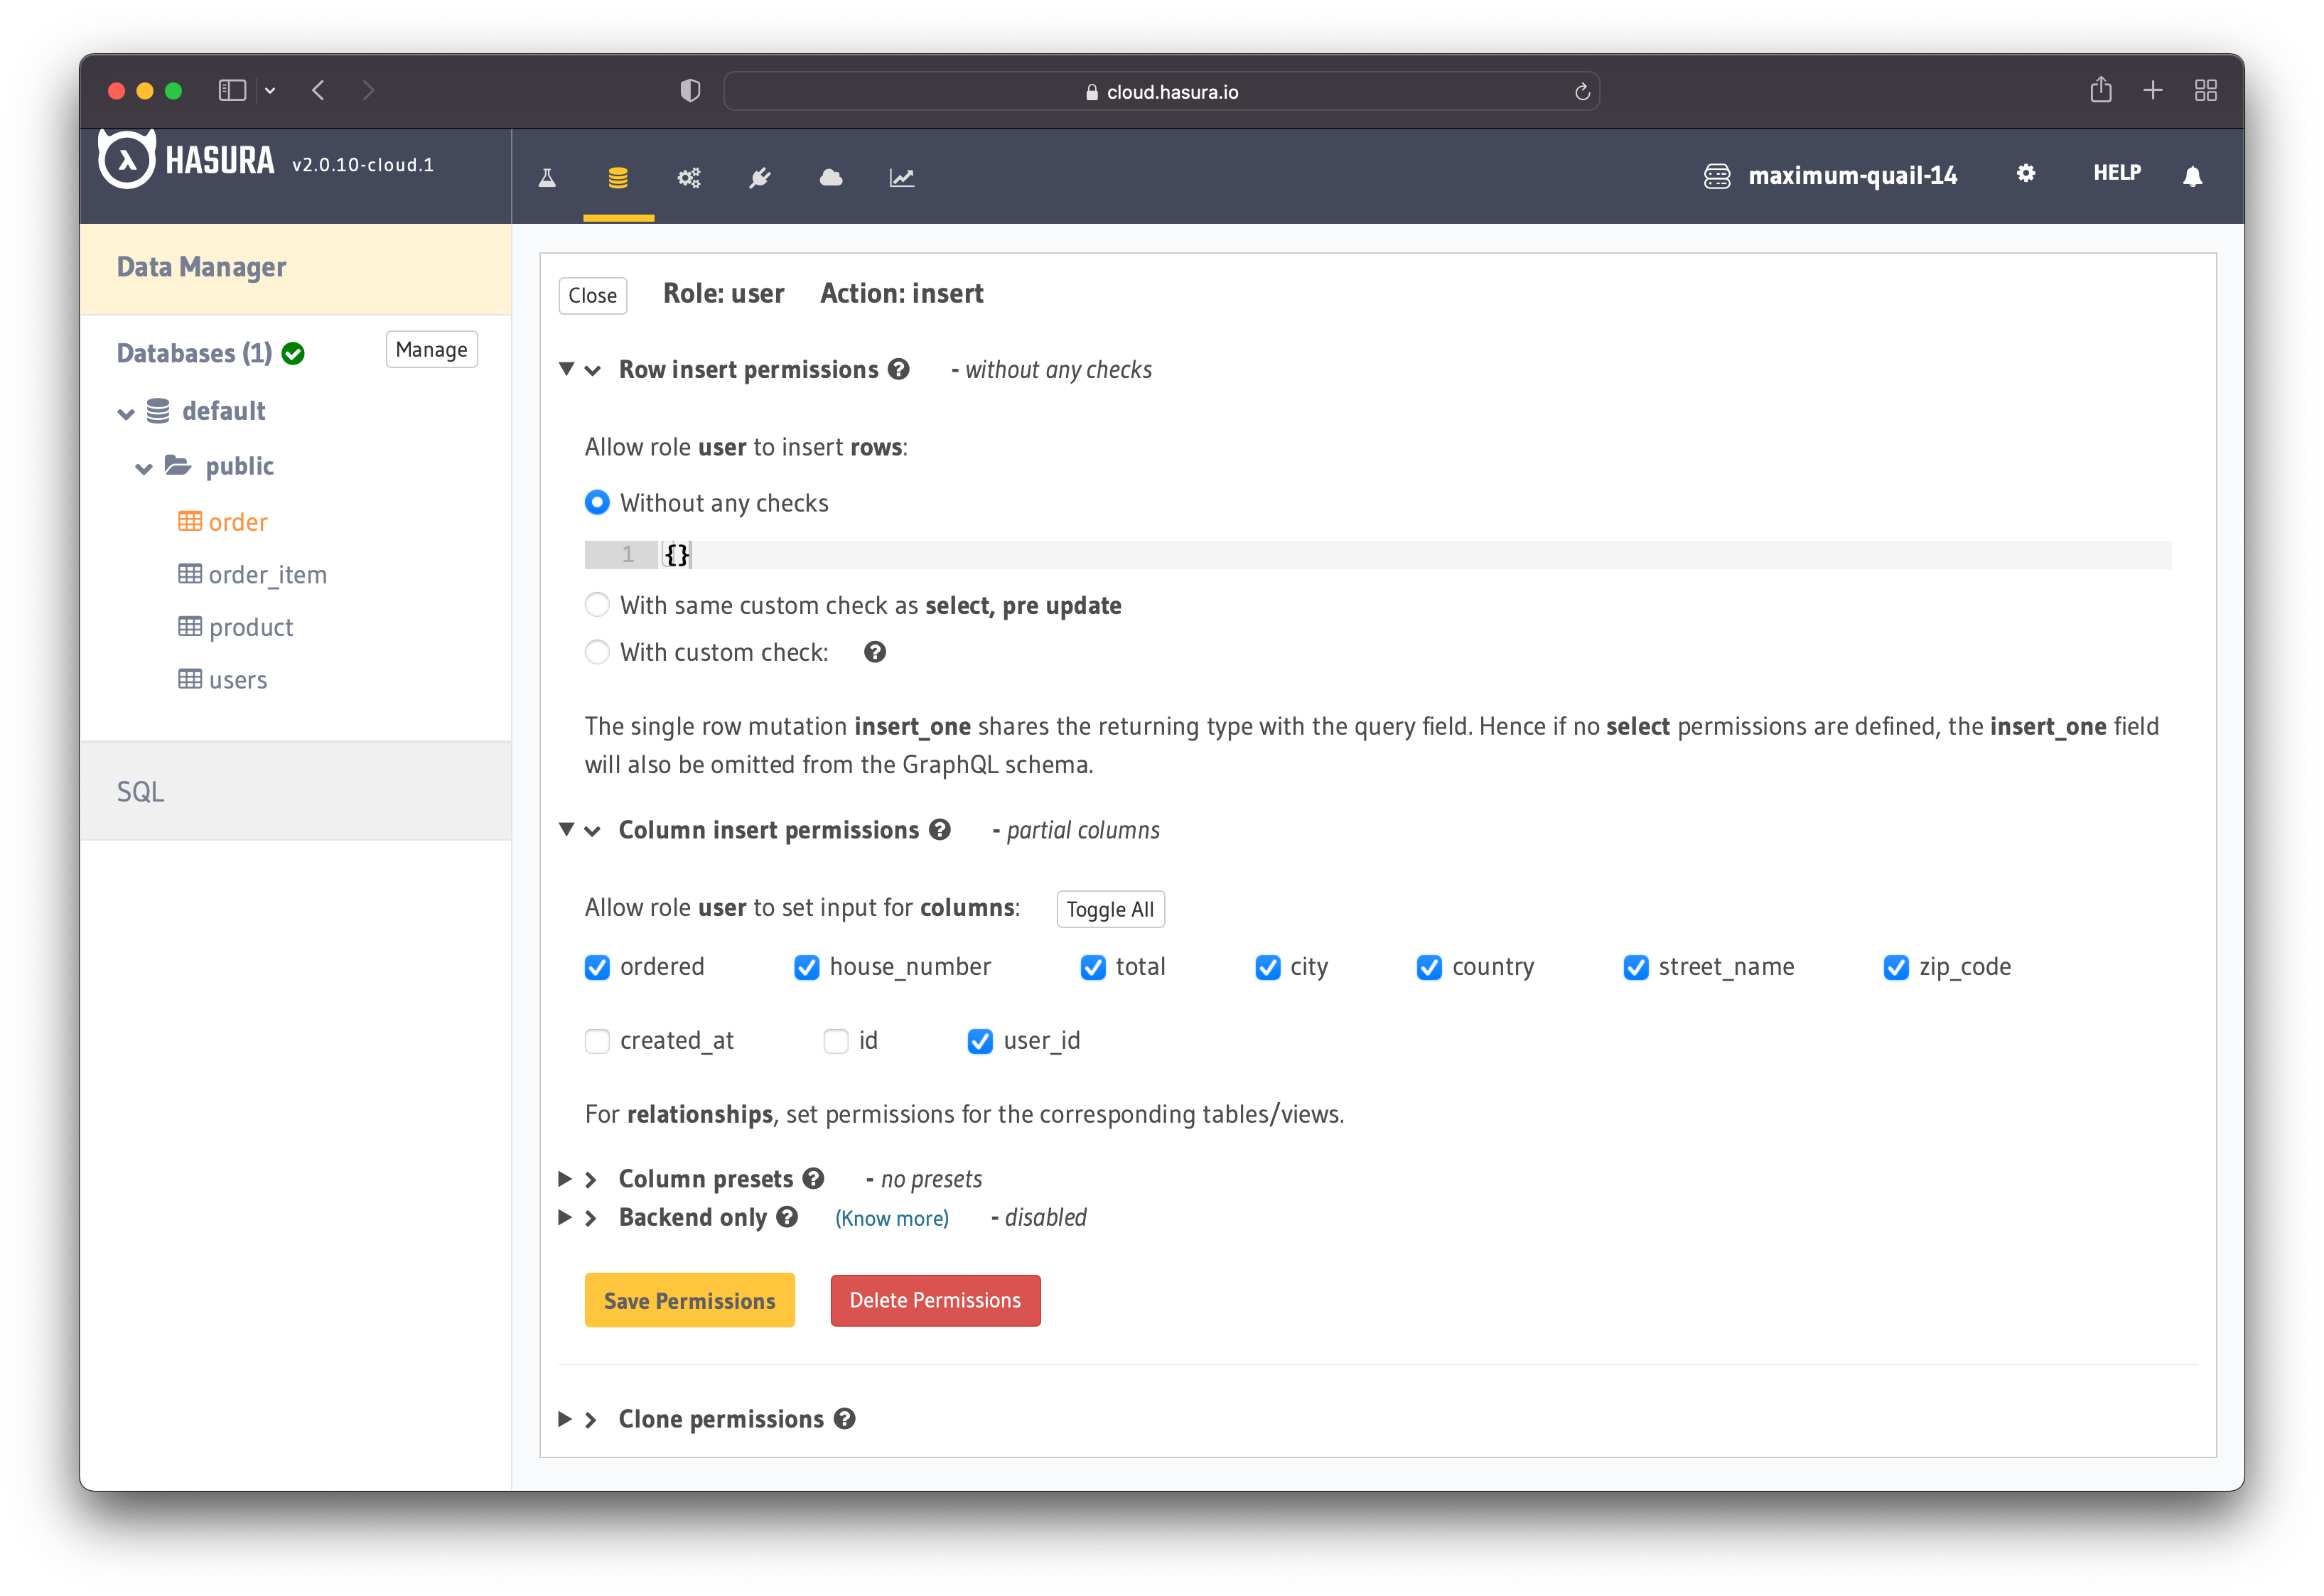
Figure 23 - User Permissions For Orders
Add the same permission rules as in figure 23.
Update
The users also need permission to update the orders. Click on the "update" Action and select all the columns except:
- created_at
- id
- user_id
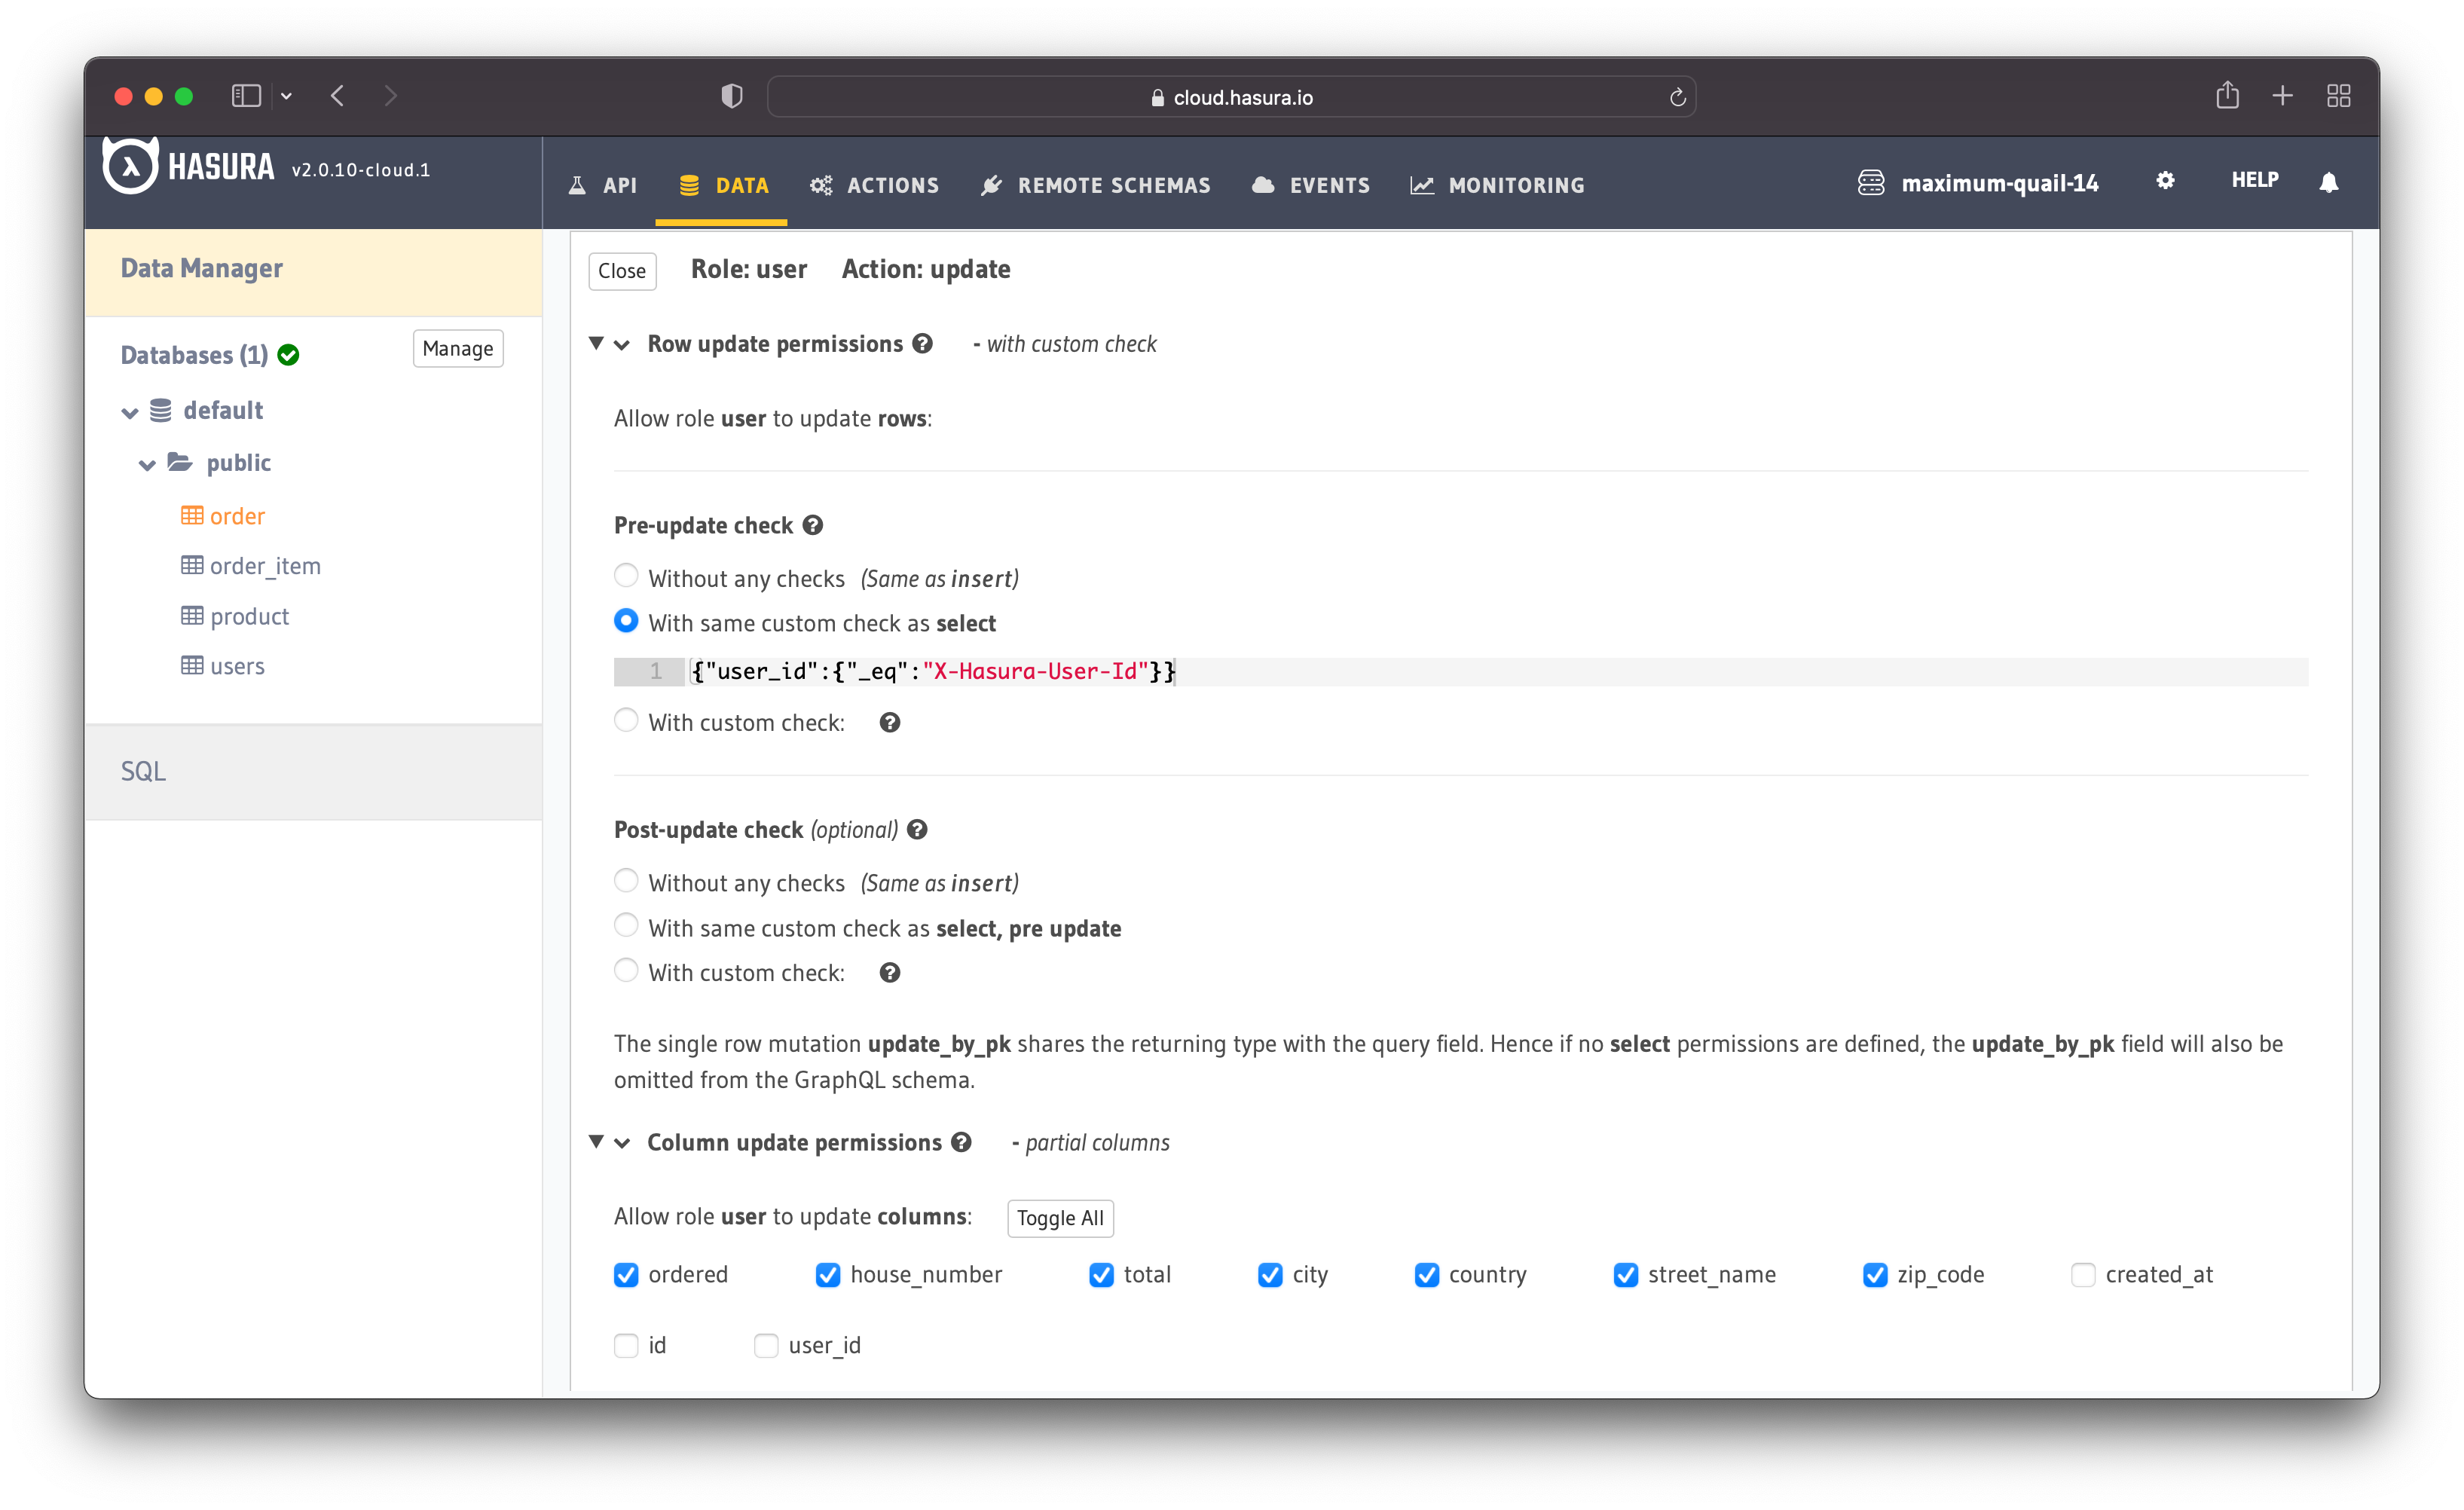
Figure 24 - User Permissions For Orders
The users can insert, read and update orders, but they cannot delete existing orders.
Order Item Permissions
To create the order items, the logged users should have access to insert them.
Insert
Go to the "Permissions" tab in the "order_item" and add the following rule:
- allow logged users to insert the "quantity", "product_id" and "order_id"
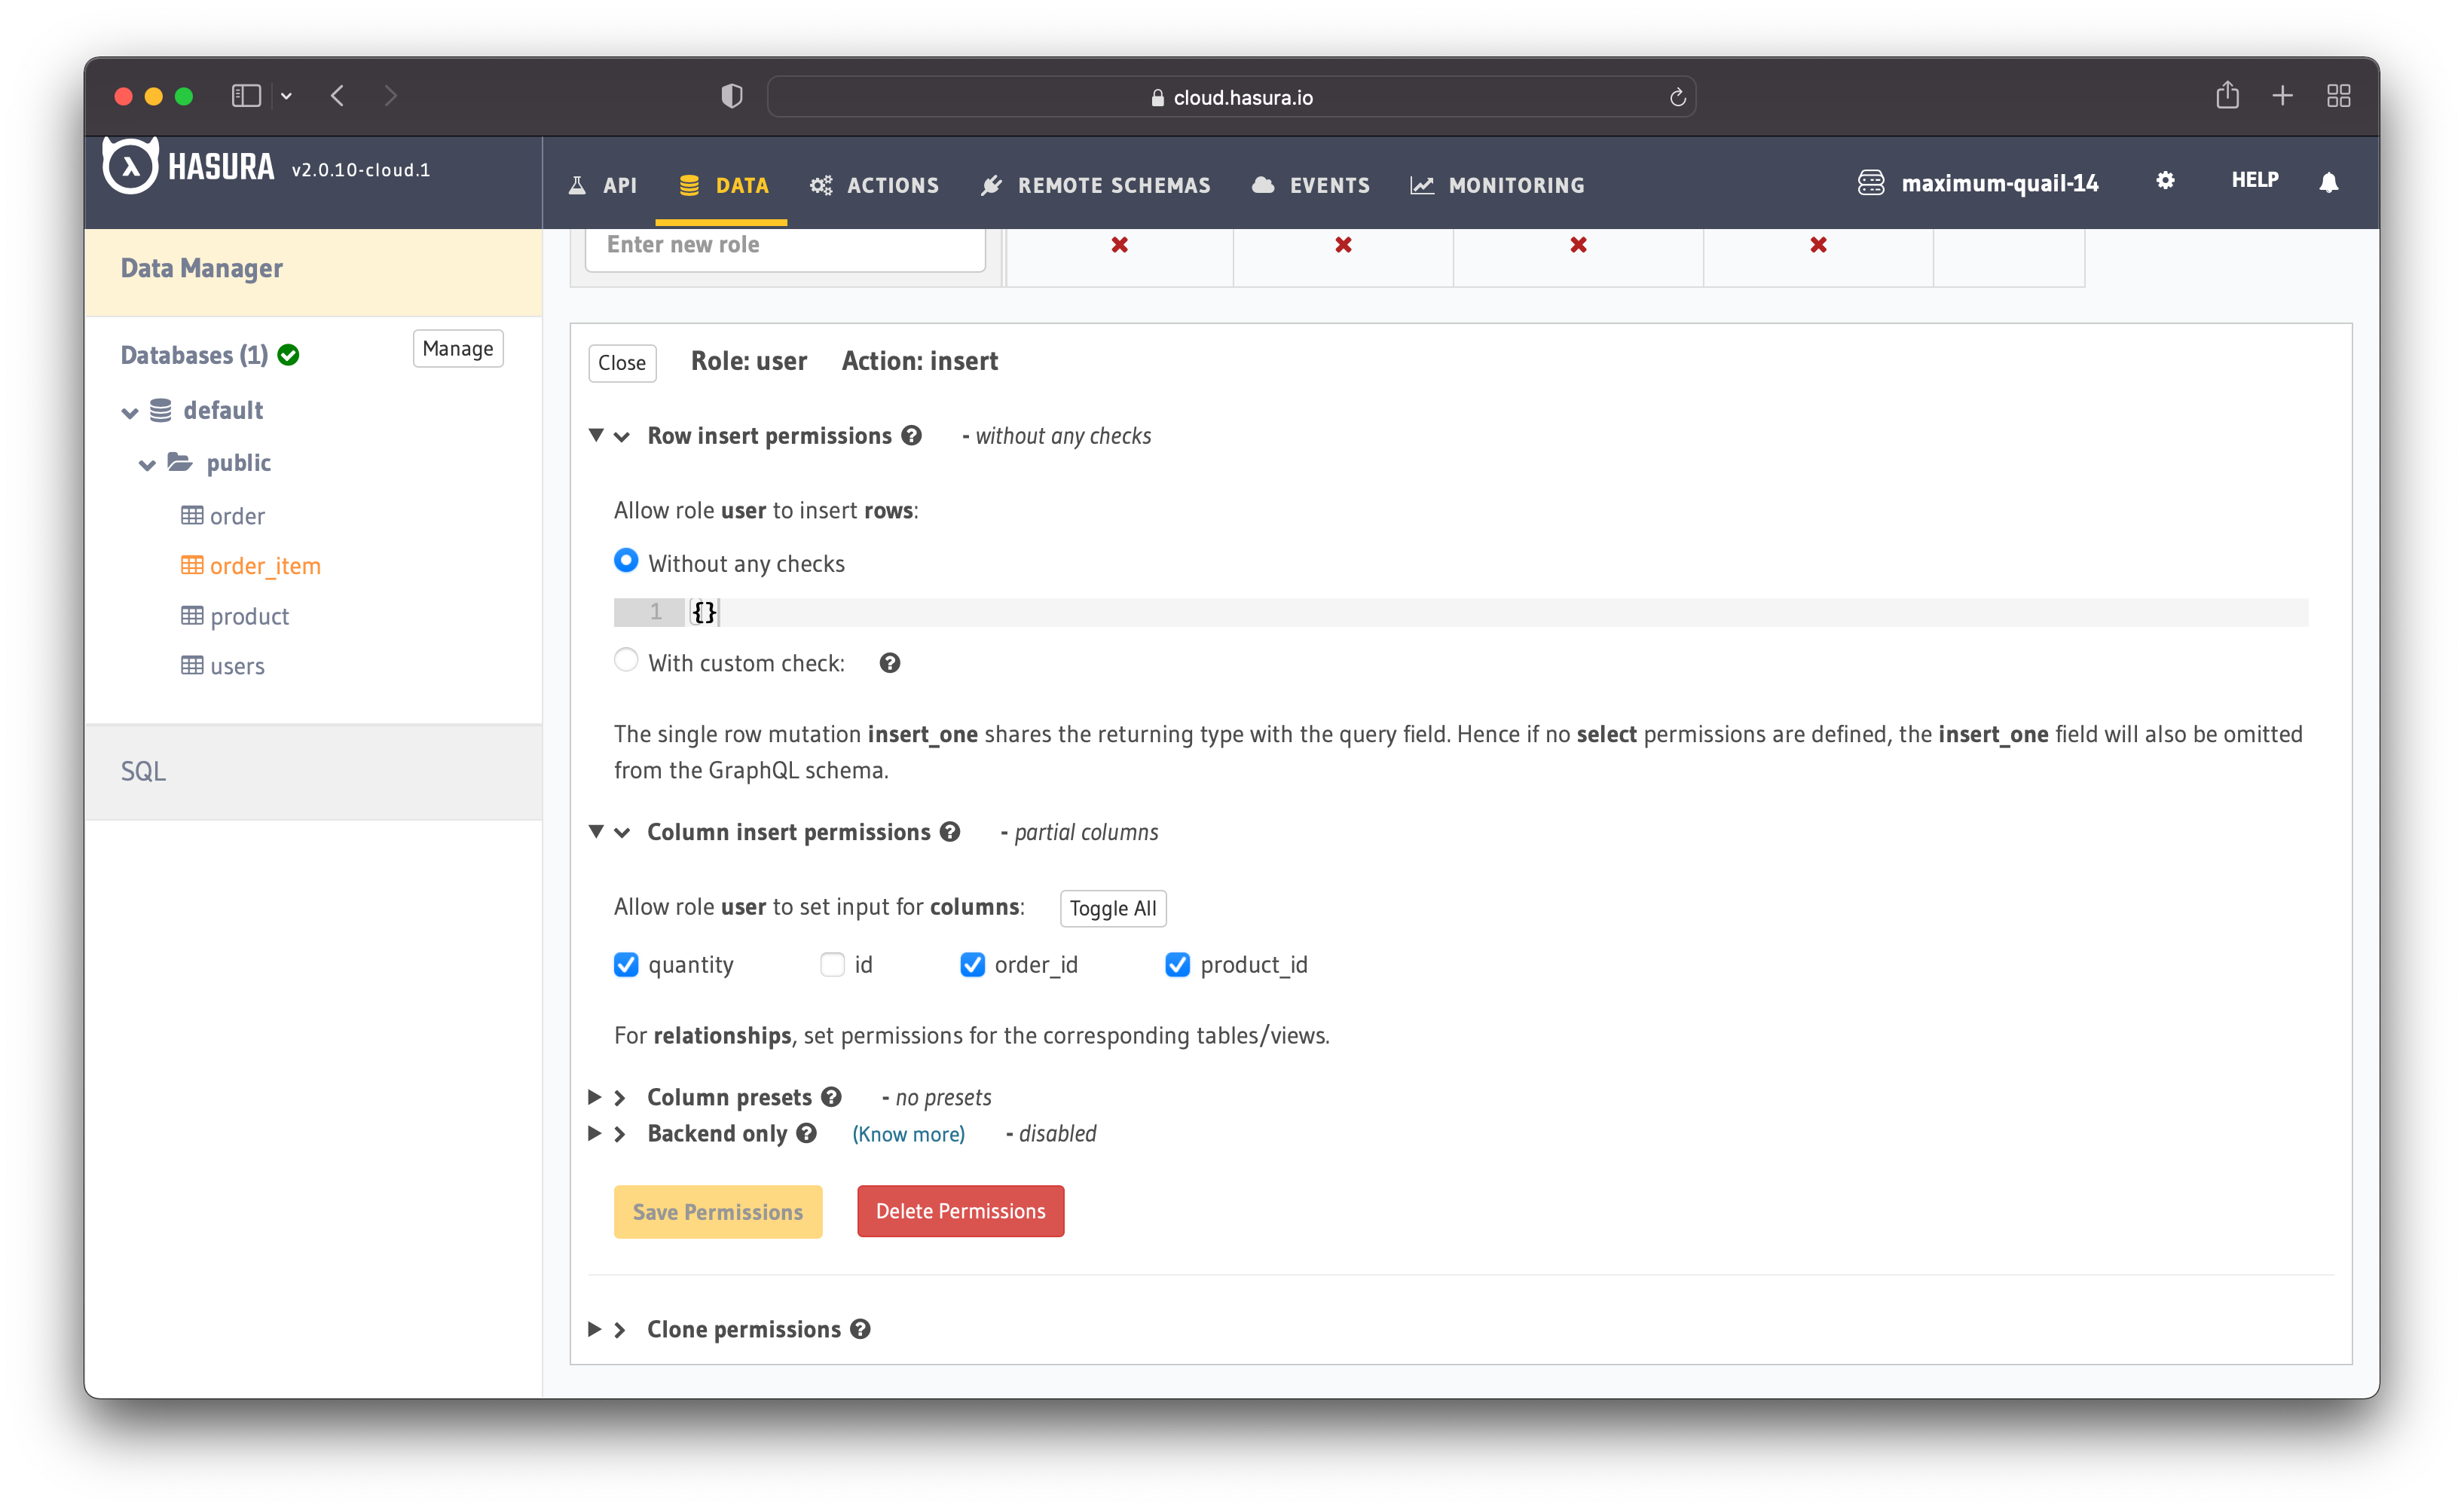
Figure 25 - User Permissions For Order Items
Figure 25 illustrates the user permissions for inserting order items.
Select
Users should also be able to see the items from their orders. To avoid users having access to other people's order items, you need to add a custom check.
It checks if the user's order to whom the order items belong matches the user's id who makes the request. It makes more sense if you look at the check in figure 26.
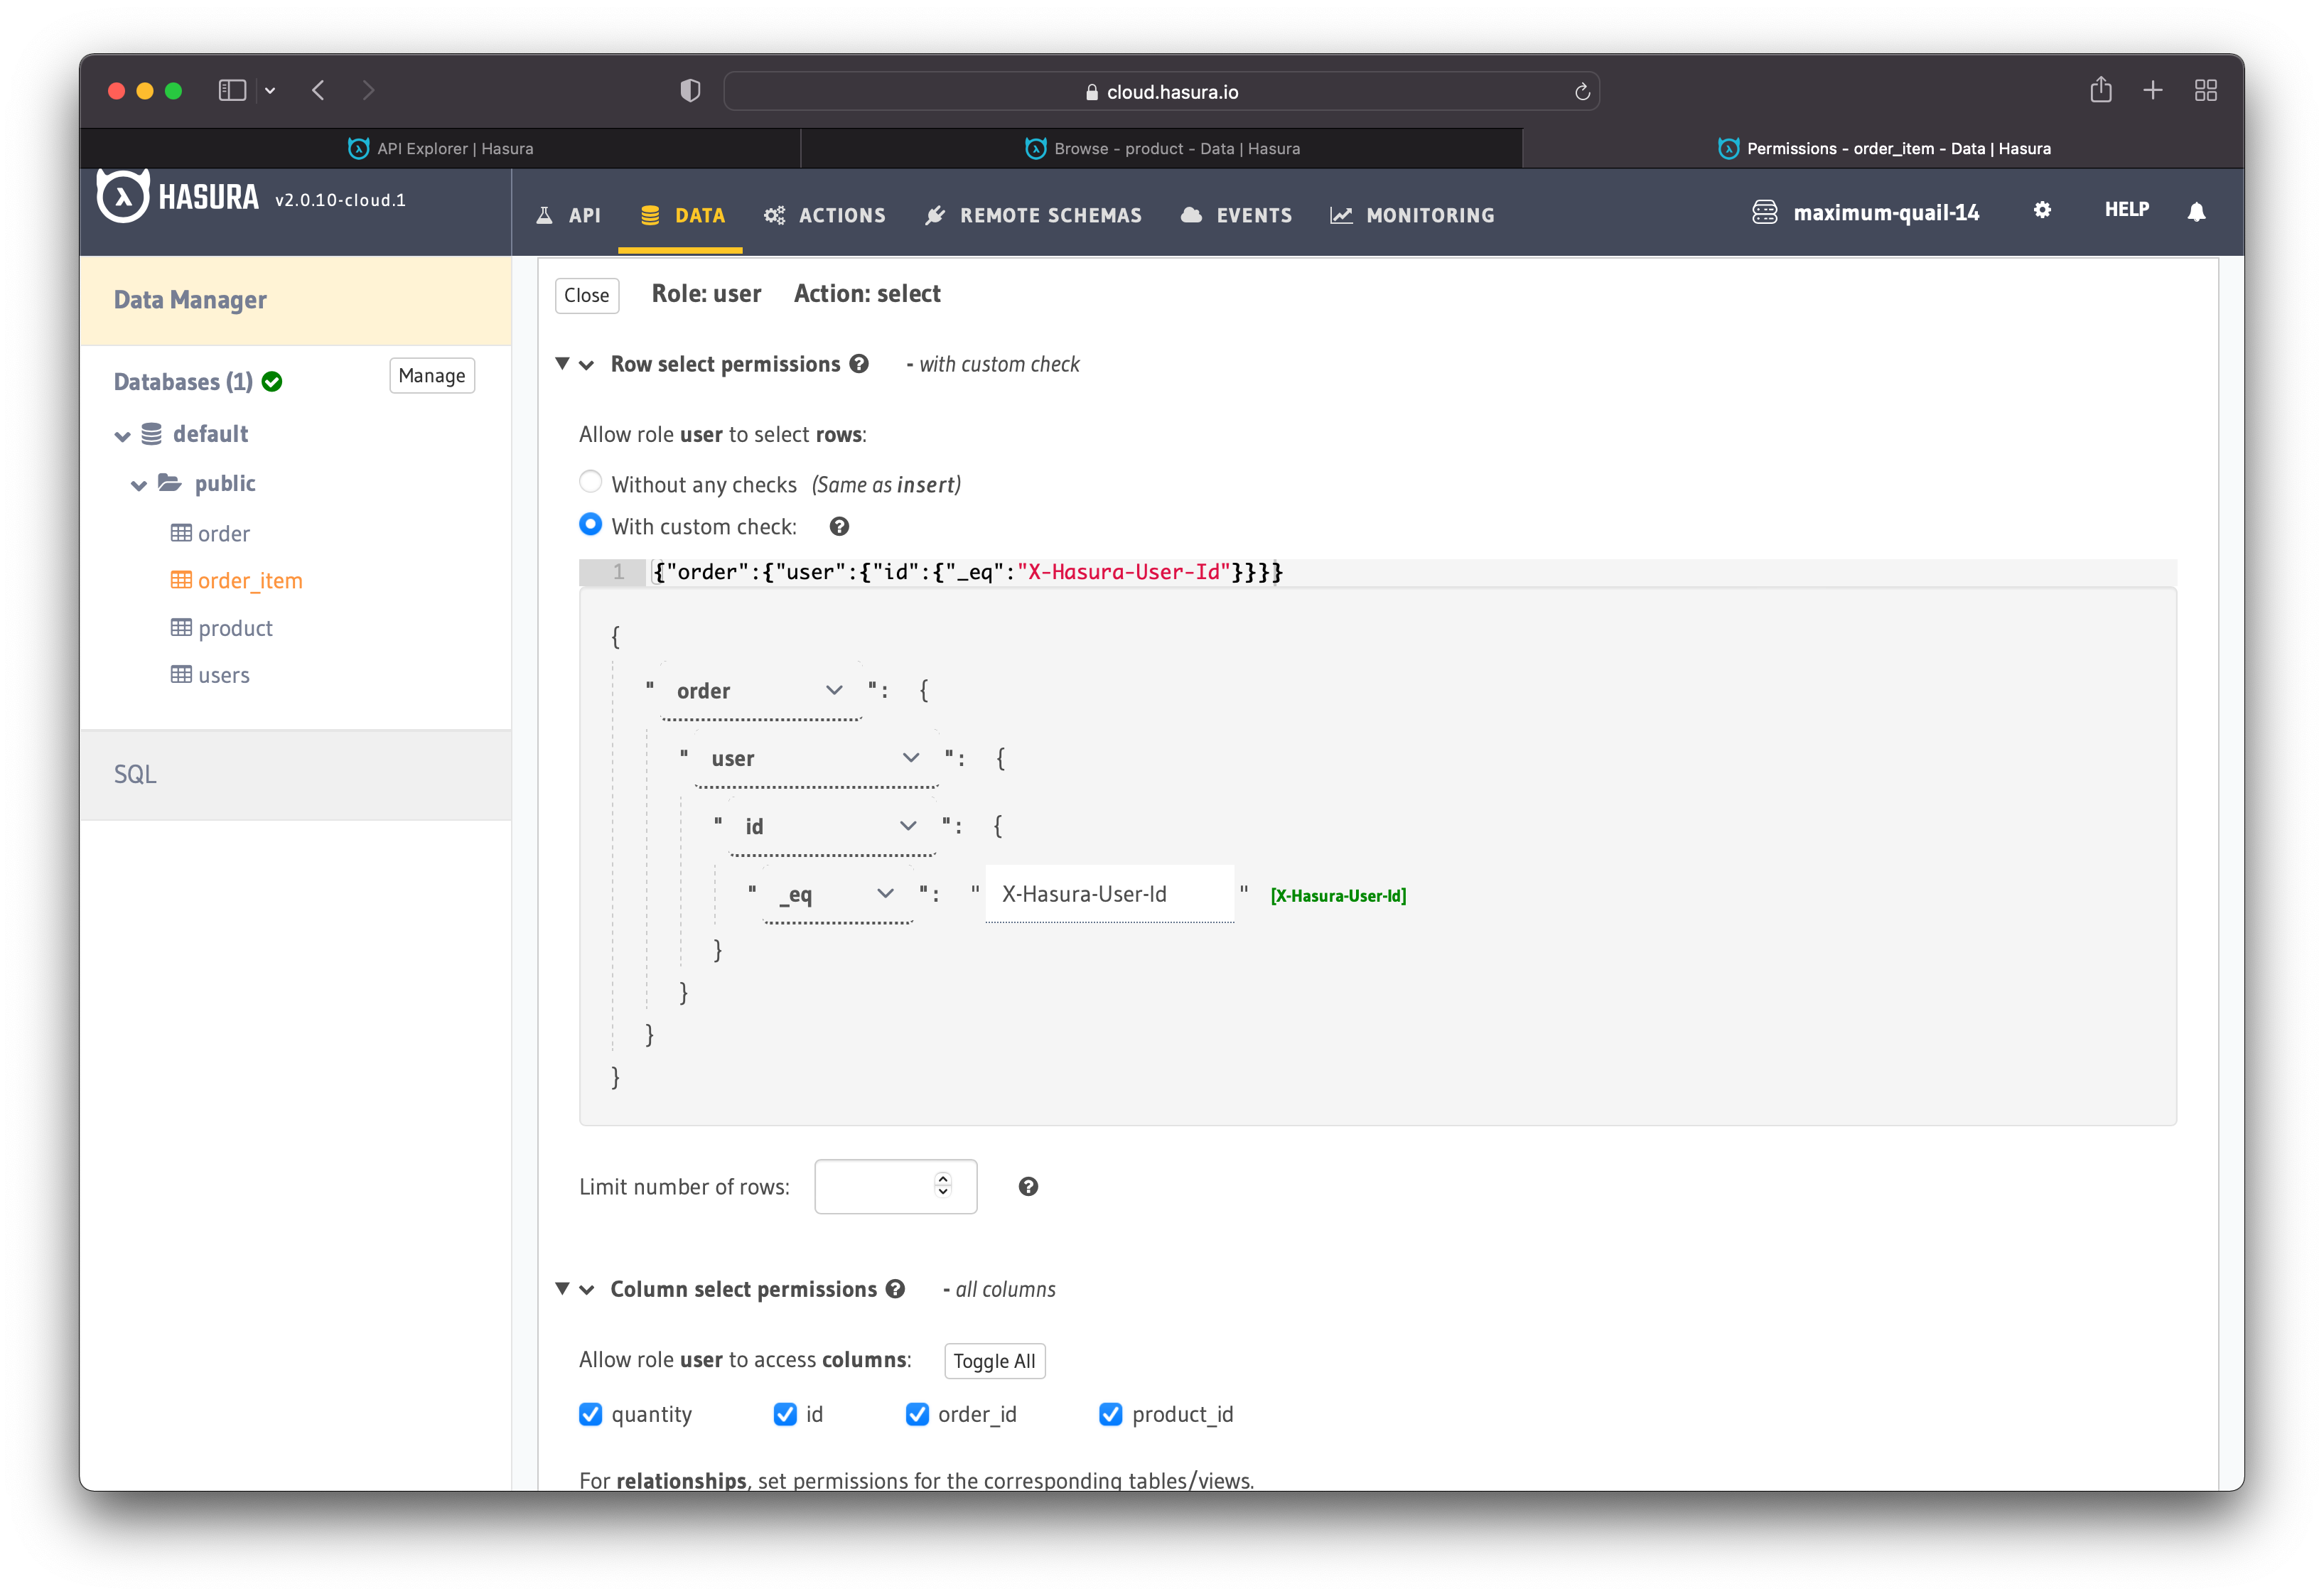
Figure 26 - User Permissions For Order Items
Since all the permissions are in place, we can move on to the next chapter - implementing custom business logic with Hasura Actions.
I recommend checking the documentation section about configuring permission rules for in-depth information about permissions rules.
Custom Business Logic
Even though Hasura generates most of the stuff you need, you might need to add custom business logic such as custom queries or mutations.
Hasura allows you to add custom business logic through Hasura Actions. Moreover, you can use Actions for data validation and transformation.
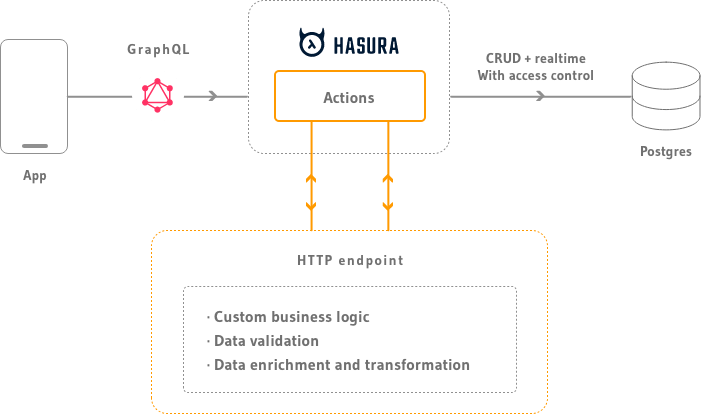
Figure 27 - Hasura Actions
For the e-commerce application, you can use Hasura Actions to:
- sign up and login users
- add items to cart
- place orders
"Actions" is a powerful tool that enables you to customize your Hasura application to fit your needs and requirements.
Access Key
Before writing custom business logic, you need to retrieve the Hasura access key. The access key enables you to make requests to Hasura's GraphQL endpoint.
Go to the Hasura main dashboard, where are listed all your projects. Then click on the gear icon to open the settings of your project.
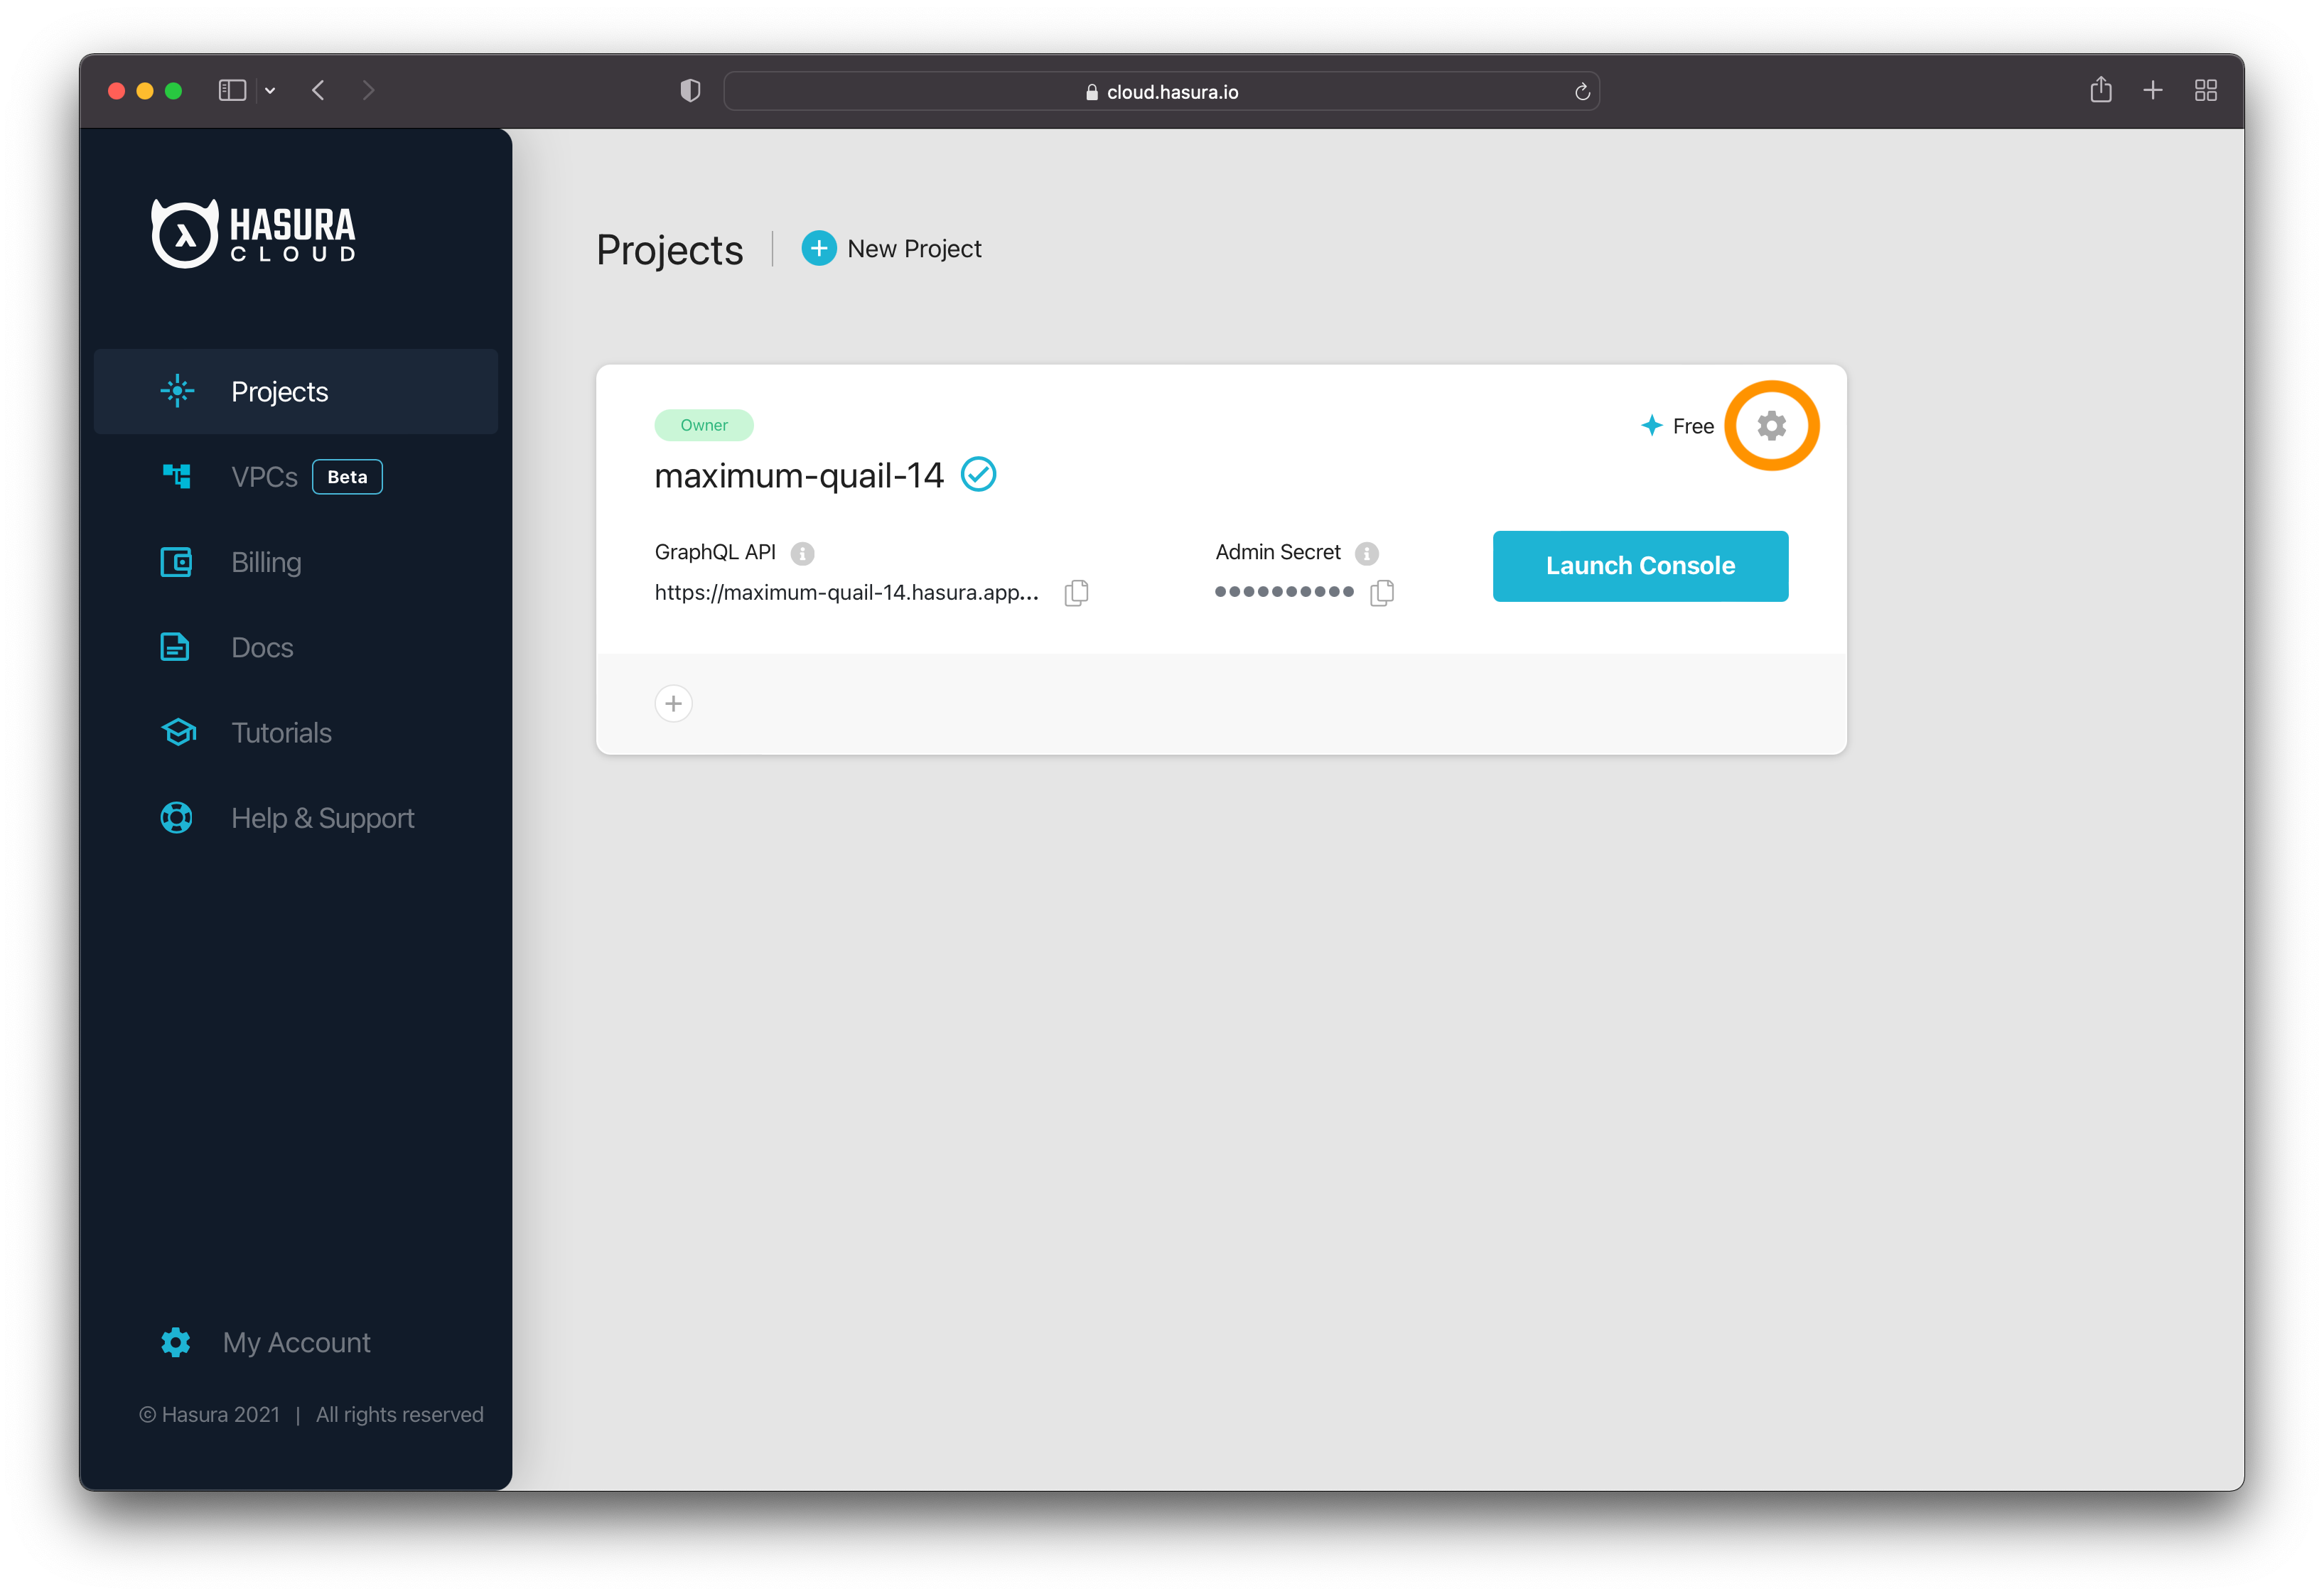
Figure 28 - Hasura Dashboard
Once you are on the settings page, go to the "Env vars" option to get your admin secret/access key.
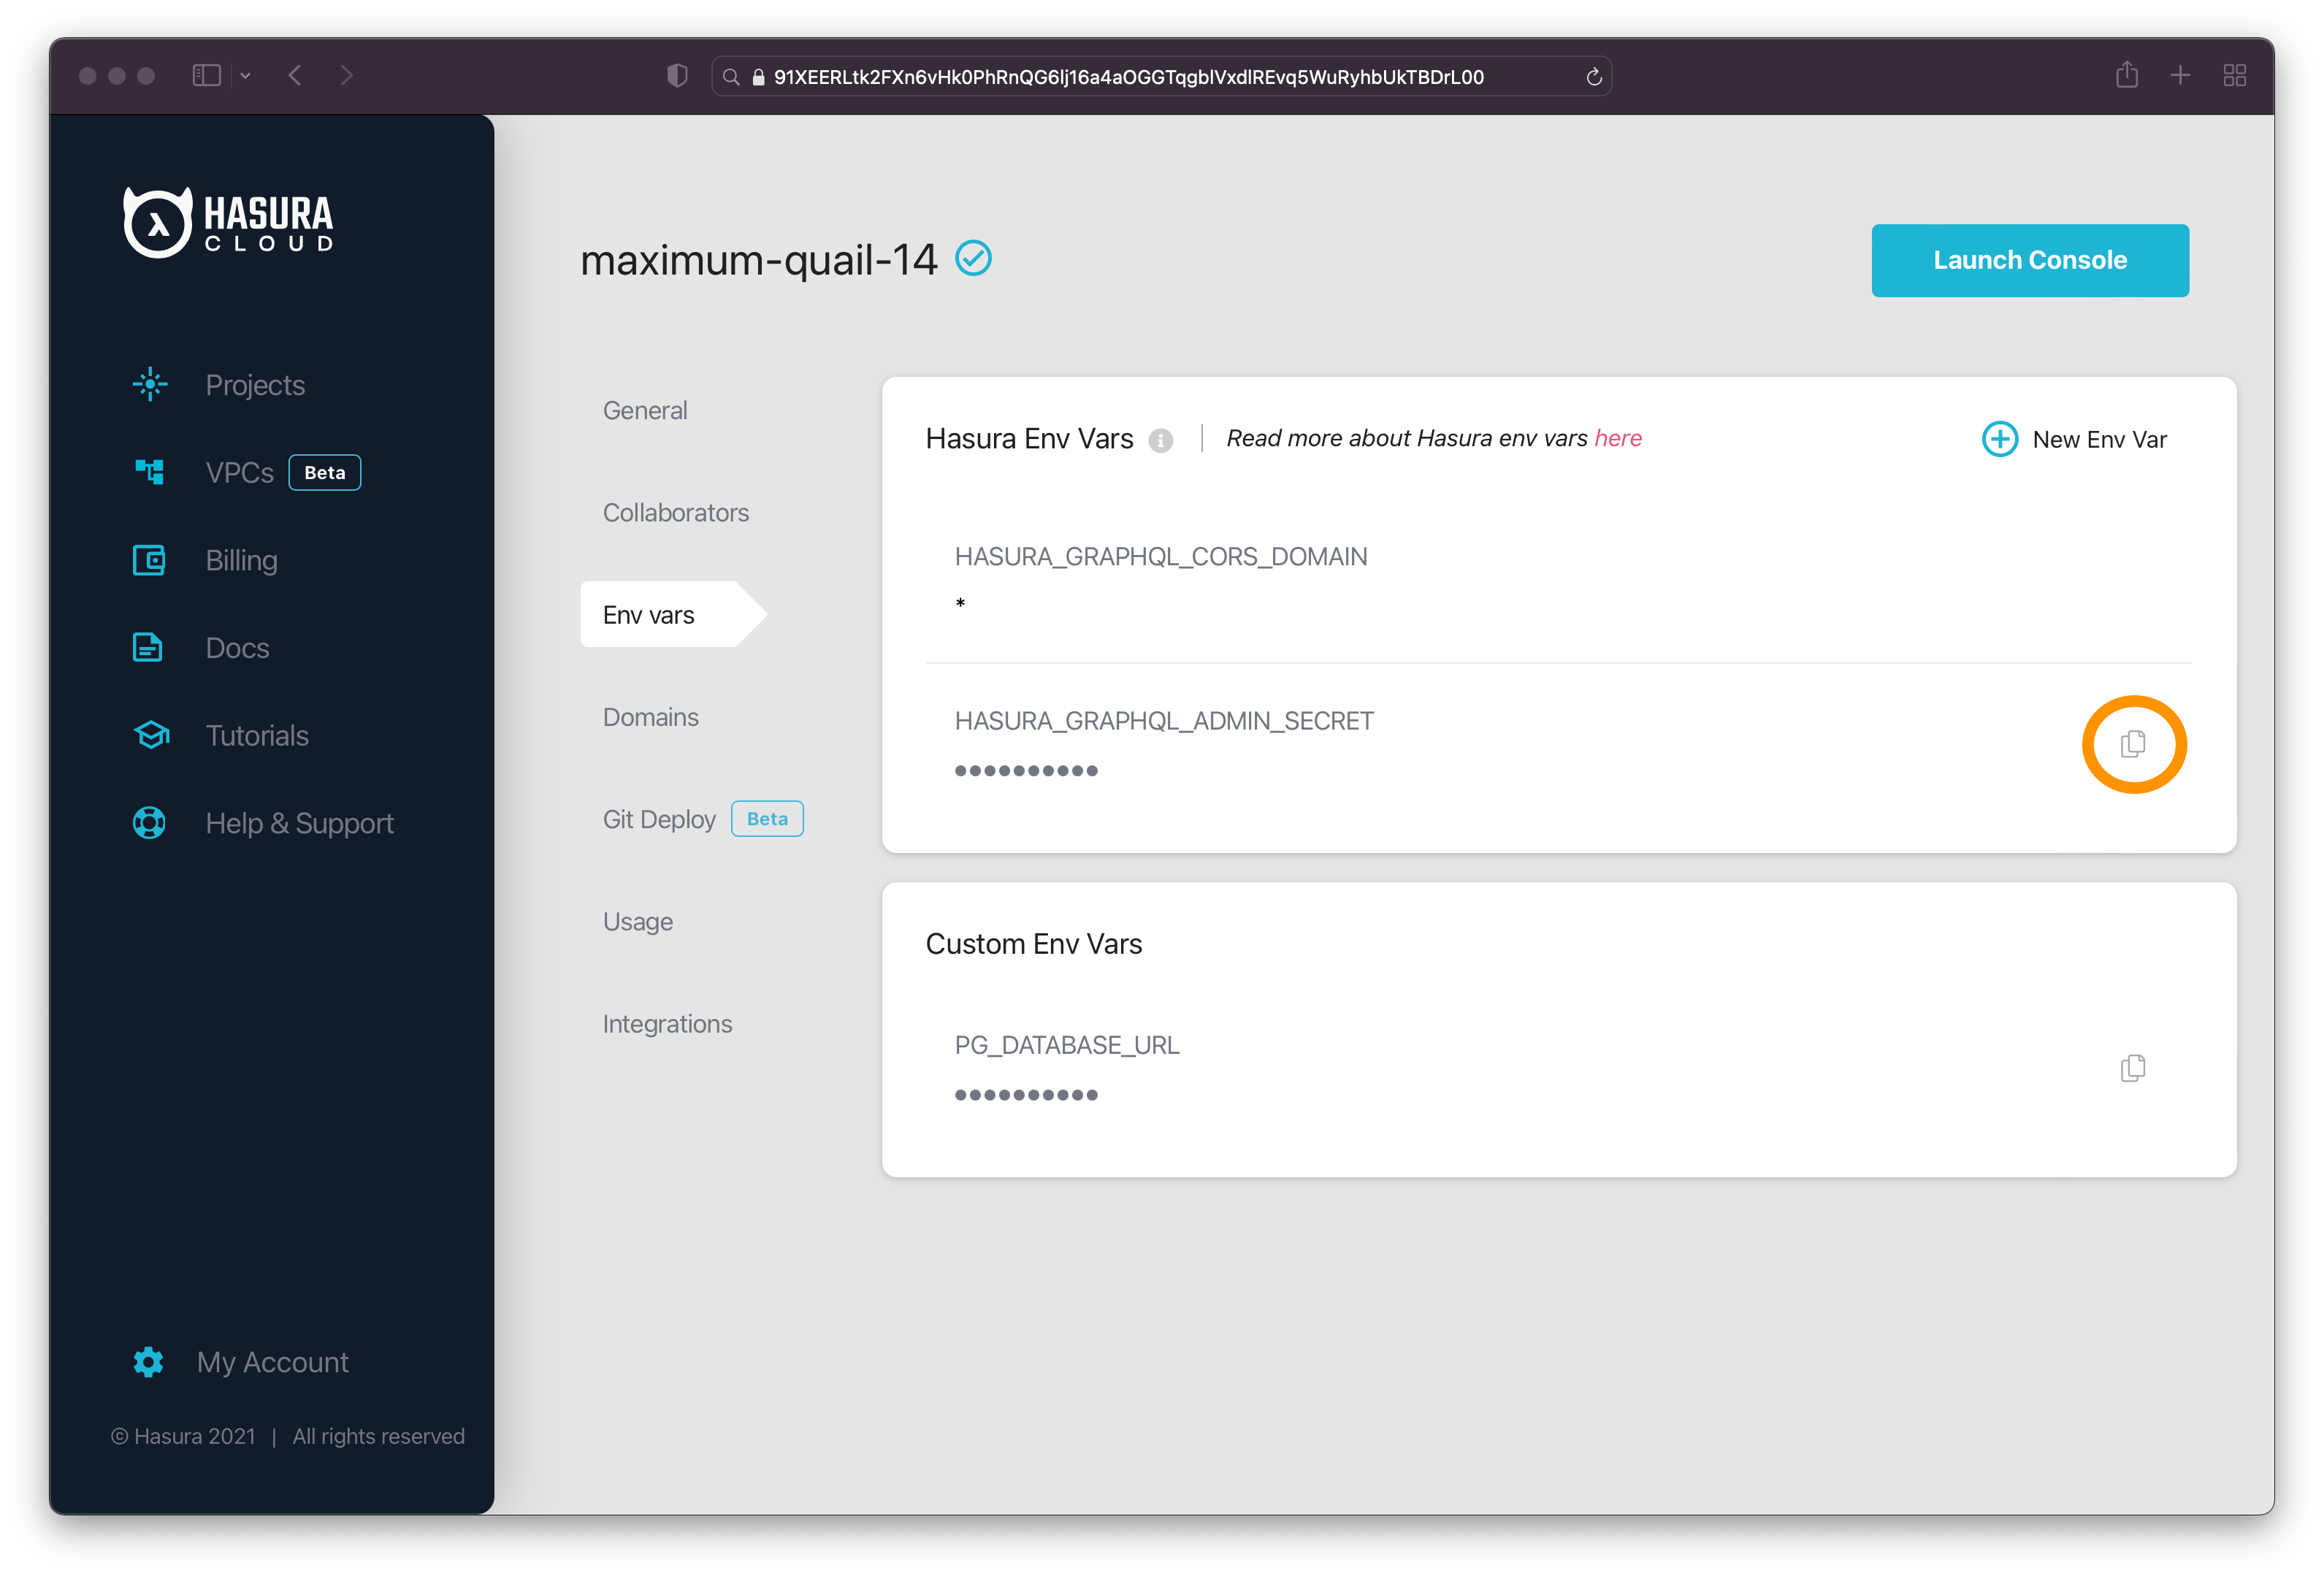
Figure 29 - Project Settings
For this project, you will use Node.js and deploy the code on Heroku. After deploying the code, you will need to add the key in your project as an environment variable. You will pass it with each request made to the Hasura GraphQL endpoint.
More on that later when you write the custom logic.
Authentication
The application should allow people to register, but at the moment, there is no way to do that. Let's create a custom mutation that allows people to register.
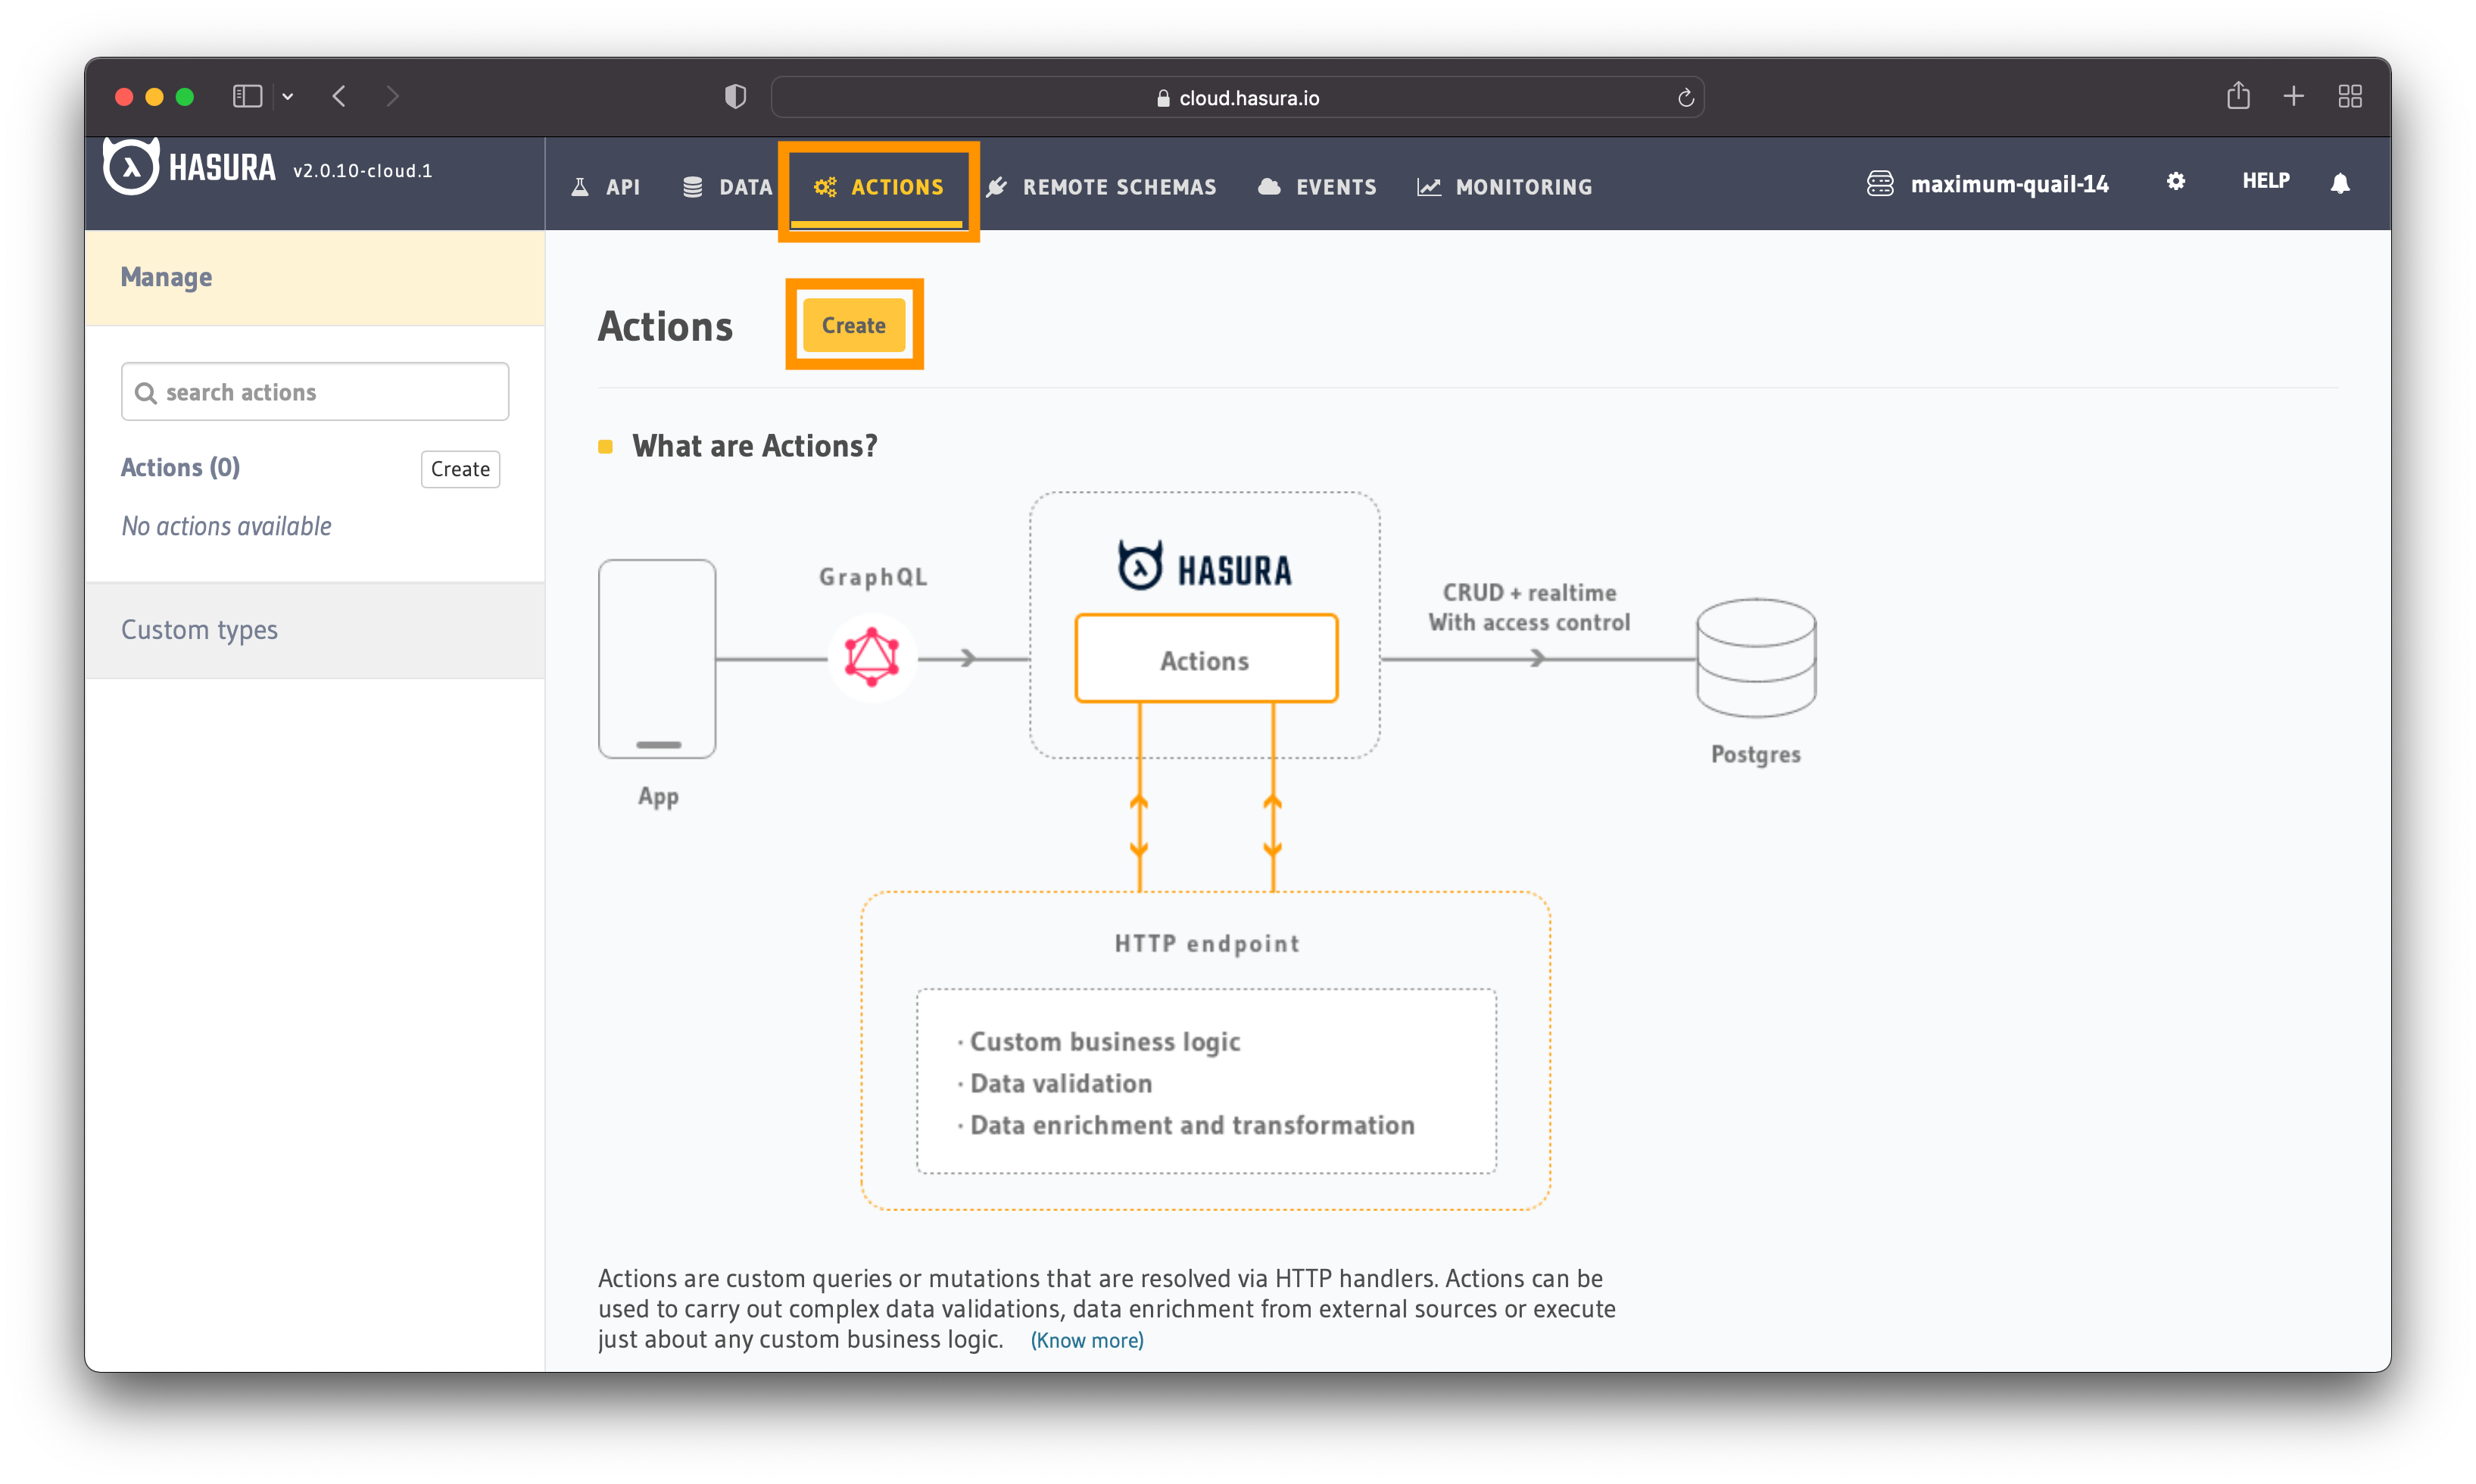
Figure 30 - Hasura Actions
Go to the actions page and click on the button saying "Create". A new page opens where you can set up the new Action.
On this page, you define the following:
- type of the Action - query or mutation
- action itself
- handler - the logic you want to run the query or mutation is executed
- kind of communication - synchronous or asynchronous
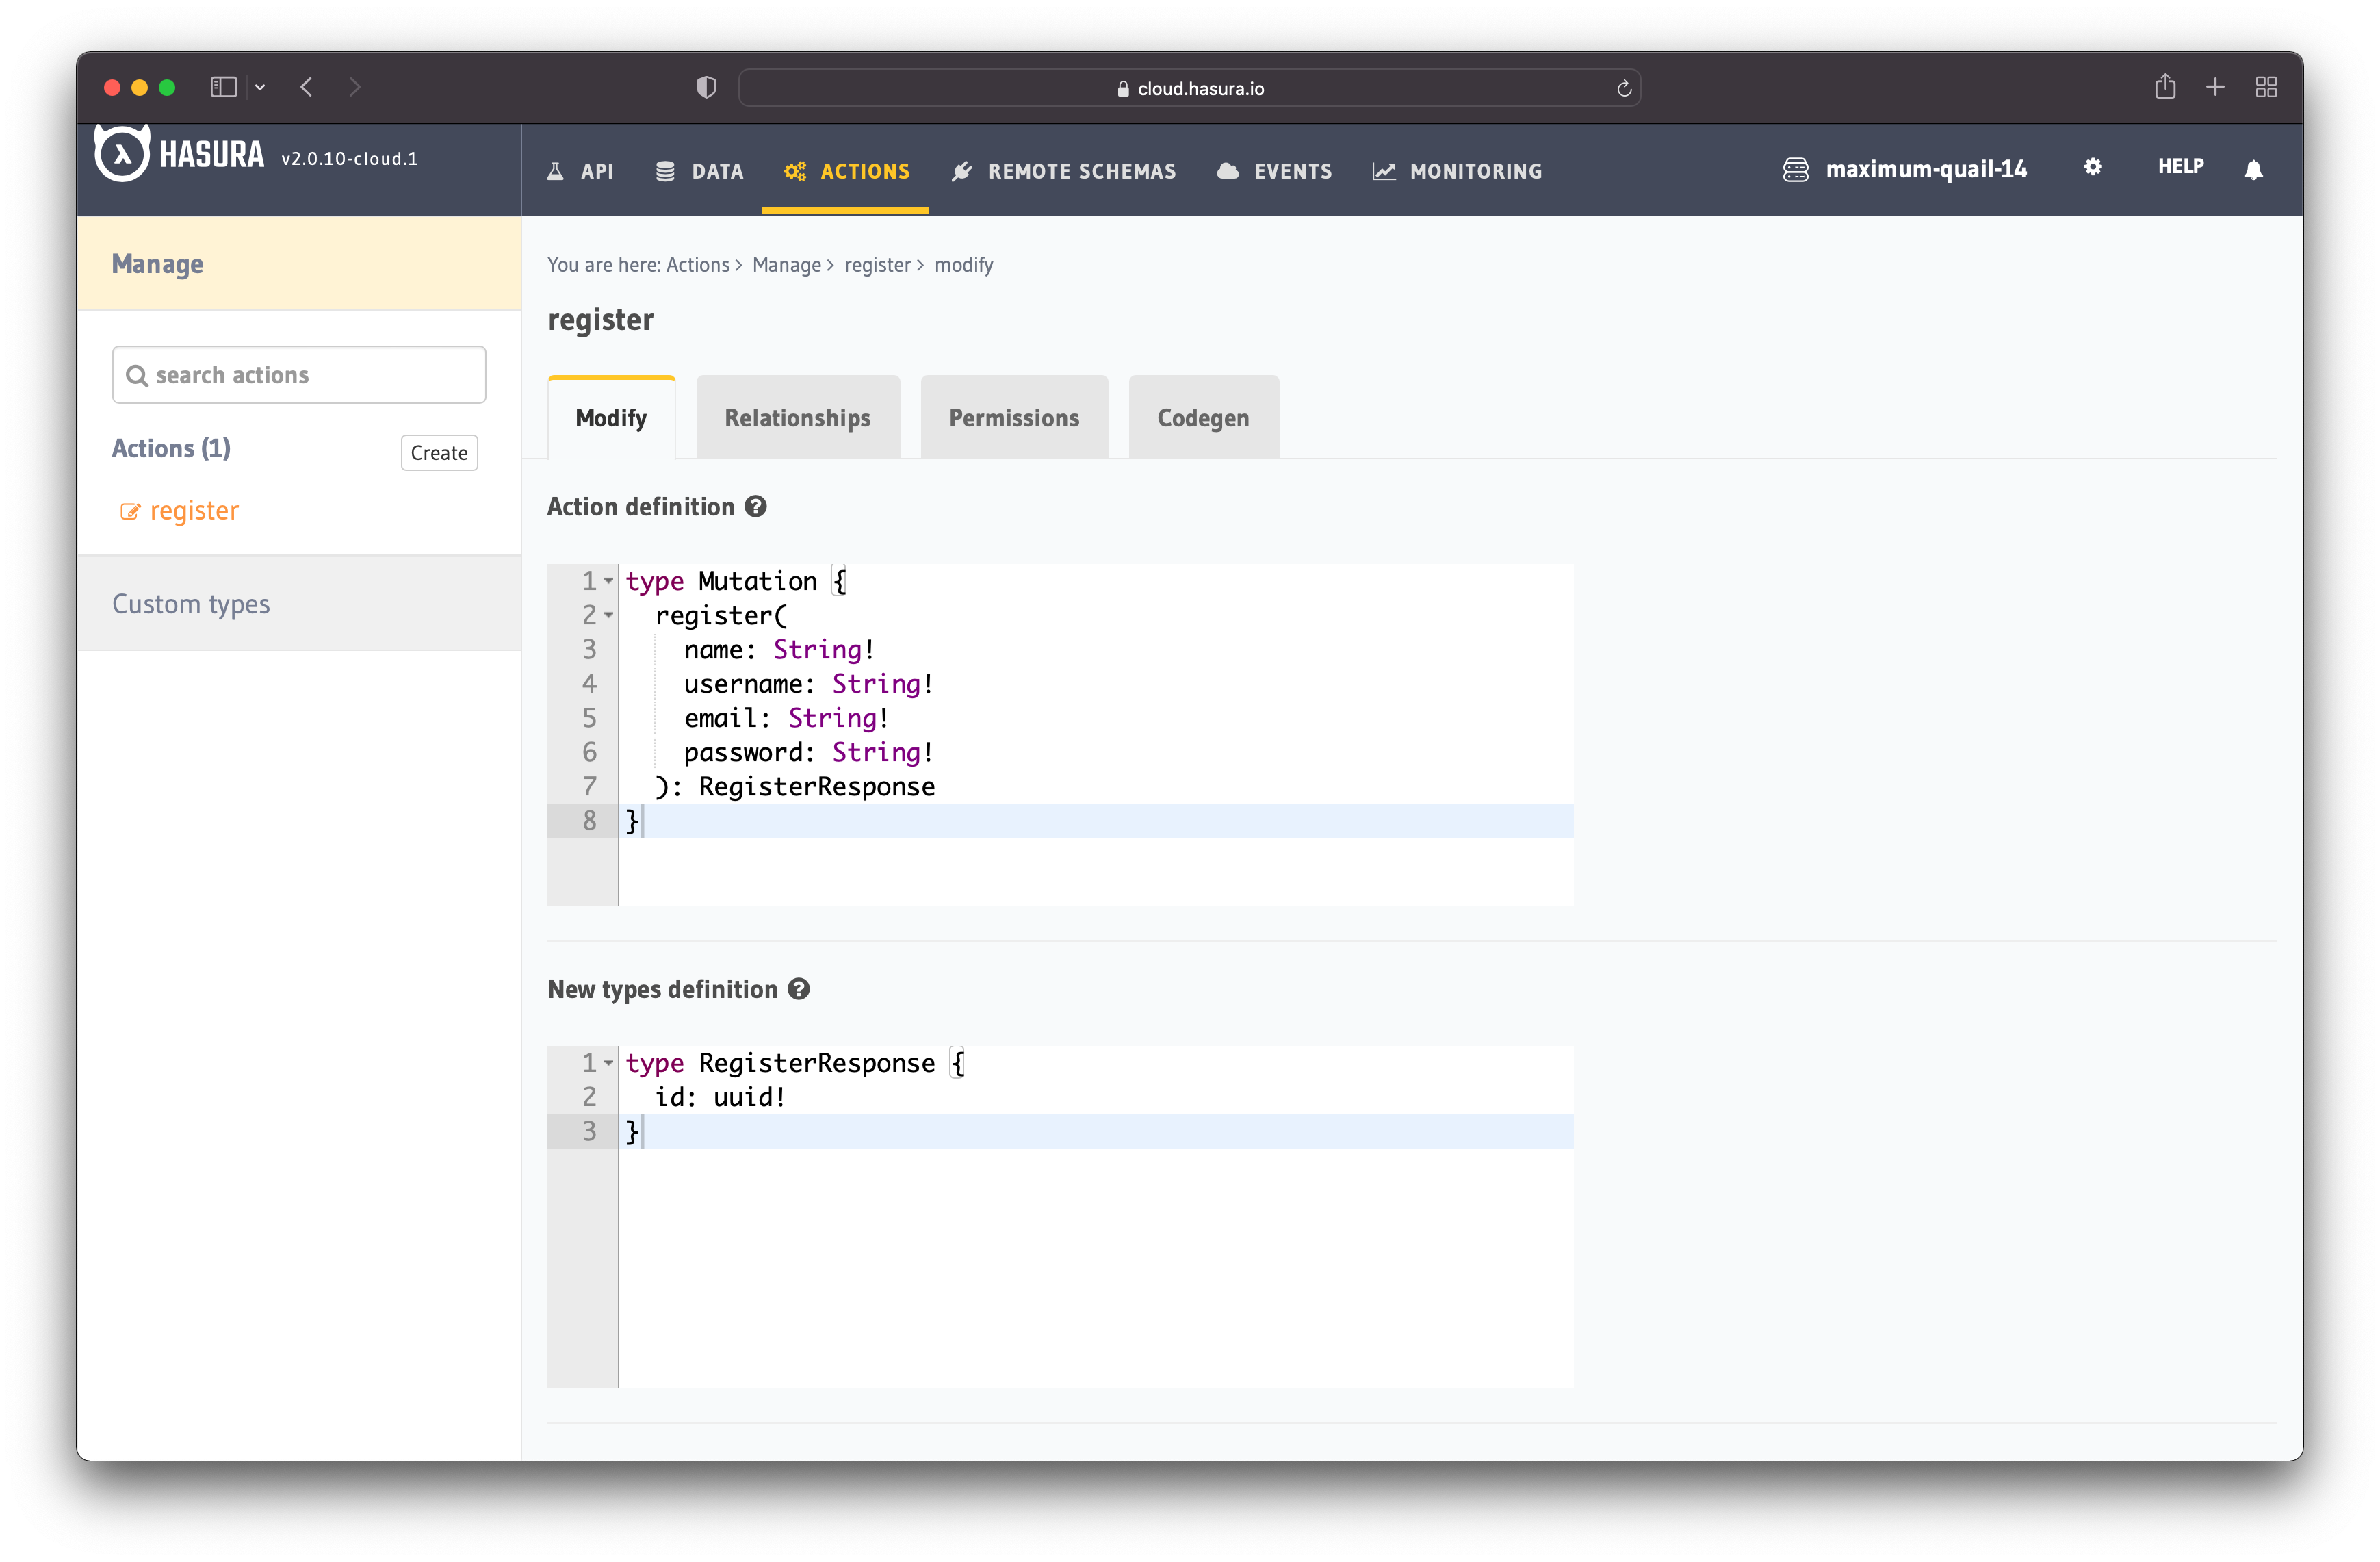
Figure 31 - Hasura Actions Page
Let's start by defining the type and Action. The action type and definition are as follows:
type Mutation {
  register(
    name: String!
    username: String!
    email: String!
    password: String!
  ): RegisterResponse
}
The Action should return something as well. In this case, let's return the id of the newly registered user.
type RegisterResponse {
  id: uuid!
}
For the "Handler" option, you can leave it as it is for now. After implementing the Action, you will deploy the code and update the handler with the appropriate URL.
For example, if the handler URL is apps-aws.hasuractions.com/register, you need to update the "Action Handler" with this URL.
For now, save the Action, and let's start building the handler.
Derived Actions
But there is another way to create an action. Hasura can automatically derive an action from a mutation or query. Go to the "API" tab in your project's dashboard.
In the GraphiQL, write the following mutation:
mutation ($name: String!, $username: String!, $email: String!, $password: String!) {
  insert_users_one(object: {
    name: $name,
    username: $username,
    email: $email,
    password: $password
  }) {
    id
  }
}
After writing the mutation, click on the "Derive action" button, as shown in figure 32.
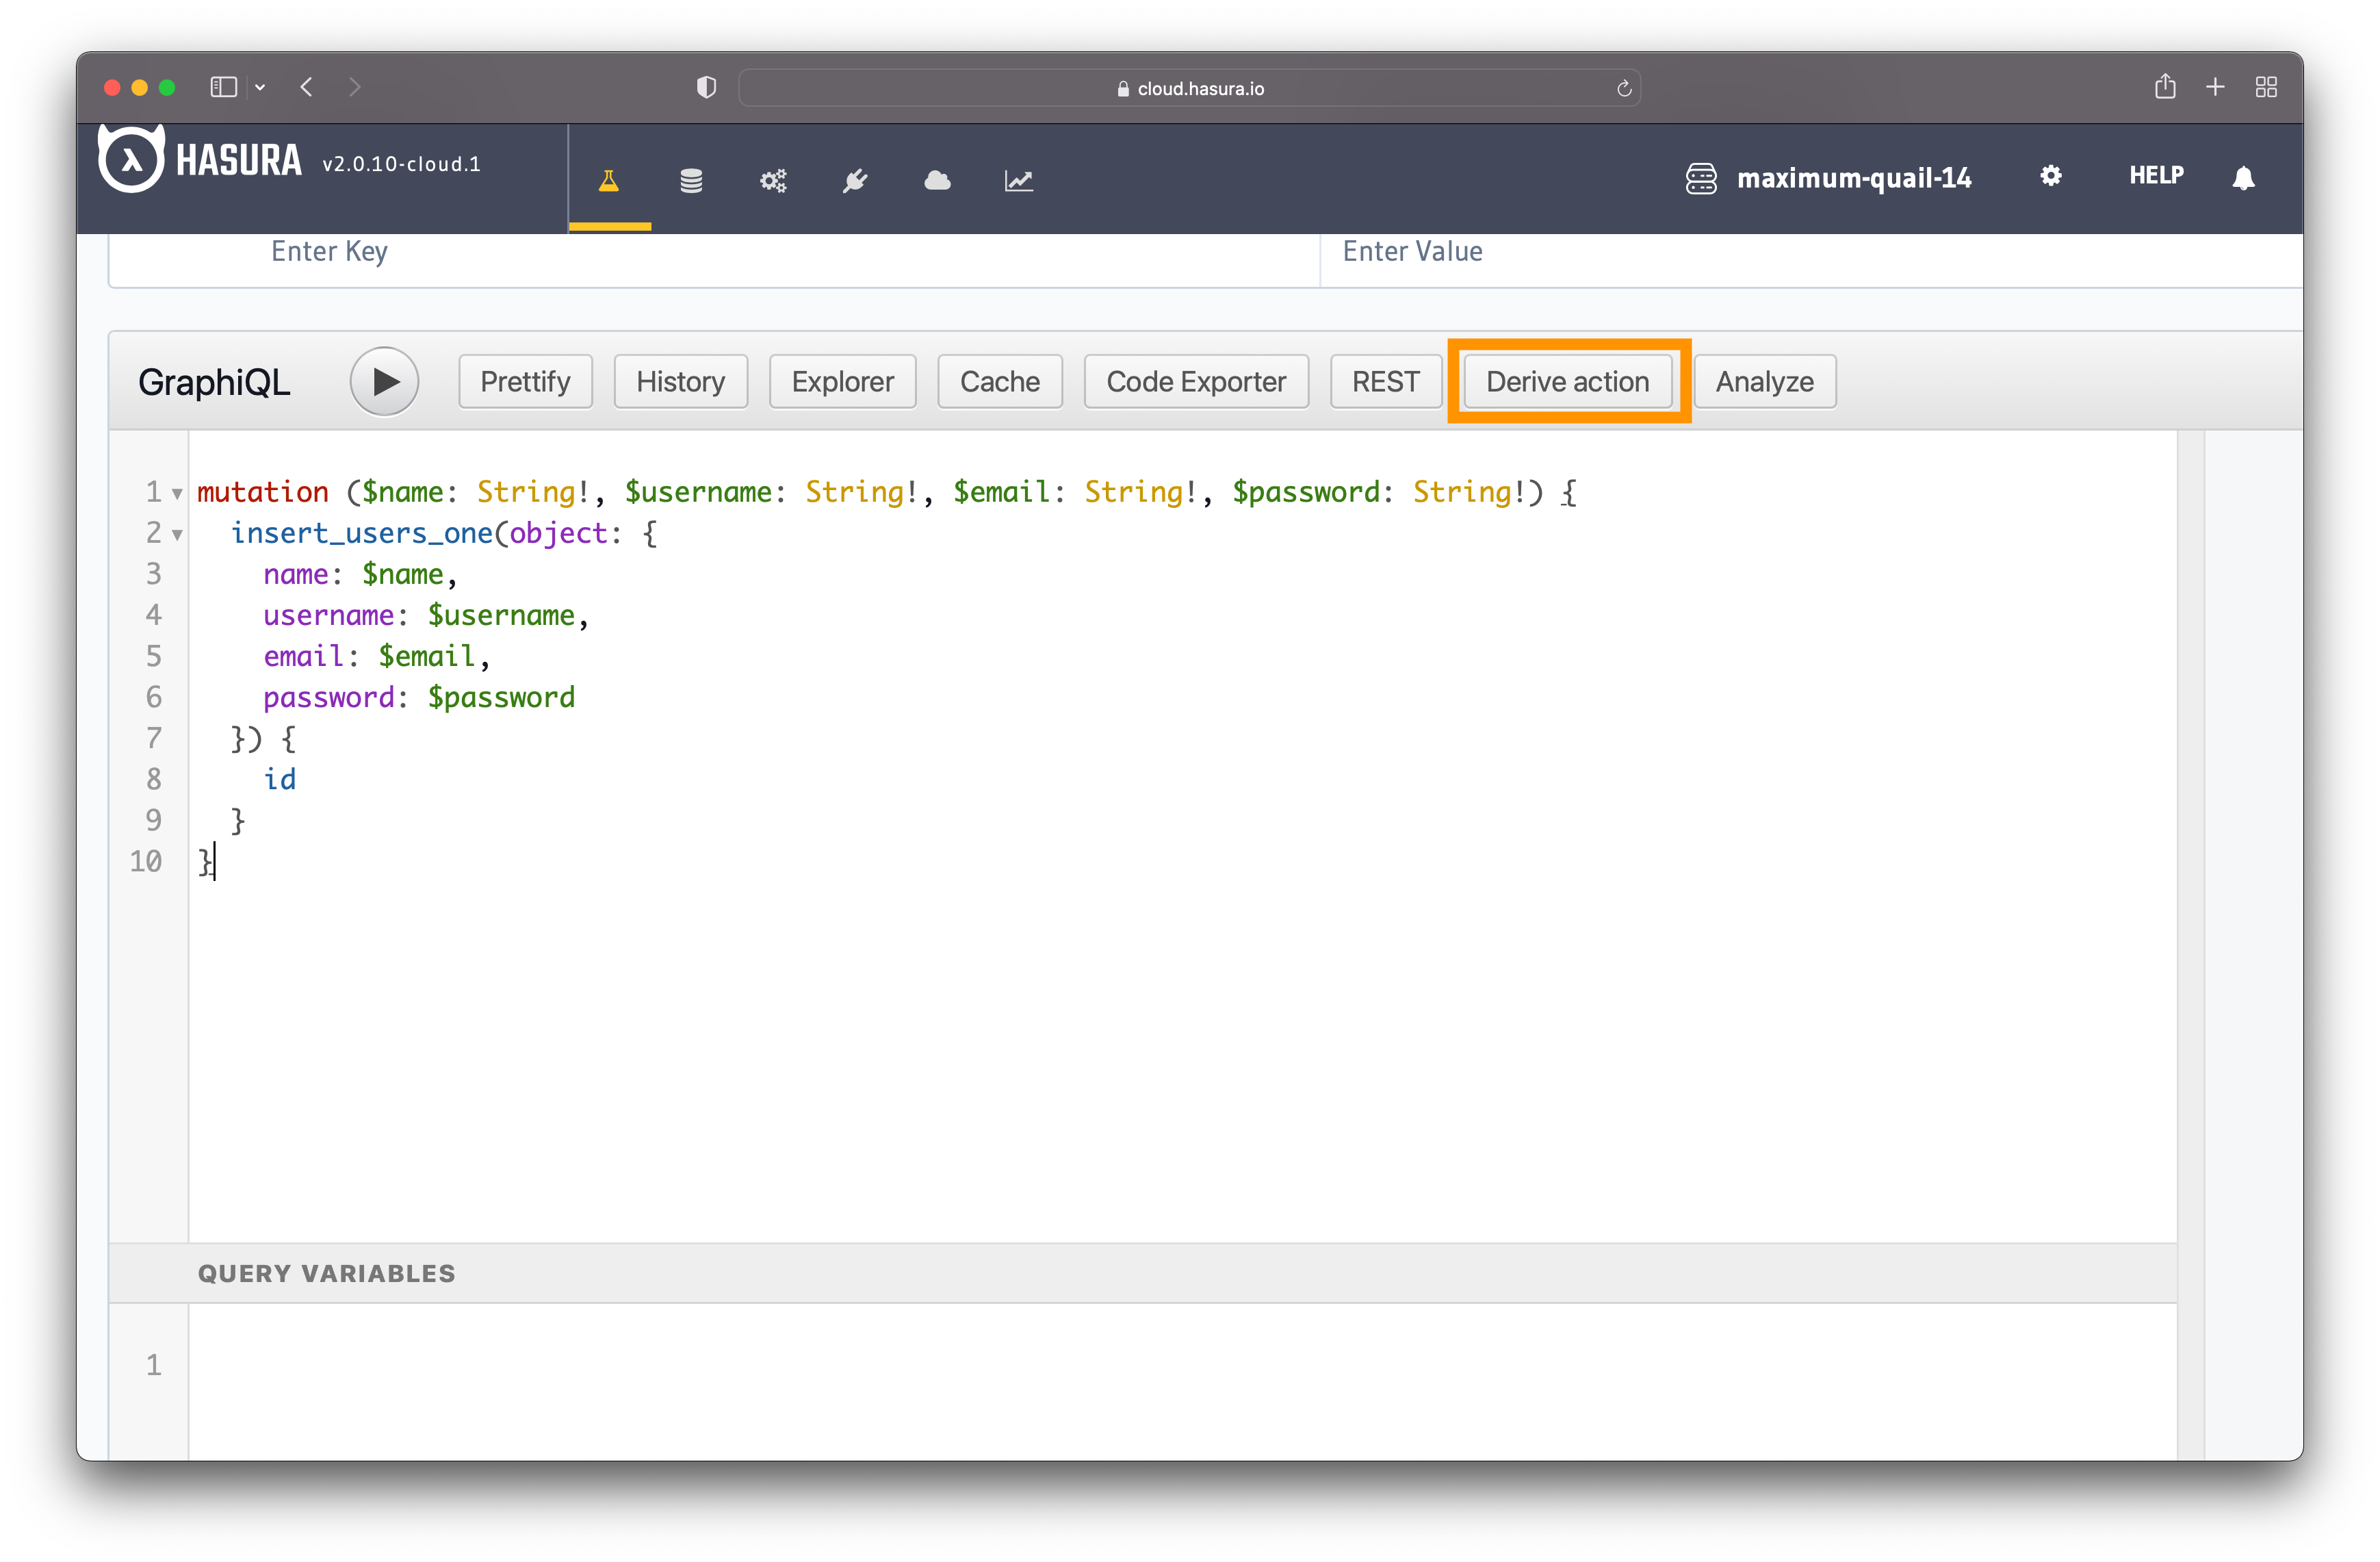
Figure 32 - Derive Action
That takes you to the page where you can create a new Action. It's the same page as the one shown in figure 31. Follow the same steps as you did when you created the Action manually and save it.
Moreover, Hasura generates the code for you as well. If you go to the "Codegen" tab, you should see the generated code.
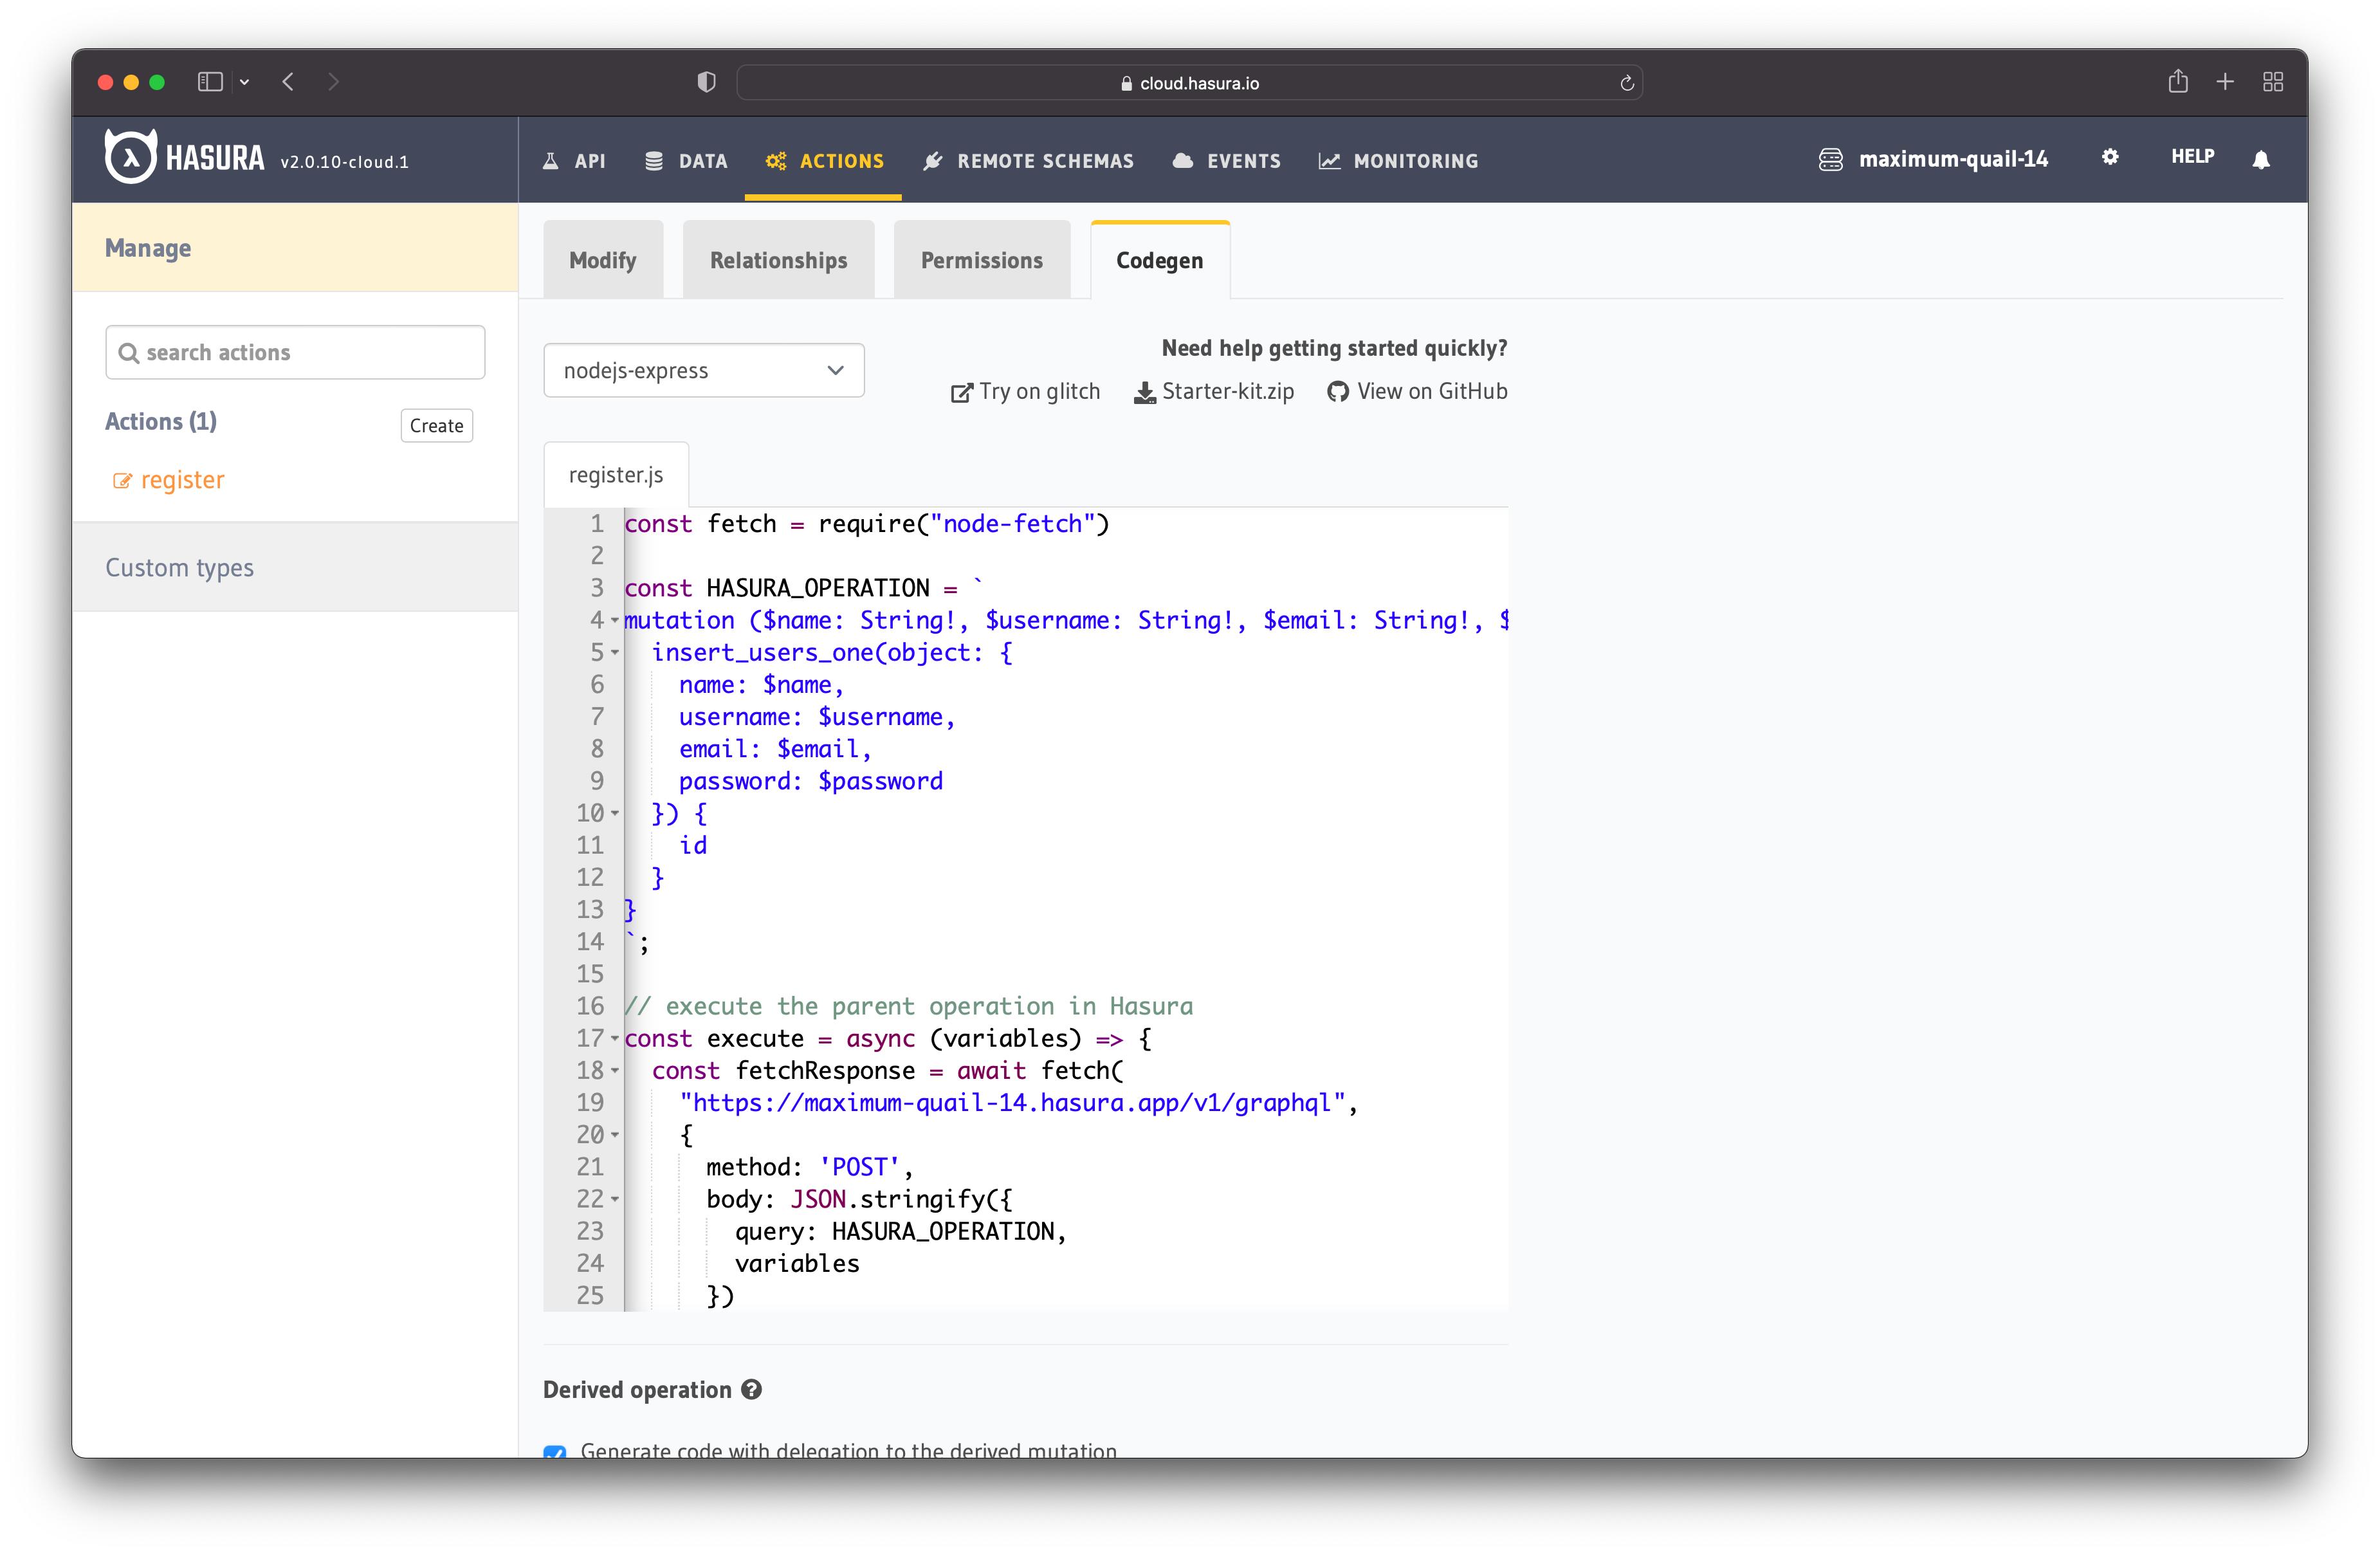
Figure 33 - Code generation
In this case, we only need to make a slight modification to the autogenerated code. That is, to encrypt the password stored in the database.
%[https://gist.github.com/catalinpit/9e1b5a36f4d420034a20a304e008cac9]
The above gist displays the code for the registration mutation. The only thing added to the auto-generated code is line 40, which encrypts the password.
Deploy the Code
Before you can use the newly created Action, you need to deploy the code. So, let's prepare the server for deployment.
Download the starter code by clicking on the Starter-kit.zip option from the "Codegen" tab (figure 33). The starter kit you download is a simple Node.js server. Instead of starting and configuring a server from the ground, you can focus on only writing the custom business logic.
Open the starter kit in your favourite code editor and then go to src/server.js. You should see the following code:
const express = require("express");
const bodyParser = require("body-parser");

const app = express();

const PORT = process.env.PORT || 3000;

app.use(bodyParser.json());

app.post('/hello', async (req, res) => {
  return res.json({
    hello: "world"
  });
});

app.listen(PORT);
You can remove the /hello route and add the code from the above gist in its place. You can see the complete server code in this repository.
Now, your application is ready to be deployed. One place where you can deploy your Node.js server for free is Heroku. Check this guide on deploying to Heroku.
After deploying the application, make sure to set up the Hasura access key (from section access key). You need to add that as an environment variable in Heroku. Check this article to see how to set environment variables in Heroku.
Update the Handler
After a successful deployment, your application should have a public URL where it can be accessed. For example, my application URL is crorit.herokuapp.com.
To update the handler URL:
- go to the "register" Action in Hasura Dashboard
- select the "Modify" tab
- add the handler URL

Figure 34 - Updated Handler URL
Save the changes, and you are done! Users can register now.
Action Permissions
By default, Actions are configured to be admin-only. That means only admins can perform these mutations.
But you might need other types of users to perform these mutations. In this case, unauthorized people should be able to register.
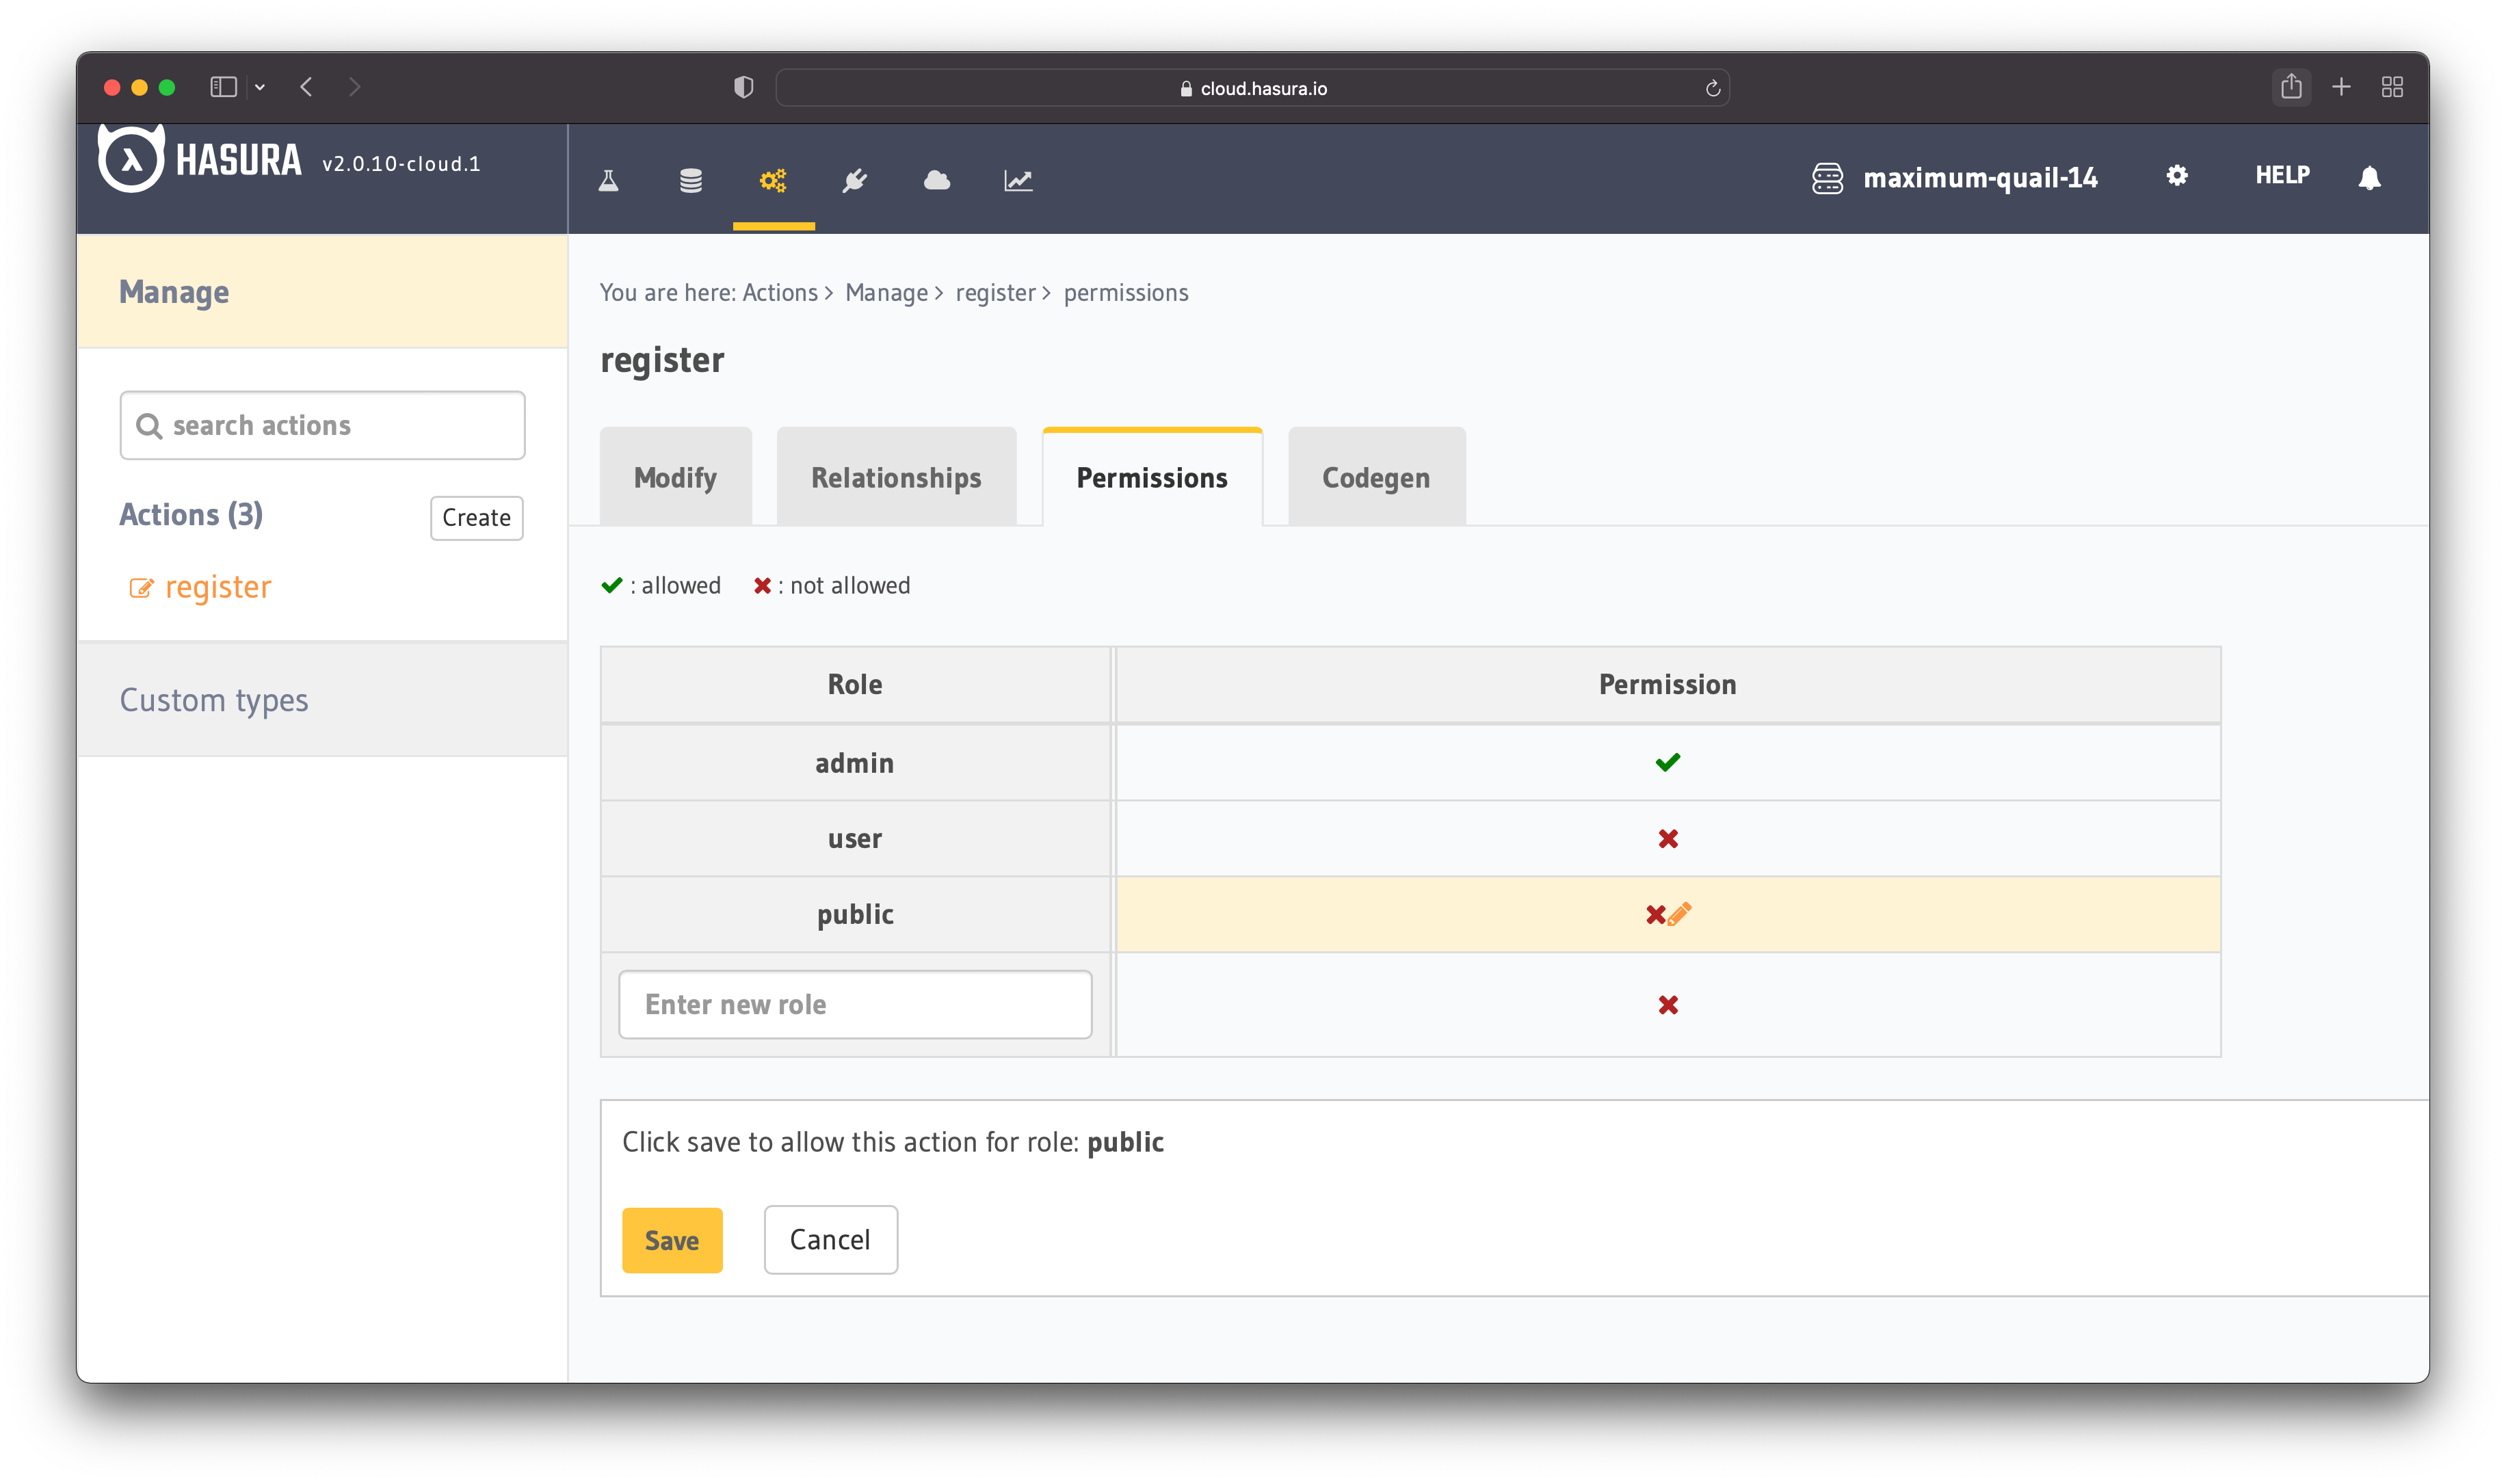
Figure 35 - Action Permissions
In the Action's "Permissions" tab, allow the Action for the public role. Click on "x" and then on "Save" to do that.
Hasura documentation covers Authentication and Authorization in great detail, if you need more information.
Test the Action
Let's test the registration process by running the following mutation:
mutation {
    register(
        name: "Hasura Action",
        username: "haac",
        email: "haac@gmail.com",
        password: "this_IS_password1!"
    ) {
        id
    }
}
Note: Do not forget to set x-hasura-role to "public" before running the mutation.
We can check if the mutation was successful by checking the records in Hasura. Querying all the users shows that the operation was successful.
Figure 36 illustrates the user added through the "register" Action.
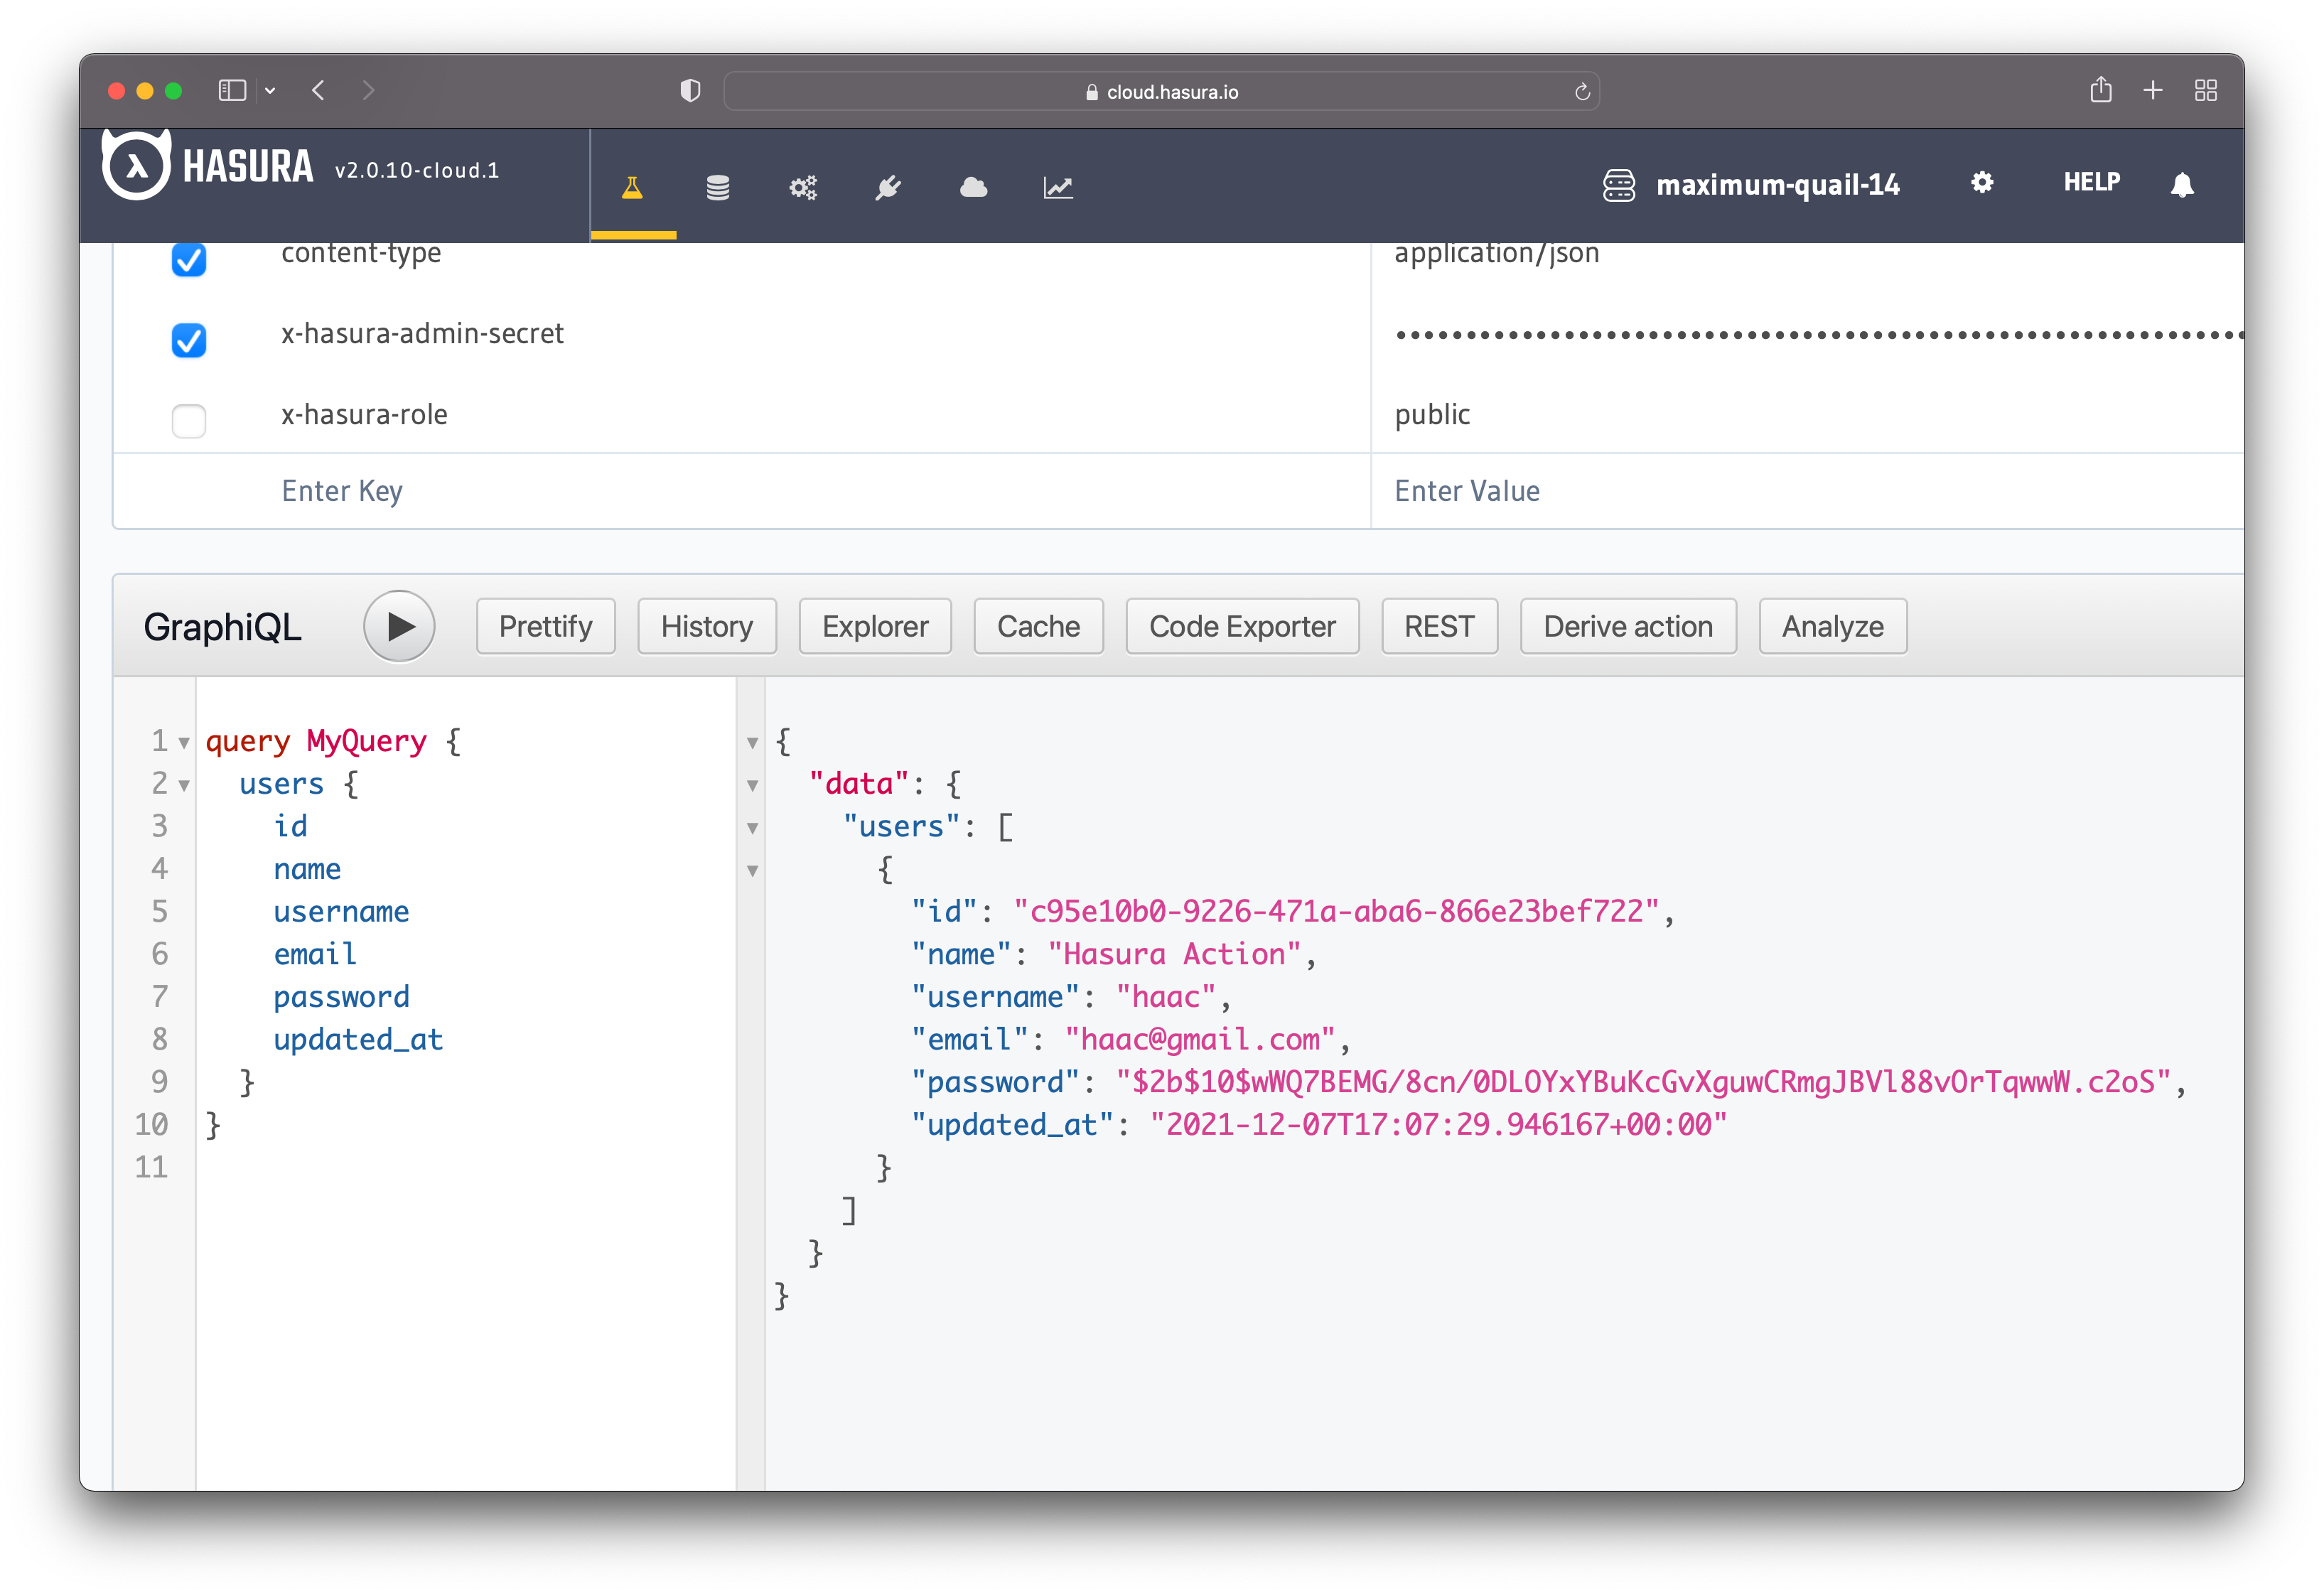
Figure 36 - Users Table
You can create custom queries or mutations through "Actions" whenever you need to extend your application's functionality.
Create Order Item
The application also needs a custom mutation to create order items. In the GraphiQL, write the following mutation:
mutation createOrderItem($product_id: uuid, $quantity: Int!, $order_id: uuid){
  insert_order_item_one(object: {
    product_id: $product_id,
    quantity: $quantity,
    order_id: $order_id
  }) {
    id
  }
}
After writing the mutation, click on the option "Derive Action", as you did for the registration Action (figure 32).
Hasura automatically generates the Action definition and type. For this custom mutation, you do not need to modify anything. You can save the Action without changing the handler URL because you will update it after deploying the application.
After saving the new Action, go to the "Codegen" tab (Figure 33) to see the code generated by Hasura and download the starter kit.
The autogenerated code is a good starting point for this Action, but we also need to write custom business logic.
What's the logic for this Action?
- Before creating an order item, check if the user has an open order.
- If the user does not have an open order or if there is a completed order, create an order first. After that, create the order item and append it to the newly created order.
- If the user has an open order, create the order item and append it to the existing order.
Execute Function
First of all, let's start by generalizing the execute function. The function should take the following arguments:
- variables
- operation - the GraphQL query or mutation
- request headers
const execute = async (variables, operation, reqHeaders) => {
  const fetchResponse = await fetch(
    "<your_GraphQL_endpoint",
    {
      method: 'POST',
      headers: {
        ...reqHeaders,
        'x-hasura-access-key': process.env.HASURA_GRAPHQL_ADMIN_SECRET
      } || {},
      body: JSON.stringify({
        query: operation,
        variables
      })
    }
  );

  const data = await fetchResponse.json();
  return data;
};
Now you can reuse the function for different queries and mutations.
Additional Queries/Mutations
Hasura gives you the first mutation that creates a new order item in the autogenerated code.
const CREATE_ORDER_ITEM = `
mutation createOrderItem($product_id: uuid, $quantity: Int!, $order_id: uuid) {
  insert_order_item_one(object: {
    product_id: $product_id,
    quantity: $quantity,
    order_id: $order_id
  }) {
    id
  }
}`;
But before creating the order item, you need to check if the user has any open orders. For that, you need another query.
const USER_ORDER_EXISTS = `query getUserOrder($user_id: uuid) {
  users(where: {id: {_eq: $user_id}}) {
    orders(order_by: {created_at: desc}) {
      created_at
      id
      ordered
    }
  }
}`;
The above query returns an empty array if the user does not have any orders. So, if it returns an empty array, we need to create a new order.
You can create a new order with the following mutation:
const CREATE_USER_ORDER = `mutation createUserOrder($city: String!, $country: String!, $house_number: Int!, $street_name: String!, $user_id: uuid, $zip_code: String!, $total: numeric) {
  insert_order(
    objects: {
      city: $city,
      country: $country,
      house_number: $house_number,
      street_name: $street_name,
      user_id: $user_id,
      zip_code: $zip_code,
      total: $total
    }
  ) {
    returning {
      id
    }
    affected_rows
  }
}`;
In this case, the order acts as a shopping cart. That means you create a new order without an address. Its purpose is to simply keep track of the items a user wants to buy.
You will create a new action that allows users to place orders later.
Build the Handler
The next stage involves building the handler itself. Let's start by storing the request input and headers in separate variables so they can be accessed easier.
Create an empty variable for the latest order as well. This variable will be assigned the user's order.
app.post('/createOrderItem', async (req, res) => {
    const { product_id, quantity } = req.body.input;
    const user_id = req.body.session_variables['x-hasura-user-id'];
    let latest_order = '';
});
The first step is to check if the user has any orders. You call the execute method with the following arguments:
- the ID of the user making the request
- the GraphQL query
USER_ORDER_EXISTS
// check if the user has any orders
const { data: orderExists, errors: orderExistsErr } = await execute({ user_id }, USER_ORDER_EXISTS, req.body.session_variables);

if (orderExistsErr) {
    return res.status(400).json({ error: orderExistsErr[0].message });
}
The USER_ORDER_EXISTS query returns an array called "orders". If the user does not have any orders, it returns an empty array. If the user has orders, it returns an array with all the orders.
In figure 37, you can see an example of a user that does not have any orders.

Figure 37 - No User Orders
Figure 38 illustrates an example of a user with an order. The query returns when the order was created and the order ID.
The order ID is necessary because you will need it to append the order items to the order.

Figure 38 - User Orders
That takes us to the next step, where we assign the order to the latest_order variable.
// if the user doesn't have any orders or the latest order is ordered
//   create a new order and store its ID in "latest_order"
// otherwise, store the ID of the latest order in "latest_order"
if (orderExists.users[0].orders.length === 0 || orderExists.users[0].orders[0].ordered === true) {
  const { data: createOrder, errors: createOrderErr } = await execute({ city: '', country: '', house_number: 0, street_name: '', user_id, zip_code: '', total: 0}, CREATE_USER_ORDER, req.body.session_variables);

  if (createOrderErr) {
    return res.status(400).json({ error: createOrderErr[0].message });
  }

  latest_order = createOrder.insert_order.returning[0].id;
} else {
  latest_order = orderExists.users[0].orders[0].id;
}
The above code checks if the "orders" array is empty OR if the latest order is completed. If the array is empty or the latest order is completed, it runs the CREATE_USER_ORDER mutation to create a new order for the user making the request. Considering that the mutation is successful, it assigns the ID of the newly created order to the latest_order variable.
Otherwise, if the "orders" array is not empty or the latest order is not completed, it assigns the id of the last incomplete order to latest_order.
At this point, there is an active order, whether the user had one already or a new one was created. That means the order item can be created and added to the order.
// create the order item and add it to the order
const { data: createOrder, errors: createOrderErr } = await execute({ product_id, quantity, order_id: latest_order }, CREATE_ORDER_ITEM, req.body.session_variables);

if (createOrderErr) {
    return res.status(400).json({ error: createOrderErr[0].message});
}

// success
return res.json({
    ...createOrder.insert_order_item_one
});
The action code is complete and you can use it to create order items. You can see the complete code for the Action in this gist.
Deploy the Code
Before you can use the newly created Action, you need to deploy the new code. To keep things separated and make it easier to understand, we will have a separate Node.js server for all Actions.
That means you need to create a new Node server. The steps are similar to what you did for the "register" Action:
- Download the starter kit
- Add the necessary code (replace the
/helloroute with the code from the above gist in thesrc/server.jsfile) - Deploy the application
You can see the complete server code in this repository.
Modify the Action
Looking at figure 37 (above), you can see that the Action definition contains the order_id field.
However, we do not have to pass it manually anymore. Only authenticated users can create an order item, so the order_id is passed automatically based on the user that makes the request.
Go to the createOrderItem Action and click on the "Modify" tab. After that, delete the line with the order_id and save it.
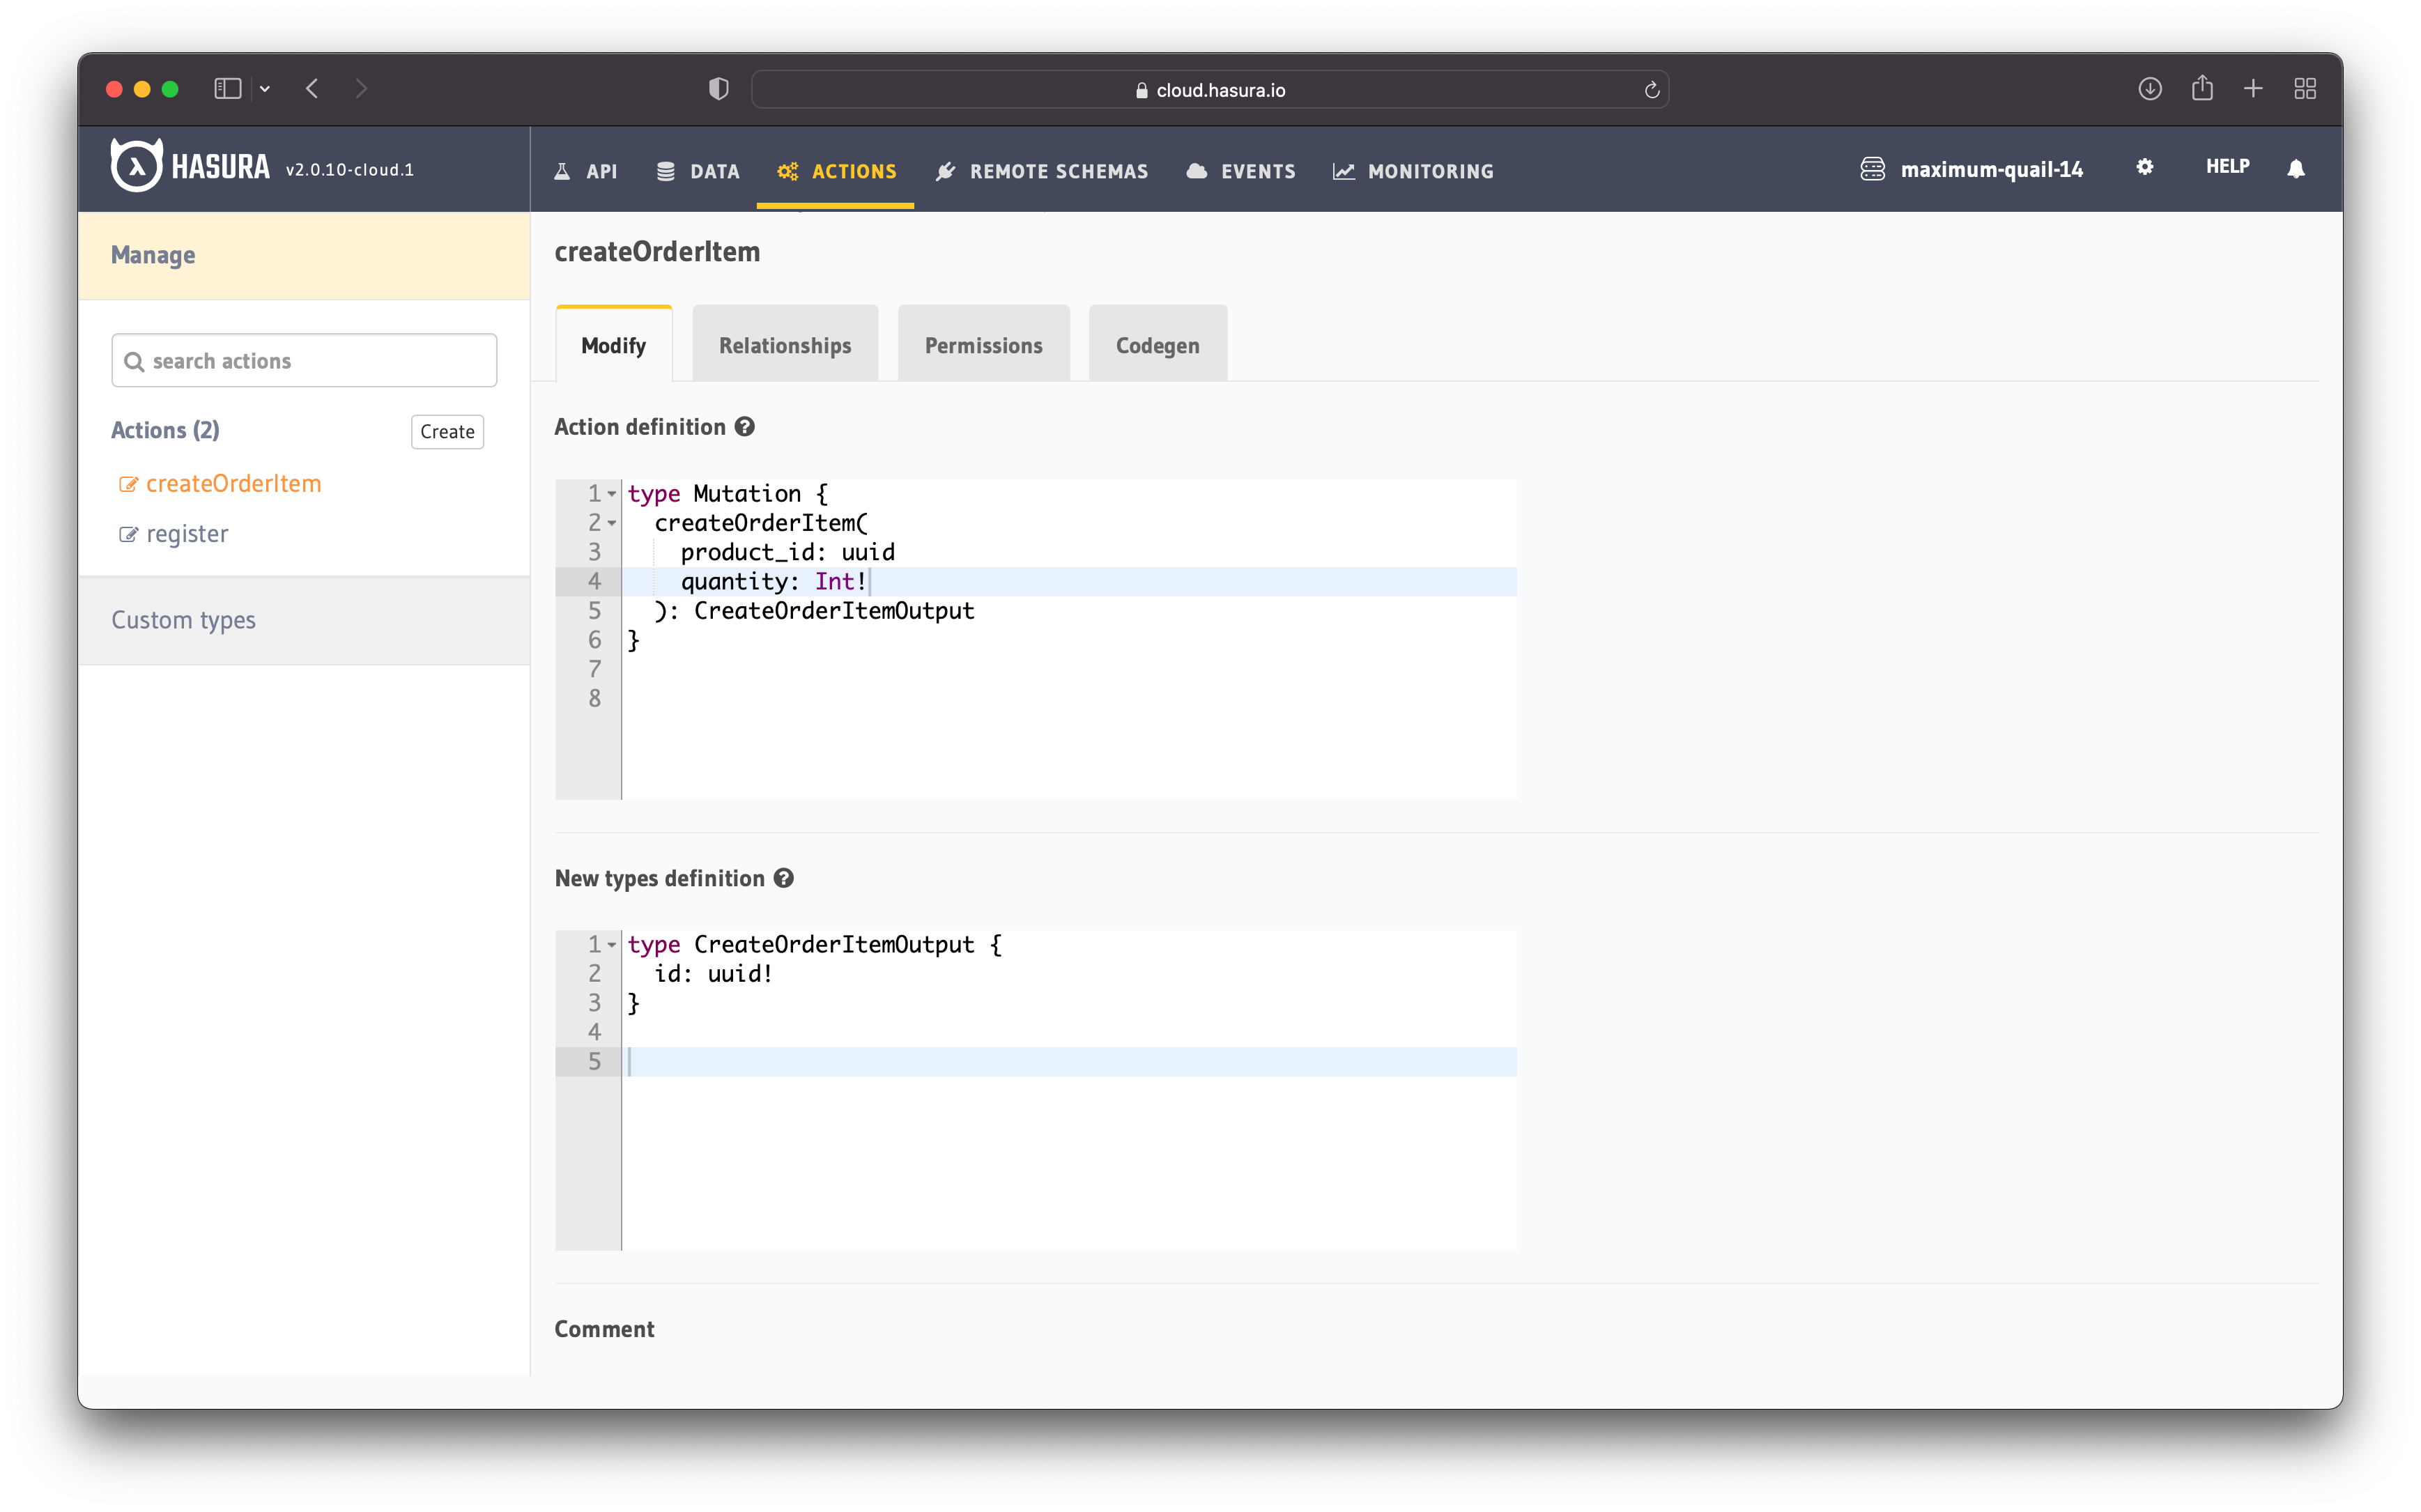
Figure 39 - Hasura Modify Action
Figure 39 illustrates how the Action should look at this point.
The last thing you need to update is the Action handler. Update the handler with the URL in a similar way you did it for the "register" action.
Now it's time to test the Action and see if it works properly.
Action Permissions
Similar to setting the Action permissions for registration, allow the "user" role to perform the createOrderItem mutation.
See figure 35 for reference.
Test the Action
Let's try to create a new order item by running the following mutation:
mutation {
    createOrderItem (
        product_id: "00209df6-d11a-4b04-b7e2-9cf1fa122215",
        quantity: 10
    ) { id }
}
The Action worked properly and it created the new order item. In figure 40, you can see that it returned the id of the newly created order item.
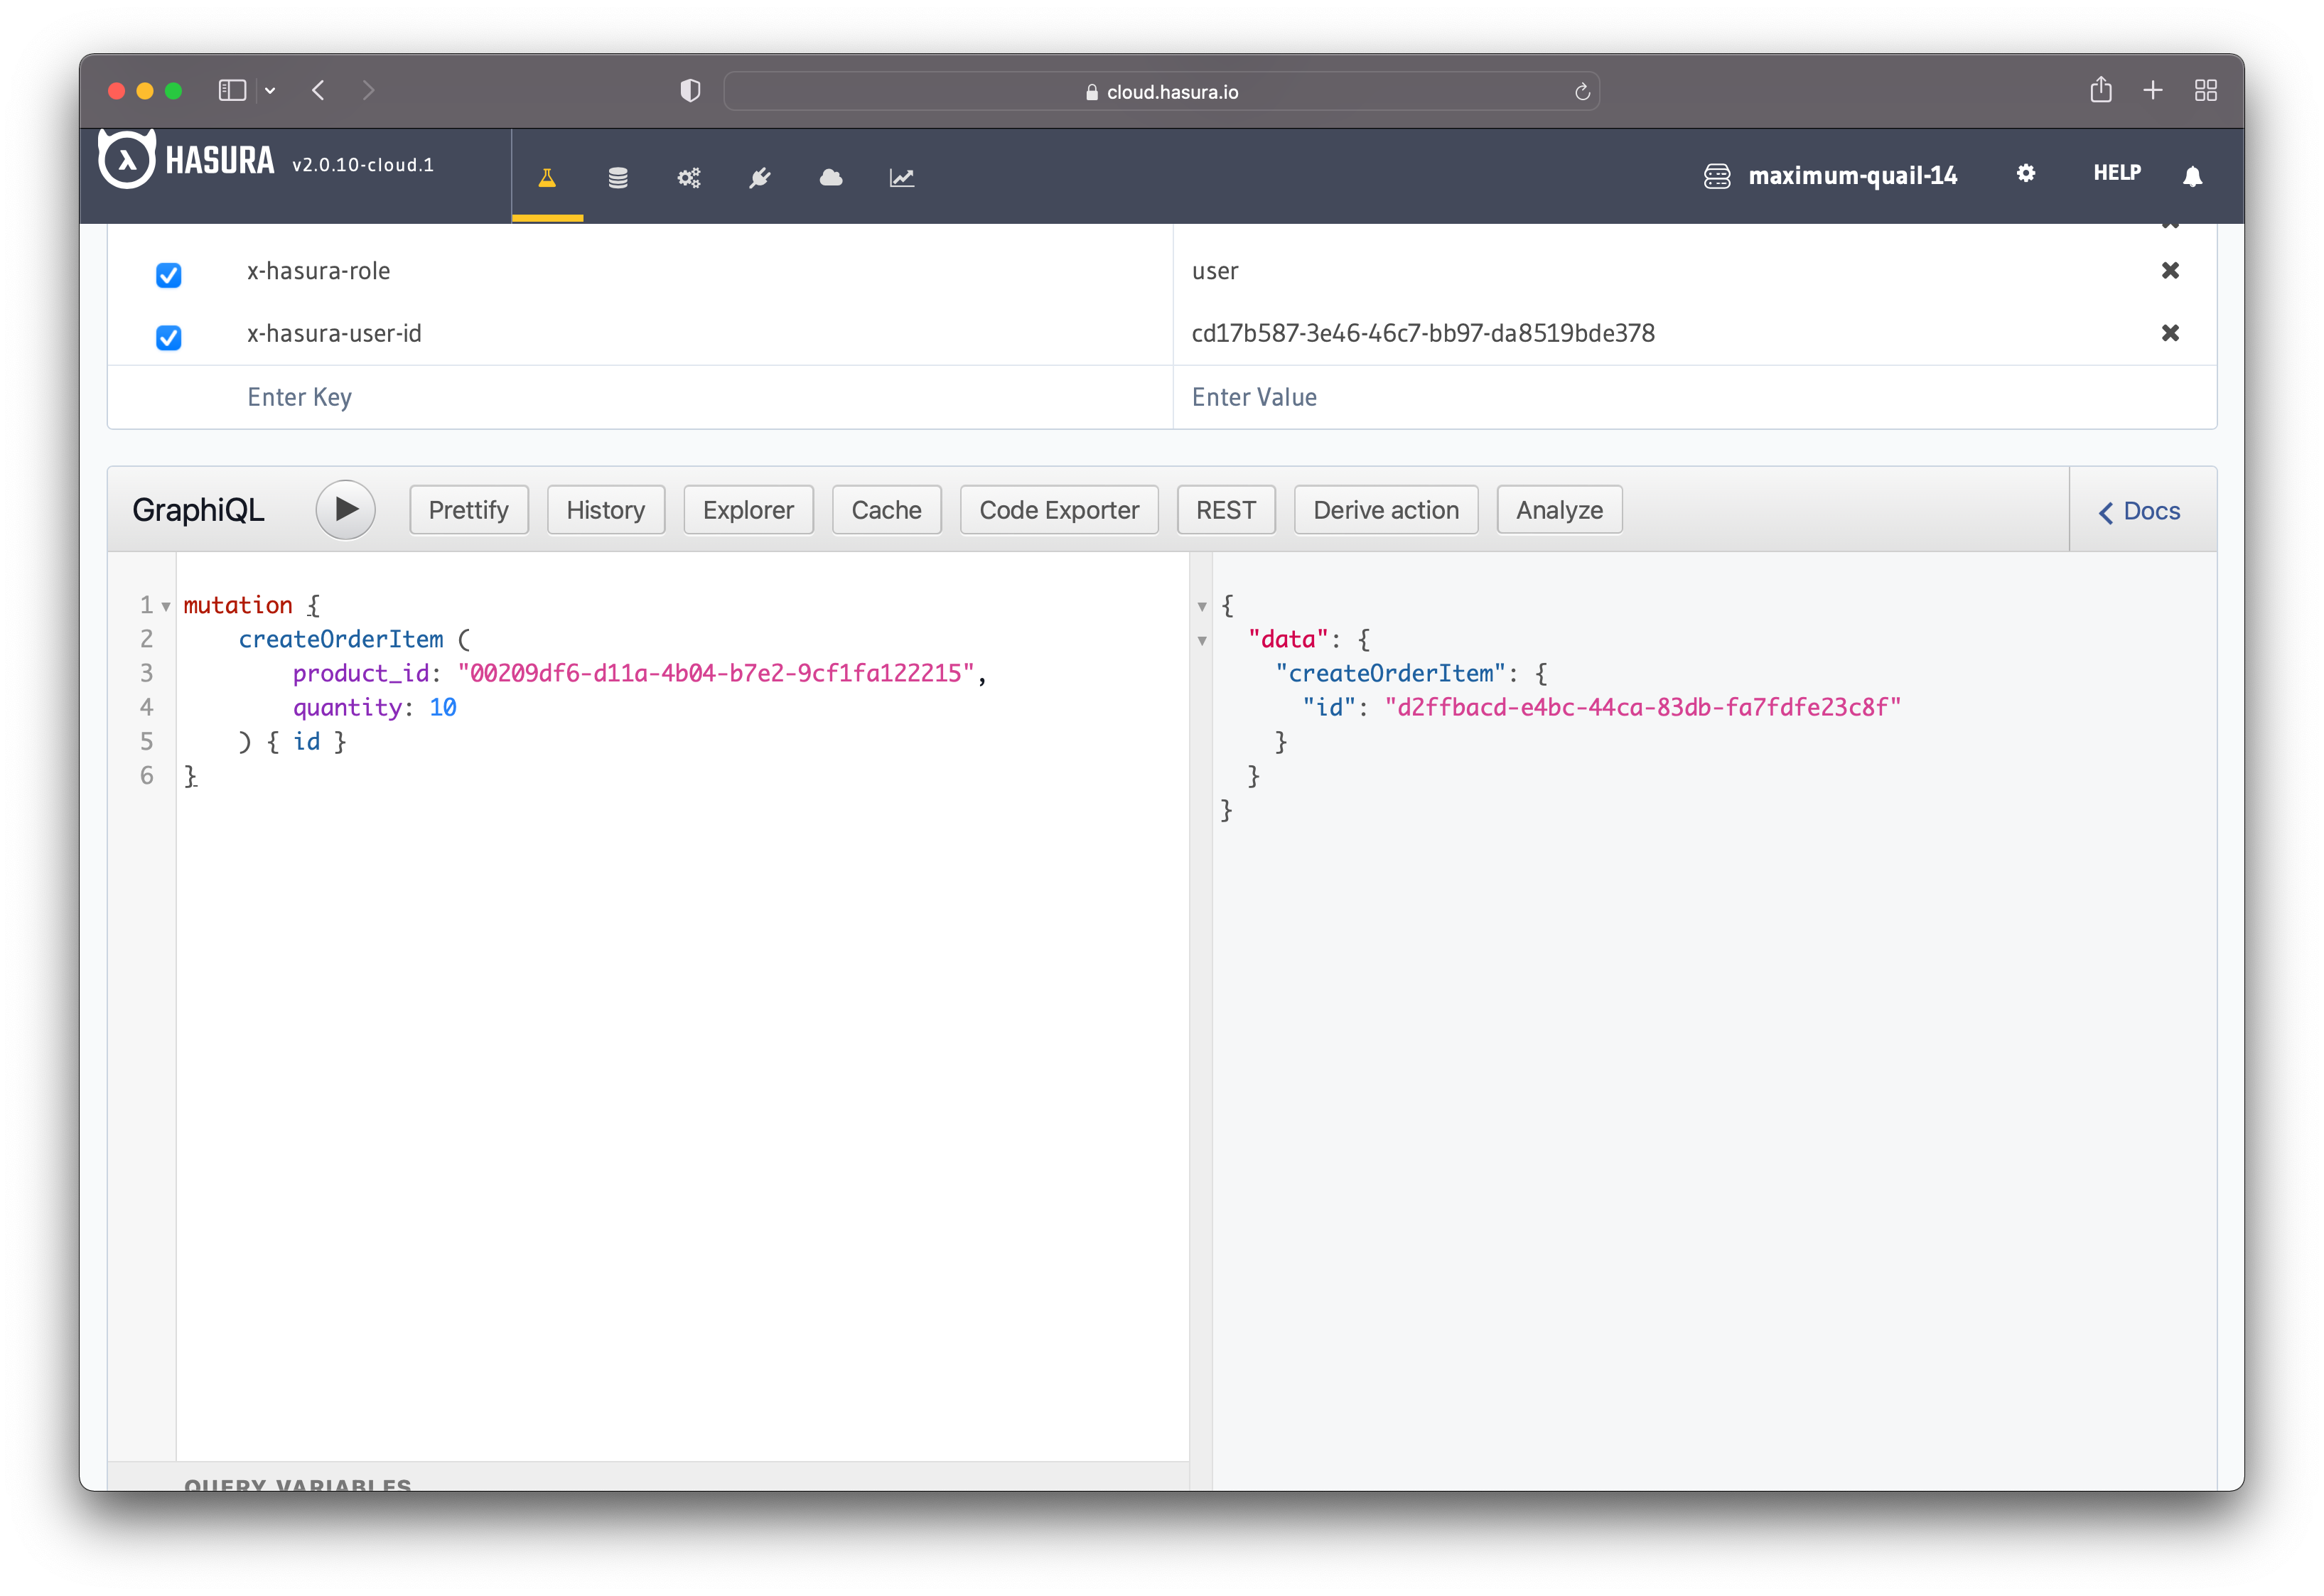
Figure 40 - Create Order Item Mutation
If you look into the database, you can see that the order item was successfully created and appended to the order.
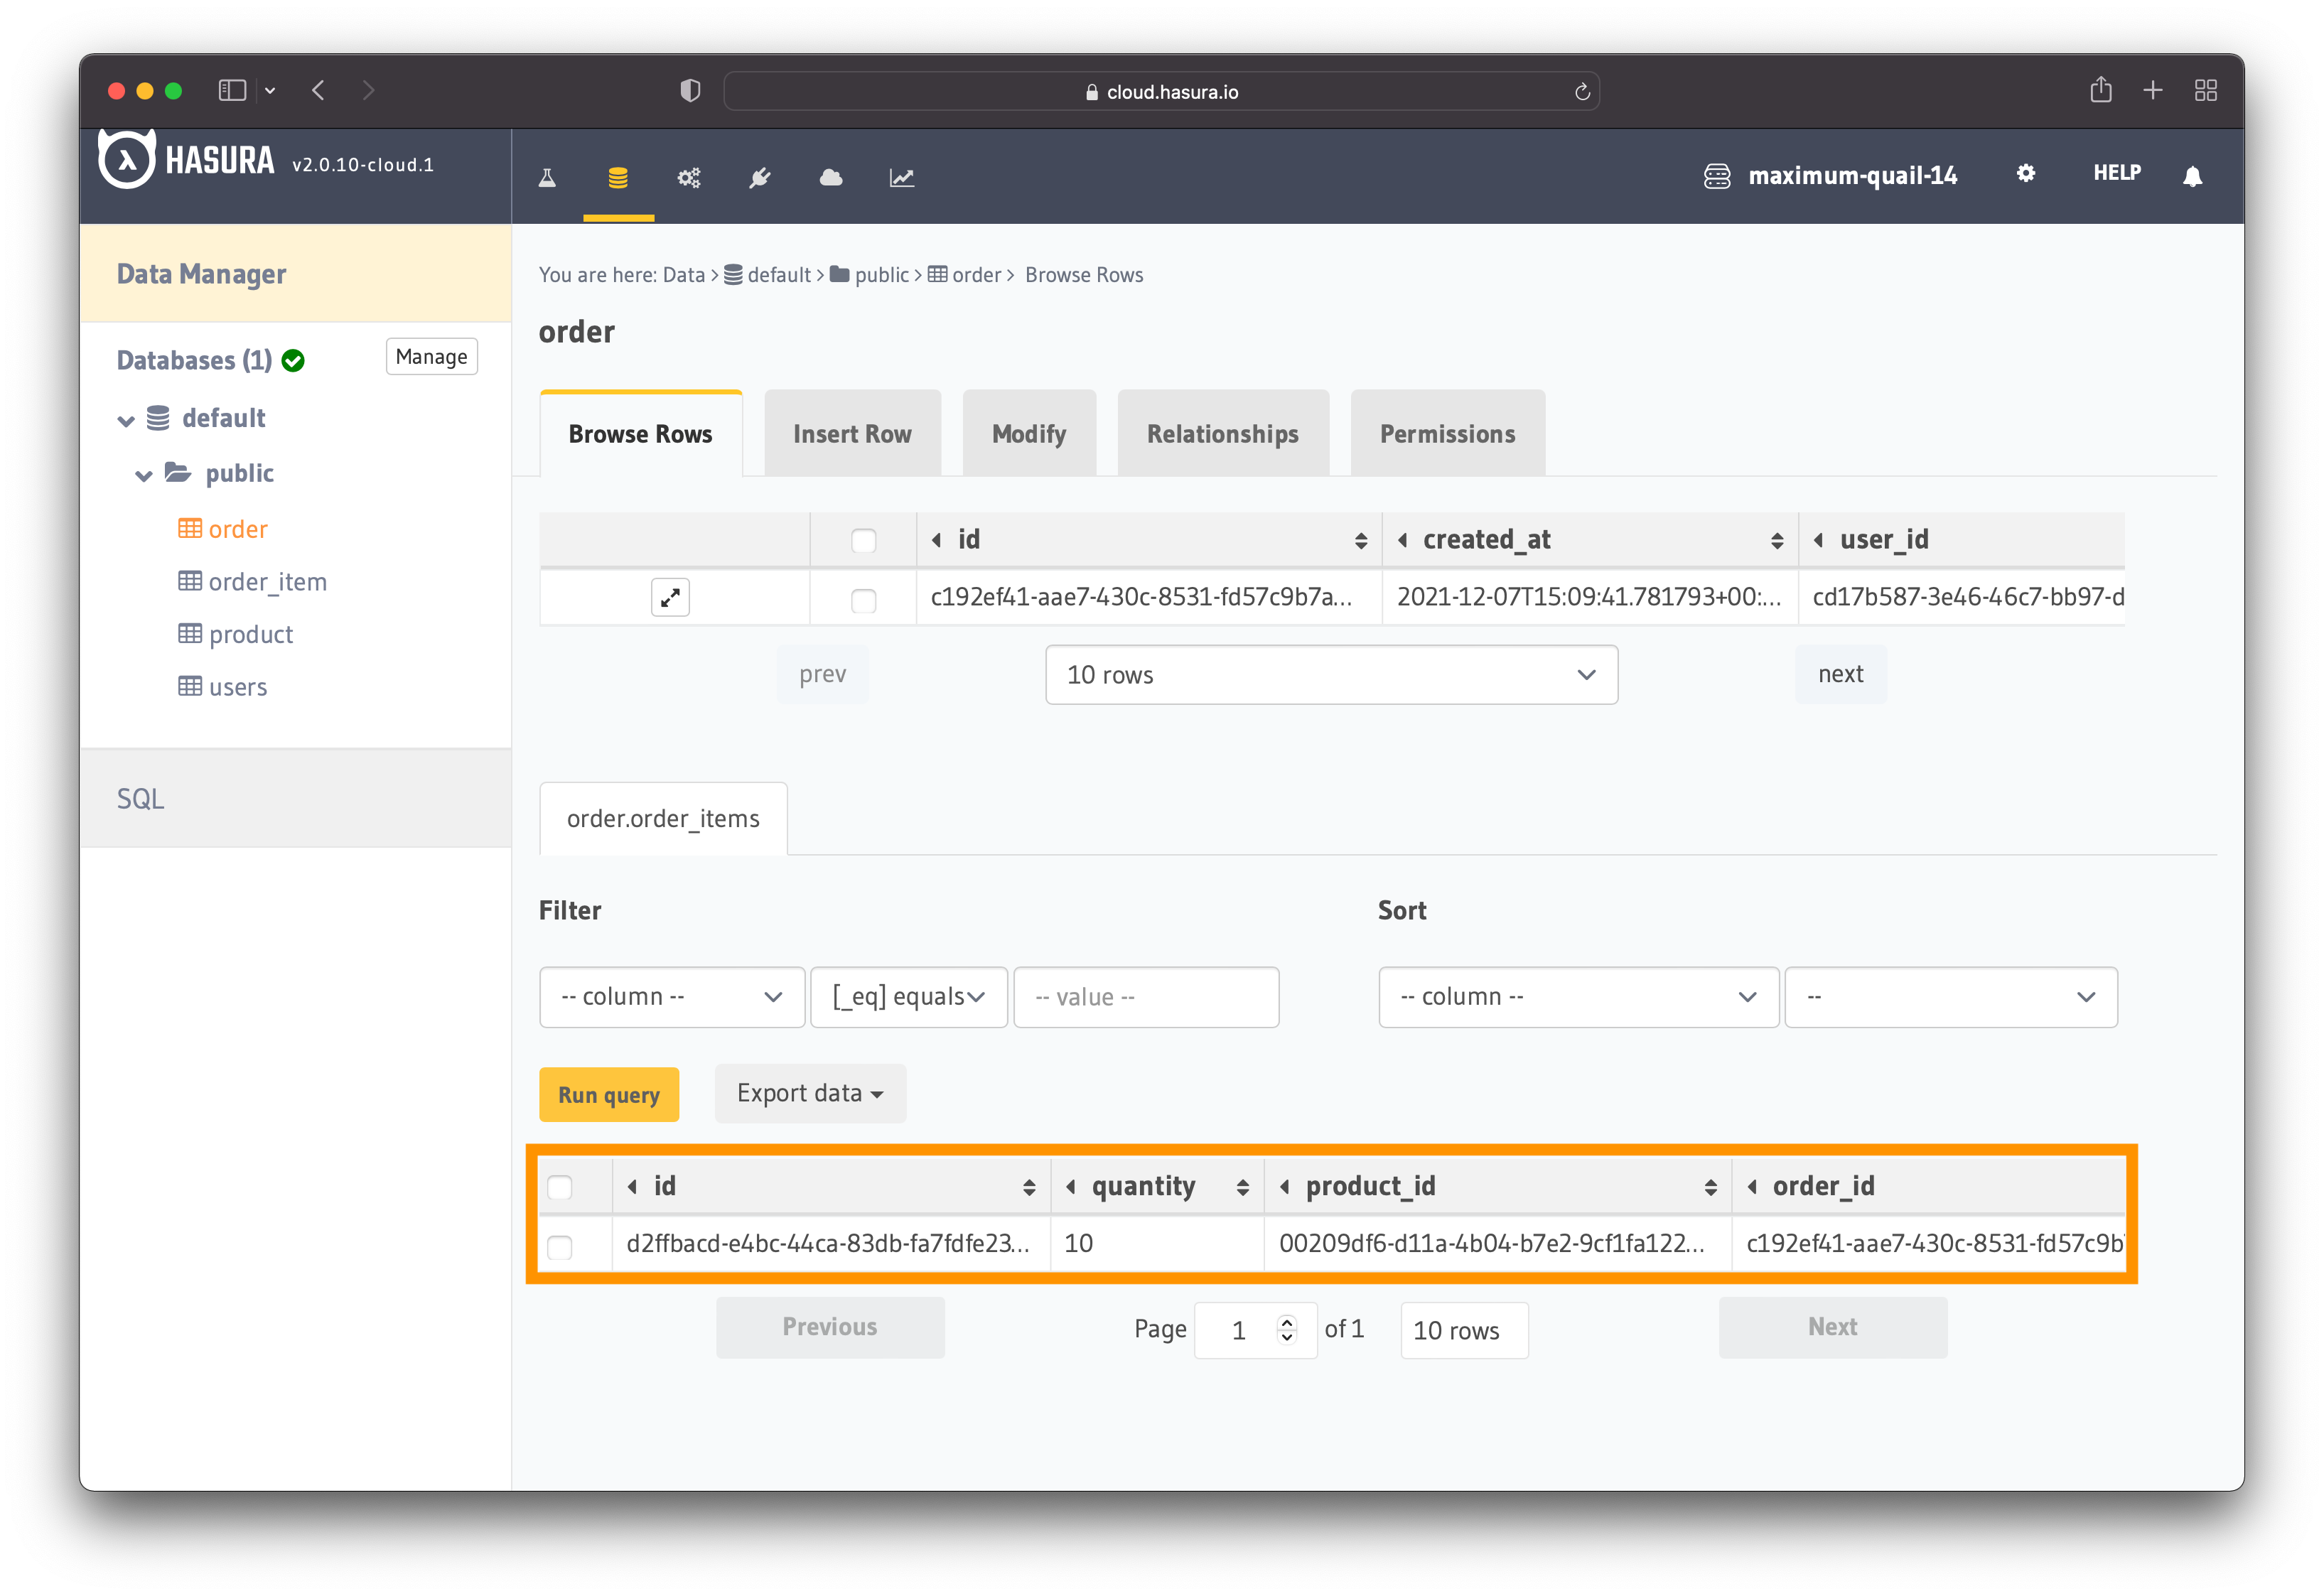
Figure 41 - New Order Item
That takes us to the next step - placing orders!
Place Order
Lastly, we need a custom mutation that allows users to place orders. Placing an order will enable users to enter their address details, calculate the total amount to pay, and turns ordered to true.
Go to the GraphiQL editor from the Hasura dashboard and write the following mutations:
mutation placeOrder(
  $order_id: uuid
  $city: String!
  $country: String!
  $house_number: Int!
  $street_name: String!
  $zip_code: String!
  $ordered: Boolean!
  $total: numeric
) {
  update_order(
    where: { id: { _eq: $order_id } }
    _set: {
      city: $city
      country: $country
      house_number: $house_number
      ordered: $ordered
      street_name: $street_name
      zip_code: $zip_code
      total: $total
    }
  ) {
    returning {
      id
      ordered
      total
    }
    affected_rows
  }
}
The mutation might look complex, so let me explain it. The mutation:
- finds an order with a specific ID
- updates the order with the details passed by the user
- returns the order id, the order status and the total amount
After writing the mutation, click on the option "Derive Action" as you did for the previous Actions.
As usual, Hasura autogenerates the Action definition. This time we will modify it by removing the order_id from the definition.
Figure 42 illustrates how the new Action should look.

Figure 42 - Place Order Action
The field order_id was removed because it will be passed automatically in the Action code.
After saving the Action, you can go to the "Codegen" tab to see the autogenerated code. We will also need to write custom business logic since the order_id is passed automatically. Also, we need to calculate the total amount that needs to be paid for the order.
Additional queries and mutations
Hasura always gives you the main mutation in the generated code. The mutation for placing an order is as follows:
const PLACE_ORDER = `mutation placeOrder($order_id: uuid, $city: String!, $country: String!, $house_number: Int!, $street_name: String!, $zip_code: String!, $ordered: Boolean!, $total: numeric) {
  update_order(where: {id: {_eq: $order_id}}, _set: {city: $city, country: $country, house_number: $house_number, ordered: $ordered, street_name: $street_name, zip_code: $zip_code, total: $total}) {
      returning {
        id
        ordered
        total
    }
  }
}`;
We also need a query to get the orders belonging to the authenticated user. The query should return the following information:
- the order ID
- the
orderedfield - all the order items
- the id of each order item
- the product it represents
- the name of the product
- the price of the product
- the quantity
The query below returns all that information.
const LATEST_USER_ORDER = `query getUserOrder($user_id: uuid) {
  users(where: {id: {_eq: $user_id}}) {
    orders(order_by: {created_at: desc}) {
      created_at
      id
      ordered
      order_items {
        id
        product {
          name
          price
        }
        quantity
      }
    }
  }
}`;
For this Action, these are all the queries and mutations needed. The next step is building the handler.
Build the Handler
You can reuse the same "execute" function to run the queries and mutations. It's the same function as the one for the previous actions.
The next step is to handle the data coming from the users and the id of the user making the request.
app.post('/placeOrder', async (req, res) => {
  // get request input
  const { city, country, house_number, street_name, zip_code, ordered } = req.body.input;
  const user_id = req.body.session_variables['x-hasura-user-id'];
Once you have the user ID, you can execute the LATEST_USER_ORDER query to retrieve all the user orders.
If the operation is successful, you store the id of the latest order in a separate variable. You will use this id to place the order.
// check if the user has any orders
  const { data: orderExists, errors: orderExistsErr } = await execute({ user_id }, LATEST_USER_ORDER, req.body.session_variables);

  if (orderExistsErr) {
    return res.status(400).json({ error: orderExistsErr[0].message });
  }

  if (orderExists.users[0].orders[0].ordered === true) {
    return res.status(400).json({ error: 'Start an order before trying to place one!' });
  }

  const order_id = orderExists.users[0].orders[0].id;
That takes us to the next step. That's where you loop over the items from the order and calculate the total for each item.
Once you have the total amount for each order item, you can calculate the total amount for the entire order.
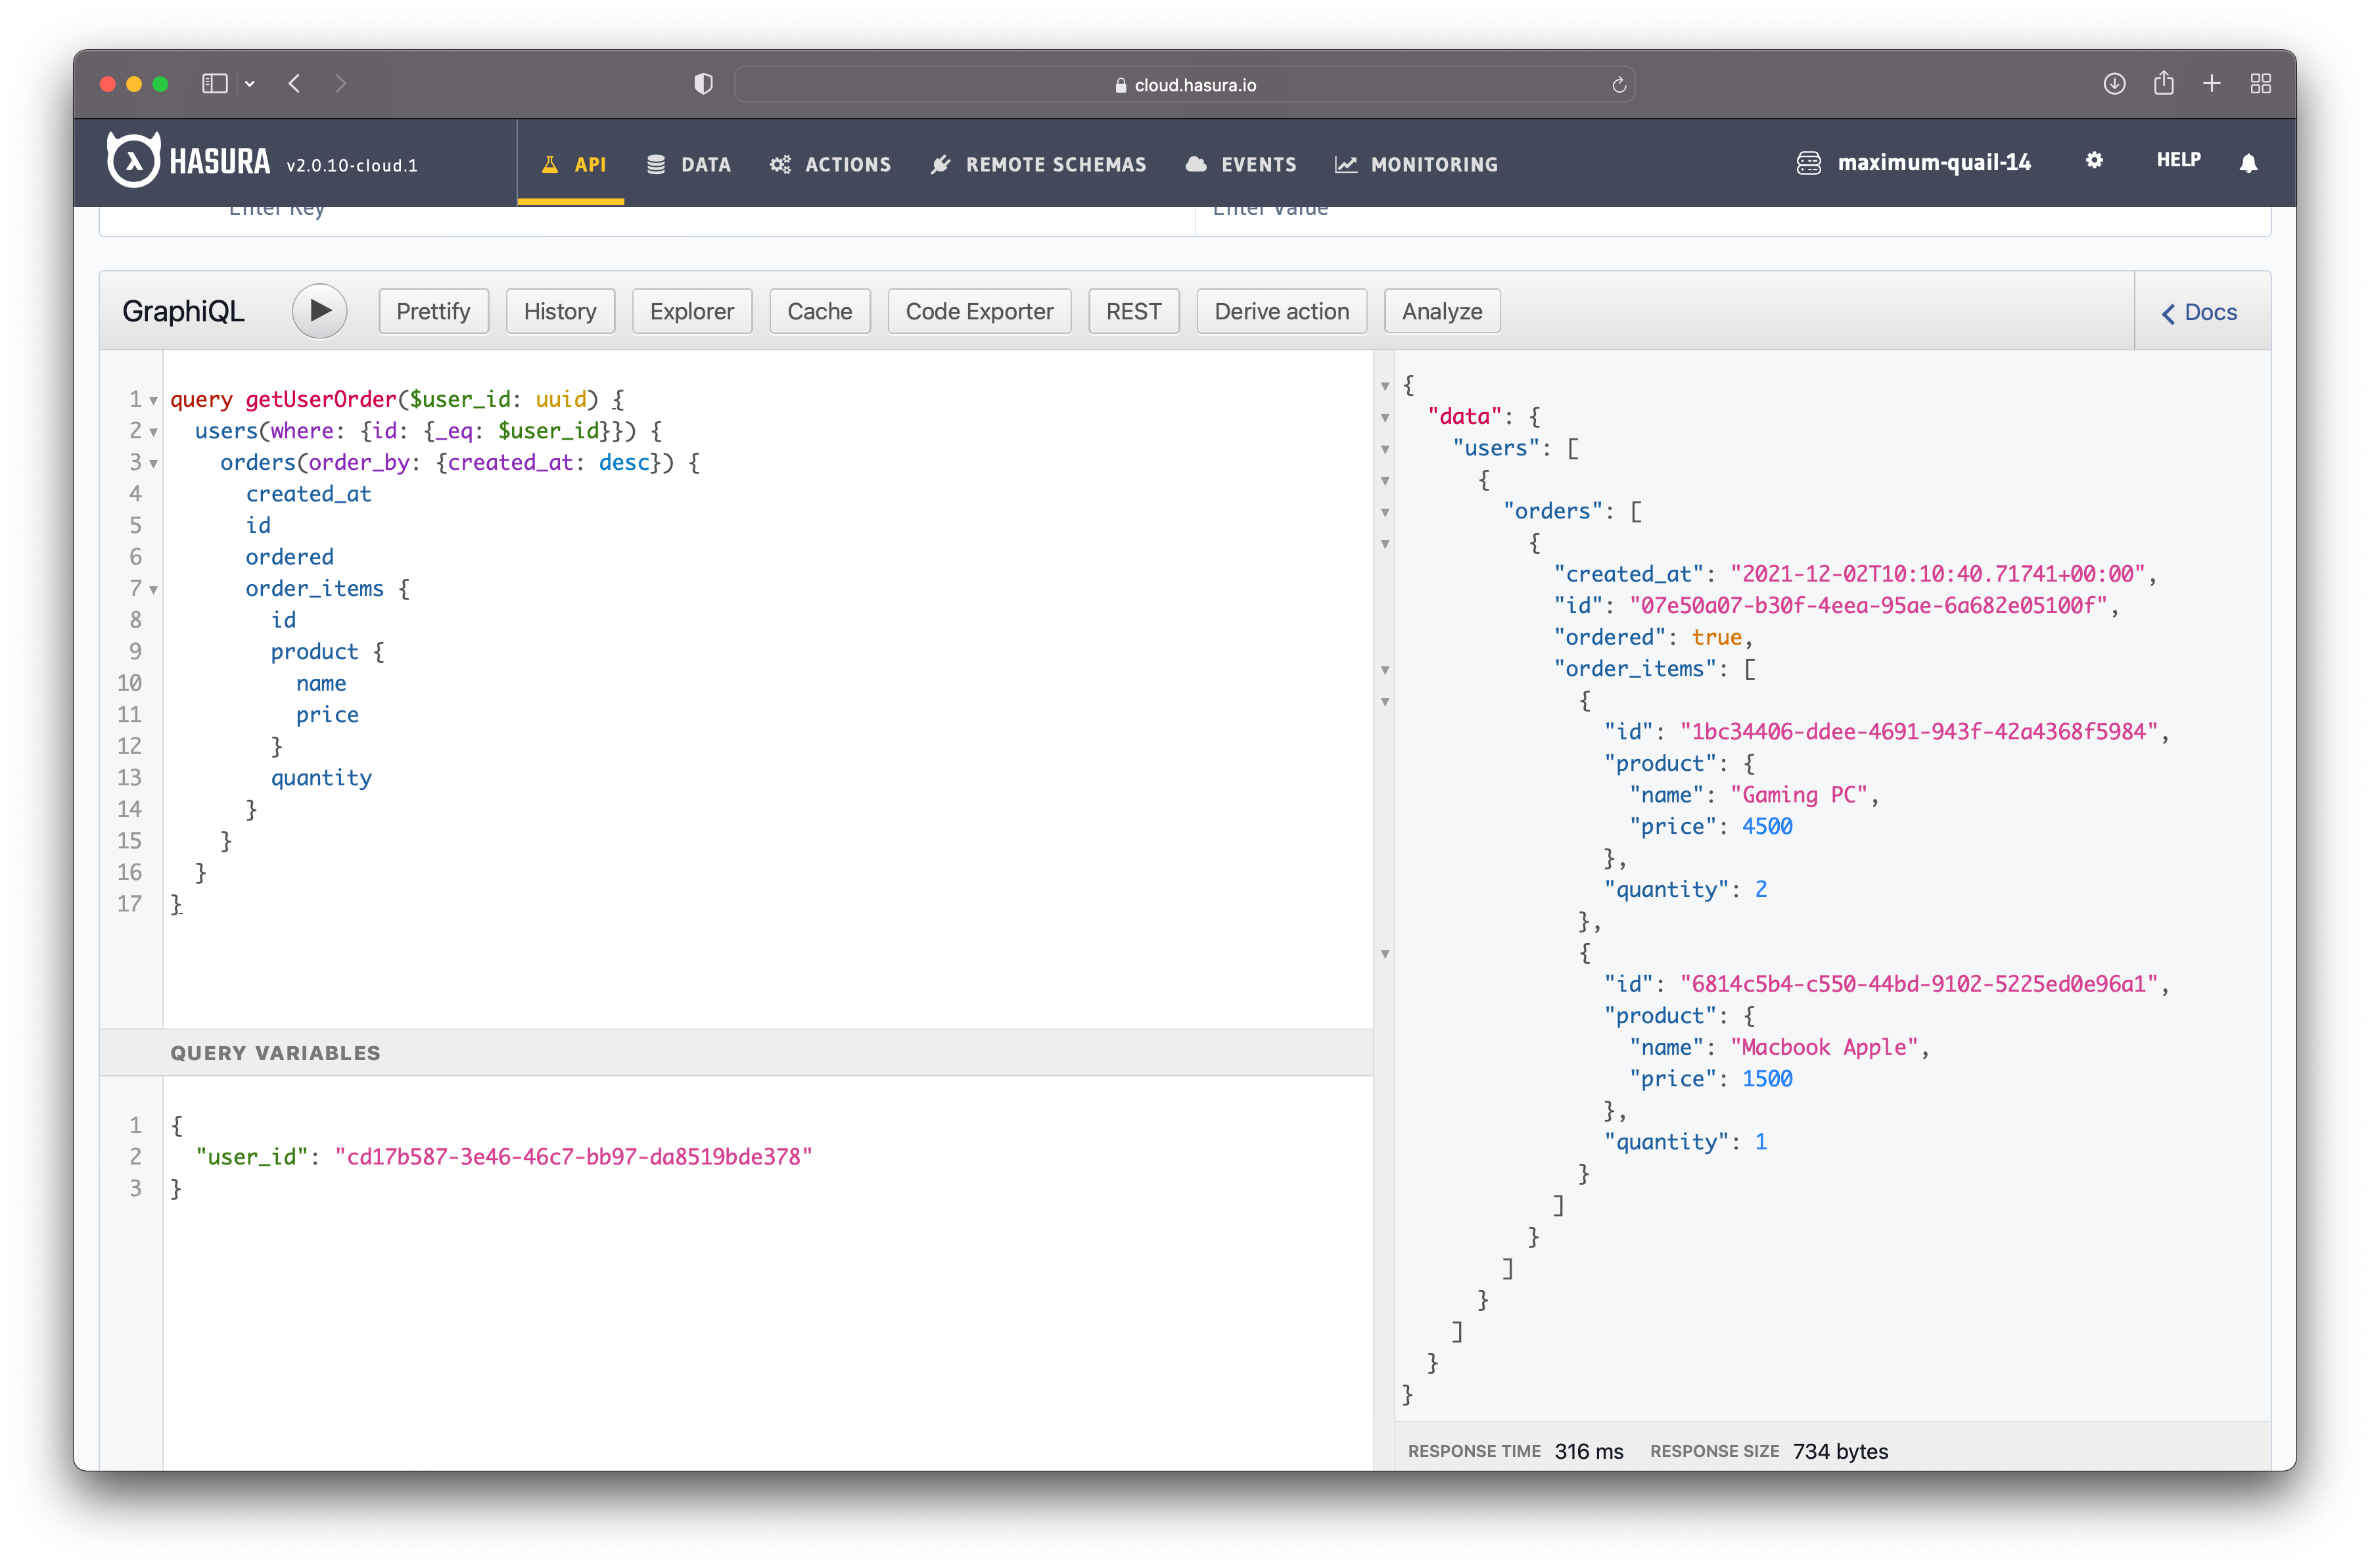
Figure 43 - Order Example
Let's take as an example the order from figure 43. The order has two order items:
- an order item containing two gaming PCs
- an order item containing one Macbook
For each order item, it multiplies the price of the product with the quantity, which returns the total amount for each order item.
The orderItemsTotal is an array containing the total amount for each order item. For this example, orderItemsTotal is the following array:
const orderItemsTotal = [ 9000, 1500 ];
Now, we need to calculate the total sum of the order. We can do it by adding all the amounts from the orderItemsTotal array. The total amount to pay for the order is stored in amountToPay.
  const orderItemsTotal = orderExists.users[0].orders[0].order_items.map(orderItem => {
    const total = orderItem.product.price * orderItem.quantity;

    return total;
  });

  const amountToPay = orderItemsTotal.reduce((acc, curr) => acc + curr, 0);
At this point, you have the order id and the total amount to pay. That means it's time to place the order.
const { data: placeOrder, errors: placeOrderErr } = await execute({ order_id, city, country, house_number, street_name, zip_code, ordered }, PLACE_ORDER, req.body.session_variables);

if (placeOrderErr) {
    return res.status(400).json({ error: placeOrderErr[0].message });
}

return res.json({
    ...placeOrder.update_order.returning[0]
});
The action code is complete and now you can place orders. You can see the complete code for the Action in this gist.
Deploy the Code
You deploy the Node.js server for this Action as you did for the previous actions. You can see the complete server code in this repository.
Update the Handler
The last thing you need to update is the Action handler. Add your URL and save the Action.
Now you can use the Action!
Action Permissions
Similar to setting the Action permissions for the previous two Actions, allow the "user" role to perform the placeOrder mutation.
See figure 35 for reference.
Test the Action
Before placing an order, you need to create an order and add order items to it. Otherwise, the application throws an error because you try to add items to an order that does not exist.
Provided that you have an open order with items, run the following mutation in GraphiQL in the Hasura dashboard:
mutation {
  placeOrder(
    city: "London"
    country: "England"
    house_number: 10
    ordered: true
    street_name: "Potter Street"
    zip_code: "AA21JJ"
  ) {
    id
    ordered
    total
  }
}
In figure 44, you can see the mutation and the response in the project dashboard.
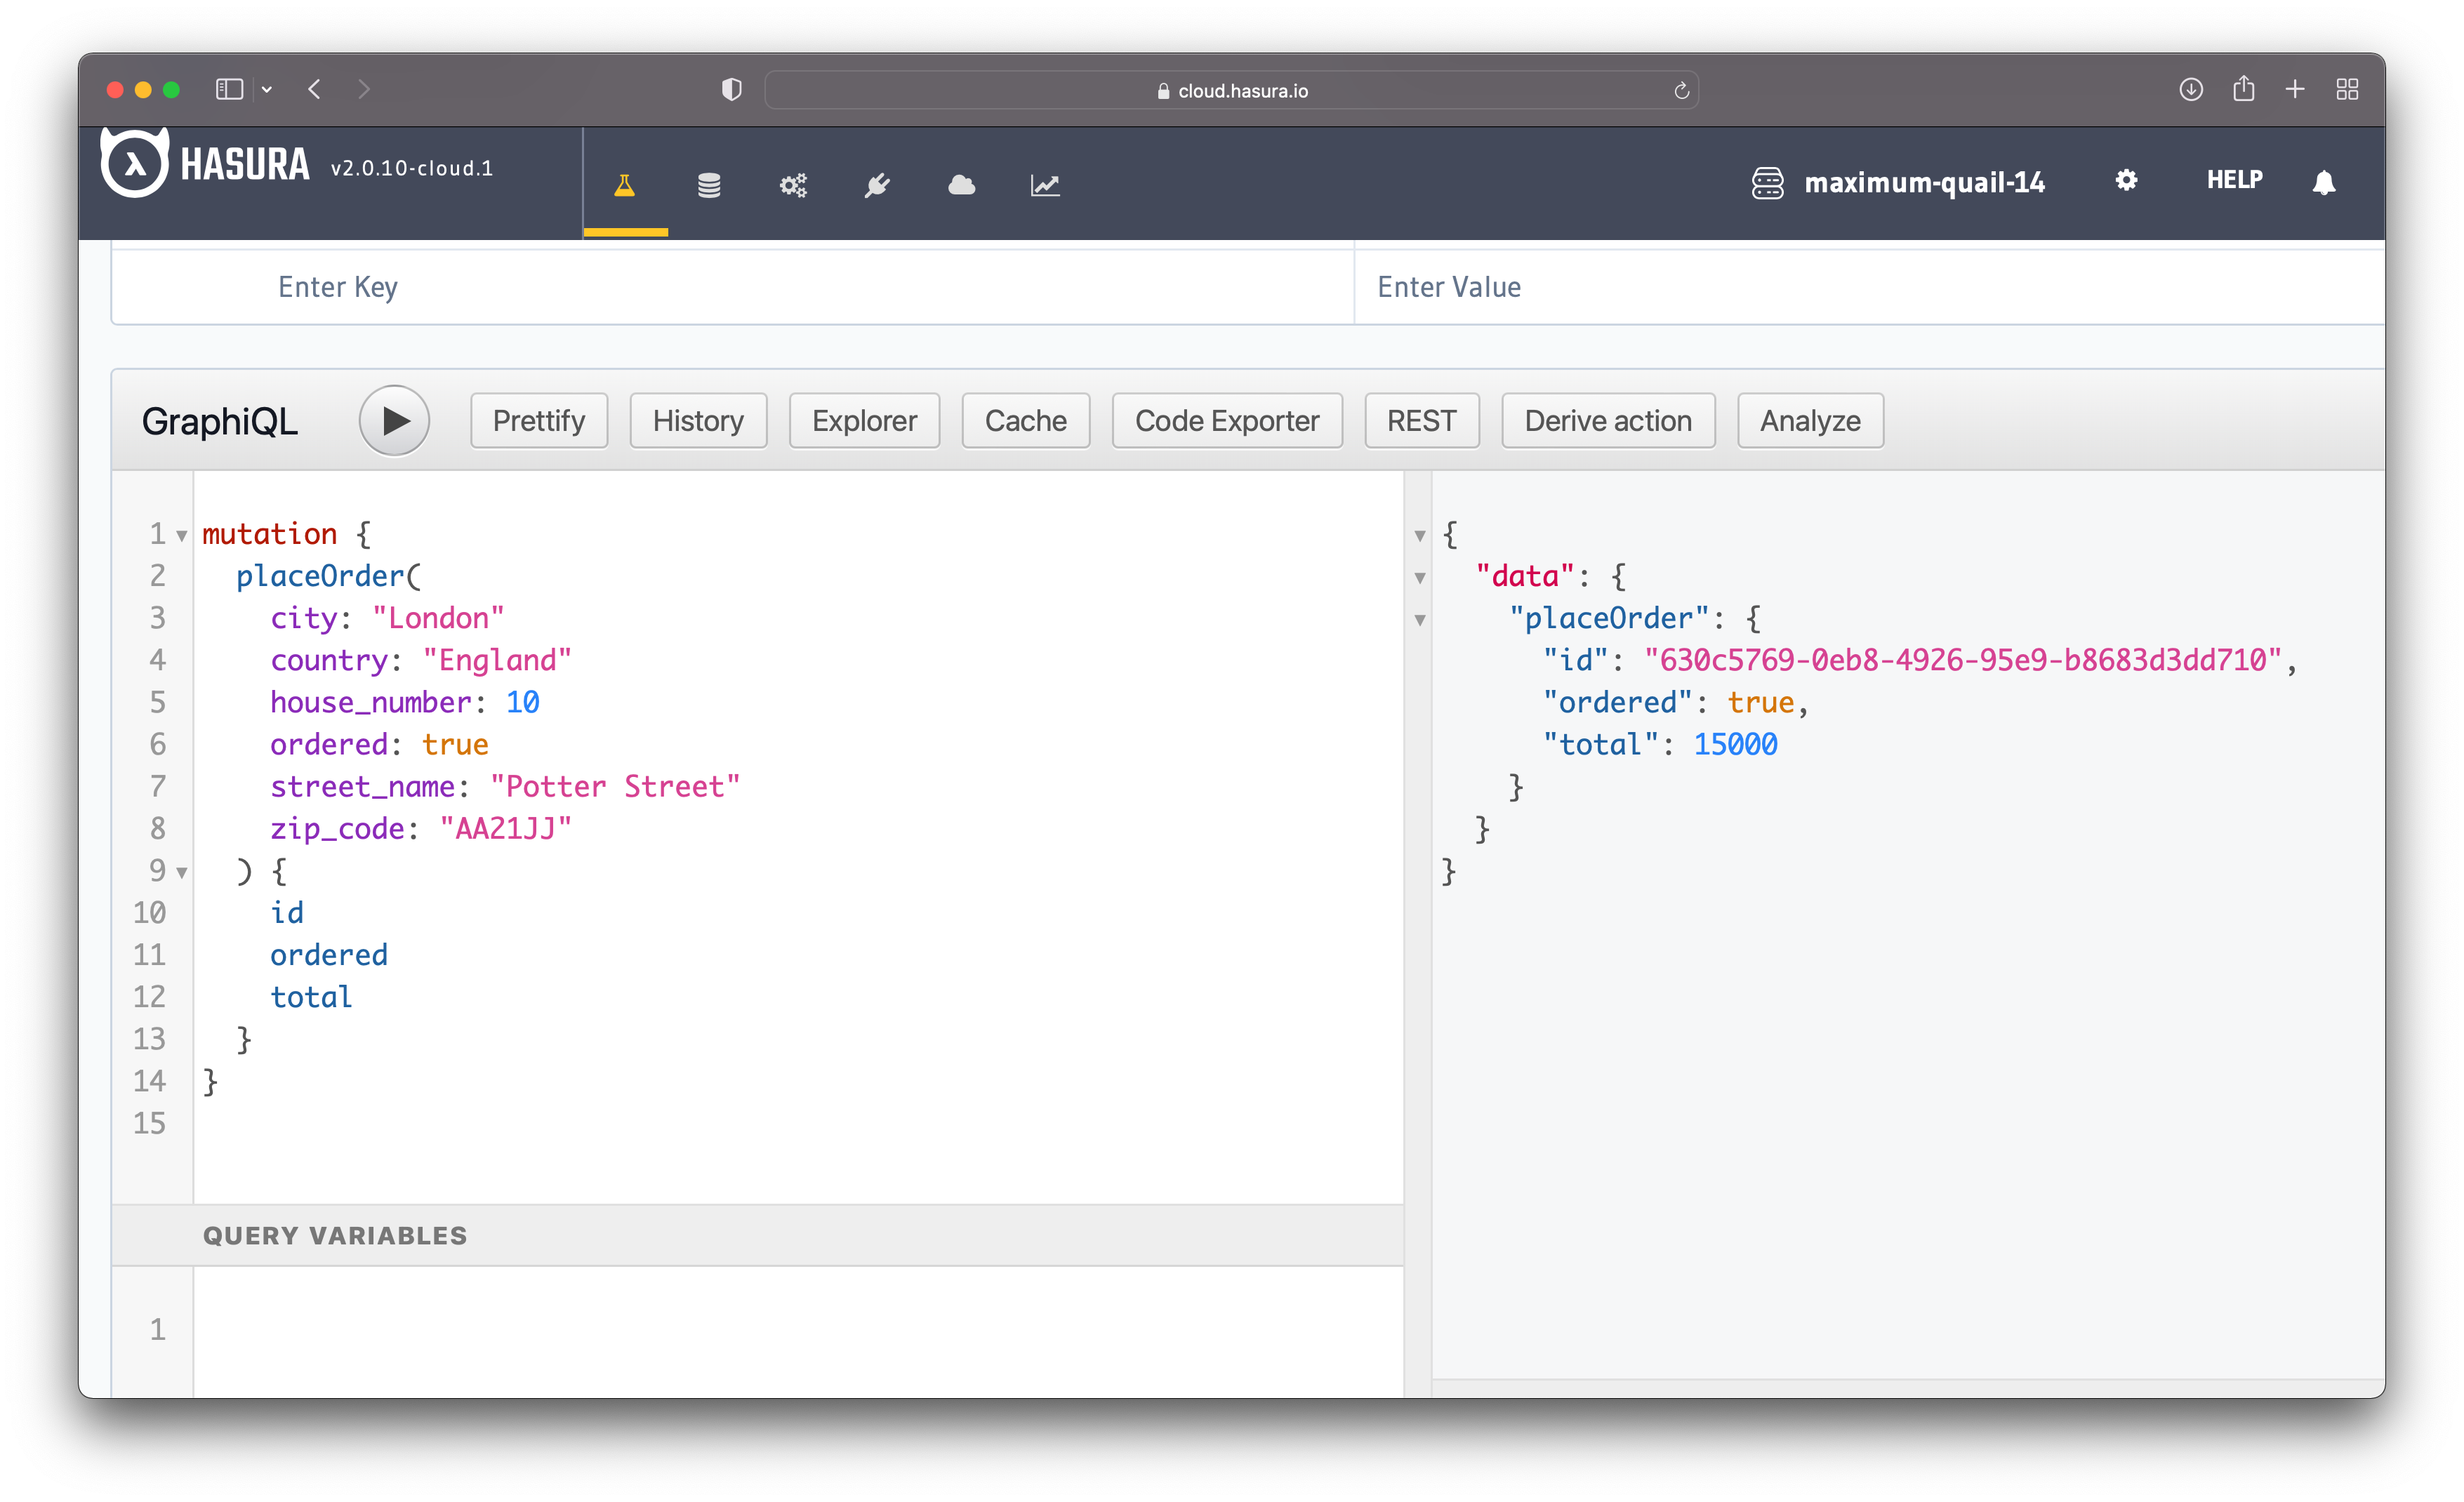
Figure 44 - Place Order Mutation
Checking the database after running the mutation shows that the order was placed. Figure 45 illustrates the new order in the database.
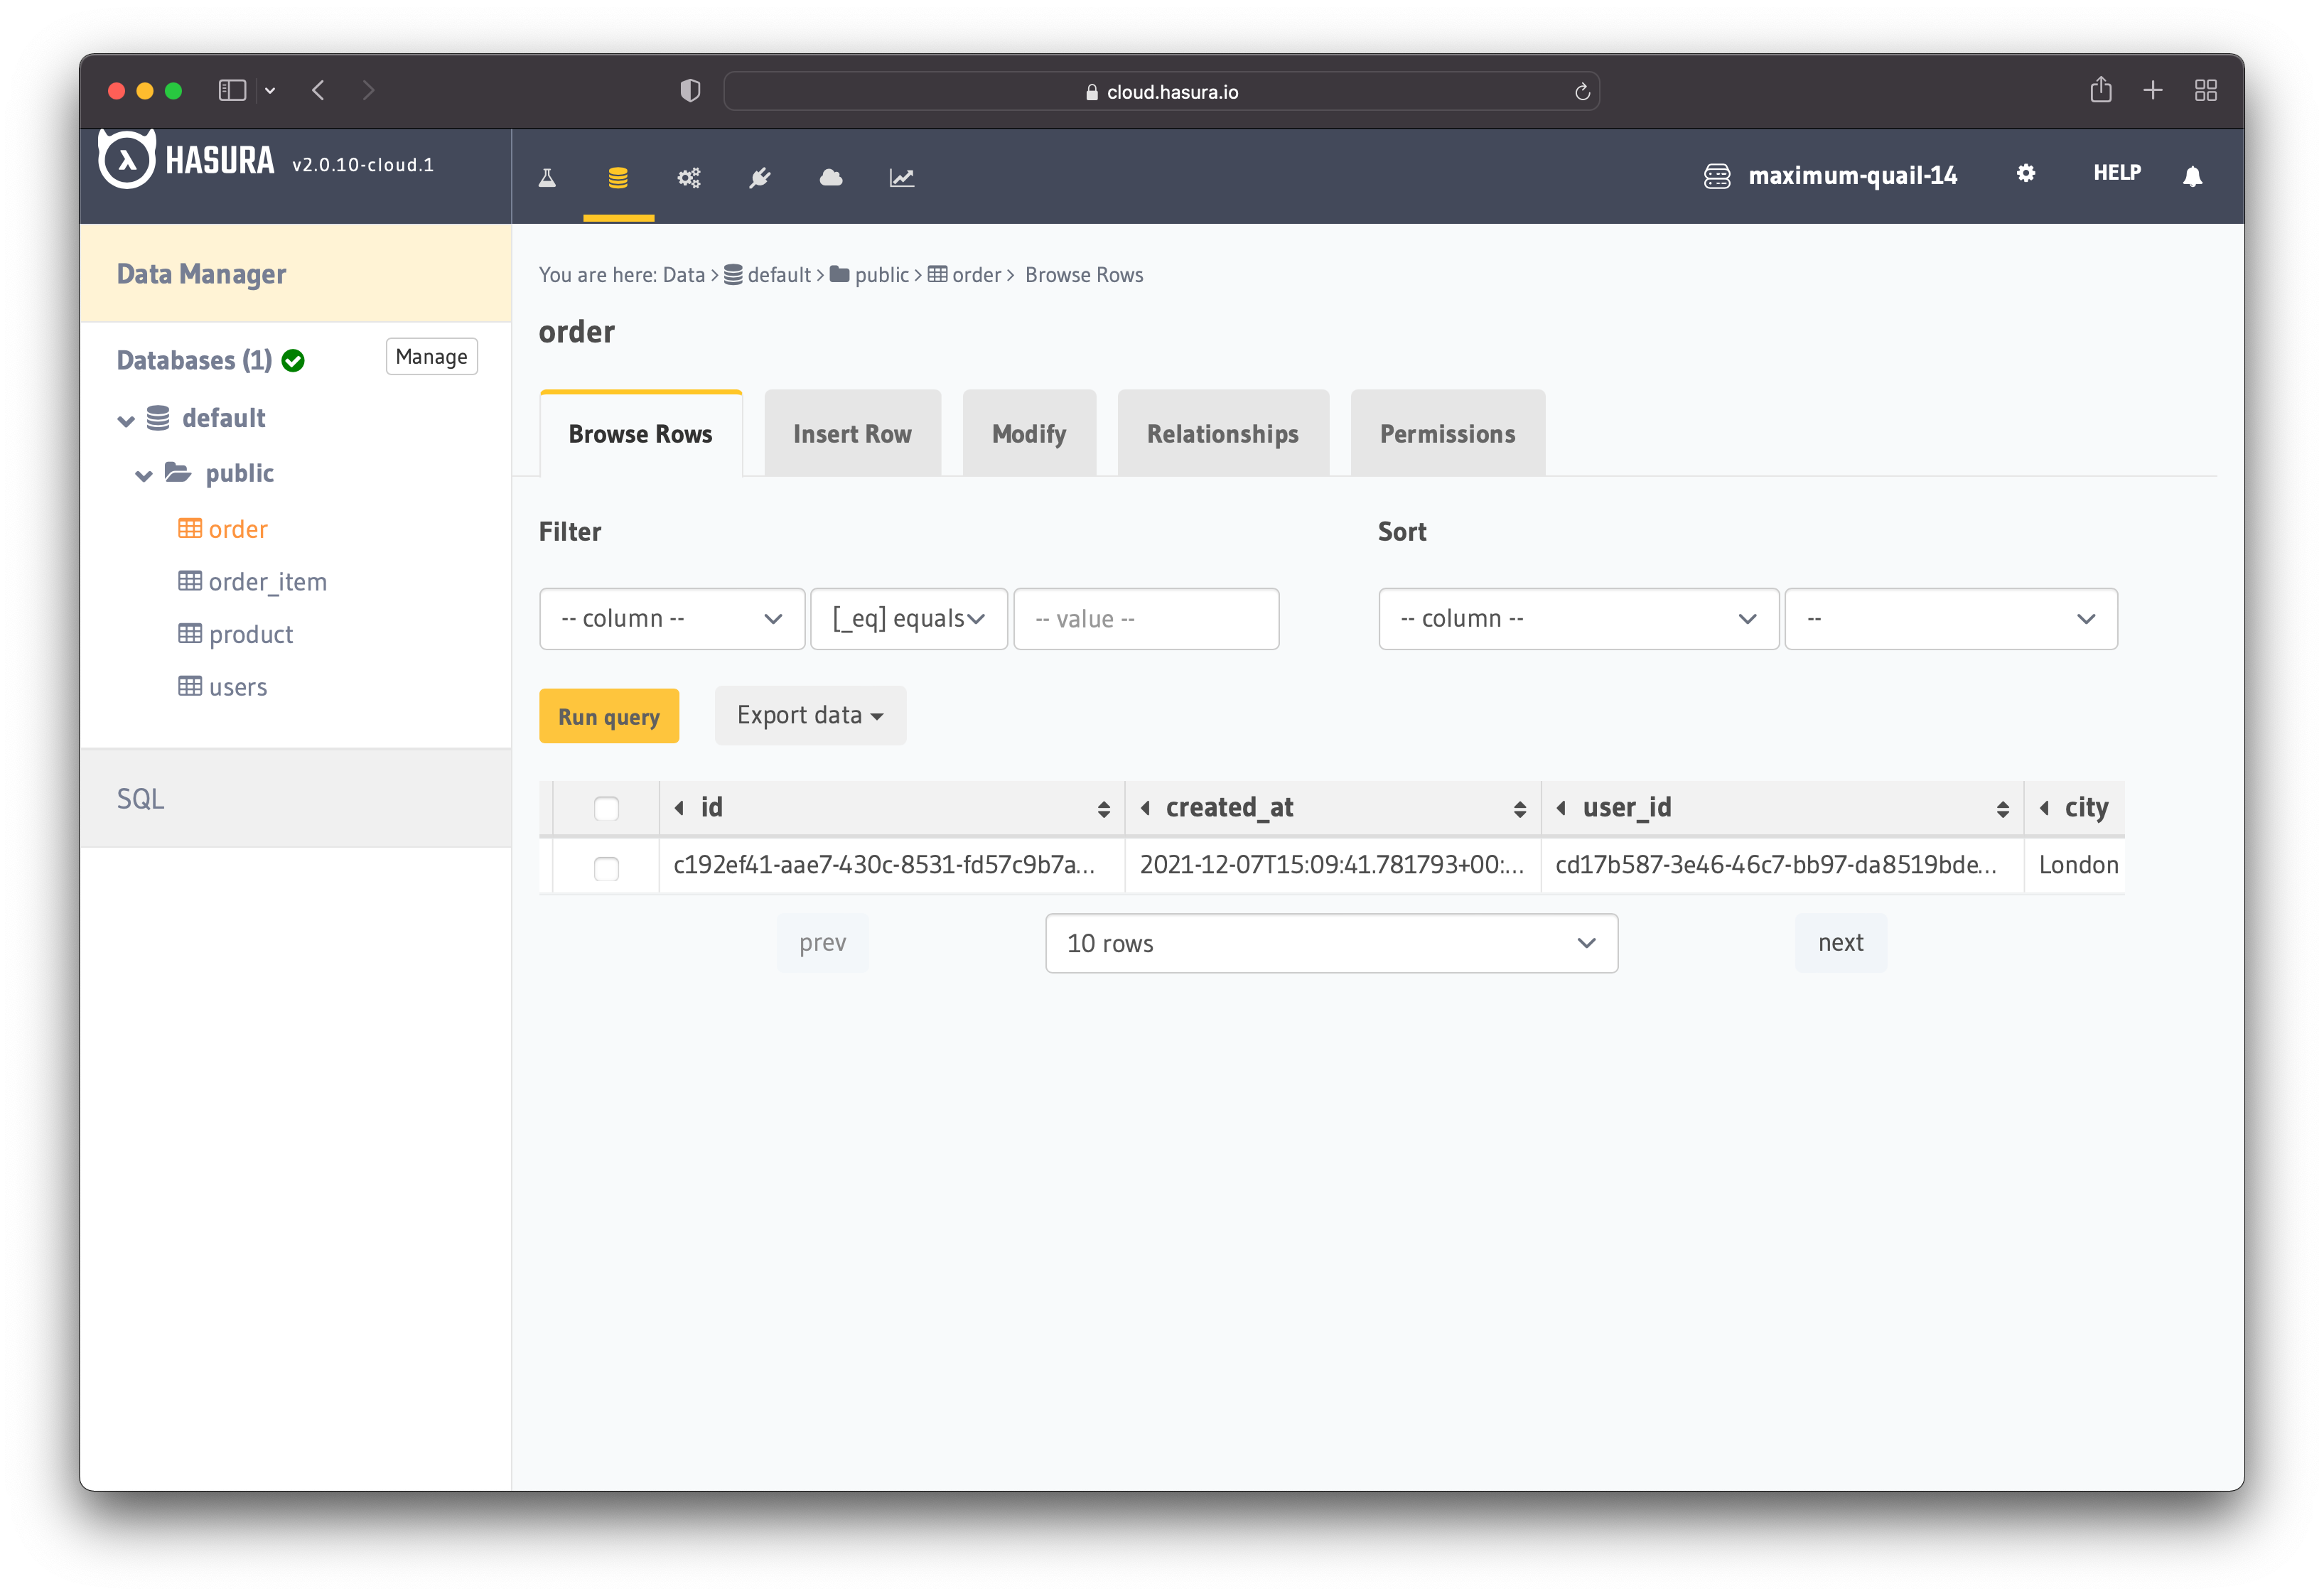
Figure 45 - Completed Order
Now, the authenticated users can place orders too! However, placing an order in this application does not deal with payments. A complete process of placing an order would deal with payment as well. Hasura has a video showing how to create a Payment API with Stripe and Actions.
To conclude, the "Actions" feature from Hasura is handy when you want to extend or customize the functionality of your application.
Conclusion
In this tutorial, you build the backend of a basic e-commerce application by writing a minimal amount of code. Hasura helps you speed up the development time by minimizing the amount of code you write when building applications.
Where to go from here? From here, you could try to build the backend of an application from scratch and then build the frontend as well. After that, you can try to plug your custom REST and GraphQL APIs into Hasura using Actions and Remote Schema.