
Notion is a productivity software that allows you to create systems for knowledge management, project management and note-taking.
They recently released their API to the public. You can use the API to integrate your Notion data to any application you want.
Thus, this article shows you to:
- build a Node.js API with Notion
- use FastifyJS to create the API
Without further ado, let's start configuring your Notion workspace.
Create integrations in Notion
Go to your Notion integrations and create a new integration by clicking on the "+ New Integration" button. After that, you will be prompted to fill three fields:
- the name of your project
- a logo for the project
- choose an associated workspace
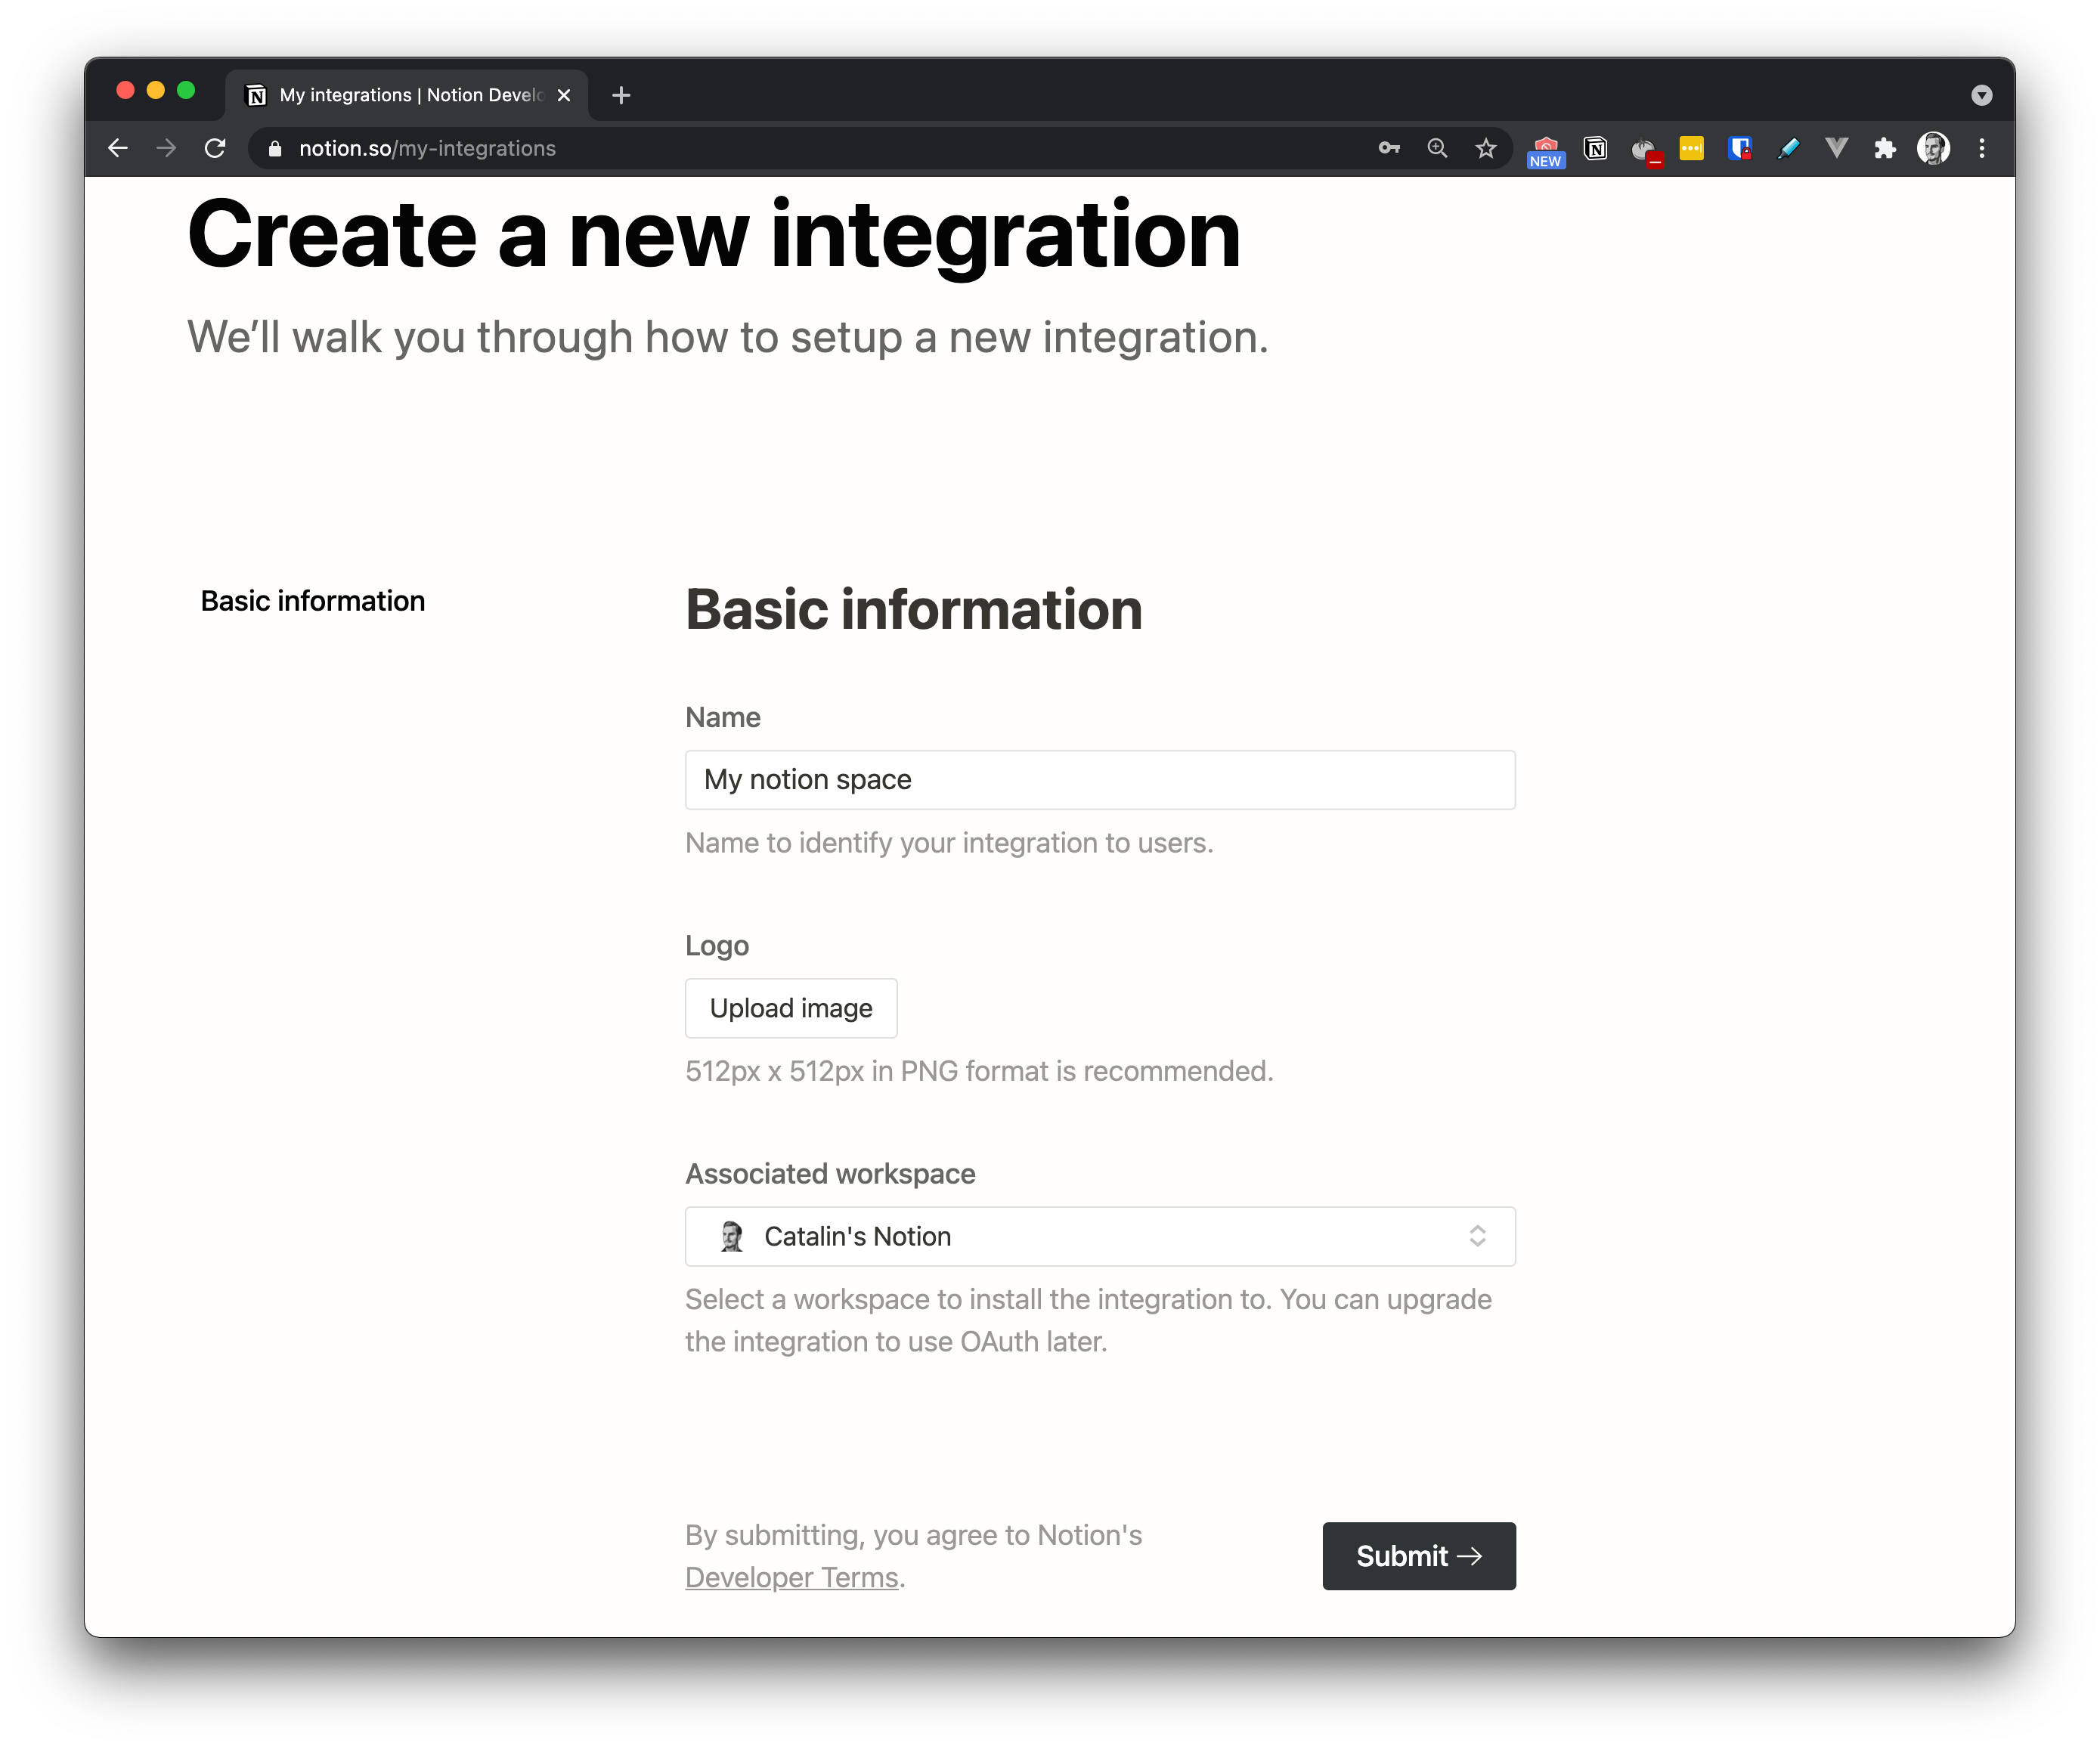
Figure 1
Figure 1 above illustrates the set-up process. After filling all the fields, click on the "Submit" button to create the integration.
Once you click the submit button, your integration should be created. You will be redirected to another page, from where you can grab your "Internal Integration Token". Figure 2 shows that.
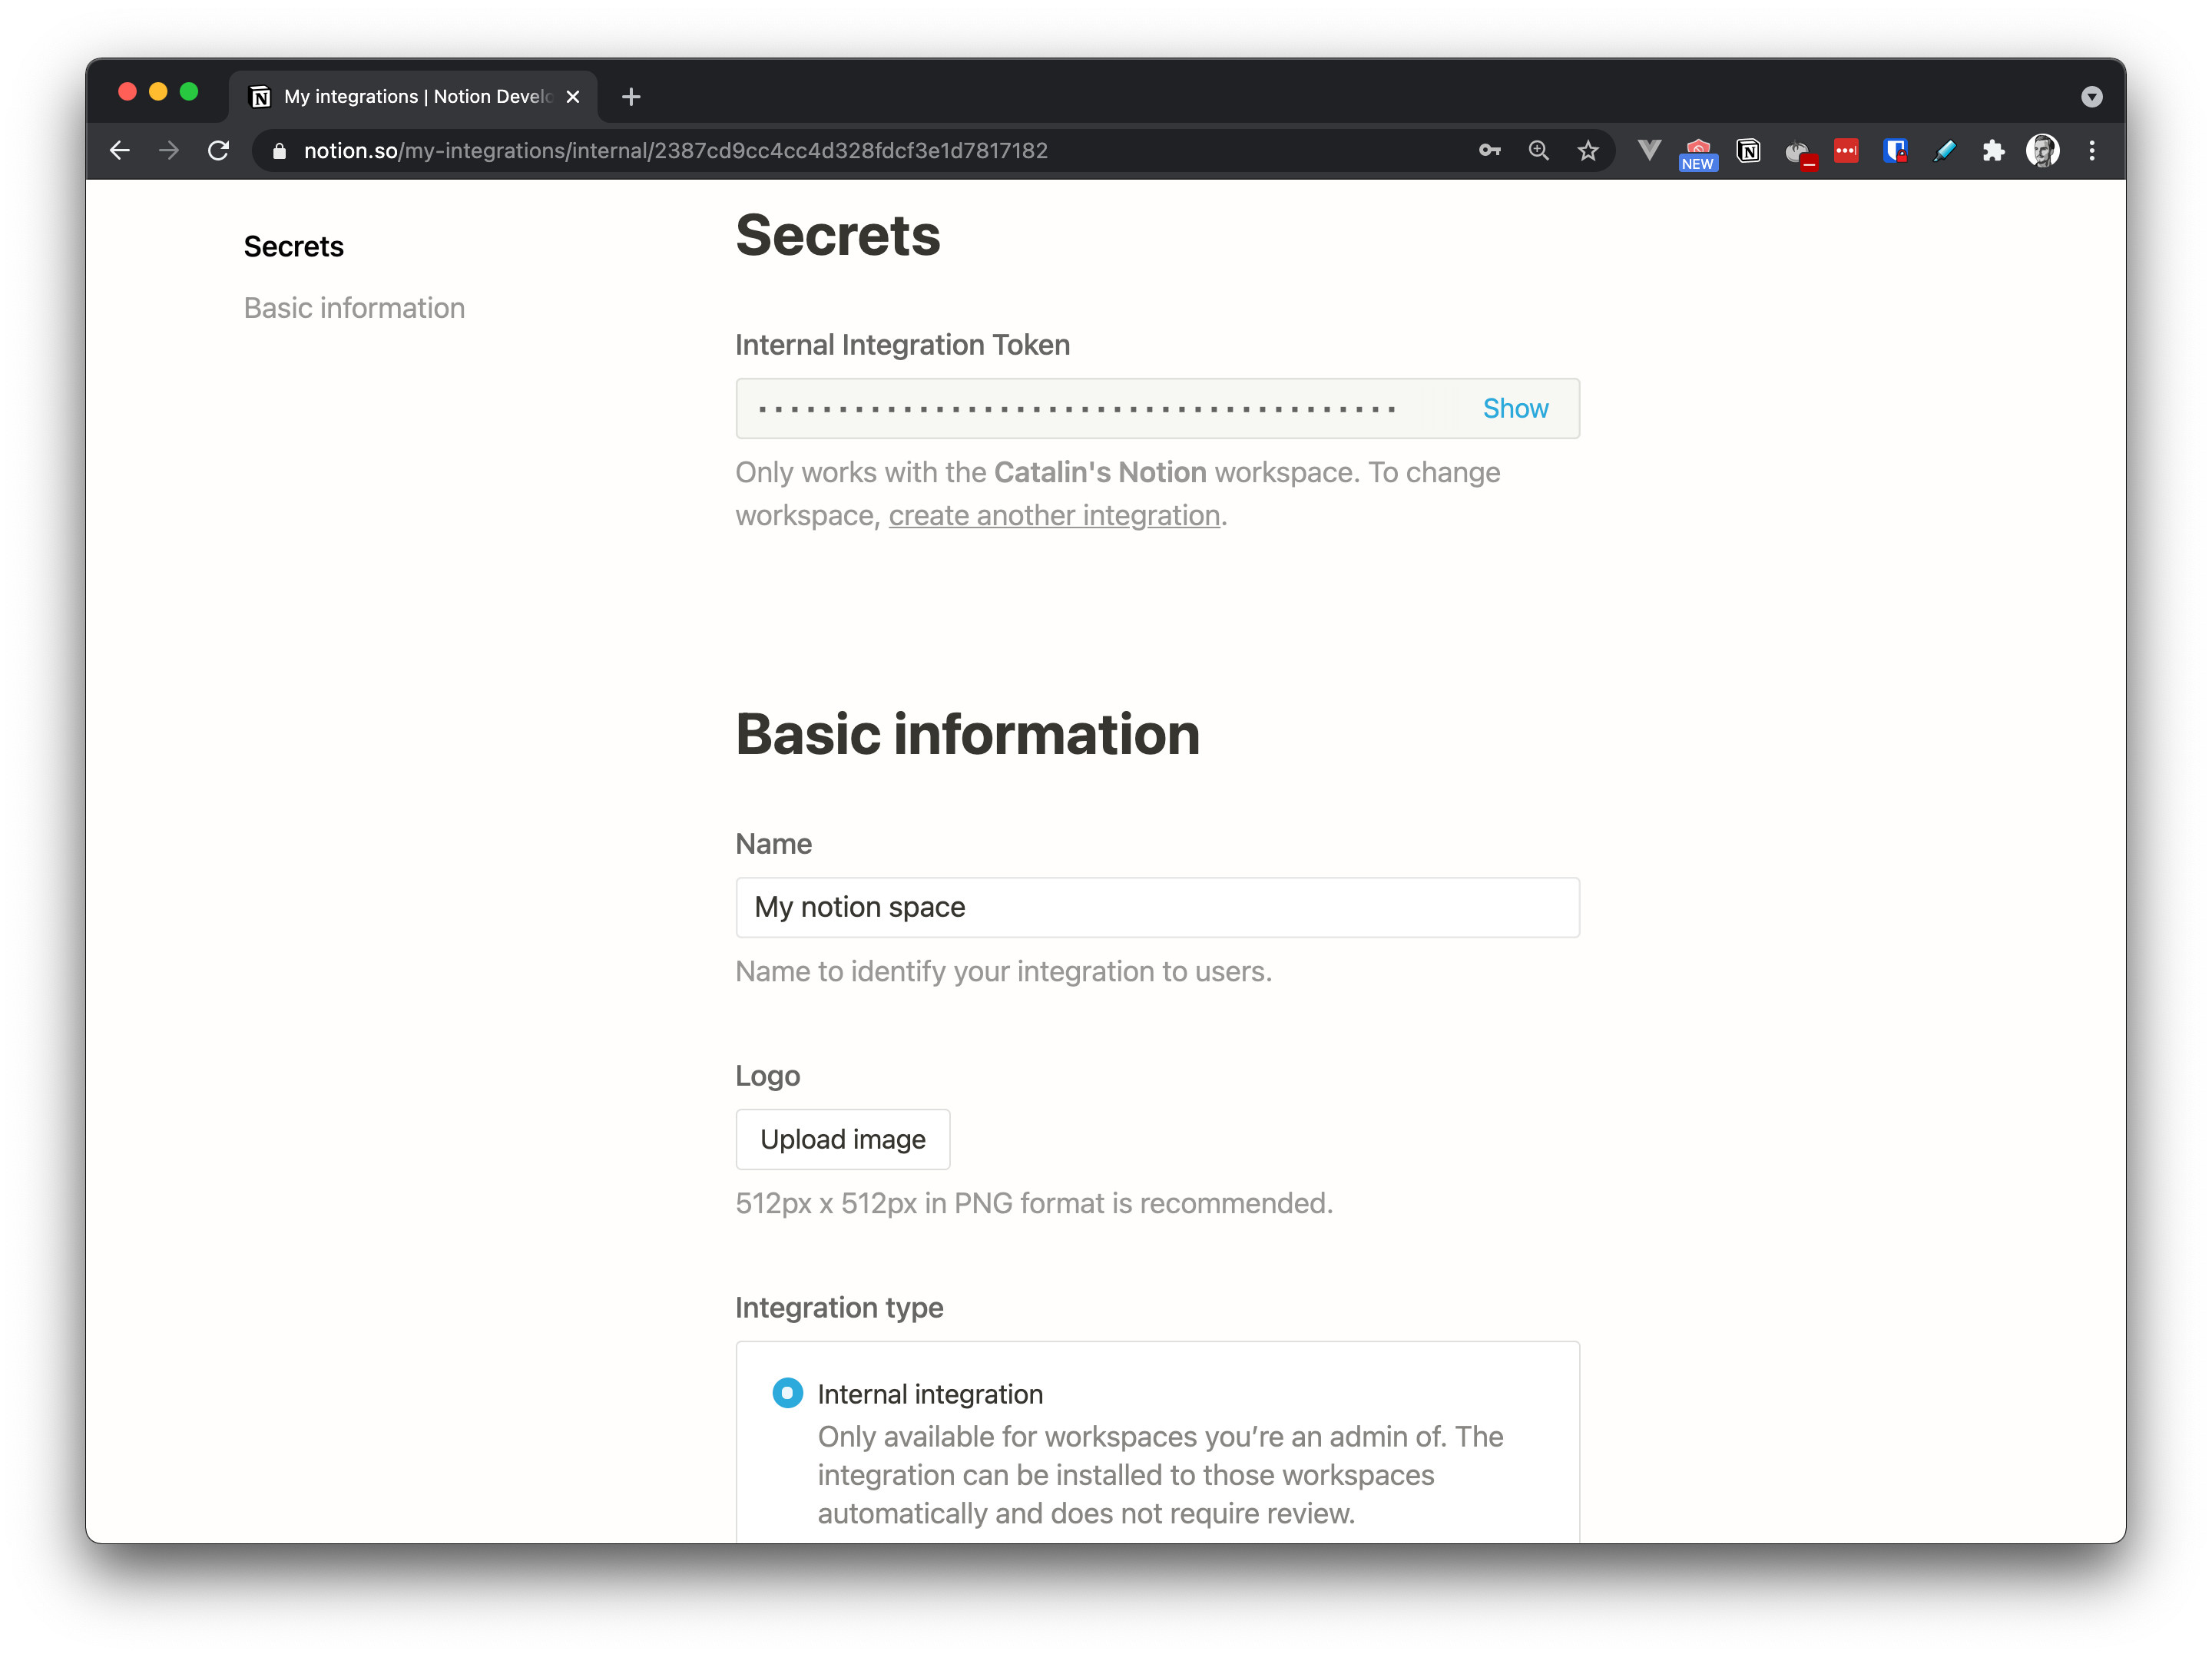
Figure 2
Before going further, it's important to note that you need to leave "Internal integration" checked, as you can see in figure 2.
For a more in-depth tutorial about creating Notion integrations, I recommend checking their official documentation.
Share your Notion pages
The last step is to share whatever page you wish with the newly-created integration. Go to your Notion account, and choose any page you want.
After the page opens, click on the "Share" button, and then click on the field saying "Add people, emails, groups, or integrations".
Figure 3, below, illustrates that.
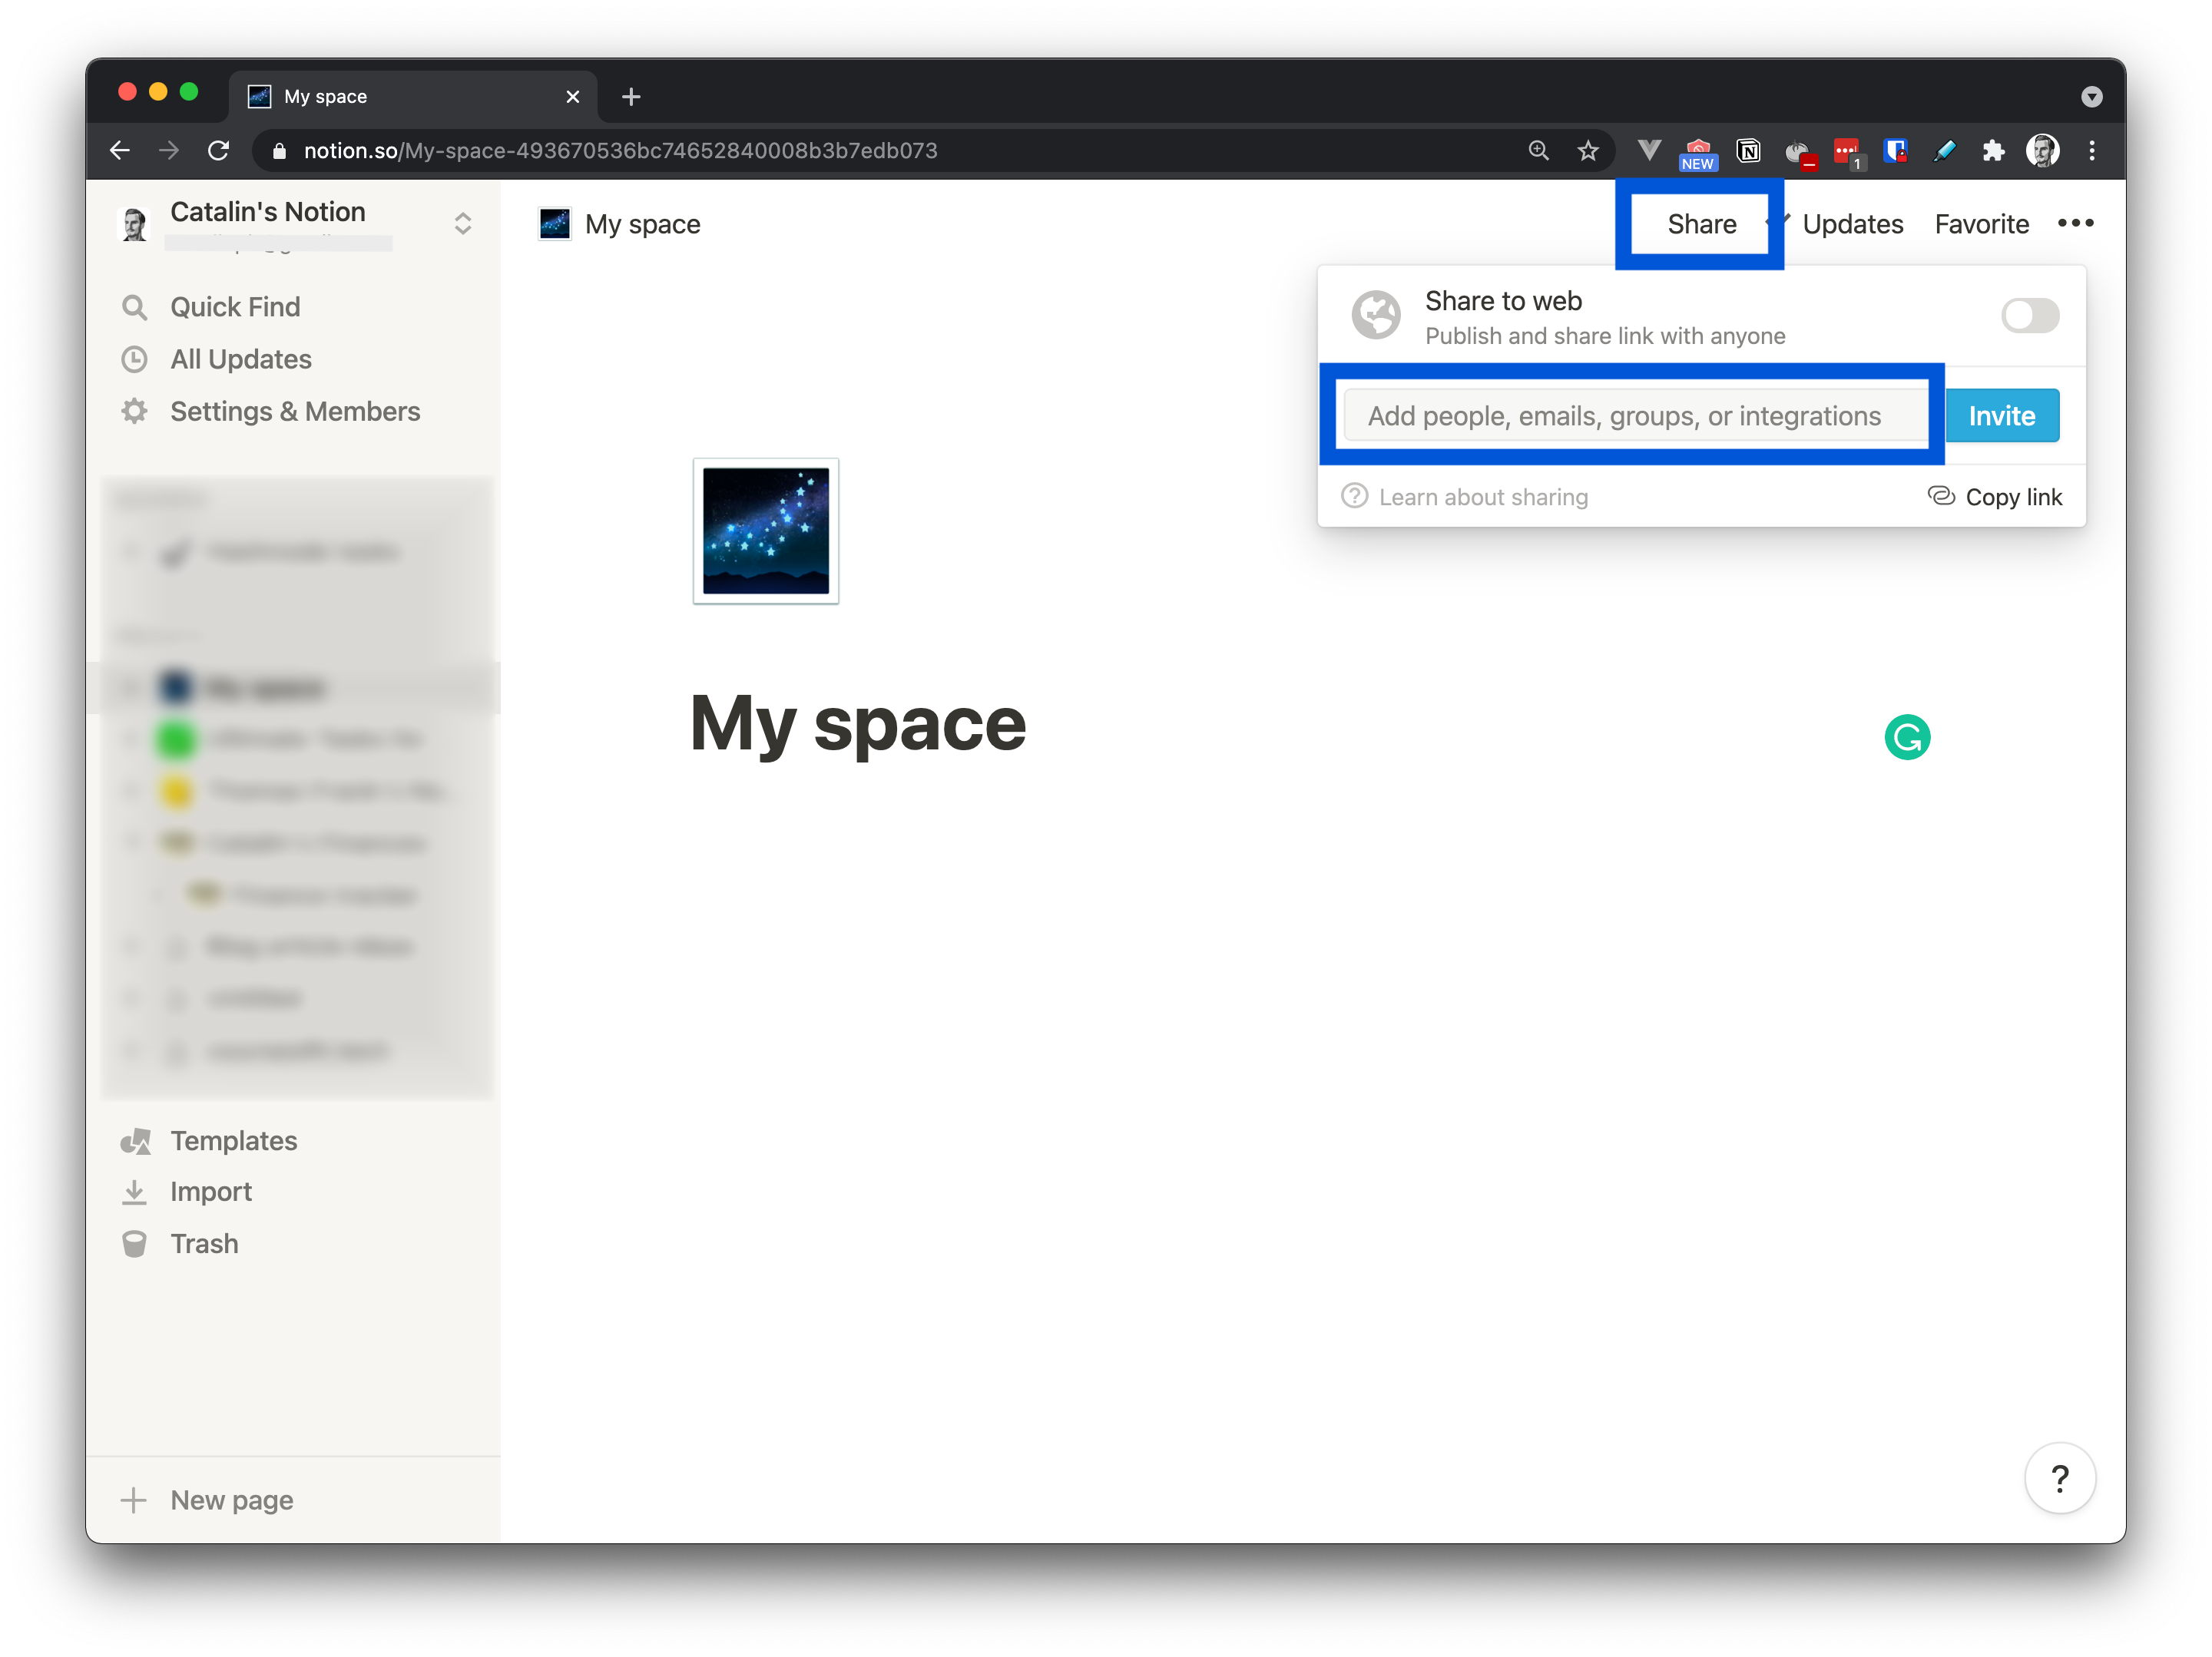
Figure 3
After clicking on that field, you are prompted to choose with whom you want to share the page. Choose your integration. In my case, I share the "My space" page with my integration called "My notion space".
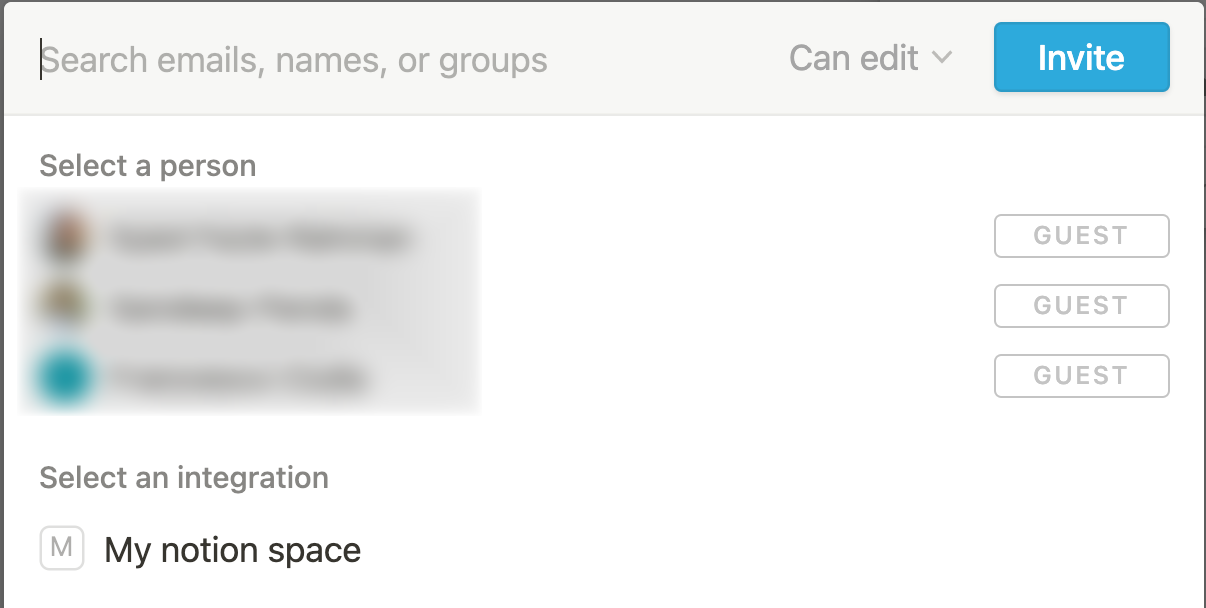
Figure 4
That's all you need to do when it comes to configuring Notion, so well done! You are done with the Notion configuration, and you are ready to use the Notion API.
Note: If you want to use the same document as me, you can duplicate this job applications template. After you duplicate it, share it with your integration (see the process above) and use your database ID (you'll see how to get the database ID later).
Configure the Node.js project
You need to use the Notion SDK for JavaScript to interact with the Notion API in your Node.js application. The Notion SDK is a client for the Notion API, and you can find more about it on its GitHub repository.
The first step is to create the application structure. Create a new folder and initialize the application as follows:
mkdir notion-api-app

cd notion-api-app

npm init -y
The command npm init -y creates the package.json file and initialises it with the default values. If you want to fill the fields manually, remove the -y flag and follow the instructions.
The next step is to install the packages required to create the application. You'll use the following packages:
- Notion SDK - to interact with the Notion API.
- FastifyJS - to build the Node.js API.
- dotenv - to manage environmental variables.
Thus, you can install the packages as follows:
npm install @notionhq/client fastify dotenv
Once the packages are installed, you need to create a file to store the environmental variables. You will store the Notion secret token and the database ID in the .env file. Thus, create the .env file as follows:
touch .env
Now go to your Notion integrations and click on your integration. You should see a field called Internal Integration Token (see figure 2 for reference). Click on the "Show" button and copy the token.
The next step is to go to your .env file and add the token:
NOTION_TOKEN=<your_token>
Note: Replace <your_token> with the token you copied earlier.
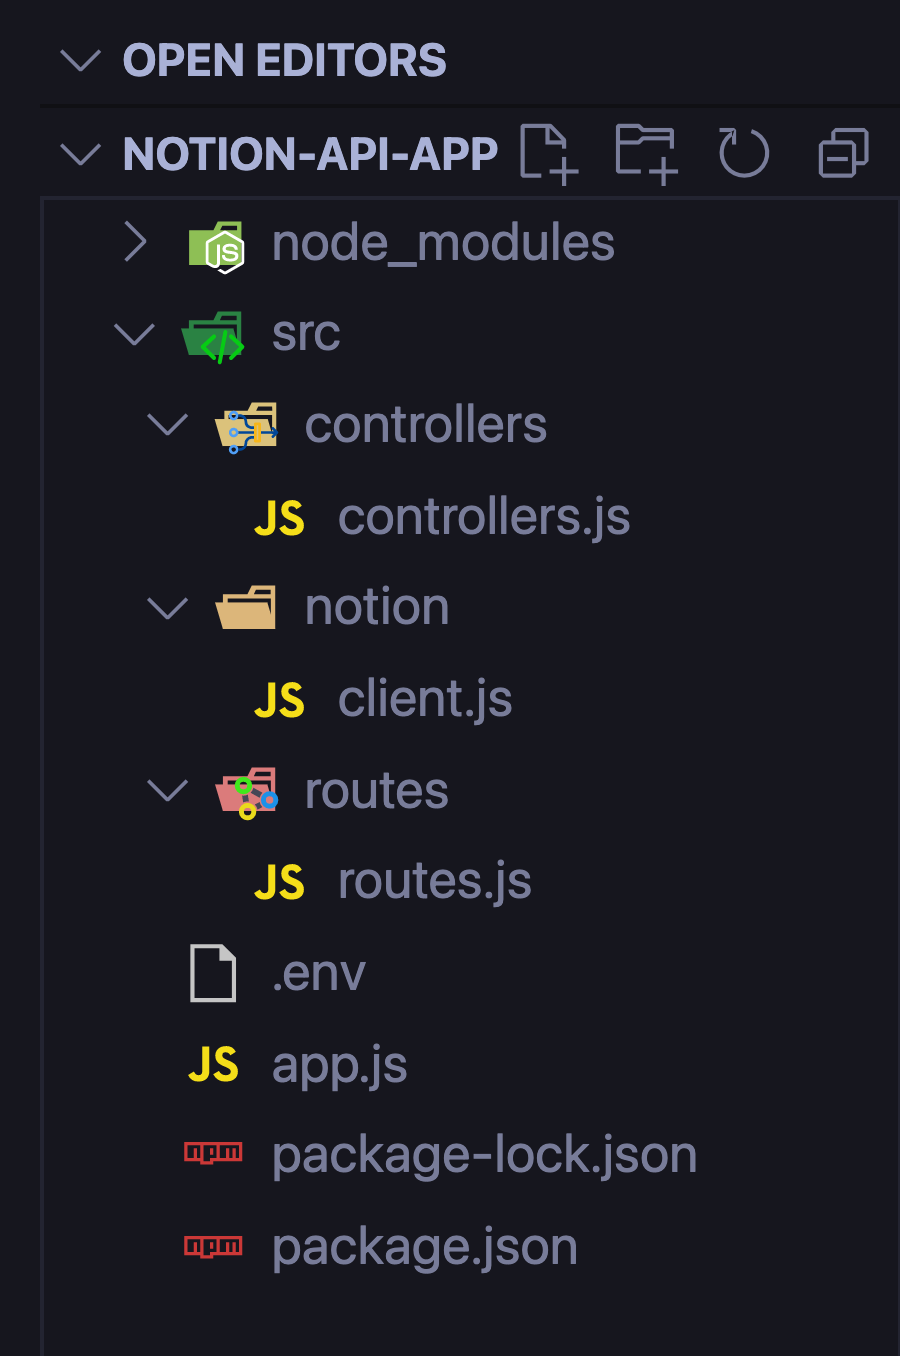
Before going further, you also need to create the folder structure for the application. You need to create the following folders:
- app.js - the home for your server configuration
- src - it hosts all the other folders.
- routes - the home folder for your routes.
- notion - the Notion client resides here.
- controllers - the home folder for your business logic.
You can create all the folders and files from the command line as follows:
touch app.js
mkdir src
mkdir src/routes src/notion src/controllers
touch src/routes/routes.js
touch src/notion/client.js
touch src/controllers/controllers.js
This is how the structure of your application should look like until this point:
Now you are ready to build the application!
Configure Notion in the application
It's time to configure the Notion client so you can use it to manipulate data. Go into the following file src/notion/client.js and add the following code:
const { Client } = require('@notionhq/client');

require('dotenv').config();
With the first line, you import the Notion client, and with the second one, you import the dotenv package. The purpose of these imports is to allow you to use the Notion client and the environmental variables.
The next step is to create a new Notion client. In the same file, after the imports, write the following code:
const notion = new Client({
    auth: process.env.NOTION_TOKEN
});
With the above code, you create a new instance of the Notion client and pass your secret token. Lastly, you store it in the notion constant so you can re-use the client.
Before going further, you need to export the notion constant so you can use it when you write the business logic. In the same file - src/notion/client.js -, at the end, write the following code:
module.exports = {
    notion
};
Now you are ready to use the Notion client.
Check this gist to see how your file
client.jsfile should look up to this point.
How to get the database ID
There is one more step before building the routes. You need the database ID so you can perform operations such as:
- creating, reading, and modifying data
You can get the database ID in two ways. You can either do it from the browser or programmatically.
If you prefer to do it from the browser, open the Notion document in your browser and copy the ID as shown in figure 5.
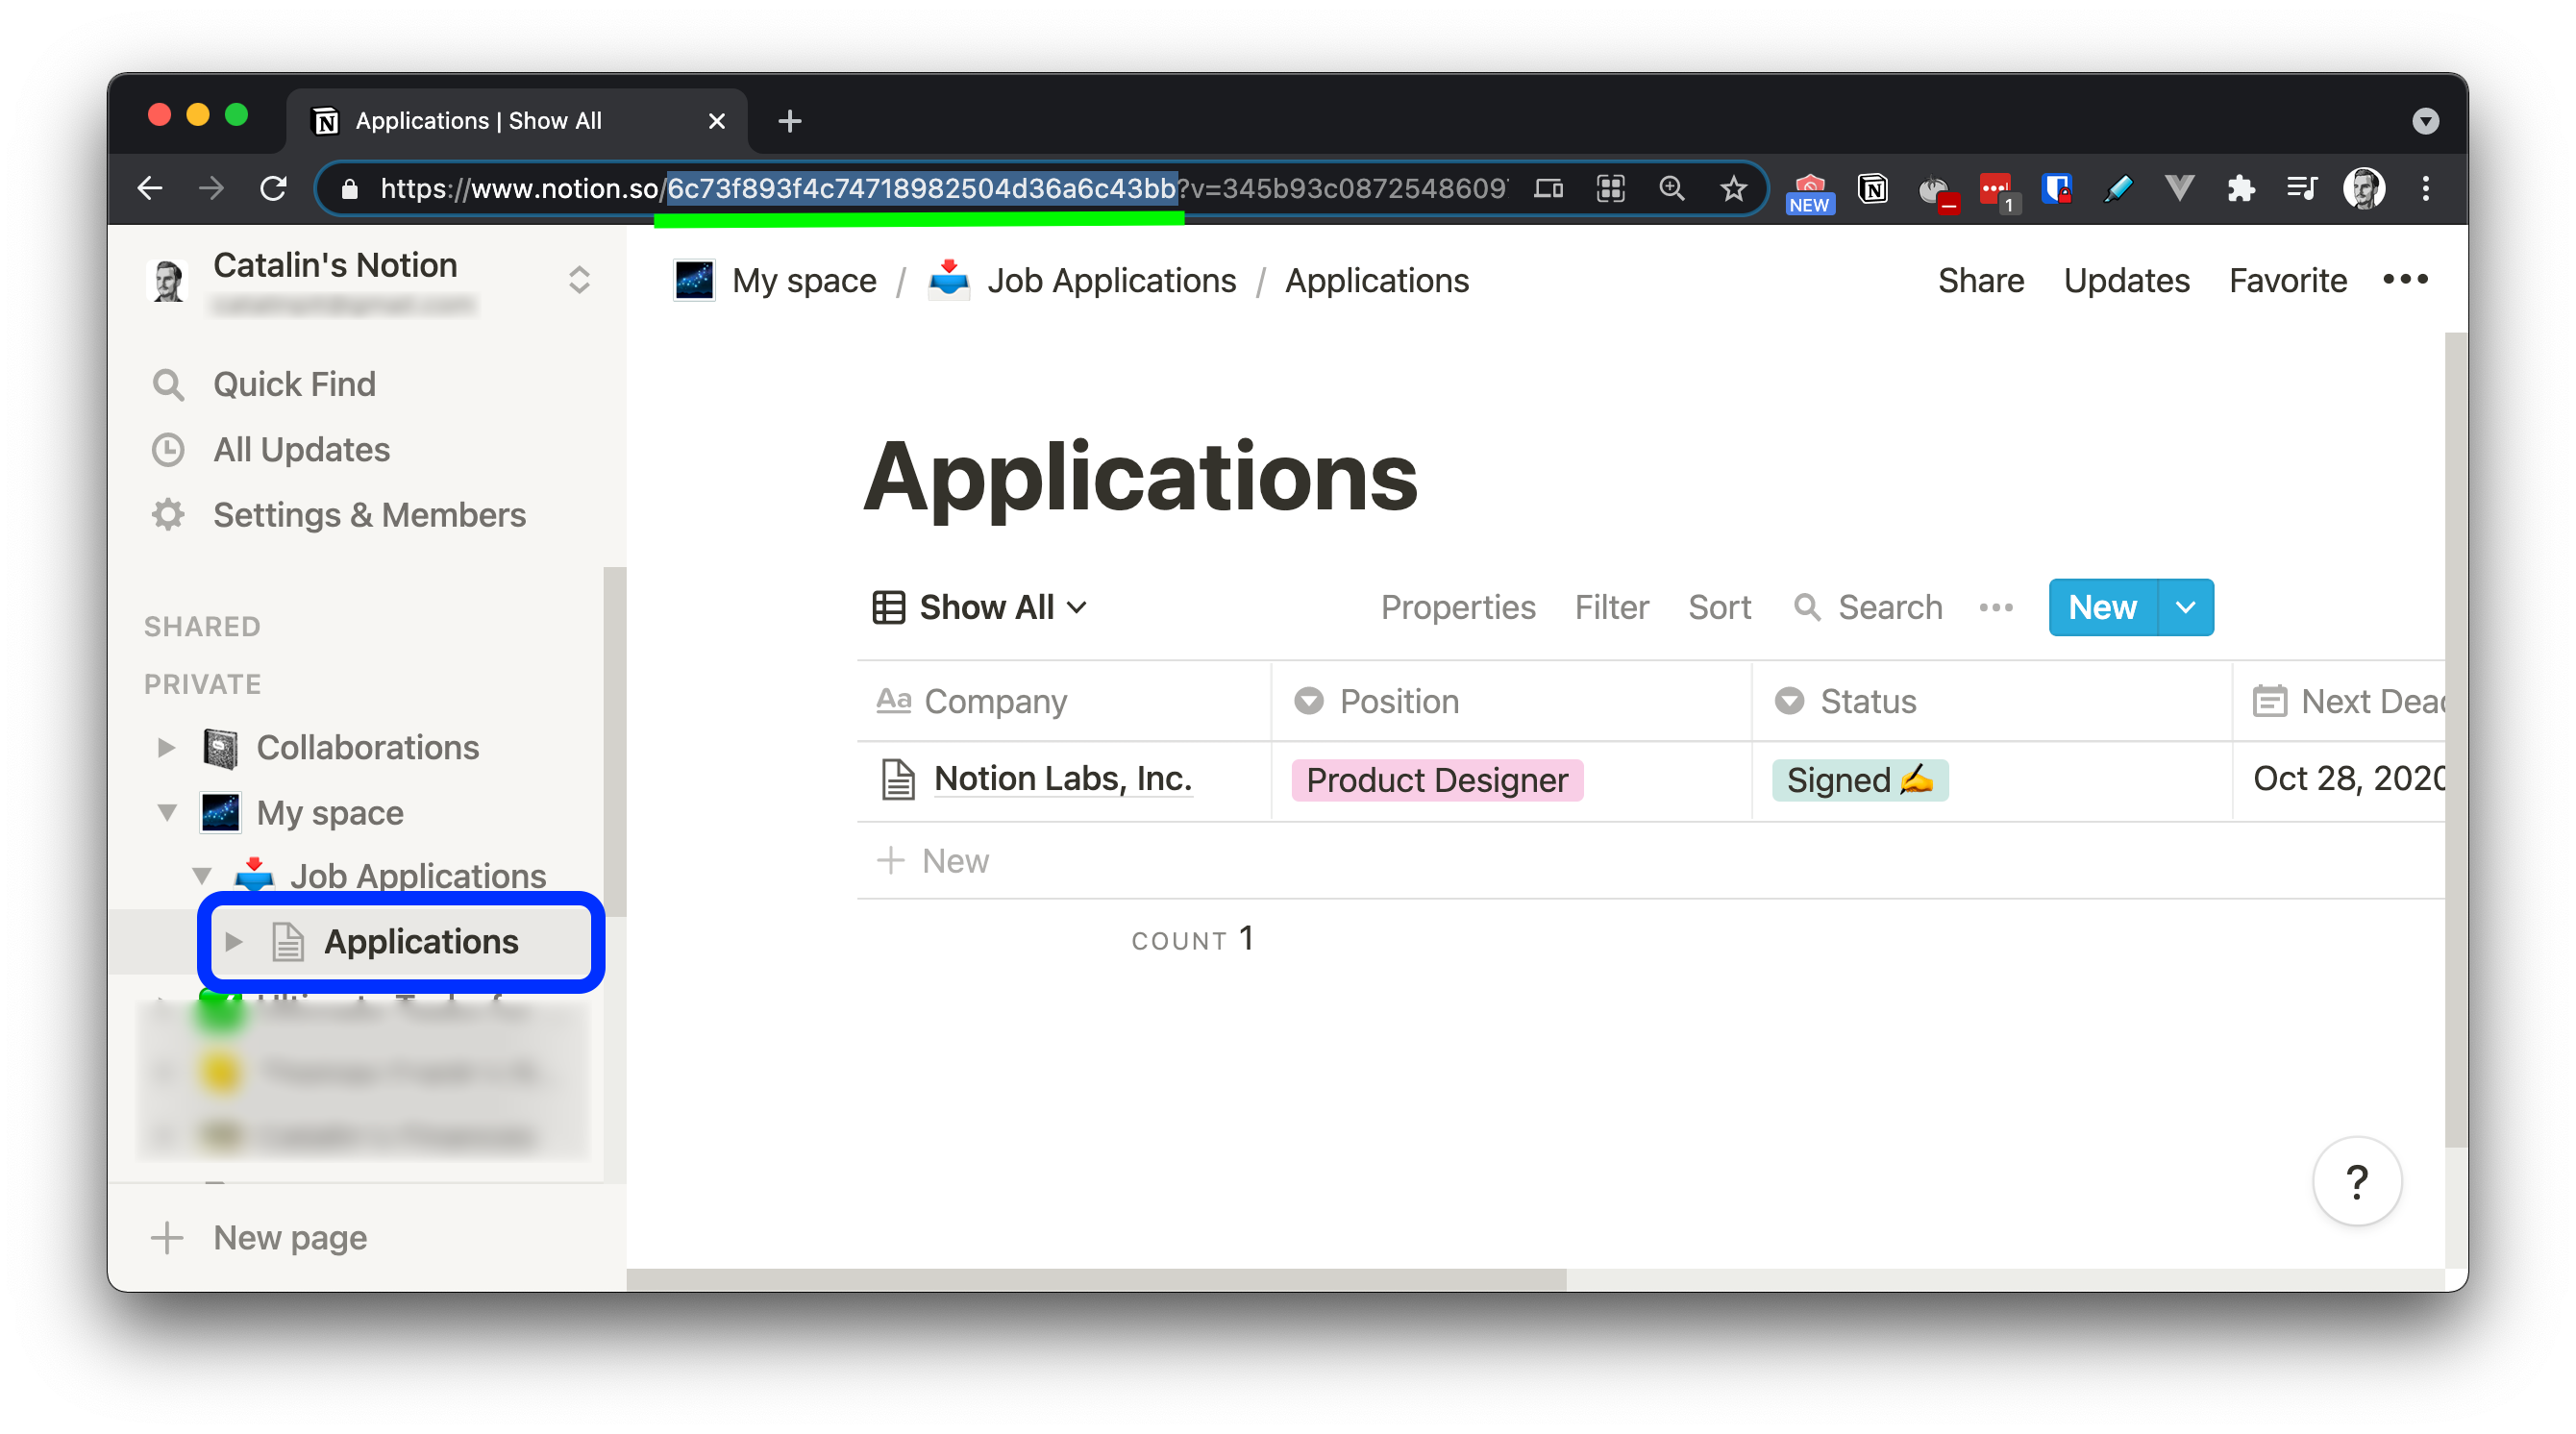
Figure 5
Alternatively, you can get the database ID programmatically, as shown in the snippet below:
const getDatabases = async () => {
    const databases = await notion.databases.list();

    console.log(databases);
};
The above code snippet lists all your databases and the information about them. For a visual representation, see figure 6 below.
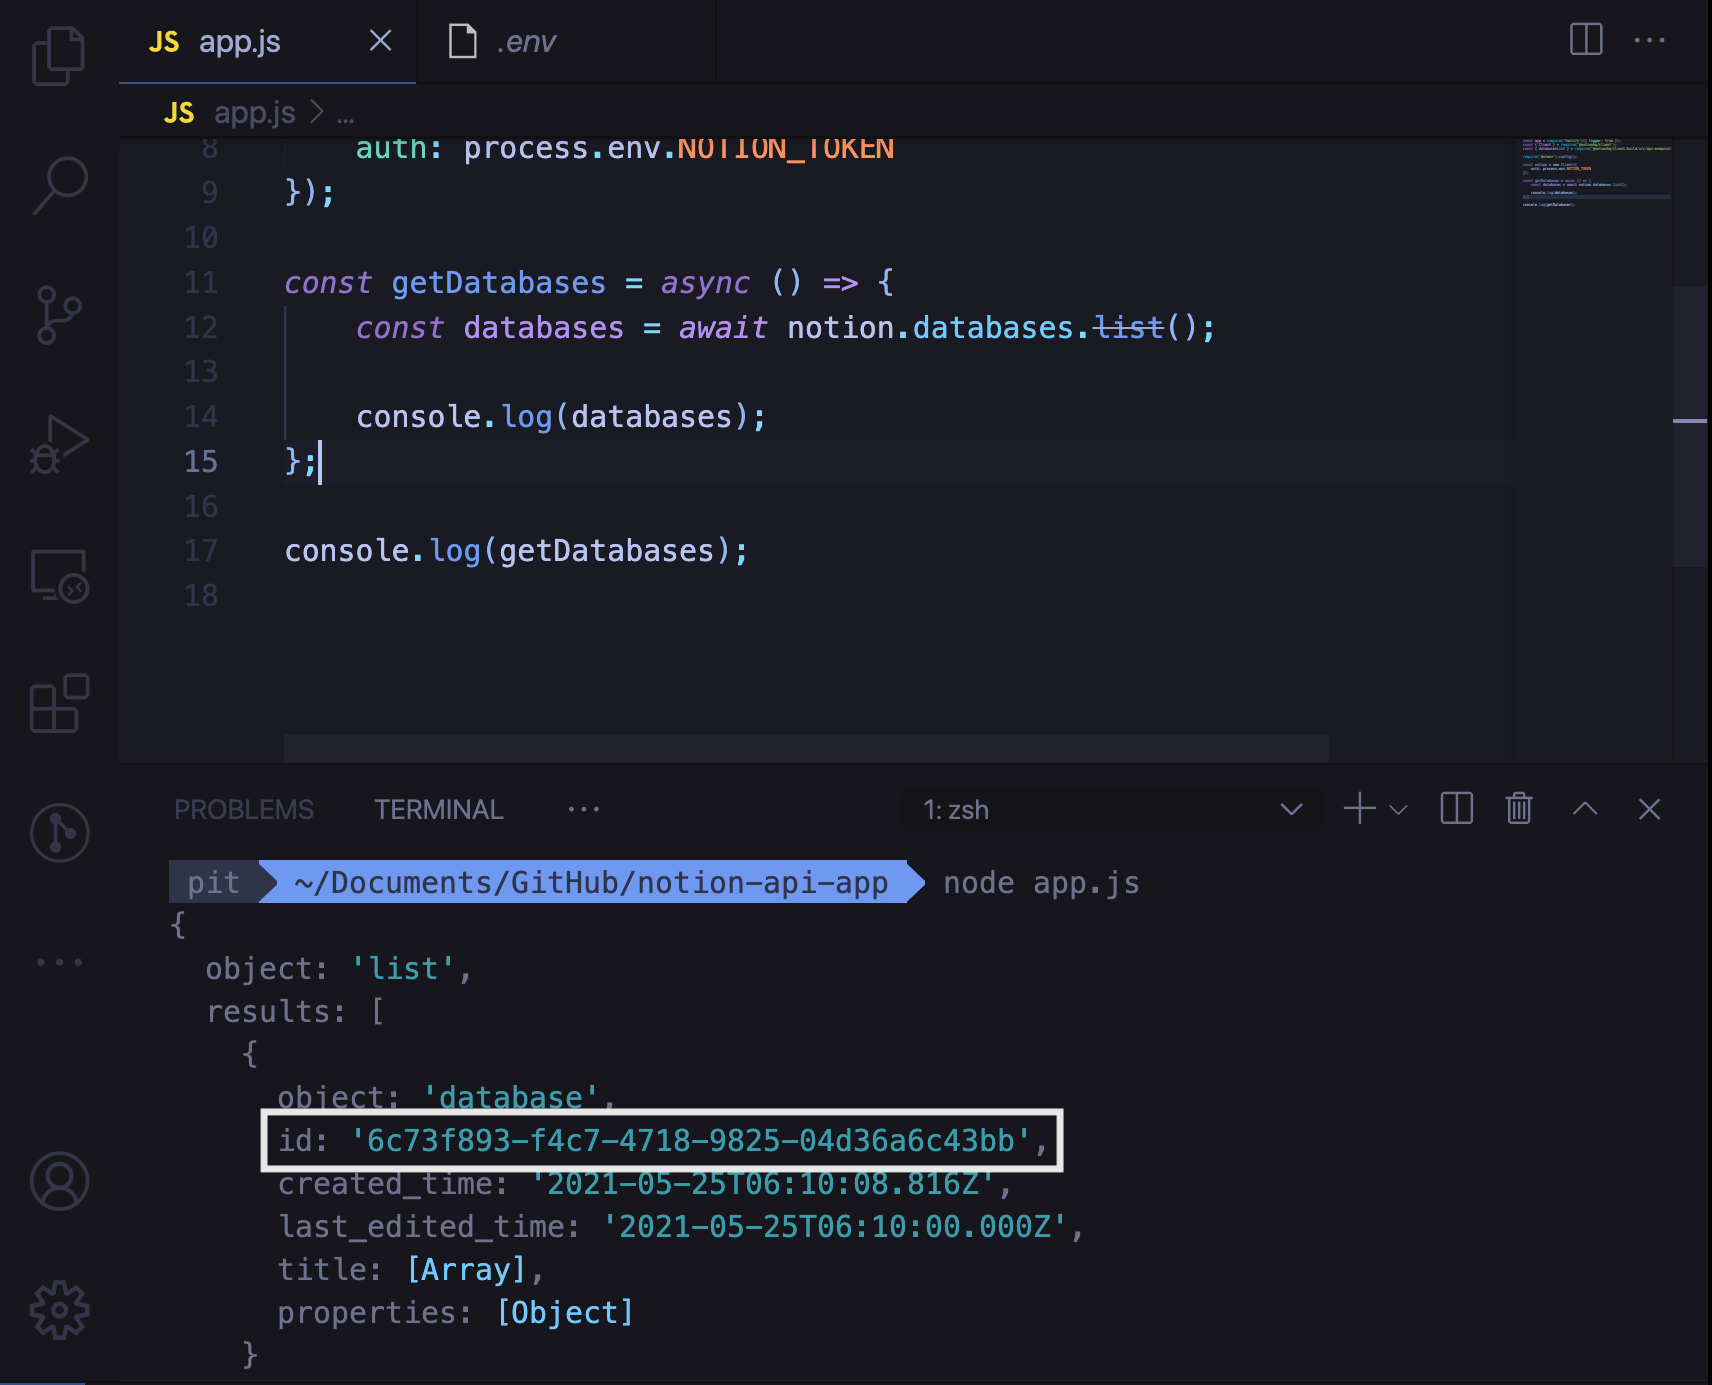
Figure 6
Whatever option you end up using, copy the database ID and add it to your .env file. At this point, your .env file should look as follows:
NOTION_TOKEN=<your_token>
DB_ID=<your_DB_ID>
You finished configuring the Notion client in your project. The next step is to create the routes and business logic.
Add FastifyJS
Open the file app.js and import FastifyJS at the top of the file.
const app = require('fastify')({ logger: true });
After that, import the "dotenv" package again so you can use the port, which is defined in the .env. file.
require('dotenv').config();
The next step is to register the routes, even though you did not write them yet. After the imports, add the following line:
app.register(require('./src/routes/routes'));
With the above line, you register all the routes. That is, you make the routes available so users can access them.
Lastly, listen to a port so you can run the application. Add the following code at the bottom of the file:
app.listen(process.env.PORT, (err, addr) => {
    if (err) {
        app.log.error(err);
        process.exit(1);
    }

    app.log.info(`Your server is listening on port ${process.env.PORT} 🧨`);
});
The application listens to a port you define in the .env file. If there is an error, it logs the error. Otherwise, it outputs in the console that the server is running and on which port it is running.
Thus, add the port number - 3333 - in your .env file. This port number is just an example; you can use any port number you want. By this point, your .env file should look as follows:
NOTION_TOKEN=<your_token>
DB_ID=<your_DB_ID>
PORT=3333
Check this gist to see how your file
app.jsfile should look up to this point.
Build the routes
The next step is to create the routes. Their purpose is to allow people to perform CRUD operations (except deleting data in this tutorial).
For the beginning, go to src/routes/routes.js and import the controller at the top of the file.
const controller = require('../controllers/controllers');
Even though you did not write the business logic yet, you will need it. After that, create the routes function and export it:
async function routes(app, opts) {
    // the code for routes go here
};

module.exports = routes;
In the routes method, you configure your application's endpoints. For each route, you specify, at minimum, the:
- HTTP method - for instance, you use the
GETHTTP verb to return all items in your database. - URL - for example, you might use the endpoint
/job/applicationsto return all the job applications. - handler - this represents the business logic. For example, what happens when people access the endpoint
/job/applications.
Now that you understand how routes work in FastifyJS, let's build the first route.
Show all job applications
The first route shows all job applications when a user makes a GET request to the endpoint /job/applications.
app.route({
    method: 'GET',
    url: '/job/applications',
    handler: controller.getAllApplications
});
Get a specific job application
The second route shows only one job application. When the user makes a GET request to the /job/applications/:id route, it shows only the job application whose ID matches the provided ID in the URL.
Write the following code after the first route:
app.route({
    method: 'GET',
    url: '/job/applications/:id',
    handler: controller.getApplication
});
Filter job applications
The third route allows the users to filter the job applications by the company name. The user can use a query parameter called company to filter the results.
An example of a URL would be /job/applications/filter?company="CatalinSoft". Thus, by making a GET request to that URL, the application returns only the job application for the company "CatalinSoft".
Write the following code in routes.js:
app.route({
    method: 'GET',
    url: '/job/applications/filter',
    handler: controller.filterApplications
});
Add a new job application
The fourth route allows people to make a POST request to add job applications into the document. When you make a POST request to the endpoint '/job/applications', with the appropriate body, it adds the job application to the Notion document.
Write the following code:
app.route({
    method: 'POST',
    url: '/job/applications',
    handler: controller.addApplication
});
Update existing application
Lastly, you have the route which allows people to update an existing job application. Make a PATCH request to /job/applications/:id with the appropriate body, and you will update the record.
app.route({
    method: 'PATCH',
    url: '/job/applications/:id',
    handler: controller.updateApplication
});
Those are all the routes. As you can see, they follow the same pattern:
- You specify the HTTP method.
- You add the URL where people can make the request.
- You provide the handler which is triggered when a request is made to that route.
Also, you might've noticed that there is no "delete" route. That is because the Notion API does not allow you to delete resources at the moment.
Check this gist to see the complete
routes.jsfile.
Add the business logic
The last step of the tutorial is to build the business logic. The business logic specifies what happens when a certain HTTP request is made to a specific endpoint.
Let's start by importing the Notion client in the controllers.js file. Open the file and add the following line at the top of the document:
const { notion } = require('../notion/client');
Now, you can use the client to manipulate data.
Retrieve all job applications
The first method you write is the one that returns all the job applications. Write the following code in controllers.js:
const getAllApplications = async (req, res) => {
    const data = await notion.databases.query({
        database_id: process.env.DB_ID
    });
}
Up to this point, you use the Notion client to query your database. The above piece of code returns an object, which in turn contains an array with all the pages from your database.
This is the result you get if you run the above code:
{
  object: 'list',
  results: [
    {
      object: 'page',
      id: '8e8e8f35-09ac-40fd-92a2-a3743b271e2e',
      created_time: '2021-05-26T05:45:00.000Z',
      last_edited_time: '2021-05-26T05:45:00.000Z',
      parent: [Object],
      archived: false,
      properties: [Object]
    },
    {
      object: 'page',
      id: '03a7aea1-c58b-49ce-9843-87131c37192a',
      created_time: '2021-05-25T06:10:08.816Z',
      last_edited_time: '2021-05-25T06:10:08.816Z',
      parent: [Object],
      archived: false,
      properties: [Object]
    }
  ],
  next_cursor: null,
  has_more: false
}
From this response, the field results is the one that interests you. That's the array with all the pages from your database.
Since you have an array, you need to loop over it and return only the pages. Go back to the method getAllApplications and add the rest of the code:
const getAllApplications = async (req, res) => {
    const data = await notion.databases.query({
        database_id: process.env.DB_ID
    });

    const pages = data.results.map(page => {
        return {
            id: page.id,
            created: page.created_time,
            updated: page.last_edited_time,
            company: page.properties.Company.title[0].plain_text,
            position: page.properties.Position.select.name,
            status: page.properties.Status.select.name,
            deadline: page.properties['Next Deadline'].date.start,
            jobDescription: page.properties['Job Description'].url,
            comments: page.properties.Comments.rich_text[0].plain_text
        }
    });

    return pages;
};
In the second part of the code, you map over the results array and return an array of custom objects. These custom objects contain the following information:
- the ID
- when it was created
- when it was last updated
- the company name
- the position you applied for
- the status of the application
- the application deadline
- the job description
- additional comments
Let's make a GET request to localhost:3333/job/applications and see what happens.
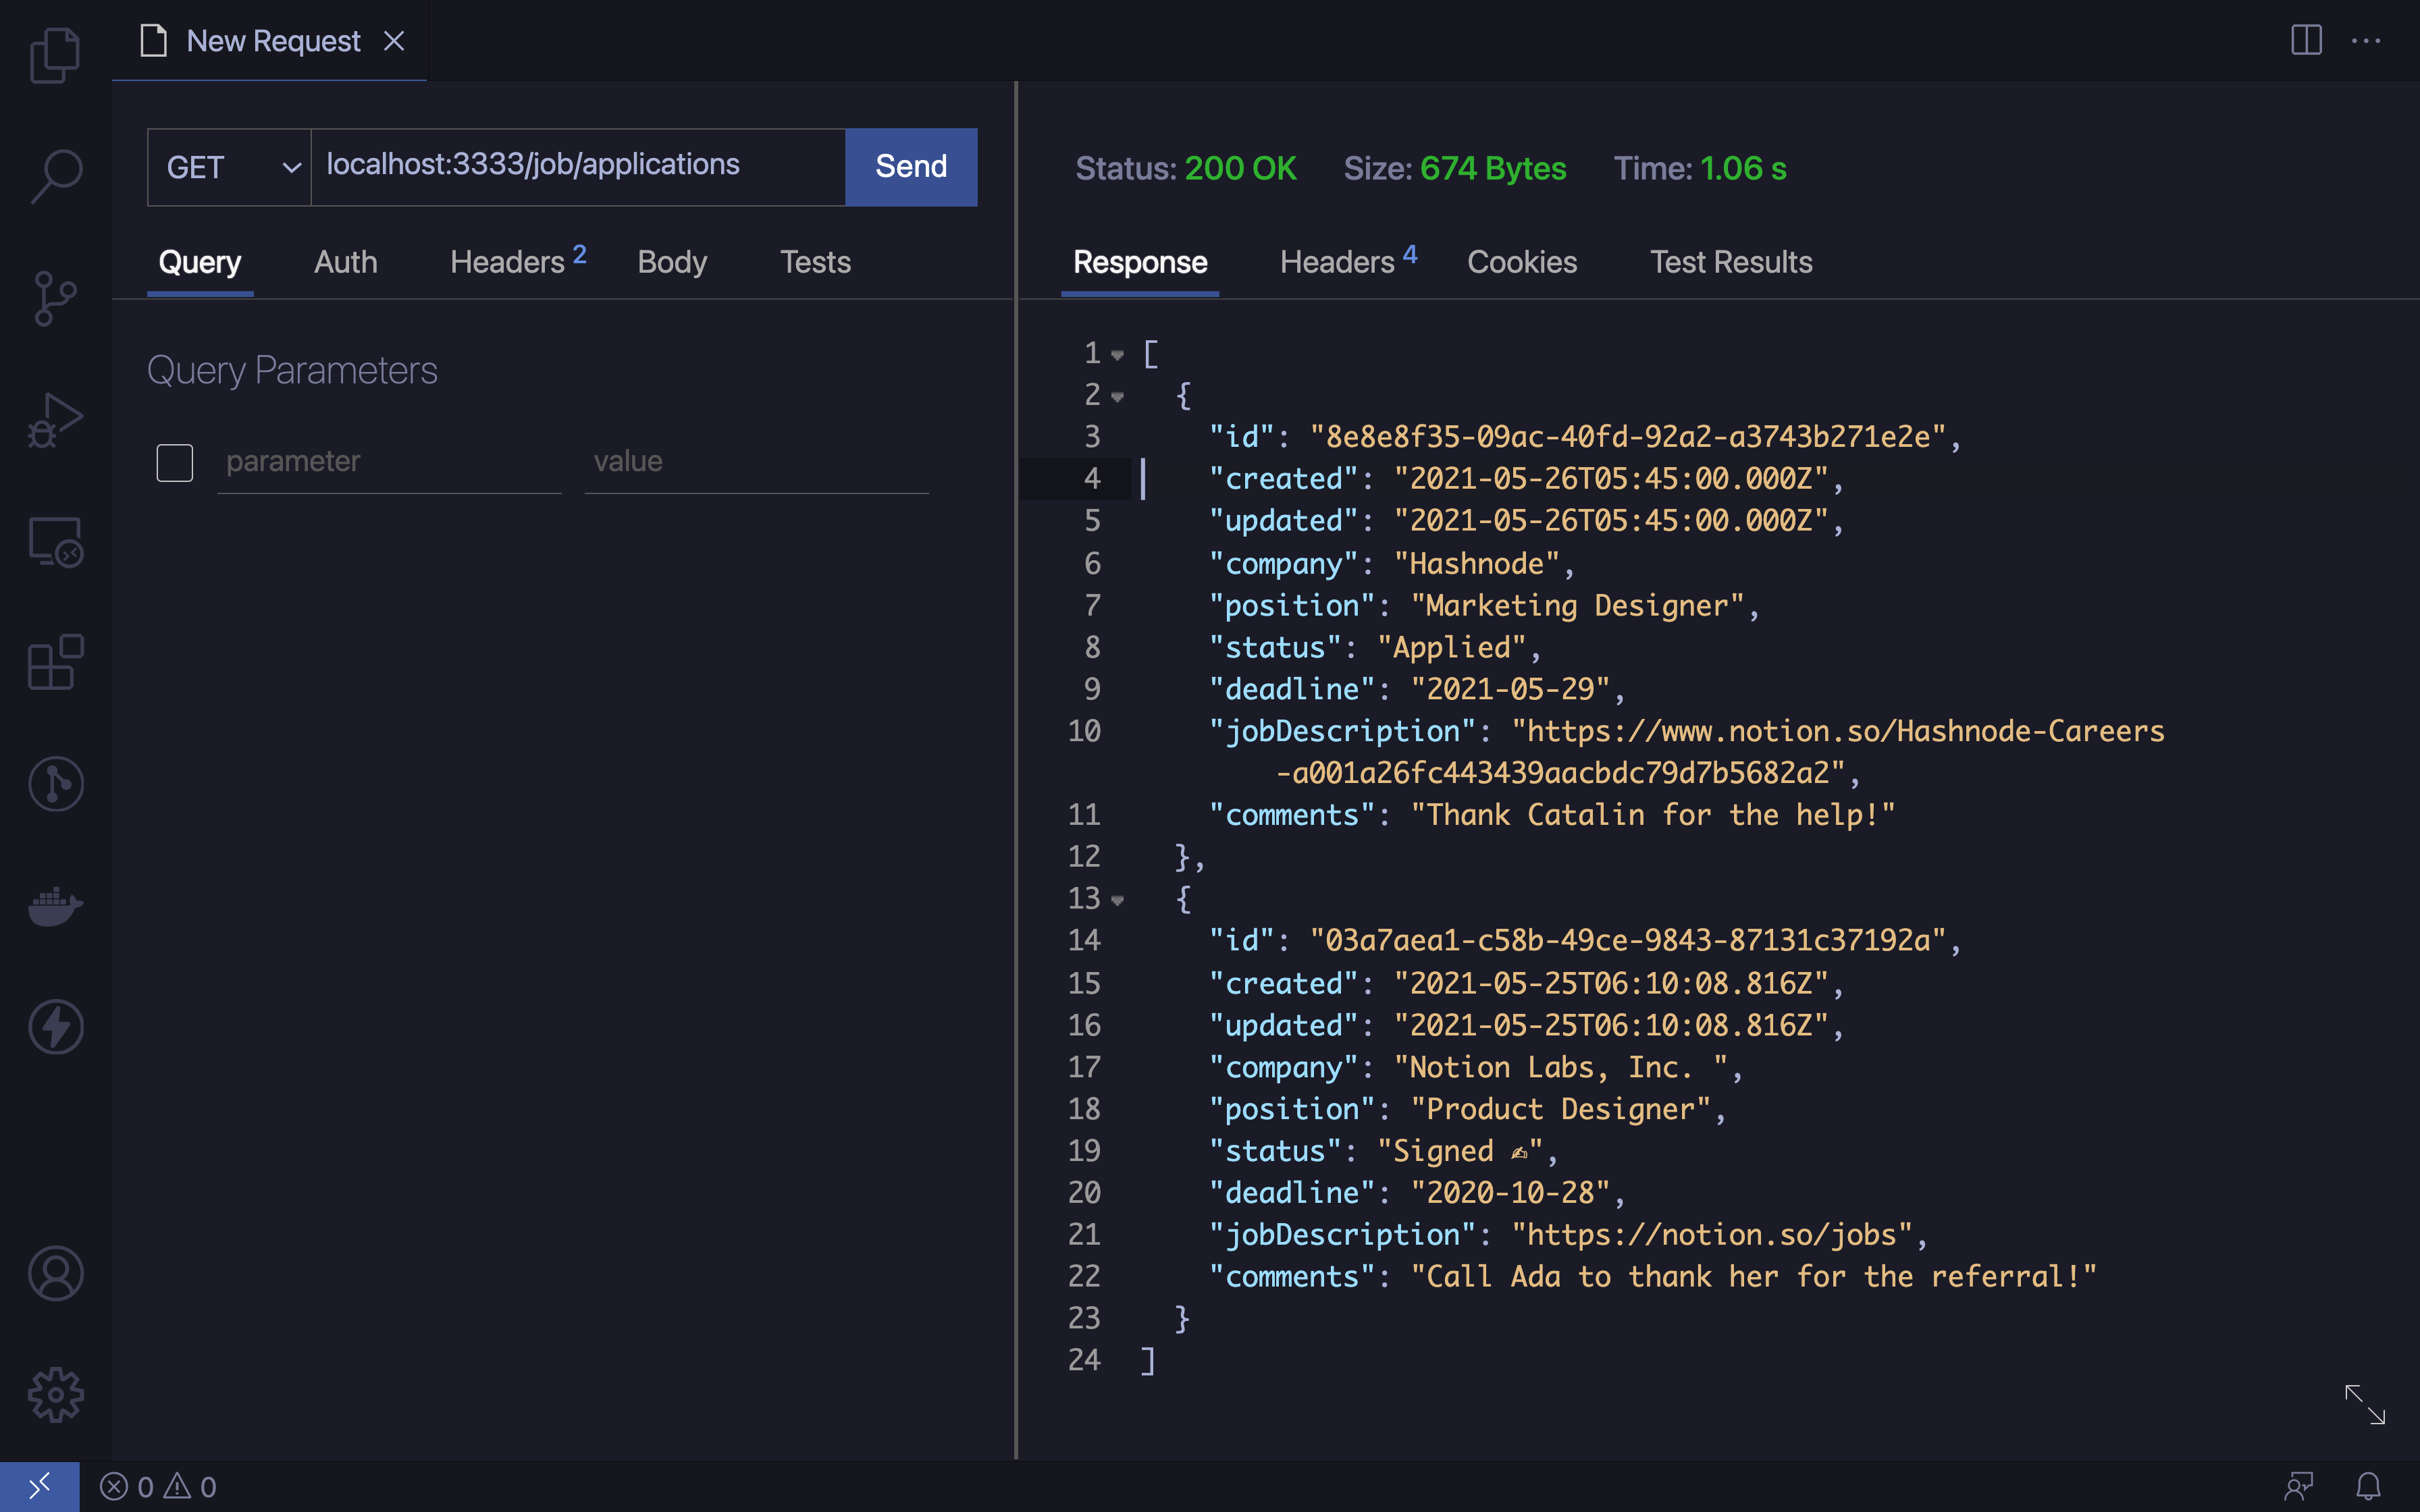
Figure 7
Figure 7 illustrates what happens after making the request. You can see it returns an array of objects, exactly how you structured them in the method getAllApplications.
Get a specific application
The next step is to add the business logic for retrieving only a specific job application. This time, you use different methods. Rather than querying a database, you retrieve a specific page.
Write the following method in your file controller.js:
const getApplication = async (req, res) => {
    const page = await notion.pages.retrieve({
        page_id: req.params.id
    });

    return {
        id: page.id,
        created: page.created_time,
        updated: page.last_edited_time,
        company: page.properties.Company.title[0].plain_text,
        position: page.properties.Position.select.name,
        status: page.properties.Status.select.name,
        deadline: page.properties['Next Deadline'].date.start,
        jobDescription: page.properties['Job Description'].url,
        comments: page.properties.Comments.rich_text[0].plain_text
    };
};
The method takes the ID of the page from the URL. Thus, if you make a GET request to the URL http://localhost:3333/job/applications/8e8e8f35-09ac-40fd-92a2-a3743b271e2e, the method takes the page ID from it.
After that, it returns the page whose ID matches the ID provided in the URL. Let's make a request and see what happens.
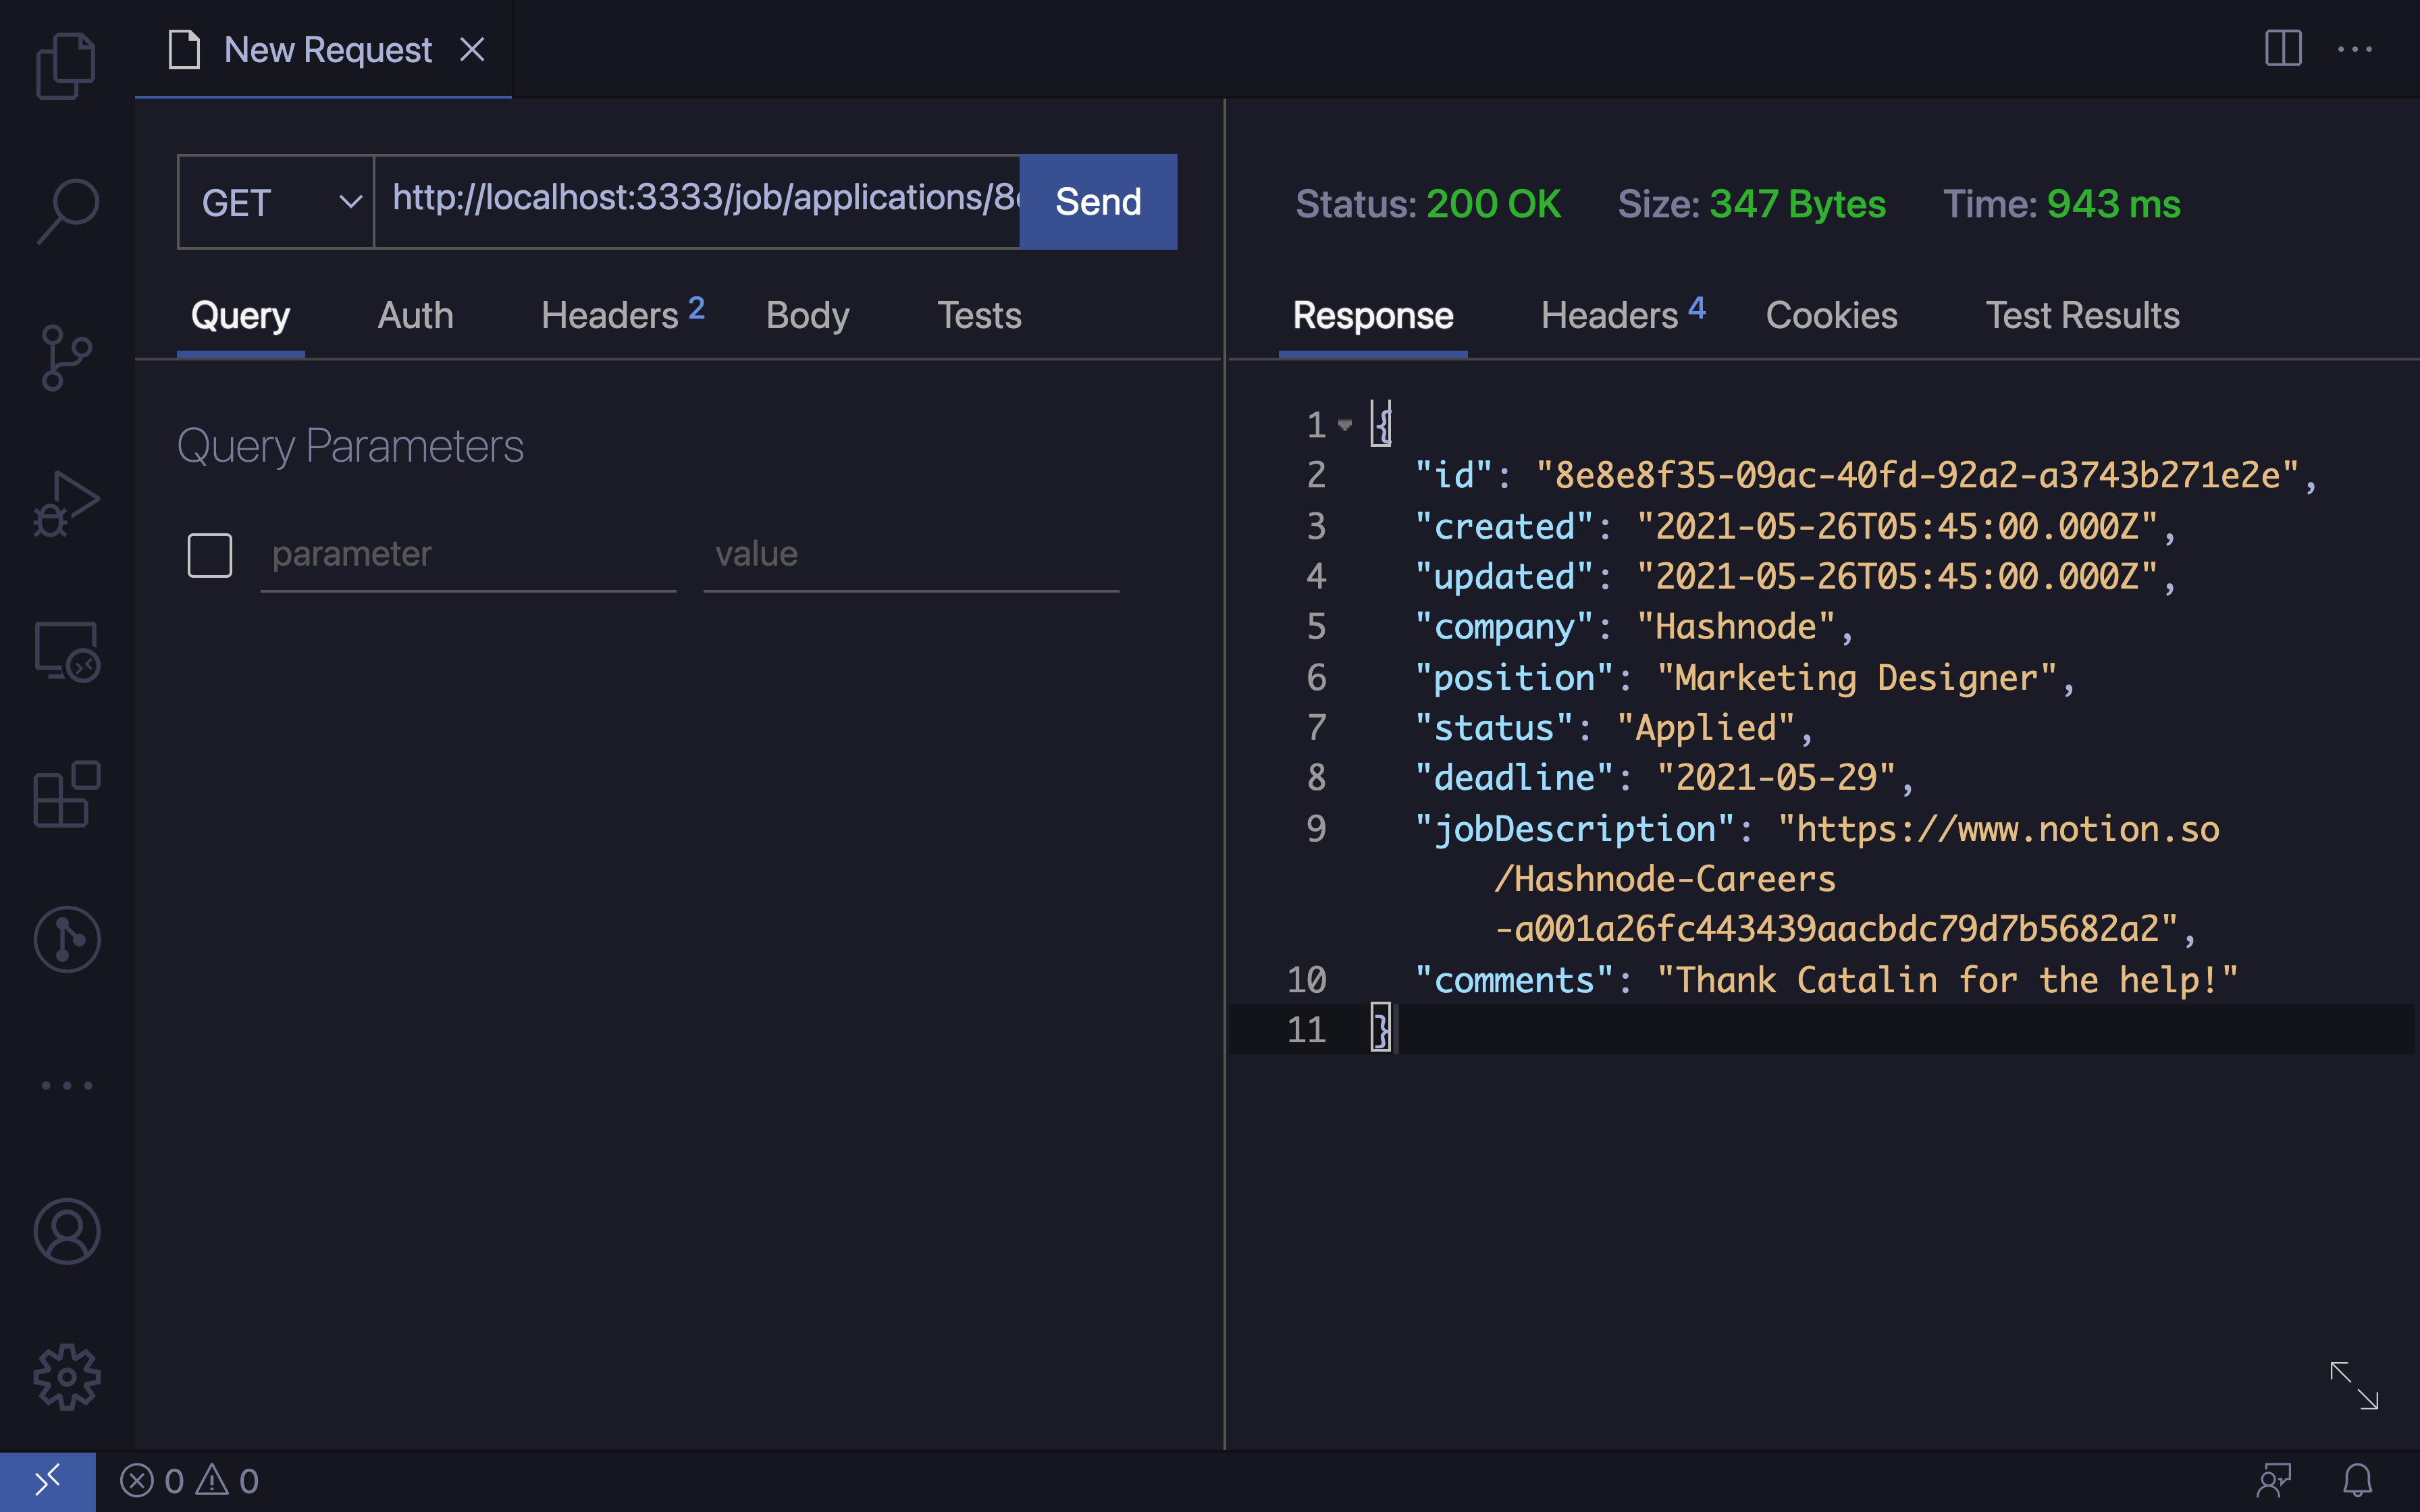
Figure 8
Figure 8 illustrates that it returns the custom page object you defined in the method getApplication.
Filter applications
The Notion client allows you to filter the data as well. For example, you might want to filter the results by the company name. Thus, you can pass the company name in the URL, and it will only return the job applications for that company.
Write the following code in controllers.js:
const filterApplications = async (req, res) => {
    const data = await notion.databases.query({
        database_id: process.env.DB_ID,
        filter: {
            property: 'Company',
            text: {
                contains: req.query.company || ''
            }
        }
    });

    const pages = data.results.map(page => {
        return {
            id: page.id,
            created: page.created_time,
            updated: page.last_edited_time,
            company: page.properties.Company.title[0].plain_text,
            position: page.properties.Position.select.name,
            status: page.properties.Status.select.name,
            deadline: page.properties['Next Deadline'].date.start,
            jobDescription: page.properties['Job Description'].url,
            comments: page.properties.Comments.rich_text[0].plain_text
        }
    });

    return pages;
};
This method is similar to the first method - getAllApplications. The only difference is that you also pass the filter property when you query the Notion database.
Querying the database returns a list object that also contains an array called results. The results array contains all the matched records. Thus, you map over the results array and return an array with custom objects.
As mentioned previously, you filter the results by the company name. If you make a GET request to the URL http://localhost:3333/job/applications/filter?company=Notion, you will only get the Notion job applications.
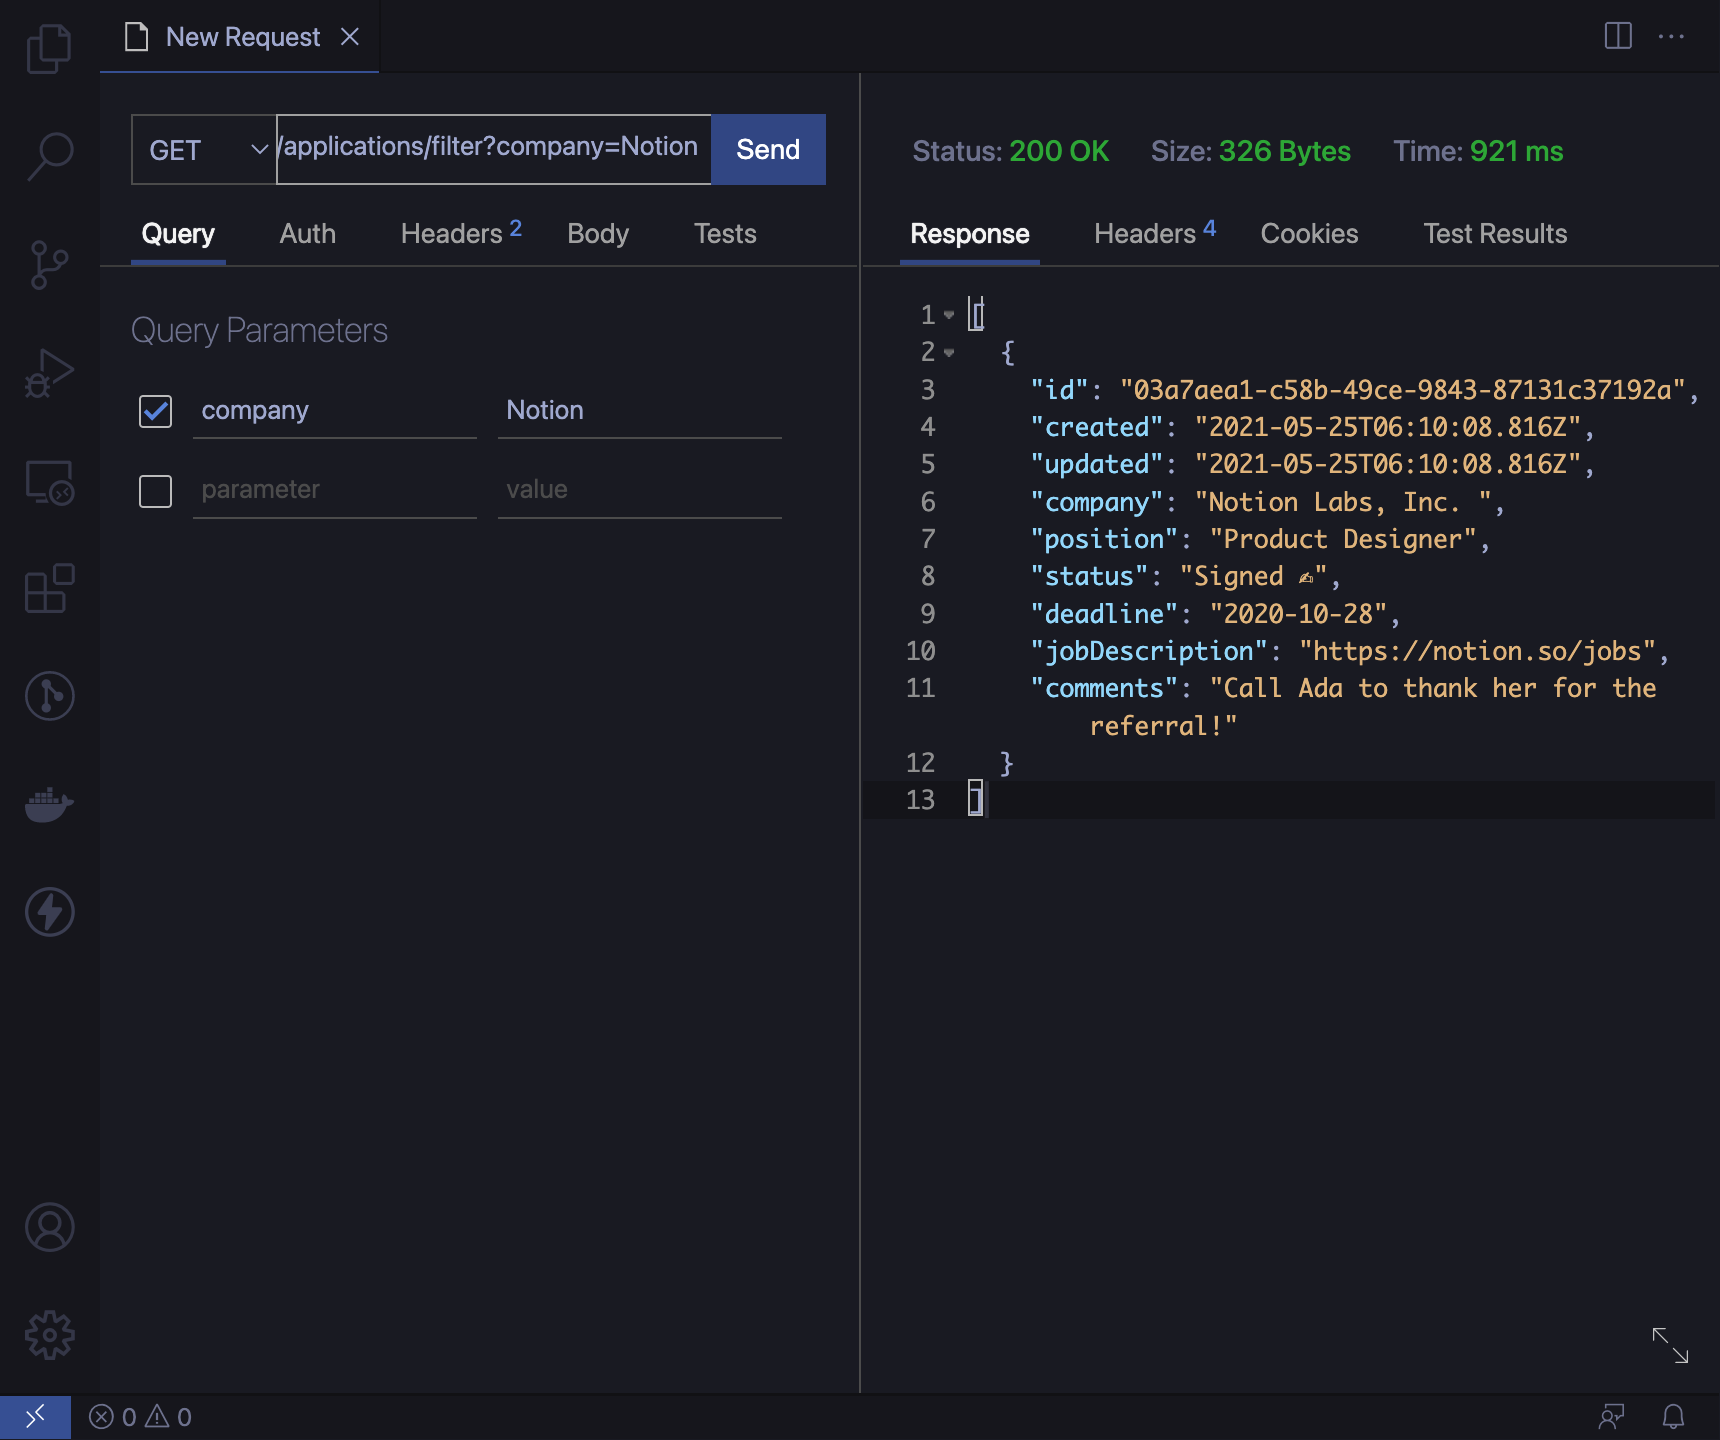
Figure 9
Figure 9 illustrates a GET request to http://localhost:3333/job/applications/filter?company=Notion. You can see that it return only the records that match ?company=Notion. That is all the Notion job applications.
Add a new application
So far, you can:
- retrieve and display all the job applications
- access a specific job application
- filter data by the company name
But you also need to add new job applications, right? Thus, in this step, you build the route for adding new job applications.
First of all, write the following code in controllers.js and then I will explain what it does:
const addApplication = async (req, res) => {
    const newPage = await notion.pages.create({
        parent: {
            database_id: process.env.DB_ID
        },
        properties: {
            Company: {
                title: [
                    {
                        text: {
                            content: req.body.company
                        }
                    }
                ]
            },
            Position: {
                select: {
                    name: status
                }
            },
            Status: {
                select: {
                    name: req.body.status
                }
            },
            'Next Deadline': {
                date: {
                    start: req.body.deadline
                }
            },
            'Job Description': {
                url: req.body.url
            },
            Comments: {
                rich_text: [
                    {
                        text: {
                            content: req.body.comments
                        }
                    }
                ]
            }
        }
    });

    return newPage;
};
In the above code snippet, you call the create method using the Notion client, and you pass two things:
- database parent - you pass the database parent. You do so by using the database ID from the
.envfile. - properties - these properties represent the Notion document fields.
After that, for each property, you add the properties passed in the body of the request. Making a POST request with the following data:
{
    "company": "CatalinsTech",
    "position": "Technical Writer",
    "status": "Applied",
    "deadline": "2021-12-12",
    "url": "https://catalins.tech",
    "comments": "I hope to get the job"
}
Adds a new job application to the Notion document. You can see that the job application was added by checking this link.
Figure 10 illustrates the POST request made to the URL http://localhost:3333/job/applications.
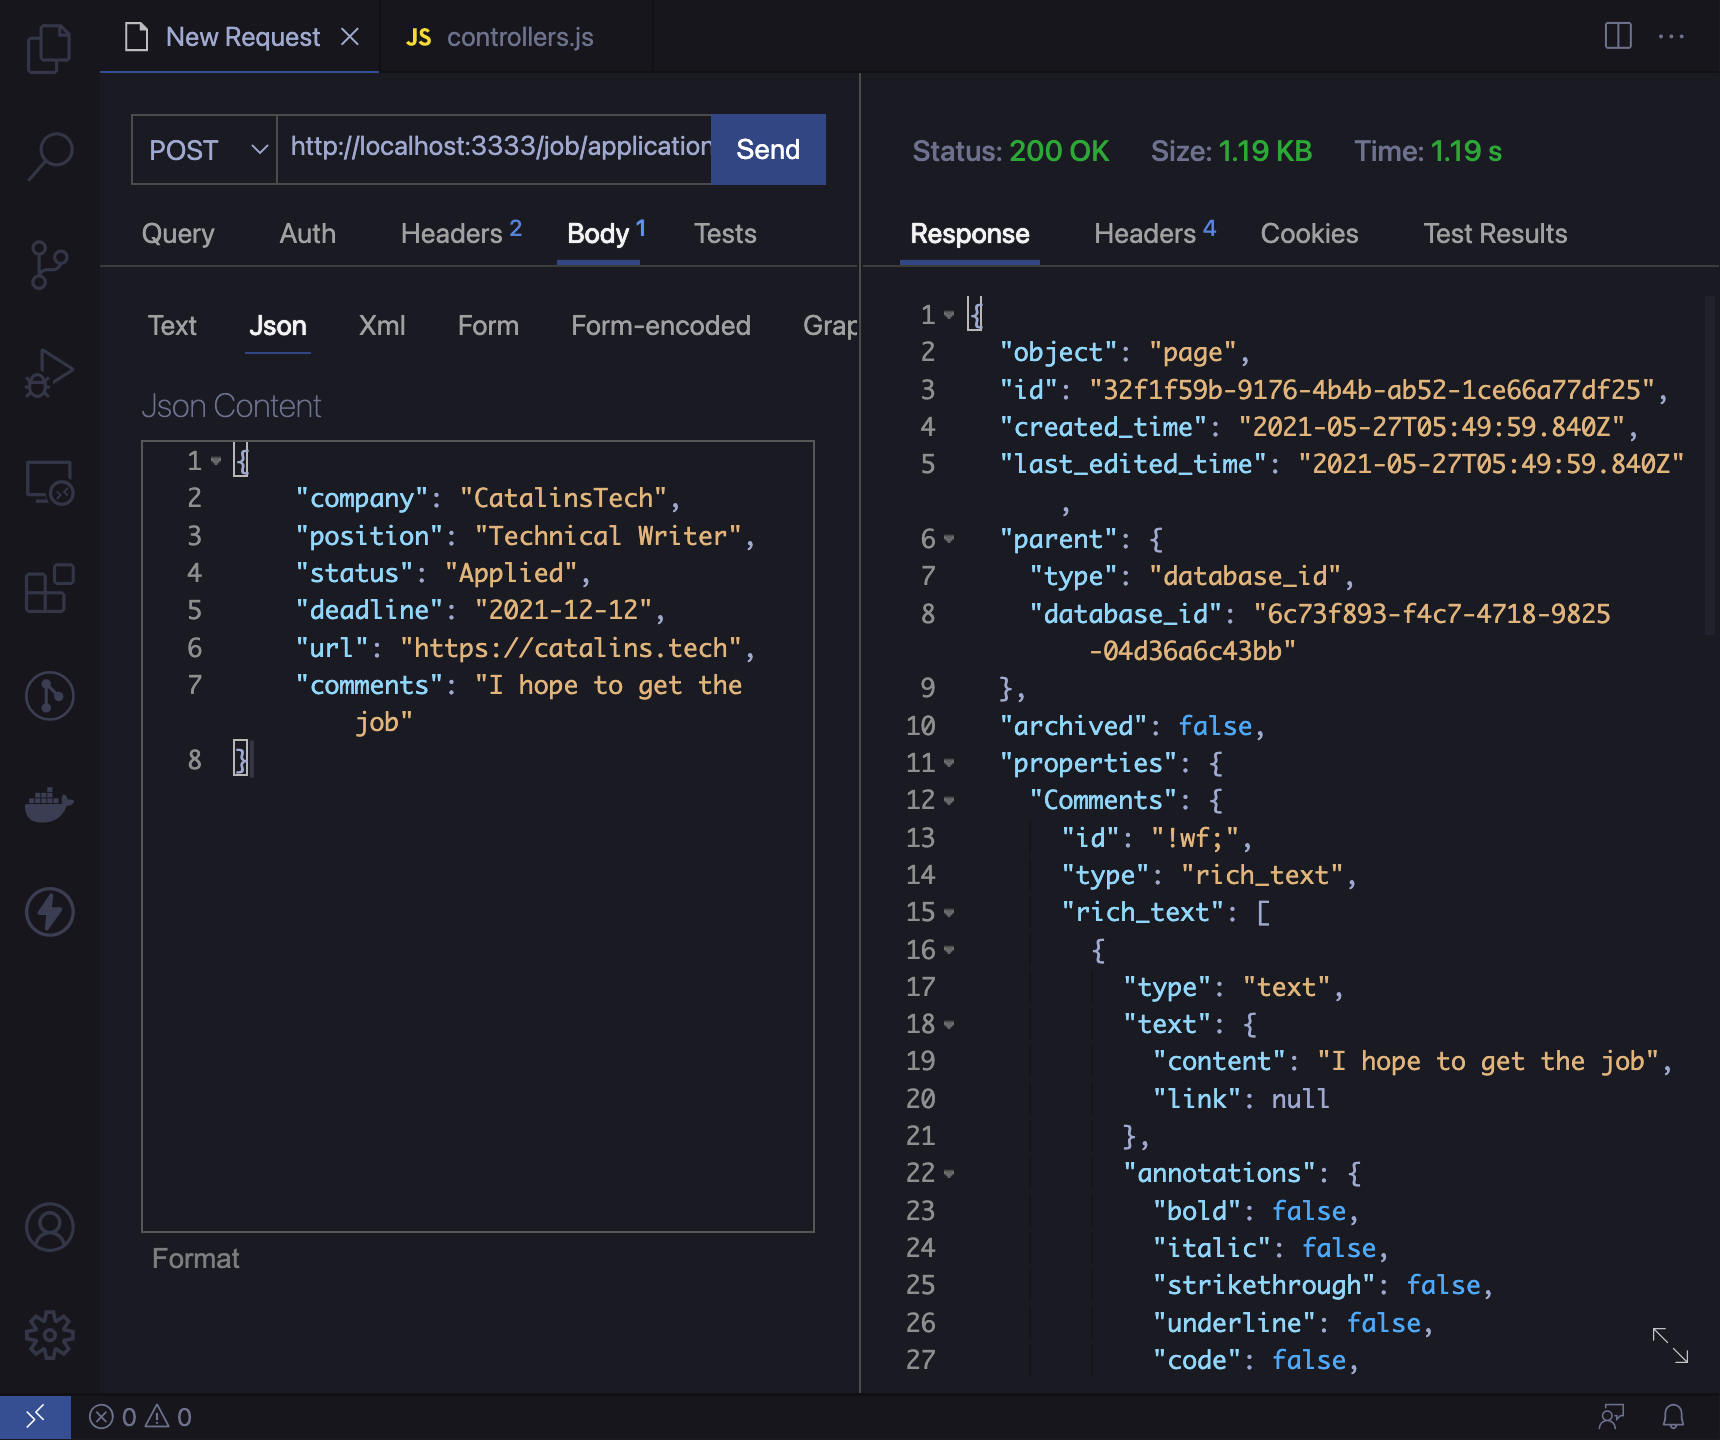
Figure 10
Update existing application
Updating an existing job application is very similar to adding a new one. There are two main differences:
- you use the update method
- you pass the page ID rather than the database ID
You pass the page ID in the URL. For instance, you will make a PATCH request to the /job/applications/:id URL where you replace :id with the actual ID of the document. You can access the ID from the URL in the request parameters - req.params.id.
Write the following code in the controllers.js file:
const updateApplication = async (req, res) => {
    const updatedPage = await notion.pages.update({
        page_id: req.params.id,
        properties: {
            Company: {
                title: [
                    {
                        text: {
                            content: req.body.company
                        }
                    }
                ]
            },
            Position: {
                select: {
                    name: req.body.position
                }
            },
            Status: {
                select: {
                    name: req.body.status
                }
            },
            'Next Deadline': {
                date: {
                    start: req.body.deadline
                }
            },
            'Job Description': {
                url: req.body.url
            },
            Comments: {
                rich_text: [
                    {
                        text: {
                            content: req.body.comments
                        }
                    }
                ]
            }
        }
    });

    return updatedPage;
};
Let's modify the last job application added - to the company CatalinsTech. Update the following fields:
- status - update it to Signed
- deadline - update it to 2021-05-27
- comments - update it to I got the job
Thus, make a PATCH request to http://localhost:3333/job/applications/32f1f59b-9176-4b4b-ab52-1ce66a77df25 with the following JSON data:
{
    "company": "CatalinsTech",
    "position": "Technical Writer",
    "status": "Signed",
    "deadline": "2021-05-27",
    "url": "https://catalins.tech",
    "comments": "I got the job"
}
Figure 11 illustrates the request being successful. The job application was updated, and you can check it here.
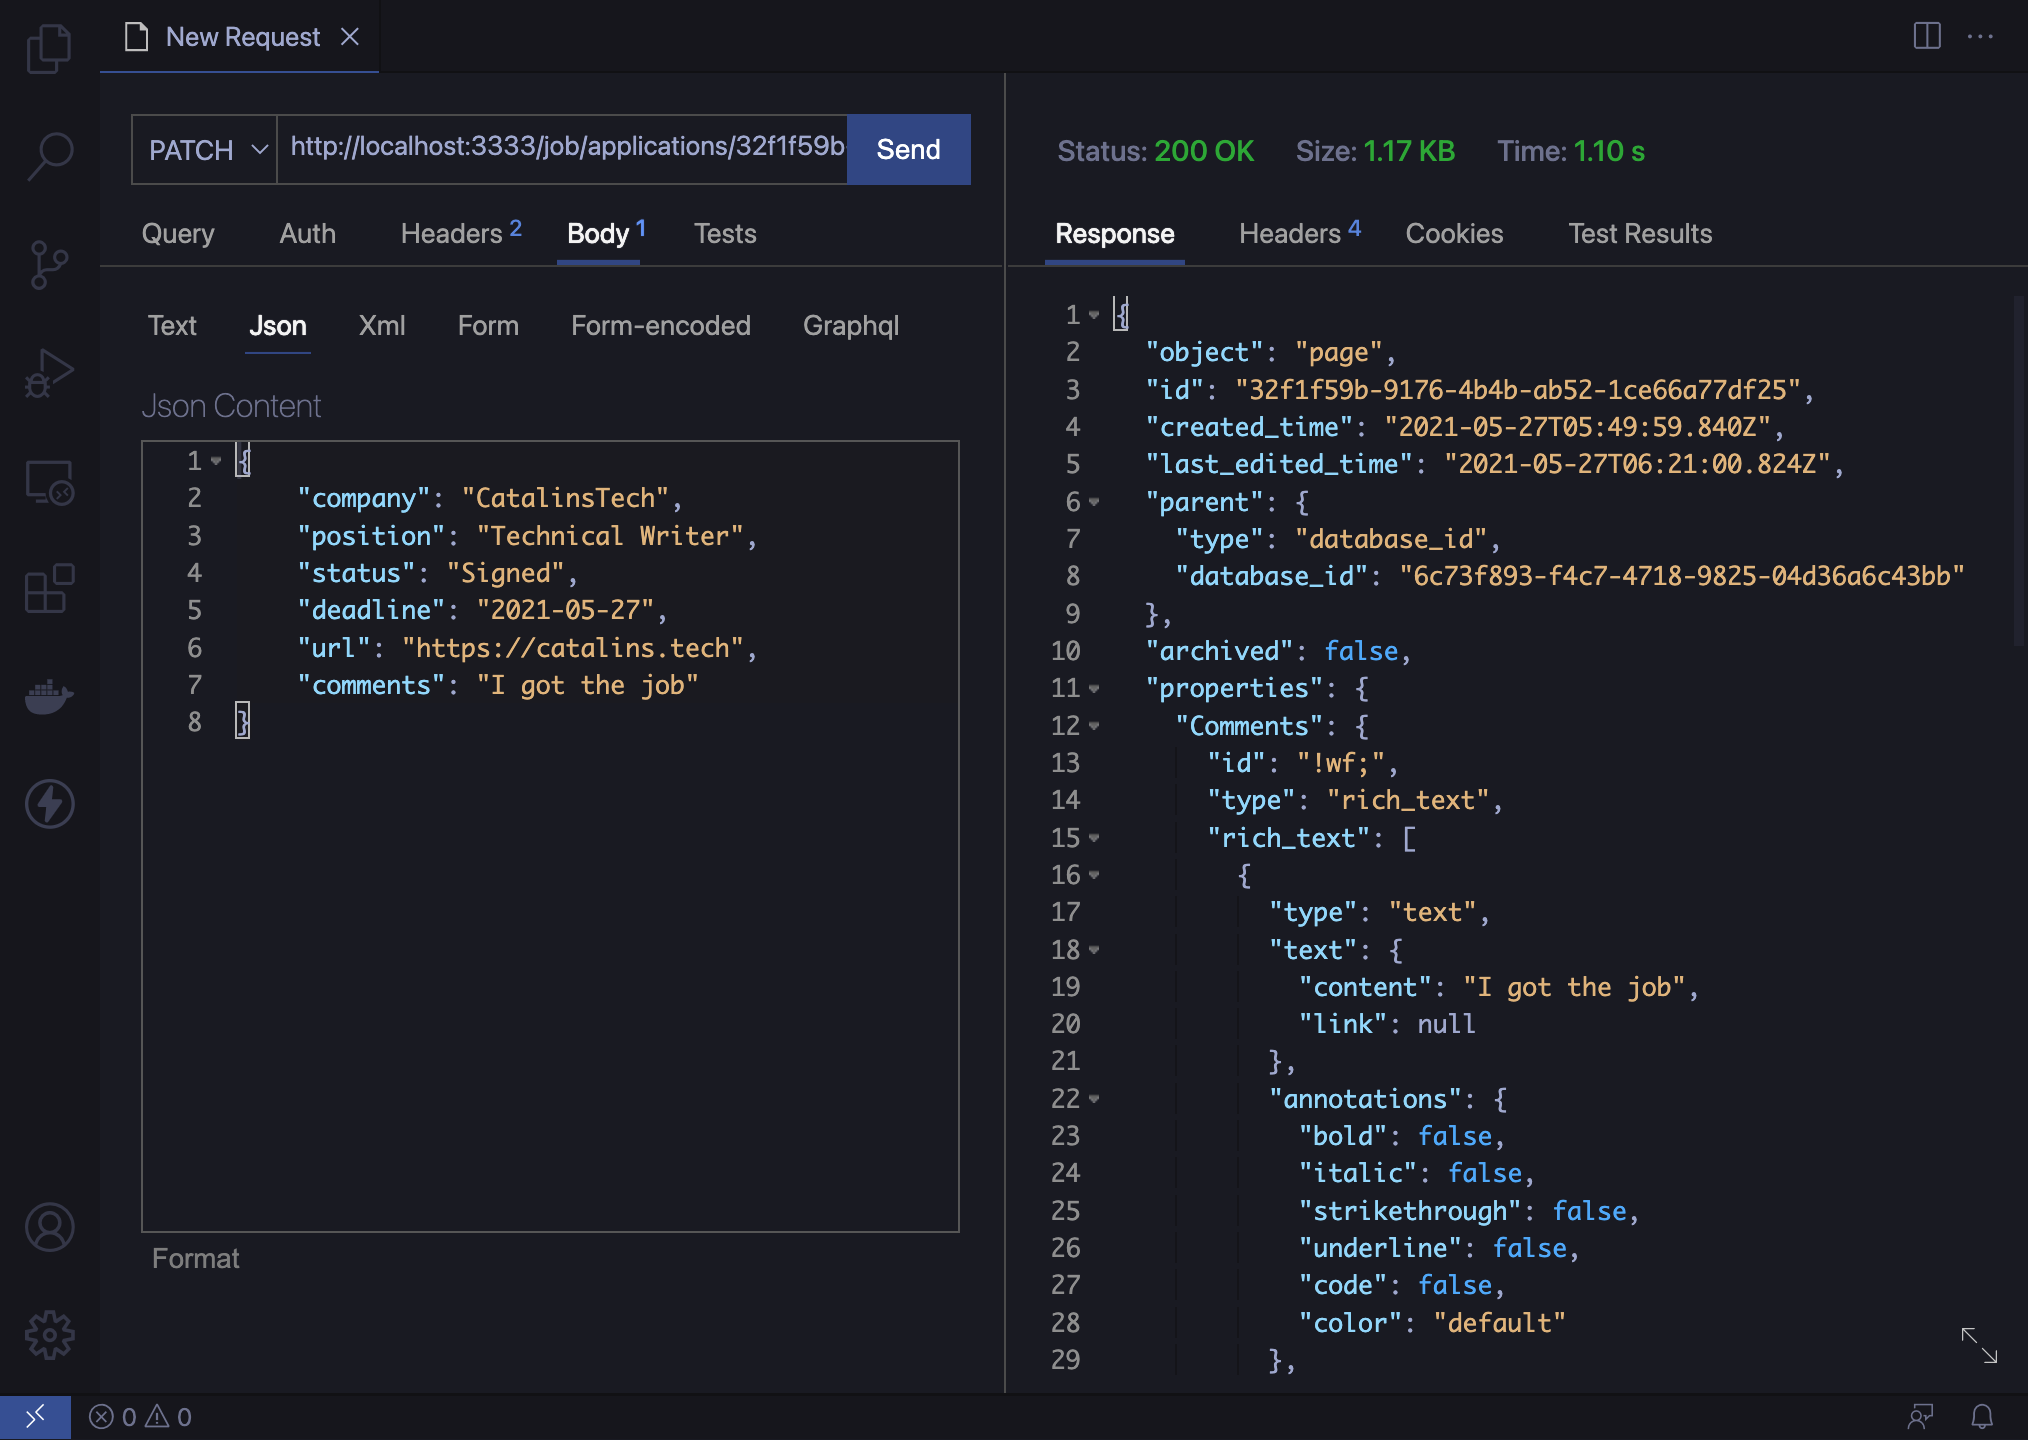
Figure 11
Thus, this is how you can update your existing job applications programmatically.
Export the controllers
Before you can use the controllers, you need to export them. The reason why you need to export them is that you use them in the routes.js file.
Thus, add the end of the file called controllers.js, add the following code:
module.exports = {
    getAllApplications,
    getApplication,
    addApplication,
    updateApplication,
    filterApplications
};
Now you can run the application and play with it!
Check this gist to see the complete
controllers.jsfile.
How to run the application
You can start the application by running node app.js in the root folder.
Once you run that, the application should start and you can make HTTP requests.
However, if you clone the application from GitHub, you need to install the dependencies first. You can do so by running:
npm install
node app.js
Conclusion
This the end of the tutorial! You build a Node.js API that allows you to:
- Create and update job applications
- Retrieve all job applications
- Access only a specific job application
- Filter the job applications by the company name
Unfortunately, the Notion API does not allow us to delete resources. That is why there is no DELETE endpoint.
Check the full application code on the GitHub repository.